
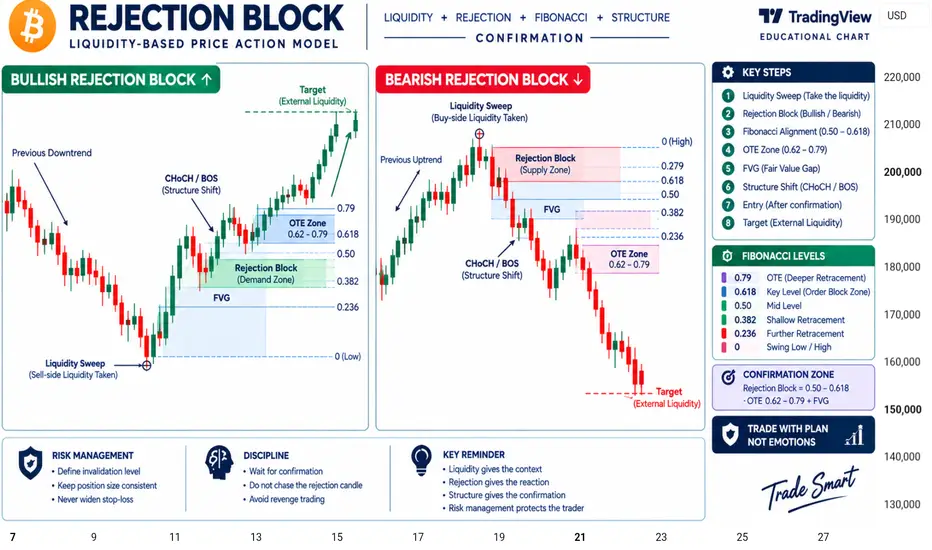
A Rejection Block represents an area where price shows a strong rejection after reaching a meaningful liquidity or premium/discount zone. The important point is not simply the candle shape, but why price rejected that area.
THE CORE MODEL
Liquidity → Rejection → Displacement → Structure Shift → Retracement → Entry
A stronger setup develops when the rejection occurs after liquidity has been taken and price produces clear displacement in the opposite direction.
BULLISH REJECTION BLOCK
Price moves below a previous low and takes sell-side liquidity. If the market then rejects the lower prices and produces bullish displacement, the rejection area can become an important demand reference.
Look for additional confluence with:
- Bullish Rejection Block
- Fibonacci 0.50–0.618 area
- OTE 0.62–0.79
- FVG
- CHoCH / BOS
- Discount zone
The preferred approach is to wait for price to retrace into the confirmed zone rather than chasing the initial rejection.
BEARISH REJECTION BLOCK
Price moves above a previous high and takes buy-side liquidity. A strong rejection followed by bearish displacement can create a potential supply-side Rejection Block.
Additional confluence may include:
- Bearish Rejection Block
- Fibonacci 0.50–0.618
- OTE 0.62–0.79
- FVG
- CHoCH / BOS
- Premium zone
CONFIRMATION RULE
A rejection candle alone is NOT an entry signal.
The setup becomes more meaningful when:
Liquidity Sweep + Rejection Block + Fib Confluence + Structure Shift
align at the same location.
RISK MANAGEMENT & DISCIPLINE
Define the invalidation level before entry. Keep position size consistent and never widen the stop-loss to avoid a loss.
Do not chase the rejection candle.
Do not enter simply because price touches the block.
Do not revenge trade after a failed setup.
Do not force a trade when structure is unclear.
Wait for the reaction. Confirm the structure. Then execute.
The objective is not to trade every rejection. It is to identify rejection that occurs at meaningful liquidity and structural locations.
Liquidity gives the context.
Rejection gives the reaction.
Structure gives the confirmation.
Risk management protects the trade.
Note
A Rejection Block is a key concept in Smart Money Concepts (SMC), highlighting areas where price strongly rejects after taking liquidity. A valid rejection becomes more meaningful when supported by displacement and a clear market structure shift (MSS).In a bullish scenario, price may sweep sell-side liquidity, reject lower prices, and create bullish displacement. Traders can then observe the retracement for potential entry opportunities.
Key Confluences:
Liquidity Sweep
Bullish Rejection Block
Fibonacci 0.50–0.618
OTE 0.62–0.79
Fair Value Gap (FVG)
CHoCH / BOS
Discount Zone
Remember: A rejection alone is not confirmation. Always wait for market structure confirmation and follow proper risk management. Use invalidation levels and avoid entering trades without a clear trading plan.
Education first, confirmation before execution.
Note
A Rejection Block is a key concept in Smart Money Concepts (SMC), highlighting areas where price strongly rejects after taking liquidity.The ideal model follows: Liquidity Sweep → Rejection → Displacement → Structure Shift → Retracement → Entry.
A valid rejection becomes more meaningful when supported by CHoCH/BOS, FVG, Fibonacci levels, and premium/discount zones.
🔹 Bullish Rejection: Sell-side liquidity is taken, followed by strong bullish displacement.
🔹 Bearish Rejection: Buy-side liquidity is taken, followed by strong bearish displacement.
Key Lesson: Never enter based on rejection alone. Wait for confirmation and a retracement into the identified zone rather than chasing price.
⚠️ Always follow proper risk management, use a defined stop-loss, and maintain trading discipline. This is an educational concept, not a guaranteed trading signal.

📈 CEO GOLD
🔗 t.me/+KEomSNgDnAwwNzFk
Professional market insights & clean trading analysis.
Join us and stay updated. 🔥
t.me/+gybzugMJPCU2ZTc0
🔗 t.me/+KEomSNgDnAwwNzFk
Professional market insights & clean trading analysis.
Join us and stay updated. 🔥
t.me/+gybzugMJPCU2ZTc0
Disclaimer
The information and publications are not meant to be, and do not constitute, financial, investment, trading, or other types of advice or recommendations supplied or endorsed by TradingView. Read more in the Terms of Use.