
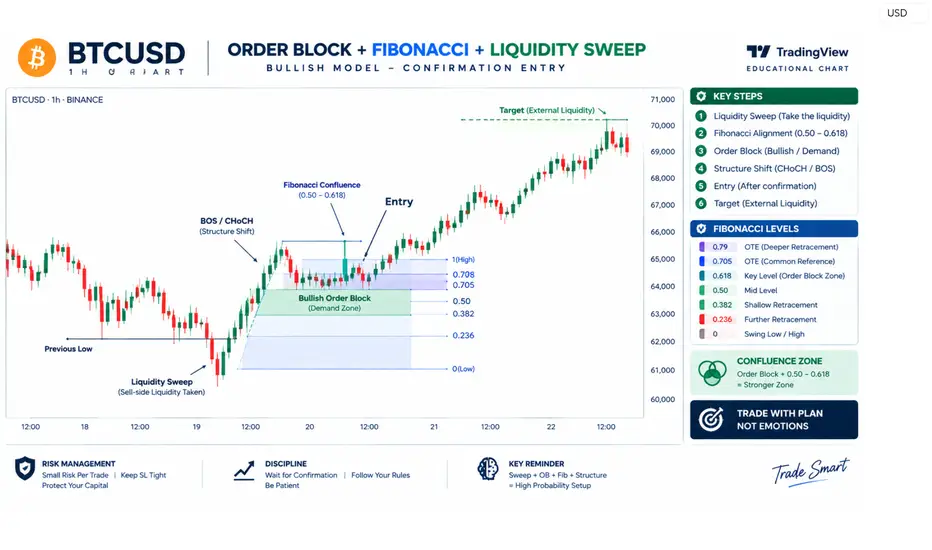
ORDER BLOCK + FIBONACCI + LIQUIDITY SWEEP | PRECISION CONFIRMATION MODEL
A high-quality setup can develop when Liquidity Sweep, Fibonacci retracement, and Order Block align at the same price area. The objective is not to enter simply because price reaches an Order Block or Fibonacci level, but to wait for liquidity to be taken and then demand confirmation from price action.
THE CORE SEQUENCE
Liquidity Sweep → Fibonacci Alignment → Order Block → Structure Confirmation → Entry
BULLISH MODEL
Price first moves below a previous low and takes sell-side liquidity. After the sweep, wait for bullish displacement and a clear CHoCH/BOS.
Now identify the bullish Order Block responsible for the displacement and measure the dealing range with Fibonacci.
The setup becomes stronger when the Order Block overlaps with the 0.50–0.618 Fibonacci area, while the deeper 0.62–0.79 OTE zone can be used for additional retracement analysis.
Sweep + OB + Fib + Structure = Confluence
The entry should be taken only after price confirms the reaction from the aligned zone.
BEARISH MODEL
Price moves above a previous high and takes buy-side liquidity. After the sweep, wait for bearish displacement and a confirmed CHoCH/BOS.
Identify the bearish Order Block and measure the relevant dealing range with Fibonacci. A stronger setup occurs when the Order Block aligns with the 0.50–0.618 retracement area, with the 0.62–0.79 OTE zone providing deeper retracement context.
IMPORTANT RULE
An Order Block alone is not an entry.
A Fibonacci level alone is not an entry.
A liquidity sweep alone is not an entry.
The real confirmation comes from the reaction after the sweep.
RISK MANAGEMENT
Define the invalidation level before entering. Keep position size consistent and risk only a controlled percentage of capital. Never widen the stop-loss after entry, revenge trade after a loss, or increase risk simply because multiple confluences appear.
DISCIPLINE
Do not chase the sweep candle.
Do not enter on the first touch without confirmation.
Do not force the setup when Fib, OB and liquidity do not align.
Wait → Sweep → Confirm → Retrace → Execute → Manage
The goal is not to trade every Order Block. The goal is to identify the Order Blocks that form after meaningful liquidity events and align with a structured Fibonacci range.
Liquidity provides the reason.
Fibonacci provides the location.
Order Block provides the execution zone.
Structure provides the confirmation.
Risk management protects the capital.
Educational framework only. Backtest and forward-test the model before applying it with real capital.

Daily Forex signals with high accuracy
t.me/+ItfnrH60DXdkYzI0
Risk management tips to protect your capital
t.me/+_xN5272kz1NhMGM0
Join now and start profit daily free signal
t.me/+ItfnrH60DXdkYzI0
Risk management tips to protect your capital
t.me/+_xN5272kz1NhMGM0
Join now and start profit daily free signal
Related publications
Disclaimer
The information and publications are not meant to be, and do not constitute, financial, investment, trading, or other types of advice or recommendations supplied or endorsed by TradingView. Read more in the Terms of Use.