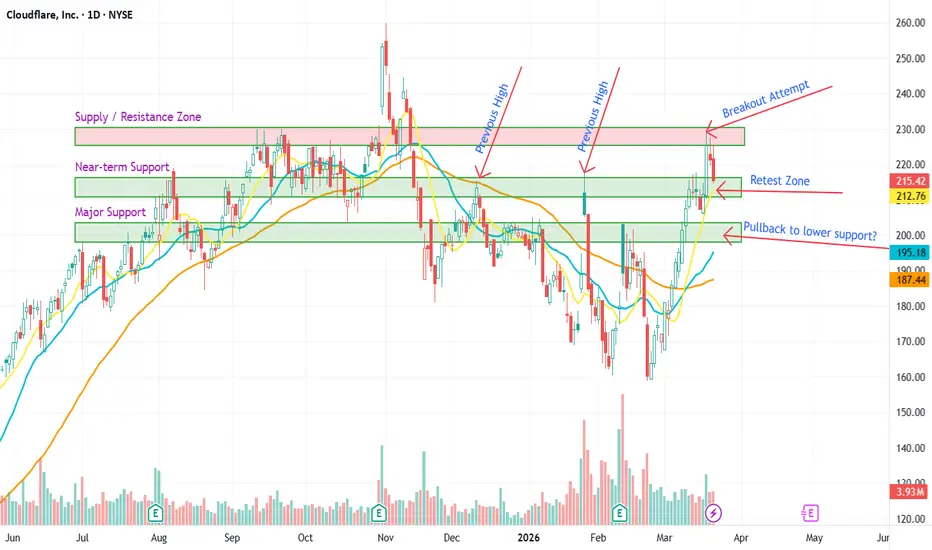
 NET Cloudflare (NET) is testing a key prior resistance/supply zone on the daily chart. Price recently pushed into the previous high area with improving momentum, but I would not call this a confirmed breakout yet. At this stage, it looks more like a breakout attempt than a fully validated move.
What I’m watching:
Upper resistance / supply zone: This is the key area price needs to reclaim and hold above.
Retest zone: If price pulls back and holds the prior breakout area, that would strengthen the bullish case.
Lower support zone: If the retest fails, price may rotate back toward the lower support region.
Market Scenarios:
🟢 Bullish scenario: If
NET can hold the retest and then push back above the resistance zone with follow-through, this breakout attempt could turn into a confirmed breakout.🟡 Neutral scenario: Price may consolidate between support and resistance for a few sessions before choosing a direction.
🔴 Bearish scenario: If price loses the retest area and falls back into the prior range, this would increase the chance that the recent move was a failed breakout (fake-out).
My view:
The trend is improving, but I prefer to see confirmation after a retest rather than chase the first push into resistance.
(Not financial advice. Just sharing chart structure and price-action levels.)

Free Pullback Reclaim Quickstart:
whop.com/myviewlab/myviewlab-pullback-reclaim-quickstart/
10 free first-month Pullback Pro spots.
Code: PULLBACK10
whop.com/myviewlab/pullback-reclaim-pro/
whop.com/myviewlab/myviewlab-pullback-reclaim-quickstart/
10 free first-month Pullback Pro spots.
Code: PULLBACK10
whop.com/myviewlab/pullback-reclaim-pro/
Disclaimer
The information and publications are not meant to be, and do not constitute, financial, investment, trading, or other types of advice or recommendations supplied or endorsed by TradingView. Read more in the Terms of Use.