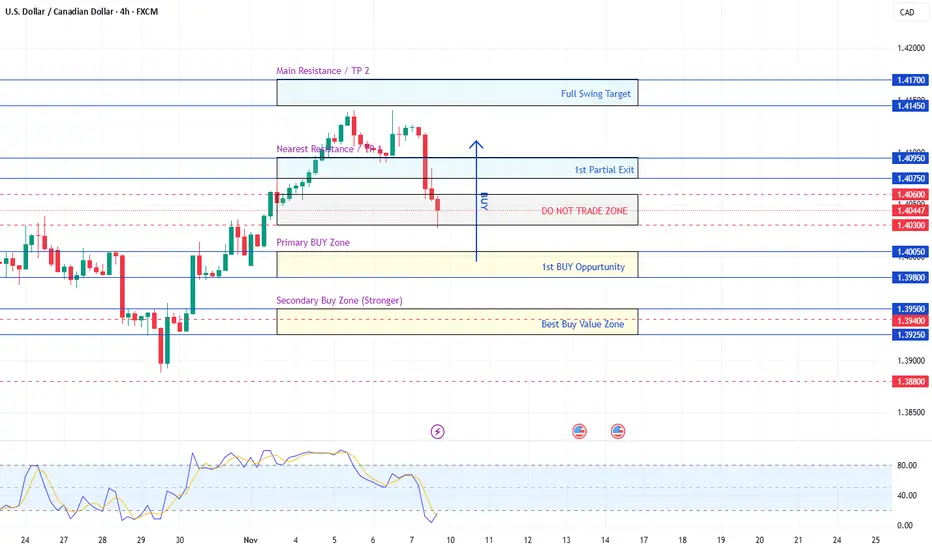
Market Structure
The trend was bullish, but price has now rejected sharply from 1.4140+.
Current price is pulling down, heading toward support.
Stochastic is oversold, so selling now is late.
Best opportunity is to BUY THE DIP at strong demand zones — not where price is now.
We wait for price to drop into support, then buy.
Key Levels
Zone / Price Range / Action
Primary Buy Zone / 1.3980 – 1.4005 / First buy opportunity
Secondary Buy Zone (Stronger) / 1.3925 – 1.3950 / Best buy value zone
Nearest Resistance / TP1 / 1.4075 – 1.4095 / First partial exit
Main Resistance / TP2 / 1.4145 – 1.4170 / Full swing target
✅ Primary Trade Setup
This is the trade most likely to trigger next week.
BUY LIMIT: 1.3980 – 1.4005
STOP LOSS: 1.3940
TAKE PROFIT 1: 1.4075
TAKE PROFIT 2: 1.4145
Why this works
Price is correcting to retest previous demand zone.
Stochastic is already oversold → momentum will shift upward soon.
You’re entering near discount, not chasing.
🟡 Secondary Setup (If price dips deeper)
If price breaks through the first buy zone:
BUY LIMIT: 1.3925 – 1.3950
STOP LOSS: 1.3880
TAKE PROFIT: 1.4000 → 1.4075 → 1.4145
This is the “high value / institutional entry” zone.
🎯 Expected Price Flow for 10–14 Nov
Early Week (Mon–Tue): Price slides toward 1.4000 → 1.3950
Mid Week (Wed): Bullish recovery begins
Late Week (Thu–Fri): Rally toward 1.4075 → 1.4145
This pattern aligns with:
CAD oil-linked volatility
USD strength recovery cycles
Standard market structure retracement → continuation
🏁 Quick Trading Card (Copy to Notes)
Main Buy
Entry: 1.3980 – 1.4005
SL: 1.3940
TP1: 1.4075
TP2: 1.4145
Deep Value Buy
Entry: 1.3925 – 1.3950
SL: 1.3880
TP: 1.4000 → 1.4075 → 1.4145
🚫 Avoid Trading Here - 1.4030 – 1.4060
This is a no-trade chop zone (no advantage, low probability).
Disclaimer
The information and publications are not meant to be, and do not constitute, financial, investment, trading, or other types of advice or recommendations supplied or endorsed by TradingView. Read more in the Terms of Use.
Disclaimer
The information and publications are not meant to be, and do not constitute, financial, investment, trading, or other types of advice or recommendations supplied or endorsed by TradingView. Read more in the Terms of Use.