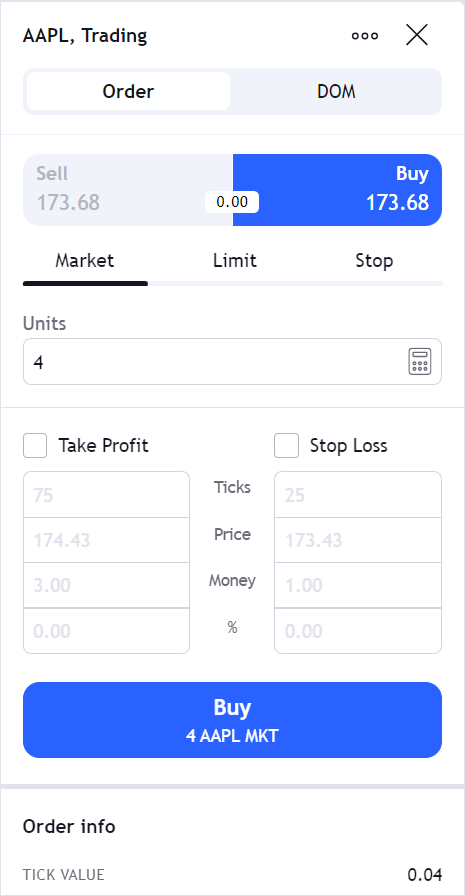
Order Ticket
The Order Ticket (also known as Order Panel) is a dialog that allows users to place orders. Users can open this dialog in several ways:
- By clicking the Trade button in the Account Manager.
- By clicking the Plus button on the Price Scale.
- By clicking the Buy Market and Sell Market buttons in the Legend.
- By right-clicking the chart and selecting Trade → Create new order… in the context menu.
The Order Ticket is enabled by default, but you can disable it using the order_panel featureset.
Configure order types
The library supports four order types: limit, market, stop, and stop-limit.
By default, users can select market, limit, and stop orders in the Order Ticket.
But you can disable support for these order types via the supportMarketOrders, supportLimitOrders, and supportStopOrders flags, respectively.
You can also enable a stop-limit order type by setting supportStopLimitOrders to true.
Refer to the Trading features configuration section for more information on setting configuration flags.
Change text for quantity units
To customize the text displaying quantity units in the Order Ticket, use the units field within the InstrumentInfo object.
You should return this object when the library calls the symbolInfo method.
Add custom fields
If you want to add custom fields to the Order Ticket dialog, implement the getOrderDialogOptions method within your Broker API implementation.
The method should return the OrderDialogOptions object.
This object should contain the customFields property of the TradingDialogCustomField type.
Note that the available custom field types are limited to combobox and checkbox.
Similarly, you can add custom fields to the Positions dialog by implementing the getPositionDialogOptions method.
The library does not support adding custom fields to the Order info section of the Order Ticket.
The information displayed there, such as pip value, is derived from the InstrumentInfo interface when certain broker configuration flags are enabled.
Consider providing additional details in the order preview dialog.
Enable order preview
You can show users additional order details before modifying or placing orders. For example, you can display the estimated order cost, commission, expiry date, and any warning or error messages as a part of the order preview dialog.
To enable order preview, follow the steps below:
Set the following flags to
true:supportPlaceOrderPreviewenables an order preview dialog before users place orders.supportModifyOrderPreviewenables an order preview dialog before users modify orders.
Refer to the Trading features configuration section for more information on setting configuration flags.
Implement the
previewOrdermethod within your Broker API implementation. When users click Buy order or Modify order in the Order Ticket, the library callspreviewOrder. This method returns theOrderPreviewResultobject with the necessary information that is displayed in the order preview dialog. Within the object, you can:- Set a unique confirmation ID via
confirmId. Note that it should be passed as a parameter tomodifyOrderorplaceOrder. - Customize extra fields using
sections. - Set up text for warnings and errors using the
warningsanderrorsproperties. The warnings and errors are displayed below the order details in colored boxes.
cautionYou will get the Order preview is not supported issue in the console if
supportPlaceOrderPreviewandsupportModifyOrderPrevieware enabled, butpreviewOrderis not implemented.- Set a unique confirmation ID via
Implement the
modifyOrderandplaceOrdermethods. The library calls them right after users click Send Order in the order preview dialog:modifyOrderis called when users want to modify existing orders.placeOrderis called when users want to place new orders.
You can check the implementation of the order preview dialog in the CodePen below.
Enable bracket controls
You can display controls for adding bracket orders in the Order Ticket dialog.
Bracket orders allow users to protect their positions.
To add controls, enable the supportOrderBrackets flag.
You can also disable bracket controls only for market orders by setting the supportMarketBrackets flag to false.
Enable Time in force menu
You can enable the Time in force drop-down menu that allows users to specify order duration. Duration determines how long the order remains active.

To enable the menu,
provide durations within the SingleBrokerMetaInfo object assigned to broker_config.
The durations property is an array of OrderDurationMetaInfo objects that specify the order duration settings. For example, you can adjust a duration value or title that is displayed in the UI.
const datafeed = new Datafeeds.UDFCompatibleDatafeed("https://demo-feed-data.tradingview.com");
new TradingView.widget({
    container: "chartContainer",
    locale: "en",
    library_path: "charting_library/",
    datafeed: datafeed,
    symbol: "AAPL",
    interval: "1D",
    broker_factory: function(host) { return new Brokers.BrokerSample(host, datafeed); },
    broker_config: {
        configFlags: {
            // Configuration flags
        },
        durations: [
            { name: 'DAY', value: 'DAY' },  // Day orders
            { name: 'GTC', value: 'GTC' },  // Good-Til-Canceled orders
        ],
    },
})
Note that the duration options are displayed for limit, stop, and stop-limit order types by default.
However, if you want to specify a different set of duration options for a particular type,
you need to provide this information in the supportedOrderTypes array of the durations property.
Implement custom Order Ticket
You can display your own Order Ticket instead of the built-in one.
To do this, you should provide customUI within the SingleBrokerMetaInfo object assigned to broker_config.
The values of customUI are functions that Trading Platform calls to show several dialogs, including the Order Ticket.
Each function returns a Promise object that should be resolved when the operation is finished or canceled.
Note that the returned Promise object should be resolved with either a true or false value.
const datafeed = new Datafeeds.UDFCompatibleDatafeed("https://demo-feed-data.tradingview.com");
new TradingView.widget({
    container: "chartContainer",
    locale: "en",
    library_path: "charting_library/",
    datafeed: datafeed,
    symbol: "AAPL",
    interval: "1D",
    broker_factory: function(host) { return new Brokers.BrokerSample(host, datafeed); },
    broker_config: {
        configFlags: {
            // Configuration flags
        },
        customUI: {
            showOrderDialog: (order, focus) => Promise<boolean>;
        },
    },
})