AUDCAD SELL Strong reject from a solid OB on H1 TF, a double top on m15 TF, looking to short down till next support line. Goodluck
Audcadshort

AUDCAD Under Heavy Supply | Downside Targets Align🔻🔥 AUDCAD Under Heavy Supply | Downside Targets Align 🎯
Overview:
AUDCAD is showing strong bearish conviction, with price firmly positioned below key resistance, opening the door for a sustained move lower.
Sell Zone (Focus Area):
🔴 0.9320
This level is acting as a confirmed supply area, where selling pressure is firmly in control.
Downside Targets:
🎯 Target 1: 0.9300 – Immediate downside reaction
🎯 Target 2: 0.9280 – Momentum continuation
🎯 Target 3: 0.9260 – Structure extension
🎯 Target 4: 0.9240 – Deeper downside target
🎯 Target 5: 0.9200 – Major downside objective
🚀 Extended Target: 0.9180 – Possible stretch if selling accelerates
Why This Setup Works:
✔ Strong rejection from a confirmed resistance level
✔ Clear bearish structure with momentum alignment
✔ Clean downside path with multiple target zones
Trade Management Insight:
Gradual profit booking across targets allows capital protection while keeping exposure for extended moves.
Execution Guidance:
Wait for price acceptance or rejection near the sell level before execution. Precision and patience matter.
Final Note:
As long as price respects the resistance level, downside continuation toward lower targets remains the dominant scenario.
⸻
✨ Special Note for Serious Traders
If you look for high-conviction setups with defined targets and disciplined execution, feel free to connect. I work closely with traders who value structure, control, and long-term consistency.
🔒 High conviction. Clear targets. Professional execution.

Q1 | W2 | Y26 AUDCAD — FRGNT WEEK AHEAD FORECAST 📅 Q1 | W2 | Y26
📊 AUDCAD — FRGNT WEEK AHEAD FORECAST
🔍 Analysis Approach
I’m applying a developed version of Smart Money Concepts, with a structured focus on:
• Identifying Key Points of Interest (POIs) on Higher Time Frames (HTFs) 🕰️
• Using those POIs to define a clear and controlled trading range 📐
• Refining those zones on Lower Time Frames (LTFs) 🔎
• Waiting for a Break of Structure (BoS) as confirmation ✅
This process keeps me precise, disciplined, and aligned with market narrative, rather than reacting emotionally or chasing price.
💡 My Motto
“Capital management, discipline, and consistency in your trading edge.”
A positive risk-to-reward ratio, combined with a high-probability execution model, is the backbone of any sustainable trading plan 📈🔐
⚠️ On Losses
Losses are part of the mathematical reality of trading 🎲
They don’t define you — they are necessary, expected, and managed.
We acknowledge them, learn, and move forward 📊➡️
🙏 I appreciate you taking the time to review my Daily Forecast.
Further context and supporting material can be found in the Links section.
Stay sharp 🧠
Stay consistent 🎯
Protect your capital 🔐
— FRGNT MASTERY 🚀📈
FX:AUDCAD

AUDCAD: Bearish Drop to 0.907?FX:AUDCAD is eyeing a bearish pullback on the 4-hour chart , with price testing resistance after rebounding from major support, converging with a potential entry zone that could trigger downside momentum if sellers defend amid recent volatility. This setup suggests a correction opportunity in the uptrend, targeting lower levels with risk-reward exceeding 1:3.🔥
Entry between 0.91890–0.92050 for a short position (entry at these levels with proper risk and capital management is recommended). Target at 0.90745 . Set a stop loss at a close above 0.9226 , yielding a risk-reward ratio of more than 1:3 . Monitor for confirmation via a bearish candle close below entry with rising volume, leveraging the pair's dynamics near resistance.🌟
Fundamentally , AUDCAD is trading around 0.914 in mid-December 2025, with key Canadian events this week potentially impacting CAD strength. On December 16 at 12:30 PM UTC, BoC Governor Macklem speaks in Montreal, which could provide policy insights. December 18 features the Bank of Canada Rate Decision at 09:45 AM UTC, where a potential hold or cut amid economic data could weaken CAD if dovish. Followed by Macklem's Speech at 12:45 PM UTC for further guidance. December 19 brings CPI (Nov) at 08:30 AM UTC, with hotter inflation possibly supporting CAD, while softer readings could pressure it. December 22 includes GDP (Oct) at 08:30 AM UTC, where strong growth might bolster CAD. No major high-impact releases for AUD this week, leaving the pair sensitive to CAD catalysts and broader USD sentiment. 💡
📝 Trade Setup
🎯 Entry (Short):
0.91890 – 0.92050
(Entries in this zone are valid with proper risk & capital management.)
🎯 Target:
• 0.90745
❌ Stop Loss:
• 4H / Daily close above 0.9226
⚖️ Risk-to-Reward:
• > 1:3
💡 Your view?
Will AUDCAD reject this resistance for a clean pullback toward 0.90745 — or will CAD weakness invalidate the setup and push price higher? 👇

AUDCAD D11️⃣ Higher-Timeframe Context
Strong bullish leg from Aug → Sep created a range expansion
Since October, price has been moving sideways, forming a distribution range
The market failed to continue higher despite multiple tests of resistance
This behavior signals bullish exhaustion, not continuation.
2️⃣ Wyckoff Structure (Distribution)
🔹 Trading Range
Range High: ~0.9200–0.9220
Range Low: ~0.9050–0.9070
Price has respected these boundaries multiple times → classic distribution.
🔹 UTAD (Upthrust After Distribution)
Price briefly broke above 0.9220
Immediate rejection back into the range
Long upper wicks + strong bearish follow-through
This is a textbook UTAD, marking the final trap of late buyers.
3️⃣ Liquidity Logic
🔴 Buy-Side Liquidity (Taken)
Equal highs around 0.9200–0.9220 fully swept
Breakout buyers above resistance are now trapped
🔵 Sell-Side Liquidity (Below)
First liquidity pool: ~0.9050
Major liquidity target: 0.8929 (blue dashed line)
The market now has a clear incentive to seek sell-side liquidity.
4️⃣ Expected Price Path (Primary Scenario)
Minor pullback toward 0.9180–0.9200 (retest of UTAD zone)
Bearish continuation below 0.9130
Break of range low (~0.9050)
Expansion toward 0.8929 (major liquidity target)
This aligns with Wyckoff Phase E – Markdown.
5️⃣ Invalidation / Bullish Risk
Bearish bias weakens if:
❌ Daily close above 0.9220
❌ Acceptance above the range high
❌ Strong bullish displacement with follow-through
Above 0.9250, the UTAD is invalidated.

AUDCAD SELLsim looking on selling audcad price has been looking good and we have alot of major news coming this week...

AUD/CAD Daily Market OutlookThe AUD/CAD structure on the daily timeframe is showing clear signs of bearish pressure after repeated rejections within the 0.91500–0.92270 supply zone. Price has been consolidating beneath this resistance area, forming lower highs and indicating a weakening bullish momentum.
My expectation is a continuation to the downside, targeting the next significant liquidity level around 0.84439, but the short-term confirmation zone sits at 0.90789.
At the moment, price is hovering just above 0.90789. For a cleaner and higher-probability sell scenario, I require a decisive daily close below 0.90789, followed by a bearish engulfing candle to signal strong seller dominance. Such a break would confirm that the market has transitioned from distribution into a stronger downside phase.
Trade Idea (Sell Bias):
• Entry Zone: Confirmation comes after a clear close below 0.90789 followed by an engulfing candle.
• Stop Loss: Positioned above the red zone around 0.92270, protecting against any liquidity grab or false breakout.
• Targets: The broader downside structure points to a continuation towards the lower range around 0.84439, where previous major demand sits.
This setup aligns with the prevailing market structure, the visible supply rejection, and the need for confirmation to avoid premature entries. OANDA:AUDCAD

AUDCAD: Bearish as Aussie Struggles Against Resilient LoonieAUDCAD has come under renewed selling pressure, sliding back toward key support zones after failing to sustain gains above 0.9200. The Canadian dollar remains supported by solid employment data and oil market stability, while the Australian dollar faces headwinds from weaker Chinese demand and a cautious RBA. With momentum shifting lower, AUDCAD looks poised for further downside if support levels give way.
Current Bias
Bearish – Price is testing the lower end of its recent consolidation and risks breaking down toward 0.8950.
Key Fundamental Drivers
AUD Weakness: RBA’s cautious tone and China’s slower growth outlook weigh heavily on the Australian dollar.
CAD Strength: Stronger-than-expected labor market data and oil resilience underpin CAD.
Commodity Flows: Oil boosts CAD, while iron ore softness limits AUD upside.
Macro Context
Interest Rate Expectations: RBA remains cautious, signaling no rush to hike, while BoC is data-dependent but reluctant to cut aggressively amid still-high inflation.
Economic Growth Trends: Australia faces slowing domestic consumption, while Canada’s growth outlook is steadier, albeit with labor market slack.
Commodity Flows: CAD benefits from oil’s relative stability, while AUD remains exposed to weakening iron ore demand from China.
Geopolitical Themes: US-China tariff tensions pressure AUD more directly, while CAD benefits from closer US trade alignment.
Primary Risk to the Trend
A rebound in Chinese stimulus measures or stronger-than-expected Australian data could provide support for AUD.
Most Critical Upcoming News/Event
Australia jobs data and CPI prints – critical for RBA policy outlook.
Canada CPI – pivotal for BoC’s rate stance.
Leader/Lagger Dynamics
AUDCAD is typically a lagger, reflecting broader AUD performance against China-sensitive pairs and CAD’s alignment with oil. It follows AUDUSD trends and CAD crosses but reacts slower than majors like AUDUSD or USDCAD.
Key Levels
Support Levels:
0.9050
0.8950
Resistance Levels:
0.9160
0.9230
Stop Loss (SL): 0.9230
Take Profit (TP): 0.8950
Summary: Bias and Watchpoints
AUDCAD is bearish, with downside momentum reinforced by weak AUD fundamentals and firmer CAD drivers. A break below 0.9050 opens the path to 0.8950, while resistance at 0.9160–0.9230 caps upside. Stop loss sits above resistance at 0.9230, and profit-taking is aimed near 0.8950. Watch for Australia’s jobs/CPI data and Canada’s CPI as the key catalysts that could either reinforce or undermine this bearish setup.

AUD/CAD: Bearish Drop to 0.9097?As the previous analysis worked exactly as predicted, FX:AUDCAD is signaling a bearish continuation on the 1-hour chart , with price testing a downward trendline and forming lower highs, indicating sustained selling pressure. The entry zone sits near the resistance zone , aligning with the trendline for a high-probability short setup if sellers maintain control.
Entry between 0.9182-0.9200 for a sell position. Targets at 0.9116 (first) and 0.9097 (second) near the support zone for a solid risk-reward ratio. Set a stop loss on a close above 0.922 to protect against an unexpected reversal. Look for confirmation with a break below 0.9182 accompanied by increasing volume, driven by the prevailing bearish momentum.
Fundamentally , tomorrow—Thursday, October 16, 2025—we have the Australian Unemployment Rate report, which could trigger volatility in AUD. Additionally, the Bank of Canada Governor’s participation in a friendly session in Washington tomorrow may influence CAD movements, adding another layer of uncertainty to the pair. 💡
📝 Trade Plan:
✅ Entry Zone: 0.9182 – 0.9200 (short setup near resistance & trendline)
❌ Stop Loss: Close above 0.9220
🎯 Targets:
TP1: 0.9116 (initial support)
TP2: 0.9097 (extended downside target)
What’s your take on this setup? Share below! 👇

AUD/CAD: Bearish Drop to 0.91630?FX:AUDCAD is signaling a bearish move on the 1-hour chart , with an entry zone between 0.92215-0.92280 near a resistance level.
First target at 0.91875 🎯 marks initial support, while the second at 0.91630 🎯 offers a deeper downside play. 📈 Set a stop loss on a daily close above 0.9232 to manage risk effectively. 🌟
A break below 0.92 with strong volume could confirm this drop, driven by CAD strength and AUD weakness. Watch commodity trends! 💡
📝 Trade Plan:
✅ Entry Zone: 0.92215 – 0.92280 (resistance area)
❌ Stop Loss: Daily close above 0.9232 to manage risk
🎯 Target 1: 0.91875 (initial support)
🎯 Target 2: 0.91630 (deeper downside target)
Ready for this move? Drop your take below! 👇

AUDCAD Resistance Ahead!
HI,Traders !
#AUDCAD is trading in an
Uptrend but the pair is locally
Overbought so after the pair
Hits the horizontal resistance
Level of 0.90210 we will be
Expecting a local bearish
Move down !
Comment and subscribe to help us grow !

AUDCAD Q3 | D21 | W30 | Y25 📊AUDCAD Q3 | D21 | W30 | Y25
Daily Forecast 🔍📅
Here’s a short diagnosis of the current chart setup 🧠📈
Higher time frame order blocks have been identified — these are our patient points of interest 🎯🧭.
It’s crucial to wait for a confirmed break of structure 🧱✅ before forming a directional bias.
This keeps us disciplined and aligned with what price action is truly telling us.
📈 Risk Management Protocols
🔑 Core principles:
Max 1% risk per trade
Only execute at pre-identified levels
Use alerts, not emotion
Stick to your RR plan — minimum 1:2
🧠 You’re not paid for how many trades you take, you’re paid for how well you manage risk.
🧠 Weekly FRGNT Insight
"Trade what the market gives, not what your ego wants."
Stay mechanical. Stay focused. Let the probabilities work.
FRGNT 📊

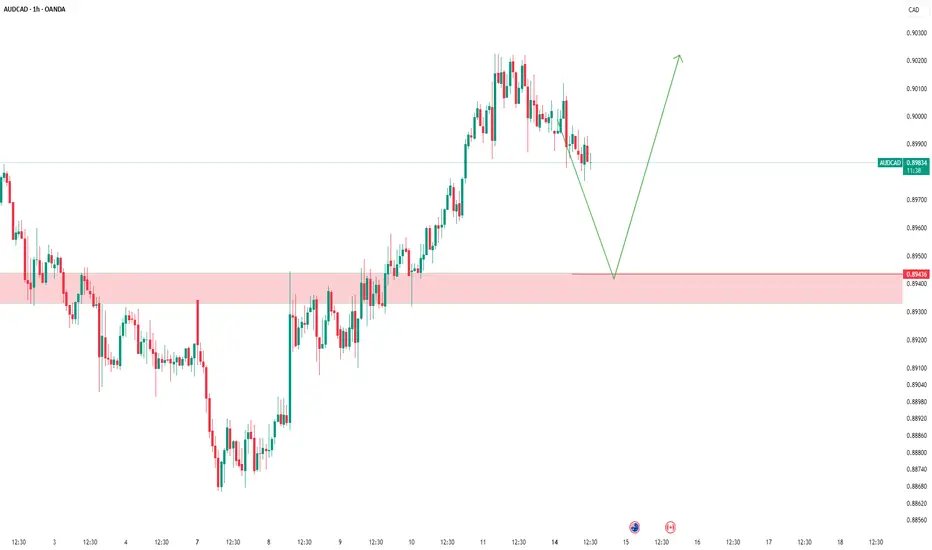
AUDCAD - Possible Buy Setup AheadThe market is approaching a significant zone.
We’re standing by — no rush, no guessing.
If a clean bullish signal appears, we go long.
If it breaks through, we wait for a pullback and adapt.
Our job isn’t prediction — it’s reaction.
Follow the plan. Let the profits take care of themselves
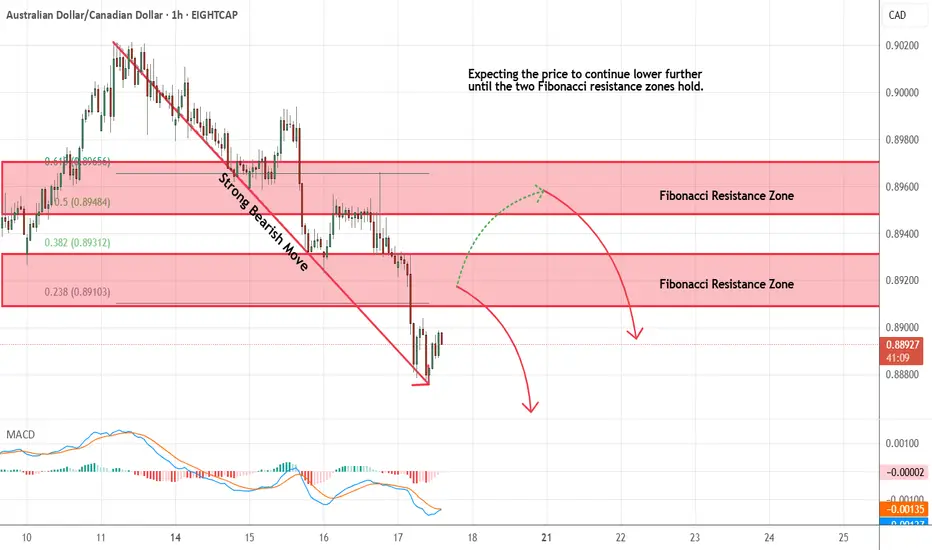
AUDCAD - Short Term Sell IdeaH1 - Strong bearish move.
No opposite signs.
Currently it looks like a pullback is happening.
Expecting bearish continuation until the two Fibonacci resistance zones hold.
If you enjoy this idea, don’t forget to LIKE 👍, FOLLOW ✅, SHARE 🙌, and COMMENT ✍! Drop your thoughts and charts below to keep the discussion going. Your support helps keep this content free and reach more people! 🚀
--------------------------------------------------------------------------------------------------------------------
AUDCAD – Bearish Rejection at Key Resistance ZoneAUDCAD is showing signs of weakness near the 0.8980 supply zone after an extended rally. The pair is now reacting to a historically respected resistance area, with bearish momentum building as exhaustion sets in.
🔍 Technical Outlook:
✅ Price rejected at multi-touch resistance around 0.8980
📐 Clean bearish structure forming after wedge-like exhaustion
📉 Expecting a move down toward:
TP1: 0.89365 – recent minor structure
TP2: 0.89080 – key demand zone from early July
TP3: 0.88654 – full measured target from range
📛 Invalidation above: 0.8985
🌍 Fundamental Breakdown:
🇦🇺 Australia:
📉 Softening inflation and retail sales
🏦 RBA cautious with limited appetite for further hikes
🇨🇳 Weak Chinese demand adds pressure on AUD
🇨🇦 Canada:
💪 Supported by rising oil prices and solid employment data
🏦 BoC remains vigilant on inflation, though on hold
🛢️ Strong WTI prices continue to support CAD
⚠️ Risks to the Bearish View:
⚡ Unexpectedly strong China data could boost AUD
📉 Sudden drop in oil prices would hurt CAD
🗣️ Surprise hawkish shift from RBA
🔗 Correlation & Flow:
AUDCAD is a lagging asset, heavily influenced by WTI crude (boosting CAD) and China-linked risk flows (affecting AUD).
Keep an eye on AUDUSD and USDCAD for early signals.
📆 Upcoming Key Events:
🇦🇺 RBA Minutes, Jobs Data, Wages Index
🇨🇦 BoC Business Outlook, CPI Print
🛢️ US Oil Inventories (affects CAD)
🧭 Summary:
🔻 Bias: Bearish
📊 Drivers: Oil strength, RBA caution, CAD resilience
⚠️ Risk: China rebound or oil correction
🕵️ Watch: Canadian CPI + Australian jobs data
📉 Likely to Follow: Oil and AUDUSD/USDCAD macro trends

AUDCAD SHORT DAILY FORECAST Q3 D10 W28 Y25AUDCAD SHORT DAILY FORECAST Q3 D10 W28 Y25
Professional Risk Managers👋
Welcome back to another FRGNT chart update📈
Diving into some Forex setups using predominantly higher time frame order blocks alongside confirmation breaks of structure.
Let’s see what price action is telling us today! 👀
💡Here are some trade confluences📝
✅Daily Order block identified
✅4H Order Block identified
✅1H Order Block identified
🔑 Remember, to participate in trading comes always with a degree of risk, therefore as professional risk managers it remains vital that we stick to our risk management plan as well as our trading strategies.
📈The rest, we leave to the balance of probabilities.
💡Fail to plan. Plan to fail.
🏆It has always been that simple.
❤️Good luck with your trading journey, I shall see you at the very top.
🎯Trade consistent, FRGNT X

AUDCAD – Bearish Setup Following Retracement to Key ResistanceWelcome to Velatrix Capital.
Below is a live market opportunity identified by our internal trading desk.
This is not financial advice. It’s a data-backed, logic-driven trading edge. Use it with discipline — or don’t use it at all.
🧠 Technical Outlook
AUDCAD is currently showing bullish momentum on the lower timeframes, approaching a key resistance zone between 0.89057 – 0.89272.
Our trading desk expects price to reach this supply zone and then present a short-selling opportunity with favorable risk/reward potential.
We advise waiting patiently for the price to enter this key range before initiating any short trades.
Trade Parameters:
• Timeframe: 1H
• Direction: Sell
• Entry Zone: 0.89272 – 0.89057
• Stop Loss (SL): 0.89386
• Take Profit 1 (TP1): 0.88458
• Take Profit 2 (TP2): 0.87954
• Risk/Reward (R/R): 1:2 / 1:4.80
Note: Setup is invalidated if price breaks and closes above 0.89386.
🔔 Follow Us
This is just the surface.
For more setups, clean breakdowns, and performance-driven content:
📌 Follow, engage, and stay sharp. Our edge is real — and it’s public.
We don’t chase hype. We build edge.

AUDCAD SHORT FORECAST Q2 W25 D20 Y25AUDCAD SHORT FORECAST Q2 W25 D20 Y25
Professional Risk Managers👋
Welcome back to another FRGNT chart update📈
Diving into some Forex setups using predominantly higher time frame order blocks alongside intraday confirmation breaks of structure.
💡Here are some trade confluences📝
✅Weekly 50 EMA
✅Weekly order block rejection
✅Daily order block rejection
✅15’ order block identification
🔑 Remember, to participate in trading comes always with a degree of risk, therefore as professional risk managers it remains vital that we stick to our risk management plan as well as our trading strategies.
📈The rest, we leave to the balance of probabilities.
💡Fail to plan. Plan to fail.
🏆It has always been that simple.
❤️Good luck with your trading journey, I shall see you at the very top.
🎯Trade consistent, FRGNT X

AUDCAD SHORT FORECAST Q2 W24 D13 Y25AUDCAD SHORT FORECAST Q2 W24 D13 Y25
Professional Risk Managers👋
Welcome back to another FRGNT chart update📈
Diving into some Forex setups using predominantly higher time frame order blocks alongside intraday confirmation breaks of structure.
💡Here are some trade confluences📝
✅Weekly 50 EMA
✅Weekly order block rejection
✅Daily order block rejection
✅15’ order block identification
🔑 Remember, to participate in trading comes always with a degree of risk, therefore as professional risk managers it remains vital that we stick to our risk management plan as well as our trading strategies.
📈The rest, we leave to the balance of probabilities.
💡Fail to plan. Plan to fail.
🏆It has always been that simple.
❤️Good luck with your trading journey, I shall see you at the very top.
🎯Trade consistent, FRGNT X

Why AUDCAD is On My Watchlist for a Short Trade🔎 AUDCAD Trade Idea Overview 🔎
Currently watching AUDCAD closely 👀 — and here’s what I’m seeing across the key timeframes:
📉 On the weekly timeframe, the pair remains in a clear bearish trend, with lower highs and lower lows forming consistently.
🕰️ Dropping down to the daily, we’re seeing continued bearish momentum in alignment with the higher timeframe bias.
⏳ On the 4-hour chart, there’s been a clean break of market structure, confirming short-term weakness.
🎯 I’m eyeing a pullback into equilibrium within the current price range for a potential short entry.
🔹 Entry: On retracement into a key value zone
🔹 Stop loss: Positioned above recent swing highs
🔹 Take profit: Targeting previous lows and liquidity pockets 💧
Patience is key here — waiting for the right setup to align across multiple timeframes. 📊
⚠️ Disclaimer: This is not financial advice. This analysis is for educational and informational purposes only. Always do your own research and manage risk responsibly. 💼

AUDCAD SHORT FORECAST Q2 W24 D12 Y25AUDCAD SHORT FORECAST Q2 W24 D12 Y25
Professional Risk Managers👋
Welcome back to another FRGNT chart update📈
Diving into some Forex setups using predominantly higher time frame order blocks alongside intraday confirmation breaks of structure.
💡Here are some trade confluences📝
✅Weekly 50 EMA
✅Weekly order block rejection
✅Daily order block rejection
✅15’ order block identification
🔑 Remember, to participate in trading comes always with a degree of risk, therefore as professional risk managers it remains vital that we stick to our risk management plan as well as our trading strategies.
📈The rest, we leave to the balance of probabilities.
💡Fail to plan. Plan to fail.
🏆It has always been that simple.
❤️Good luck with your trading journey, I shall see you at the very top.
🎯Trade consistent, FRGNT X

AUDCAD SHORT FORECAST Q2 W24 D10 Y25AUDCAD SHORT FORECAST Q2 W24 D10 Y25
Professional Risk Managers👋
Welcome back to another FRGNT chart update📈
Diving into some Forex setups using predominantly higher time frame order blocks alongside intraday confirmation breaks of structure.
💡Here are some trade confluences📝
✅Weekly 50 EMA
✅Weekly order block rejection
✅Daily order block rejection
✅15’ order block identification
🔑 Remember, to participate in trading comes always with a degree of risk, therefore as professional risk managers it remains vital that we stick to our risk management plan as well as our trading strategies.
📈The rest, we leave to the balance of probabilities.
💡Fail to plan. Plan to fail.
🏆It has always been that simple.
❤️Good luck with your trading journey, I shall see you at the very top.
🎯Trade consistent, FRGNT X

DAILY HOT PICK ! AUDCAD SHORT FORECAST Q2 W23 D3 Y25AUDCAD SHORT FORECAST Q2 W23 D3 Y25
🔥🔥DAILY HOT PICK !!!!!! 🎯🎯
Professional Risk Managers👋
Welcome back to another FRGNT chart update📈
Diving into some Forex setups using predominantly higher time frame order blocks alongside intraday confirmation breaks of structure.
💡Here are some trade confluences📝
✅Daily 50 EMA
✅Weekly order block rejection
✅Daily order block rejection
✅15’ order block identification
🔑 Remember, to participate in trading comes always with a degree of risk, therefore as professional risk managers it remains vital that we stick to our risk management plan as well as our trading strategies.
📈The rest, we leave to the balance of probabilities.
💡Fail to plan. Plan to fail.
🏆It has always been that simple.
❤️Good luck with your trading journey, I shall see you at the very top.
🎯Trade consistent, FRGNT X
