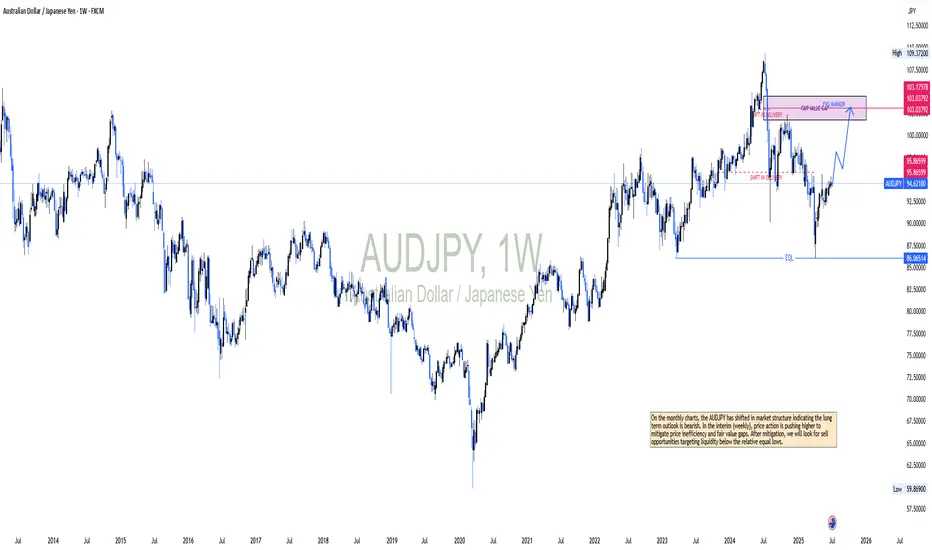
AUDJPY OUTLOOKOn the monthly charts, the AUDJPY has shifted in market structure indicating the long term outlook is bearish. In the interim (weekly), price action is pushing higher to mitigate price inefficiency and fair value gaps. After mitigation, we will look for sell opportunities targeting liquidity below the relative equal lows.
Audjpyanalysis
AUD/JPY :: Market Structure & Momentum ReviewAUD/JPY (Australian Dollar vs Japanese Yen) — Bullish Technical Setup + Macro Context + Correlation Watchlist 💹
📌 TRADE IDEA — PLAN
✔️ Market bias: Bullish trend confirmed — price respect on HULL MA pullbacks + strong RSI support, momentum still favoring upside continuation. (Technical momentum structure visible on daily/4H chart)
✔️ Entry strategy: Thief layering style (multiple limit buys):
💎 Buy Limits: 106.500 — 107.000 — 107.500 — 108.000 (you can add more layers based on your risk.)
➡️ Big picture: Layers capture pullbacks into value while keeping jungle-style risk control.
📌 Stop Loss (Thief SL): 109.500
– Adjust to your risk tolerance but keep it logical above recent swing highs.
📌 Target Zone: 🎯 106.000 first target
🔥 Police-force resistance + overbought zone likely to trap late sellers — escape profits early! (manage profit levels dynamically)
📌 Note (Respect the Market):
Dear Traders (Thief OG’s), this TP/SL is a guide — your profit is your choice. Trade smart, lock gains, manage risk. 🙌
📊 REAL-TIME FUNDAMENTAL CONTEXT (London Time)
🧠 Economic Drivers Impacting AUD/JPY:
🔹 AUD Strength Factors:
• AUD rally on improved risk appetite & Aussie CPI anticipation — strong commodity flows buoy AUD.
• AUD/JPY often tracks global risk sentiment (bullish in rally phases).
🔹 JPY Dynamics:
• Japanese inflation/currency dynamics shifting — Tokyo CPI slowdown tempers BoJ tightening expectations.
• Fresh reports suggest potential yen intervention signals from Japan’s PM & policymakers.
📆 Upcoming Key Releases (Watchlist):
• AUD CPI / RBA rate commentary — big volatility trigger.
• Japan GDP / BoJ policy updates — can bend JPY strength.
• Global risk news (equity, bond routs) — impact carry crosses like AUD/JPY.
🔗 RELATED PAIRS + CORRELATION WATCHLIST
• OANDA:AUDUSD – Shows overall Australian dollar strength. If AUD/USD holds bullish momentum, it supports AUD/JPY upside.
• FX:USDJPY – Direct Yen strength indicator. Strong USD/JPY = weak JPY → bullish pressure for AUD/JPY.
• OANDA:NZDJPY – Similar risk-on carry trade behavior; often moves in the same direction as AUD/JPY.
• OANDA:EURJPY – Confirms broader JPY sentiment during risk-on / risk-off market conditions.
🔁 Correlation Insight:
AUD/JPY performs best in risk-on environments (strong equities, rising yields) and weakens when safe-haven Yen demand increases.
🛠️ TECHNICAL & STRUCTURAL NOTES
📍 Minor cross pair — subject to volatility swings but tradable with layered entry strength and defined risk.
📍 Daily/4H HULL & RSI show supportive pullbacks into key levels.
📍 Price above 100-EMA indicates medium-term bullish structure with reasonable support.
🧠 THIEF TRADER MOTIVATION & WISHES 💎🔥
💬 “Trade like a smart thief — take only what the market gives you, exit before resistance hits. Patience + precision = profit.”
💬 “Layers stack profits, discipline stacks equity.”
💬 “Be a strategist, not a spectator.”
Wishing every Thief OG 📈 smart entries, shark-level exits, and snowballing profits! 🦈💰

AUD/JPY Price Outlook – Trade Setup📊 Technical Structure
OANDA:AUDJPY AUD/JPY remains in a short-term bullish structure after staging a strong impulsive rally from the lower range. Price is currently pulling back toward the 107.85–108.05 support zone, which aligns with the prior breakout area.
The broader structure suggests continuation higher as long as the pair holds above support. The projected path indicates a potential dip for liquidity before buyers attempt another push toward the 108.65–108.85 resistance zone.
🎯 Trade Setup (Bullish Bias)
Entry Zone: 108.05 – 107.85
Stop Loss: 107.80
Take Profit 1: 108.65
Take Profit 2: 108.85
Risk–Reward Ratio: Approx. 1 : 3.01
📌 Invalidation:
A sustained break and close below 107.80 would invalidate the bullish setup and signal weakening upside momentum.
🌐 Macro Background
AUD/JPY is supported by persistent weakness in the Japanese Yen amid fiscal uncertainty and political developments in Japan. Discussions around potential tax pauses and election-related spending have pressured the currency.
Meanwhile, the Australian Dollar remains relatively resilient, benefiting from stable risk sentiment. Although intervention concerns from Japanese authorities may slow the rally, the near-term macro environment still favours upside continuation.
🔑 Key Technical Levels
Resistance Zone: 108.65 – 108.85
Support Zone: 107.85 – 108.05
Bullish Invalidation: Below 107.80
📌 Trade Summary
AUD/JPY is undergoing a healthy pullback after a strong bullish impulse. As long as price holds above the support zone, the bias favours a buy-on-dips strategy, targeting a continuation toward the upper resistance band.
⚠️ Disclaimer
This analysis is for reference only and does not constitute trading advice. Financial markets involve significant risk; proper risk and position management are essential.

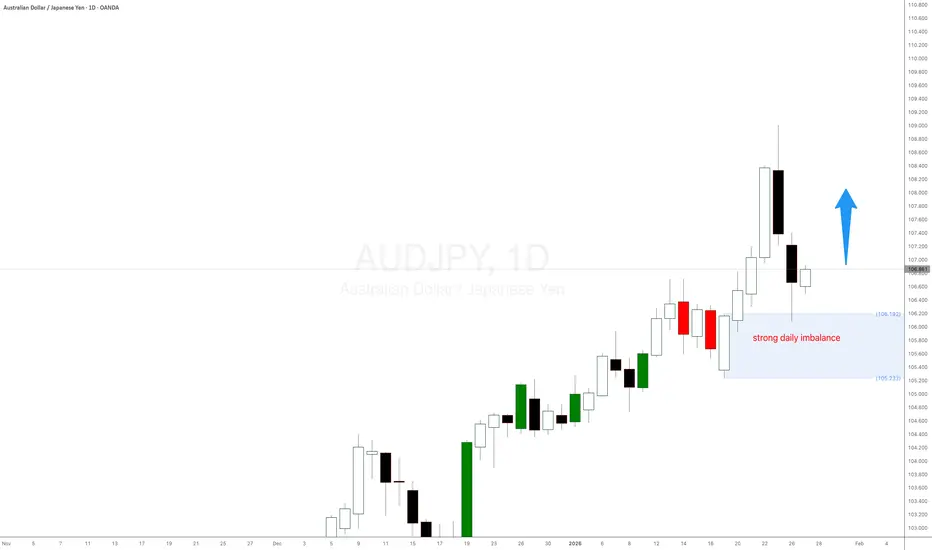
AUDJPY forex pair strong daily imbalanceAUDJPY forex pair strong daily imbalance took control and is trying to push the australiann dollar to higher grounds. The Japanese Yen is very weak accross the board. Let's see if this imbalance wants to play out.
AUD/JPY: Multi-Layer Execution Strategy | Technical & Macro View🔥 AUD/JPY Bullish Setup | Layered Buy Strategy | Smart Money Flow 📈
📌 Asset
AUD/JPY – Australian Dollar vs Japanese Yen
Forex Market Trade Opportunity Guide (Day / Swing Trade)
🧠 Market Bias
✅ Bullish Structure Confirmed
Price is holding above key demand with higher-timeframe support intact. Risk sentiment favors AUD strength while JPY remains weak under current macro conditions.
🎯 Trade Plan – Thief Layering Strategy 🧩
This setup uses a multiple limit-order layering method to optimize average entry price and reduce emotional execution.
🟢 Buy Limit Layers (Scale-In):
105.000
105.300
105.600
105.900
👉 (You may add or adjust layers based on your risk profile and capital allocation)
📌 Entry Logic:
Demand zone reaction
Mean reversion opportunity
Liquidity absorption near intraday lows
🏁 Take Profit (TP)
🎯 106.600
📍 Reasoning:
Prior resistance zone
Overbought conditions expected near highs
Possible liquidity trap above → book profits, don’t get greedy
⚠️ TP is flexible — partials are recommended based on price action.
🛑 Stop Loss (SL)
🔻 104.800
📌 SL Logic:
Invalidation of bullish structure
Below demand & liquidity pocket
⚠️ Risk management is personal — adapt SL to your strategy.
🌍 Live Fundamental & Economic Drivers (Macro Watch – London Session ⏱️)
📈 AUD Support Factors
Commodity demand resilience (China-linked exposure)
Risk-on sentiment across Asia-Pacific equities
Stable RBA stance compared to peers
📉 JPY Weakness Factors
Ongoing ultra-loose BoJ policy
Yield-spread favoring higher-yield currencies
Persistent carry-trade demand
🗓️ High-Impact Events to Monitor
🇦🇺 Australia: Employment data, CPI, RBA statements
🇯🇵 Japan: BoJ policy updates, CPI, wage data
🌐 Global: Risk sentiment, equity market flow, bond yields
📌 Always track live macro updates during London hours before execution.
🔗 Correlated & Related Pairs to Watch
💲 AUD/USD – Confirms AUD strength
💲 NZD/JPY – Risk sentiment alignment
💲 USD/JPY – Yen weakness validation
💲 AUD/NZD – Regional currency balance
👉 If AUD strength aligns across pairs and JPY remains soft → bullish AUD/JPY bias stays valid.
🧩 Key Technical Notes
✔️ Structure holding above demand
✔️ Layered entries reduce timing risk
✔️ Liquidity-based TP zone
✔️ Macro + technical confluence
⚠️ Risk Disclaimer
This idea is for educational purposes only.
You control your entries, exits, and risk. Trade responsibly.
💬 If this setup adds value, boost it with a 👍, 💬 your view, and ⭐ follow for more structured trade ideas.
Let the chart do the talking 📊🔥

AUDJPY is Holding After Channel BreakoutHello Traders
In This Chart AUDJPY HOURLY Forex Forecast By FOREX PLANET
today AUDJPY analysis 👆
🟢This Chart includes_ (AUDJPY market update)
🟢What is The Next Opportunity on AUDJPY Market
🟢how to Enter to the Valid Entry With Assurance Profit
This CHART is For Trader's that Want to Improve Their Technical Analysis Skills and Their Trading By Understanding How To Analyze The Market Using Multiple Timeframes and Understanding The Bigger Picture on the Charts

AUDJPY BULLISH TO BEARISH OUTLOOKThe Yen is setting up a major bullish rally against major currencies. In the interim we expect the Yen to weaken and allow prices to grab liquidity higher (110 region) before we see the long term bullish yen rally pushing AUDJPY to 86 levels possibly by close of 2026 or early 2027.

AUD/JPY Price Outlook – Trade Setup📊 Technical Structure
OANDA:AUDJPY AUD/JPY pulled back after the recent rally and is now consolidating around the 105.70–105.93 support zone. This area overlaps with prior demand and a key technical base, where downside momentum has started to slow.
From a structural perspective, the current move appears to be a corrective pullback within an ongoing bullish trend, rather than a trend reversal. As long as price holds above the support zone, the broader price action favours a continuation higher toward the upper resistance area.
🎯 Trade Setup (Bullish Bias)
Entry Zone: 105.70 – 105.93
Stop Loss: 105.61
Take Profit 1: 106.62
Take Profit 2: 106.84
Risk–Reward Ratio: Approx. 1 : 2.36
📌 Invalidation
A sustained break and close below 105.61 would invalidate the bullish setup and suggest a deeper corrective move.
🌐 Macro Background
On the macro front, the Japanese Yen continues to face pressure despite repeated verbal warnings from Japanese officials regarding potential intervention. So far, these comments have failed to translate into concrete action, keeping the JPY structurally vulnerable.
Meanwhile, the Australian Dollar remains supported by expectations that the Reserve Bank of Australia maintains a relatively hawkish stance, especially compared with Japan’s still-accommodative policy environment. This ongoing policy divergence continues to underpin AUD/JPY, favouring buy-on-dips strategies rather than aggressive selling.
🔑 Key Technical Levels
Resistance Zone: 106.68 – 106.84
Support Zone: 105.70 – 105.93
Bullish Invalidation: Below 105.61
📌 Trade Summary
AUD/JPY is undergoing a healthy pullback within a broader bullish structure. As long as price holds above the 105.70 support zone, the technical bias favours a rebound toward the upper resistance band. The overall setup supports a buy-on-dips approach, rather than a bearish trend reversal.
⚠️ Disclaimer
This analysis is for reference only and does not constitute trading advice. Financial markets involve significant risk; proper risk and position management are essential.

TheGrove | AUDJPY BUY | Idea Trading AnalysisAUDJPY is moving in an UP trend channel.
The chart broke through the dynamic Resistance line, which now acts as support.
We expect a decline in the channel after testing the current level which suggests that the price will continue to rise
Hello Traders, here is the full analysis.
I think we can soon see more fall from this range! GOOD LUCK! Great BUY opportunity AUDJPY
I still did my best and this is the most likely count for me at the moment.
-------------------
Traders, if you liked this idea or if you have your own opinion about it, write in the comments. I will be glad 🤝

AUD/JPY Price Outlook – Trade Setup📊 Technical Structure
FOREXCOM:AUDJPY AUD/JPY is currently consolidating near recent highs after a strong impulsive rally. Price has pulled back into the 105.18–105.37 support zone, where buying interest has emerged and downside momentum has clearly slowed.
The broader market structure remains bullish. As long as price holds above the support zone, AUD/JPY is likely to form a higher low and resume its upward move. The projected path suggests a brief consolidation or shallow retracement, followed by a continuation toward the 105.75–105.93 resistance zone, rather than a deeper corrective breakdown.
🎯 Trade Setup (Bullish Bias)
Entry Zone: 105.15 – 105.37
Stop Loss: 105.15
Take Profit 1: 105.75
Take Profit 2: 105.93
Risk–Reward Ratio: Approx. 1 : 2.6
📌 Invalidation:
A sustained break and close below 105.15 would invalidate the bullish setup and signal a deeper correction risk.
🌐 Macro Background
The macro backdrop continues to favor AUD/JPY on a relative basis. Persistent uncertainty surrounding the Bank of Japan’s policy normalization keeps the Japanese Yen structurally weak, while expectations of a relatively hawkish Reserve Bank of Australia continue to support the Australian Dollar.
In the near term, markets remain sensitive to global risk sentiment and upcoming U.S. macro data. However, as long as risk appetite does not deteriorate sharply, yield differentials and policy divergence should continue to underpin AUD/JPY, favoring buy-on-dips opportunities near key technical support.
🔑 Key Technical Levels
Resistance Zone: 105.75 – 105.93
Support Zone: 105.15 – 105.37
Bullish Invalidation: Below 105.15
📌 Trade Summary
AUD/JPY is holding above a critical support zone following a corrective pullback from recent highs. As long as price remains supported above 105.15, the bias favours a buy-on-dips approach, targeting a continuation toward the upper resistance band near 105.90.
⚠️ Disclaimer
This analysis is for reference only and does not constitute trading advice. Financial markets involve significant risk; proper risk and position management are essential.

AUDJPY - Short Trade Plan
AUDJPY - Short
1. Bearish Divergence
2. Sentiment - Short (90%)
3. RSI > 70 (Overbought)
The plan is to short the pair if the price
falls below the 104.3 mark. A simple
Risk to Reward of 1:1 trade is fine.

AUDJPY Bearish Breakout!
HI,Traders !
#AUDJPY made a bearish
Breakout and the breakout
Is confirmed so we are
Bearish biased and we
Will be expecting a further
Bearish move down !
Comment and subscribe to help us grow !

AUDJPY: Bearish Drop to 88?FX:AUDJPY is eyeing a bearish reversal on the daily chart , with price approaching a key resistance zone near cumulative sell liquidation, converging with a potential entry area that could trigger downside momentum if sellers defend against further upside. This setup suggests a pullback opportunity amid the recent rally, targeting lower support levels with favorable risk-reward.🔥
Entry between 104.5–106.5 for a short position. Targets at 95 (first), 88 (second). Set a stop loss at a close above 109.5 , yielding a risk-reward ratio more than 1:3 overall. Monitor for confirmation via a bearish candle close below entry with rising volume, leveraging the pair's volatility near highs.🌟
Fundamentally , AUDJPY is strengthening around 101-102 in November 2025, supported by RBA's rate pause and probing yearly highs amid bullish trends, though recovery attempts from 99.00 face headwinds from resilient labor markets and inflation concerns. Forecasts indicate continued upside potential to 102.00+ if momentum builds, but risks of correction persist due to diverging central bank policies and global risk sentiment. 💡
📝 Trade Setup
🎯 Entry (Short):
104.5 – 106.5
🎯 Targets:
• 95.00 (first)
• 88.00 (second)
❌ Stop Loss:
• Daily close above 109.5
⚖️ Risk-to-Reward:
• More than 1:3 overall
👇 Share your thoughts below! 👇

AUDJPY is setting up..... Patient is keyIn this AUDJPY analysis, I outline the current price structure, key levels of interest, and possible scenarios the market may deliver next. This breakdown is focused on clean price action and smart risk management rather than predictions.
#audjpy #forexanalysis #forextrading #technicalanalysis #priceaction #fxtrader #marketanalysis #chartanalysis #daytrading #forexmarket
AUDJPY: +400 Pips Possible Buying Opportunity! Dear Traders,
AUDJPY is likely to continue the bullish price momentum up until 104, currently price has reversed from a critical point. You may consider buying at this moment with a proper risk management. Please use strict management while trading and use this analysis for educational purposes only.
Please like and comment for more!
Team Setupsfx_❤️🏆


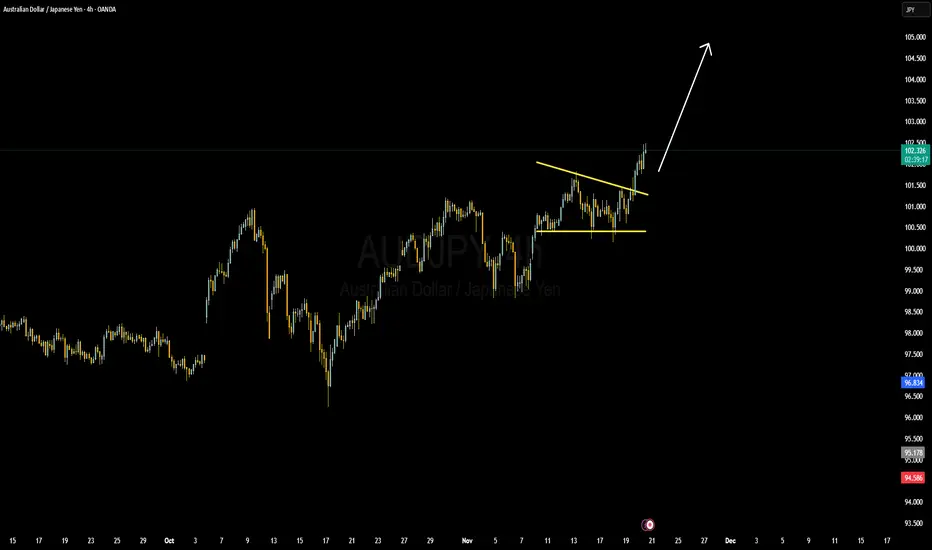
AUD/JPY | Bullish Momentum After Australian CPI Data ReleaseThe AUD/JPY pair gained a strong bullish boost after higher-than-expected Australian consumer inflation data, which dampened speculation of an interest rate cut by the Reserve Bank of Australia (RBA). Currently, the price is at a new weekly high and awaits confirmation of a breakout.
1. Market Fundamental Factors (Drivers of the Upside)
Higher Australian Inflation: The hotter (higher) Australian consumer inflation figures dampened market bets for further interest rate cuts by the RBA.
Impact: This significantly boosted the Australian Dollar (AUD), lifting the AUD/JPY pair to the 101.70 area (a new weekly high).
2. Technical Analysis and Indicators
Long-Term Bias: The 100-day Simple Moving Average (SMA) is rising steadily, and the price is holding above it, reinforcing the bullish bias.
Trend Conditions: Trend conditions will remain favorable as long as the price is above the rising SMA, which is currently below 98.00.
3. Bullish Scenario ⬆️
Strong Upside Trigger: Bulls await a breakout through the nearly three-week-old trading range (currently around 101.70). A decisive MACD push into positive territory would strengthen this case.
Next Target: A move will head towards the 102.45-102.50 region, or the highest level since July 2024, touched last week.
4. Bearish Scenario ⬇️
Initial Key Support: Weakness below the 101.40 area is likely to find decent support near the 101.00 round number.
Trading Range Support: A break below 101.00 could retest the trading range support around the 100.40-100.35 region.
Bias Reversal: A convincing break below 100.35 could trigger technical selling and drag the price below the psychological 100.00 mark, towards the next relevant support near the 99.65 - 99.60 region.
AUD/JPY Price Outlook – Trade Setup📊 Technical Structure
OANDA:AUDJPY AUD/JPY has rebounded toward 101.20 after defending the 100.40–100.70 support zone, keeping the medium-term uptrend structure intact. Price continues to trade above a rising trendline and the 100-day EMA, while momentum (RSI) remains in bullish territory.
The chart shows a clear range within an ascending structure:
Support zone: 100.40 – 100.70
Resistance zone / target area: 102.07 – 102.39
As long as the cross holds above 100.40, dips into support are likely to attract buyers, with upside potential back toward the 102.00+ resistance band. A decisive 4H close below 100.40 would invalidate the bullish scenario and expose the 99.80 area.
🎯 Trade Setup
Idea: Buy dips into support, targeting a move back into the 102.00 resistance zone.
Entry: 100.70 – 100.40
Stop Loss: 100.10 (below support and recent swing low)
Take Profit 1: 102.07
Take Profit 2: 102.39
Risk–Reward Ratio: ≈ 1 : 2.81
Bias stays constructively bullish while price holds above 100.40–100.70 on a closing basis. A 4H close below this zone would warn that the bullish structure is breaking down.
🌐 Macro Background
According to FXStreet, AUD/JPY has attracted buyers near 101.20 in early European trading as the Japanese Yen weakens on fiscal concerns and uncertainty over the Bank of Japan’s (BoJ) tightening path. Mixed signals from Tokyo keep JPY under pressure, supporting the cross.
BoJ & Japan:
Markets remain unsure how quickly the BoJ will move away from ultra-loose policy.
Japan’s Finance Minister Satsuki Katayama reiterated that FX intervention is possible if JPY moves become “excessively volatile and speculative,” which could cap AUD/JPY on sharp spikes higher.
Australia:
Traders are watching October CPI data due Wednesday for clues on the RBA’s rate path.
A firmer CPI print could reinforce expectations that the RBA will keep policy relatively tight, lending support to AUD.
Overall, BoJ uncertainty and relatively firmer Australian yields favour AUD/JPY on dips, but the risk of verbal or actual FX intervention argues for scaling out profits near resistance rather than chasing the move.
🔑 Key Technical Levels
Resistance zone: 102.07 – 102.39
Interim resistance: 101.70–101.90
Support zone: 100.40 – 100.70
Invalidation level (bulls): 100.40 (4H close below)
📌 Trade Summary
AUD/JPY remains in a gradually bullish structure above the 100-handle, with buyers defending the 100.40–100.70 support band. As long as this floor holds, the setup favours buying dips toward support and targeting 102.07–102.39 where prior supply and intervention risk may re-emerge. Traders should stay alert to Japanese officials’ comments and the upcoming Australian CPI release, which could amplify short-term volatility.
⚠️ Disclaimer
This analysis is for reference only and does not constitute trading advice. Trading involves significant risk, and proper risk management is essential.

AUD/JPY – H4 - Rising Wedge Breakdown | Key Zones Targeted📝 Description:
The AUD/JPY pair is showing a clear Rising Wedge formation on the 4H timeframe, with three clean touches on the trendline—indicating weakening bullish momentum. Price has now broken below the lower trendline, suggesting increased probability of bearish continuation toward the next key zones. FX:AUDJPY
This setup highlights:
Rising Wedge pattern
Trendline break
Retest opportunity
Key support zones at 99.00 and 97.80
AUD fundamentals: driven by commodity demand, RBA policy, and risk sentiment
JPY fundamentals: influenced by BOJ stance, yields, and safe-haven flows
This analysis is ideal for traders monitoring price action, forex patterns, and high-probability setups on AUD/JPY.
Keep an eye on upcoming economic releases from RBA, BOJ, and US data, as they can influence risk sentiment and impact this pair heavily.
✅ Support this analysis with a
LIKE 👍 | COMMENT 💬 | FOLLOW 🔔
It helps a lot & keeps the ideas coming!
⚠️ Disclaimer: This analysis is for educational purposes only and does not constitute financial advice. Forex trading involves high risk. Trade only with capital you can afford to lose and always do your own research.


AUDJPY Forming Bullish StructureAUDJPY continues to show strong bullish structure, with price breaking out of a descending channel and pushing toward new highs, confirming continued buying interest. The market has been forming higher highs and higher lows, and this recent breakout signals a potential continuation of bullish momentum. From a technical perspective, the breakout above the consolidation zone reflects aggressive demand from institutional participants, and as long as price holds above the recent support region, buyers may continue controlling the trend.
Fundamentally, AUDJPY is currently influenced by contrasting monetary conditions between the Reserve Bank of Australia and the Bank of Japan. The RBA has maintained a firm stance as inflation in Australia remains above the target range, increasing the probability of additional rate policy firmness to keep inflation under control. This supports the Australian dollar, as higher interest rates strengthen currency demand in global carry trade flows. On the opposite side, the Bank of Japan continues to maintain an ultra-dovish stance, with very low interest rates and ongoing financial easing, which keeps the yen fundamentally weak.
At the same time, global equity sentiment remains risk-on, which typically benefits AUD over JPY due to Australia’s commodity-linked profile. With Japanese yields still suppressed and foreign capital outflows steady, traders continue favoring AUDJPY as a popular carry trade pair. If risk sentiment remains stable and RBA maintains its policy outlook, the pair may continue advancing toward higher price levels in the medium term.
Overall, as long as price remains above the breakout level and the fundamental divergence between the two central banks persists, AUDJPY has the potential to sustain further upside. Professional traders will continue watching price reactions on retests and market volume to secure profitable continuation entries as the bullish trend develops.
Sell Off (Retracement)- AUDJPYThe macro bias of AUDJPY is bullish
Price has been making Higher Highs and Higher Lows
Price has reached an area of resistance (supply zone) and preparing to sell off
I expect price to sell off and test the 50.0-61.8 fib level before the trend continuation.

AUD/JPY Swing Trade Plan: Entry & Targets Unlocked!🎯 AUD/JPY: The Aussie Heist Setup | Triple-MA Pullback Party! 🦘💴
📊 ASSET BREAKDOWN
Pair: AUD/JPY (Australian Dollar vs Japanese Yen)
Market: Forex
Style: Swing/Day Trade
Timeframe: Multi-timeframe confluence
🔍 THE SETUP
Bias: 🐂 BULLISH
We've got ourselves a textbook triangular moving average pullback with a clean retest happening right now! The Aussie's looking spicy against the Yen, and the technical stars are aligning for a potential north-bound journey.
Current Price Action: Price has respected the triple-MA structure, showing strength after the pullback. Bulls are defending key support zones like bouncers at an exclusive club.
💰 THE "THIEF STRATEGY" ENTRY PLAYBOOK
Entry Method: Layered Limit Orders (Scale-In Style)
Instead of going all-in like it's last call, we're spreading entries across multiple levels:
📍 Layer 1: 97.000
📍 Layer 2: 97.250
📍 Layer 3: 97.500
📍 Layer 4: 97.750
📍 Layer 5: 98.000
Pro Tip: You can add more layers based on your risk appetite and account size. This ain't financial advice—it's a buffet, take what fits your plate! 🍽️
🛡️ RISK MANAGEMENT
Stop Loss: 96.500
(Thief's SL reference point)
⚠️ IMPORTANT: This is MY stop level based on structure invalidation. YOU are the captain of your own ship—adjust your SL according to YOUR risk tolerance, account size, and trading psychology. No two traders are the same, and that's the beauty of this game!
🎯 PROFIT TARGETS
🥇 Primary Target: 99.400 (+140-240 pips depending on entry)
🥈 Secondary Target: 101.000 (+300-400 pips depending on entry)
Exit Strategy Note: These are MY technical targets based on structure and fib extensions. Take profits whenever YOU feel comfortable. Lock in gains, move stops to breakeven, and let the market pay you—don't let greed be your enemy! 💪
🔗 CORRELATED PAIRS TO WATCH
Keep these bad boys on your radar—they move together like synchronized swimmers:
OANDA:AUDUSD 🦘💵 - Aussie strength gauge
FX:USDJPY 💵💴 - Yen weakness confirmation
OANDA:NZDJPY 🥝💴 - Commodity currency cousin
OANDA:EURJPY 🇪🇺💴 - Risk-on sentiment checker
OANDA:XAUUSD (Gold) 📈✨ - Often inversely correlated with risk appetite affecting JPY
Correlation Logic: When Aussie shows strength against USD AND Yen shows weakness across the board, AUD/JPY becomes the sweet spot for maximum momentum. Watch USD/JPY for directional confirmation—if it's climbing, our setup gets even juicier! 🔥
📈 KEY TECHNICAL POINTS
✅ Triple moving average alignment = trend confirmation
✅ Pullback to support completed = entry opportunity
✅ Retest holding = bulls in control
✅ Higher lows forming = momentum building
✅ Volume supporting the move = conviction present
🎬 FINAL THOUGHTS
This setup screams potential, but remember—the market doesn't owe us anything. Manage your risk, stay disciplined, and trade YOUR plan, not your emotions. Whether you're scaling in with the layered approach or waiting for your personal confirmation, make sure it aligns with YOUR strategy.
Risk Disclosure: Past performance doesn't guarantee future results. The "Thief Strategy" is a playful trading methodology for educational and entertainment purposes only. This is NOT financial advice—I'm just a trader sharing ideas with the community. Trade at your own risk, do your own analysis, and never risk more than you can afford to lose.
✨ If you find value in my analysis, a 👍 and 🚀 boost is much appreciated — it helps me share more setups with the community!
#AUDJPY #ForexTrading #SwingTrading #DayTrading #TechnicalAnalysis #MovingAverage #PullbackStrategy #ForexSignals #TradingIdeas #RiskManagement #AustralianDollar #JapaneseYen #ForexCommunity #TradingView #PriceAction #ForexStrategy
