AUDJPY Bearish Breakout!
HI,Traders !
#AUDJPY made a bearish
Breakout and the breakout
Is confirmed so we are
Bearish biased and we
Will be expecting a further
Bearish move down !
Comment and subscribe to help us grow !
Audjpyidea

AUDJPY: +400 Pips Possible Buying Opportunity! Dear Traders,
AUDJPY is likely to continue the bullish price momentum up until 104, currently price has reversed from a critical point. You may consider buying at this moment with a proper risk management. Please use strict management while trading and use this analysis for educational purposes only.
Please like and comment for more!
Team Setupsfx_❤️🏆


AUD/JPY | Bullish Momentum After Australian CPI Data ReleaseThe AUD/JPY pair gained a strong bullish boost after higher-than-expected Australian consumer inflation data, which dampened speculation of an interest rate cut by the Reserve Bank of Australia (RBA). Currently, the price is at a new weekly high and awaits confirmation of a breakout.
1. Market Fundamental Factors (Drivers of the Upside)
Higher Australian Inflation: The hotter (higher) Australian consumer inflation figures dampened market bets for further interest rate cuts by the RBA.
Impact: This significantly boosted the Australian Dollar (AUD), lifting the AUD/JPY pair to the 101.70 area (a new weekly high).
2. Technical Analysis and Indicators
Long-Term Bias: The 100-day Simple Moving Average (SMA) is rising steadily, and the price is holding above it, reinforcing the bullish bias.
Trend Conditions: Trend conditions will remain favorable as long as the price is above the rising SMA, which is currently below 98.00.
3. Bullish Scenario ⬆️
Strong Upside Trigger: Bulls await a breakout through the nearly three-week-old trading range (currently around 101.70). A decisive MACD push into positive territory would strengthen this case.
Next Target: A move will head towards the 102.45-102.50 region, or the highest level since July 2024, touched last week.
4. Bearish Scenario ⬇️
Initial Key Support: Weakness below the 101.40 area is likely to find decent support near the 101.00 round number.
Trading Range Support: A break below 101.00 could retest the trading range support around the 100.40-100.35 region.
Bias Reversal: A convincing break below 100.35 could trigger technical selling and drag the price below the psychological 100.00 mark, towards the next relevant support near the 99.65 - 99.60 region.
AUD/JPY Price Outlook – Trade Setup📊 Technical Structure
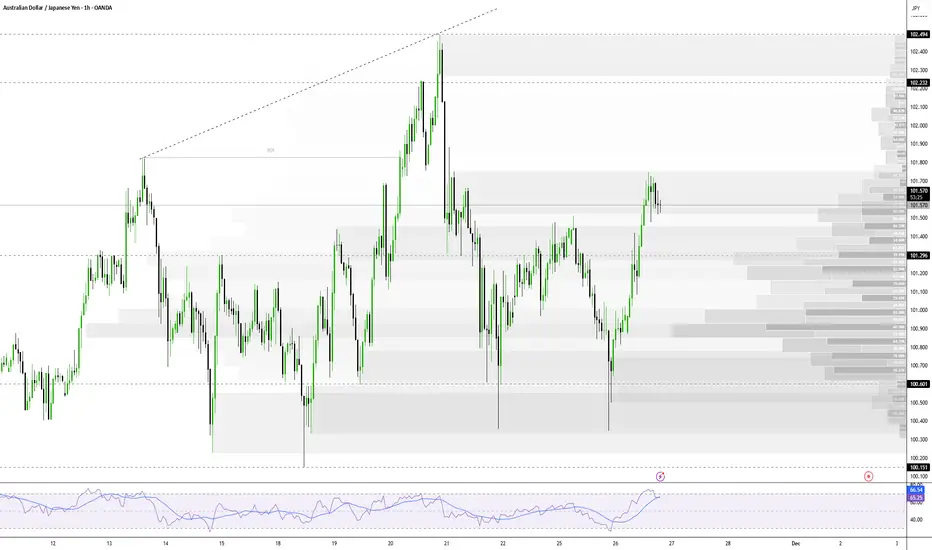
OANDA:AUDJPY AUD/JPY has rebounded toward 101.20 after defending the 100.40–100.70 support zone, keeping the medium-term uptrend structure intact. Price continues to trade above a rising trendline and the 100-day EMA, while momentum (RSI) remains in bullish territory.
The chart shows a clear range within an ascending structure:
Support zone: 100.40 – 100.70
Resistance zone / target area: 102.07 – 102.39
As long as the cross holds above 100.40, dips into support are likely to attract buyers, with upside potential back toward the 102.00+ resistance band. A decisive 4H close below 100.40 would invalidate the bullish scenario and expose the 99.80 area.
🎯 Trade Setup
Idea: Buy dips into support, targeting a move back into the 102.00 resistance zone.
Entry: 100.70 – 100.40
Stop Loss: 100.10 (below support and recent swing low)
Take Profit 1: 102.07
Take Profit 2: 102.39
Risk–Reward Ratio: ≈ 1 : 2.81
Bias stays constructively bullish while price holds above 100.40–100.70 on a closing basis. A 4H close below this zone would warn that the bullish structure is breaking down.
🌐 Macro Background
According to FXStreet, AUD/JPY has attracted buyers near 101.20 in early European trading as the Japanese Yen weakens on fiscal concerns and uncertainty over the Bank of Japan’s (BoJ) tightening path. Mixed signals from Tokyo keep JPY under pressure, supporting the cross.
BoJ & Japan:
Markets remain unsure how quickly the BoJ will move away from ultra-loose policy.
Japan’s Finance Minister Satsuki Katayama reiterated that FX intervention is possible if JPY moves become “excessively volatile and speculative,” which could cap AUD/JPY on sharp spikes higher.
Australia:
Traders are watching October CPI data due Wednesday for clues on the RBA’s rate path.
A firmer CPI print could reinforce expectations that the RBA will keep policy relatively tight, lending support to AUD.
Overall, BoJ uncertainty and relatively firmer Australian yields favour AUD/JPY on dips, but the risk of verbal or actual FX intervention argues for scaling out profits near resistance rather than chasing the move.
🔑 Key Technical Levels
Resistance zone: 102.07 – 102.39
Interim resistance: 101.70–101.90
Support zone: 100.40 – 100.70
Invalidation level (bulls): 100.40 (4H close below)
📌 Trade Summary
AUD/JPY remains in a gradually bullish structure above the 100-handle, with buyers defending the 100.40–100.70 support band. As long as this floor holds, the setup favours buying dips toward support and targeting 102.07–102.39 where prior supply and intervention risk may re-emerge. Traders should stay alert to Japanese officials’ comments and the upcoming Australian CPI release, which could amplify short-term volatility.
⚠️ Disclaimer
This analysis is for reference only and does not constitute trading advice. Trading involves significant risk, and proper risk management is essential.


AUD /JPY Best Place For Sell Cleared After This Massive Move !Here is my opinion on 4H T.F On AUD /JPY Chart , the price Very Near to touch a very strong res area that forced the price to respect it and go down for more than 500 pips for 1 time , and if we checked the chart we will see that the price is going up very hard without any correction so we need a very strong res area to force the price to go down at least for 300 pips so i choose this area cuz it`s the highest place the price touch it and it respect it very much and go down very hard as it go up very hard , so i`m waiting the price at this area to sell it and targeting from 100 to 200 pips . if we have a daily closure above my res area this idea will not be valid anymore .
Entry Reasons :
1- Very Strong Daily & Weekly Res Area .
2- Perfect Bearish Price Action Last Time .
3- Bigger Time Frames Confirmed .

AUD/JPY Swing Trade Plan: Entry & Targets Unlocked!🎯 AUD/JPY: The Aussie Heist Setup | Triple-MA Pullback Party! 🦘💴
📊 ASSET BREAKDOWN
Pair: AUD/JPY (Australian Dollar vs Japanese Yen)
Market: Forex
Style: Swing/Day Trade
Timeframe: Multi-timeframe confluence
🔍 THE SETUP
Bias: 🐂 BULLISH
We've got ourselves a textbook triangular moving average pullback with a clean retest happening right now! The Aussie's looking spicy against the Yen, and the technical stars are aligning for a potential north-bound journey.
Current Price Action: Price has respected the triple-MA structure, showing strength after the pullback. Bulls are defending key support zones like bouncers at an exclusive club.
💰 THE "THIEF STRATEGY" ENTRY PLAYBOOK
Entry Method: Layered Limit Orders (Scale-In Style)
Instead of going all-in like it's last call, we're spreading entries across multiple levels:
📍 Layer 1: 97.000
📍 Layer 2: 97.250
📍 Layer 3: 97.500
📍 Layer 4: 97.750
📍 Layer 5: 98.000
Pro Tip: You can add more layers based on your risk appetite and account size. This ain't financial advice—it's a buffet, take what fits your plate! 🍽️
🛡️ RISK MANAGEMENT
Stop Loss: 96.500
(Thief's SL reference point)
⚠️ IMPORTANT: This is MY stop level based on structure invalidation. YOU are the captain of your own ship—adjust your SL according to YOUR risk tolerance, account size, and trading psychology. No two traders are the same, and that's the beauty of this game!
🎯 PROFIT TARGETS
🥇 Primary Target: 99.400 (+140-240 pips depending on entry)
🥈 Secondary Target: 101.000 (+300-400 pips depending on entry)
Exit Strategy Note: These are MY technical targets based on structure and fib extensions. Take profits whenever YOU feel comfortable. Lock in gains, move stops to breakeven, and let the market pay you—don't let greed be your enemy! 💪
🔗 CORRELATED PAIRS TO WATCH
Keep these bad boys on your radar—they move together like synchronized swimmers:
OANDA:AUDUSD 🦘💵 - Aussie strength gauge
FX:USDJPY 💵💴 - Yen weakness confirmation
OANDA:NZDJPY 🥝💴 - Commodity currency cousin
OANDA:EURJPY 🇪🇺💴 - Risk-on sentiment checker
OANDA:XAUUSD (Gold) 📈✨ - Often inversely correlated with risk appetite affecting JPY
Correlation Logic: When Aussie shows strength against USD AND Yen shows weakness across the board, AUD/JPY becomes the sweet spot for maximum momentum. Watch USD/JPY for directional confirmation—if it's climbing, our setup gets even juicier! 🔥
📈 KEY TECHNICAL POINTS
✅ Triple moving average alignment = trend confirmation
✅ Pullback to support completed = entry opportunity
✅ Retest holding = bulls in control
✅ Higher lows forming = momentum building
✅ Volume supporting the move = conviction present
🎬 FINAL THOUGHTS
This setup screams potential, but remember—the market doesn't owe us anything. Manage your risk, stay disciplined, and trade YOUR plan, not your emotions. Whether you're scaling in with the layered approach or waiting for your personal confirmation, make sure it aligns with YOUR strategy.
Risk Disclosure: Past performance doesn't guarantee future results. The "Thief Strategy" is a playful trading methodology for educational and entertainment purposes only. This is NOT financial advice—I'm just a trader sharing ideas with the community. Trade at your own risk, do your own analysis, and never risk more than you can afford to lose.
✨ If you find value in my analysis, a 👍 and 🚀 boost is much appreciated — it helps me share more setups with the community!
#AUDJPY #ForexTrading #SwingTrading #DayTrading #TechnicalAnalysis #MovingAverage #PullbackStrategy #ForexSignals #TradingIdeas #RiskManagement #AustralianDollar #JapaneseYen #ForexCommunity #TradingView #PriceAction #ForexStrategy

AUDJPY Overextended: Watching for a Corrective Pullback 📈 Taking a closer look at AUD/JPY, we can see that price is in a strong bullish trend, but currently overextended and trading into a major external range high — an area rich in liquidity 🏦. The market appears to be absorbing buy-side liquidity, signaling that a corrective phase may be approaching.
From a structural standpoint, I’m monitoring two overlapping concepts — a potential Three-Drive pattern 🌀 and a Five-Wave structure that may lead into an ABC correction. Both suggest that price could be preparing for a deeper retracement before the next bullish leg resumes.
At this stage, I’m not interested in buying at a premium 💸. Instead, I’ll wait for price to pull back, ideally into a discount zone, and then look for bullish structure confirmation to rejoin the trend. Patience here is key — let the market come to you. 🧘♂️
💬 Disclaimer: This analysis is for educational purposes only and not financial advice. Always trade responsibly and manage risk effectively.

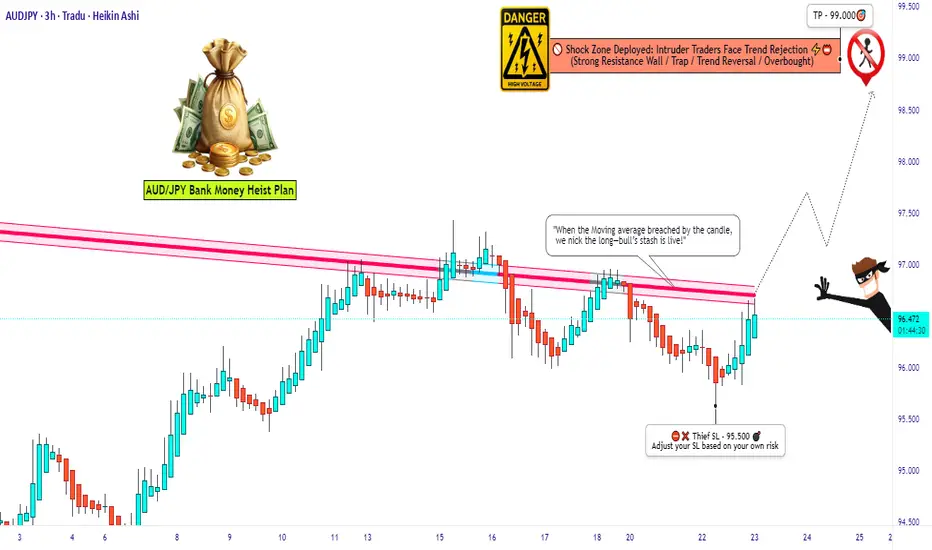
Will AUD/JPY Break 97.5? Bullish Thief Plan & Fundamental Edge🔑 AUD/JPY “Aussie vs Yen” | Thief Market Plan 🎭 (Swing/Day Trade)
📌 Plan Overview
Bias: Bullish (Pending Order Plan)
Entry Idea: Breakout above 97.500 ⚡ Moving Average Dynamic Line
Thief Layer Strategy:
Multiple Buy Limit Orders → 96.500 | 97.000 | 97.500 | 97.700
You can increase layer entries based on your own plan.
✅ Always confirm with breakout before entry.
🔔 Set an alert in TradingView to catch breakout moves easily.
Stop Loss (SL): Thief SL suggested near 96.300 (after breakout level).
Note: This is not a fixed rule—adjust SL according to your own risk management.
Take Profit (TP): Resistance barricade at 99.000 (overbought + liquidity trap zone).
Note: Escape with profits before the police barricade! 🎯
🧭 Why This Plan? (Thief OG Strategy + Market Analysis)
📊 AUD/JPY Key Data (08 Sept 2025)
Prev. Close: 97.35
Day’s Range: 96.82 – 97.35
Change: -0.44 (-0.45%)
😰 Fear & Greed Sentiment
CNN Fear & Greed Index → 51.5 (Neutral)
Market momentum balanced, mild caution amid geopolitical risk.
🏛 Retail vs Institutional Sentiment
🧑💼 Retail Traders → Bullish 60% | Bearish 40%
Retail leaning bullish thanks to AUD resilience.
🏦 Institutional Outlook → Bullish bias (AUD strength vs BOJ dovishness)
Concerns: Japanese political uncertainty (PM resignation).
Macro Score: 7/10 in favor of AUD.
🌍 Fundamental & Macro Drivers
✅ AUD Strengths
🔥 Inflation hot (July CPI +2.8% y/y)
🏠 Household spending growth (+5.1% y/y)
🏦 RBA keeping policy steady (hawkish tilt)
❌ JPY Weaknesses
🕊️ BOJ dovish stance continues
🏛️ Political instability (PM resignation)
🚗 US auto tariff cuts pressuring JPY
🐂🐻 Market Outlook
Bullish (Long) Score: 70%
Bearish (Short) Score: 30%
Summary: AUD/JPY shows bullish structure above 97.00, but caution on overbought signals after 10-day rally.
⚠️ Risks to Watch
US NFP (Sept 12) → May drive USD/JPY flows.
Overbought daily RSI signals.
Geopolitical volatility (China & Ukraine).
🎯 Bottom Line
AUD/JPY maintains a bullish bias 🟢 with fundamentals, sentiment, and Thief layering strategy supporting higher targets.
📌 Monitor 97.45–97.50 breakout zone → potential continuation toward 99.000.
🔗 Related Pairs to Watch
FX:USDJPY | OANDA:AUDUSD | OANDA:EURJPY | OANDA:GBPJPY
✨ “If you find value in my analysis, a 👍 and 🚀 boost is much appreciated — it helps me share more setups with the community!”
#audjpy #forex #swingtrade #daytrade #fundamentalanalysis #sentiment #thieftrader #forexanalysis #macromarket #currencytrading

AUDJPY.....IS GOING FOR A RIDE? I THINK SOHey Amazing People!
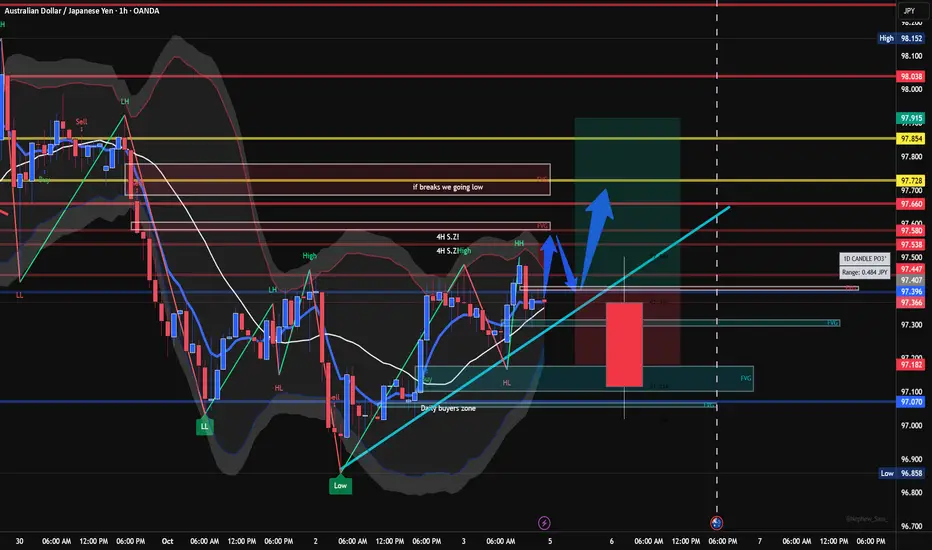
My T.A. of AJ is pretty simplistic, we have seen a rejection to the downside and what seems to be a double bottom in the making on the 1H time frame! Showing me that we could see a heavy push to the upside, also taking out a key R-Zone! Meaning that there is a TON of avaiable room to run up and orders that need to be eaten up! So I believe if we have a break of the current high we can see a rally to Price points such as
97.580 or even
97.660-97.728!
I am worried about AUS news reaction on tuesday but we can only wait and see but either way the currency strength are rather equal so it sould just continue with trend.
This is just my thoughts and logging but tell me what you think? I trade with binary options so I let price tell me which way to go so if it follows this im going to sell high and buy low! If price gives me a push to the downside well dang haha looks like we looking for sell ops!! ;P
but let me know your thoughts or if you feel like this could be correct as well!
AUDJPY Daily Forecast -Q3 | W40 | D30 | Y25|📅 Q3 | W40 | D30 | Y25|
📊 AUDJPY Daily Forecast
🔍 Analysis Approach:
I’m applying Smart Money Concepts, focusing on:
Identifying Points of Interest on the Higher Time Frames (HTFs) 🕰️
Using those POIs to define a clear trading range 📐
Refining those zones on Lower Time Frames (LTFs) 🔎
Waiting for a Break of Structure (BoS) for confirmation ✅
This method allows me to stay precise, disciplined, and aligned with the market narrative, rather than chasing price.
💡 My Motto:
"Capital management, discipline, and consistency in your trading edge."
A positive risk-to-reward ratio, paired with a high win rate, is the backbone of any solid trading plan 📈🔐
⚠️ Losses?
They’re part of the mathematical game of trading 🎲
They don’t define you — they’re necessary, they happen, and we move forward 📊➡️
🙏 I appreciate you taking the time to review my Daily Forecast.
Stay sharp, stay consistent, and protect your capital
— FRNGT 🚀
FX:AUDJPY

AUDJPY Daily Forecast -Q3 | W40 | D29 | Y25|FX:AUDJPY
📅 Q3 | W40 | D29 | Y25|
📊 AUDJPY Daily Forecast
🔍 Analysis Approach:
I’m applying Smart Money Concepts, focusing on:
Identifying Points of Interest on the Higher Time Frames (HTFs) 🕰️
Using those POIs to define a clear trading range 📐
Refining those zones on Lower Time Frames (LTFs) 🔎
Waiting for a Break of Structure (BoS) for confirmation ✅
This method allows me to stay precise, disciplined, and aligned with the market narrative, rather than chasing price.
💡 My Motto:
"Capital management, discipline, and consistency in your trading edge."
A positive risk-to-reward ratio, paired with a high win rate, is the backbone of any solid trading plan 📈🔐
⚠️ Losses?
They’re part of the mathematical game of trading 🎲
They don’t define you — they’re necessary, they happen, and we move forward 📊➡️
🙏 I appreciate you taking the time to review my Daily Forecast.
Stay sharp, stay consistent, and protect your capital
— FRNGT 🚀

AUDJPY: Sell SignalLast week we did get a bearish CHoCH followed by new LHs and LLs. We are currently in this trade...
🔴 Entry 97.422
SL 97.9
TP1 96.122
TP2 96.822
TP3 96.422
TP4 95.63
If you decide to enter, make sure you are managing your trades.

AUDJPY Daily Forecast -Q3 | W39 | D24 | Y25| 📅 Q3 | W39 | D24 | Y25|
📊 AUDJPY Daily Forecast
🔍 Analysis Approach:
I’m applying Smart Money Concepts, focusing on:
Identifying Points of Interest on the Higher Time Frames (HTFs) 🕰️
Using those POIs to define a clear trading range 📐
Refining those zones on Lower Time Frames (LTFs) 🔎
Waiting for a Break of Structure (BoS) for confirmation ✅
This method allows me to stay precise, disciplined, and aligned with the market narrative, rather than chasing price.
💡 My Motto:
"Capital management, discipline, and consistency in your trading edge."
A positive risk-to-reward ratio, paired with a high win rate, is the backbone of any solid trading plan 📈🔐
⚠️ Losses?
They’re part of the mathematical game of trading 🎲
They don’t define you — they’re necessary, they happen, and we move forward 📊➡️
🙏 I appreciate you taking the time to review my Daily Forecast.
Stay sharp, stay consistent, and protect your capital
— FRNGT 🚀
FX:AUDJPY

AUDJPY Momentum Weakens, Sellers Eye Deeper PullbackAUDJPY has lost steam after a strong recovery rally, with sellers now pressing back below trendline support. The recent rejection near 98.40 signals exhaustion, and the pair looks set for a corrective leg lower toward key support zones. Unless buyers reclaim higher ground quickly, the near-term risk is skewed to the downside.
Current Bias
Bearish – price action shows a breakdown from recent upward momentum, with downside targets opening below 97.10.
Key Fundamental Drivers
RBA Policy: Australia’s central bank remains cautious with no immediate tightening bias, limiting AUD support.
BOJ Policy: Still ultra-loose but rising JGB yields and quiet speculation about adjustments give JPY some underlying support.
Commodities: Weakness in iron ore and concerns around Chinese growth cap AUD upside.
Macro Context
Interest Rates: RBA is holding rates steady, while markets anticipate the Fed and ECB easing earlier than BOJ. Yield differentials still favor AUDJPY upside, but recent data has weakened AUD’s momentum.
Economic Growth: Australia’s growth is slowing; Japan is stable but not accelerating, making yield spreads the main driver.
Geopolitics: Trade tensions and tariff-related uncertainty push investors toward JPY during risk-off episodes, undermining AUD.
Primary Risk to the Trend
A rebound in Chinese demand or a risk-on rally in equities could boost AUD and derail the bearish setup.
Most Critical Upcoming News/Event
Australian retail sales and CPI updates
Japanese inflation data
China PMIs for growth signals impacting AUD
Leader/Lagger Dynamics
AUDJPY is a lagger compared to USDJPY and EURJPY, which tend to set the tone for yen pairs. It is also influenced by AUDUSD moves, making it sensitive to Chinese and commodity-linked headlines.
Key Levels
Support Levels: 97.10, 96.29
Resistance Levels: 97.90, 98.40
Stop Loss (SL): 98.72 (above recent highs)
Take Profit (TP): 97.10 (first target), 96.29 (secondary target)
Summary: Bias and Watchpoints
AUDJPY is turning bearish after losing momentum at 98.40, with sellers eyeing 97.10 and 96.29 as key downside targets. A stop above 98.72 helps protect against sharp rebounds, while risk sentiment and China data remain the main watchpoints. The pair is more of a lagger, following broader yen moves and AUD commodity flows, so traders should watch USDJPY and AUDUSD closely for signals.

Is This Your Entry for the AUD/JPY Bull Run?🔓💸 AUD/JPY "Aussie vs Yen" Forex Bank Heist 💸🔓
🎯 Plan: Bullish Robbery | Targeting 97.500 | Stop Loss: 95.000
💰 Multi-Layer Limit Entry | Precision Heist | No Mercy
🚨🧠 Attention Thieves, Looters & Forex Mercenaries! 🧠🚨
The AUD/JPY vault is cracked, and the Thief Trader blueprint is live! We're executing a multi-layer LIMIT ENTRY HEIST – stacking orders like stolen cash in a briefcase. 💼💷💣
👀 We ain't chasing price – we're setting a TRAP with layers. Every dip? A planned robbery opportunity.
💥 ENTRY: The Thief's Layered Ambush 💥
"Aussie Bull" on a bank job – we loot using precise limit orders!
Thief Layer Entry Zones: 95.500 | 95.800 | 96.000 | 96.100
Pro Thief Move: You can increase your limit layers based on your own capital. More layers, more loot!
🛑 STOP LOSS: This is Thief SL @95.000 🔐
Dear Ladies & Gentleman (Thief OG's), this is the panic room. Adjust your SL based on your own strategy & risk. Let the amateurs get shaken out, we hold firm or reload.
🎯 TARGET: Escape Before The Cops Arrive! 💸
The police barricade is set @98.000. Kindly escape with the stolen money before that! OUR target is a clean getaway @97.500.
🧠 Scalpers? Take partials on the way up. Swingers? Let the layers ride. Investors? You're the mastermind behind the heist. ☕💵
Use a trailing SL to protect your stolen profits as the market moves.
🕵️♂️ THIEF TRADER PROTOCOL:
📊 This heist is backed by technicals, liquidity grabs, and pure audacity.
🗞️ Remember: High-impact news = volatility = adjust your layers accordingly.
⚠️ MONEY HEIST RULES:
✅ Avoid placing new layers during news events 📉
✅ Use risk-adjusted sizing on each limit order
✅ Patience is key – a layered heist requires discipline, not desperation
❤️🔥 Hit that 💥 BOOST BUTTON 💥 if you're riding with the Thief Squad!
Support the robbery. Respect the style. Make money like a true Market Outlaw.
🔔 Follow for the next HEIST PLAN. Big bags only. 💼💰🚀
“The market is a bank, not a casino. Act accordingly.” – Thief Trader
🤑📈🐂 #AUDJPY #ForexHeist #ThiefTrader #LayeredEntry #LimitOrders #SwingTrading #ForexTrading #RobTheMarket #DayTrading #BankTheProfit

AUD/JPY Ready To Go Up And Give Us 100 Pips , Are You Ready ?Here is my 2H Chart on AUD /JPY , We Have A Clear Breakout and the price closed above my old res and new support and we have a very good bullish Price Action on 1 And 2 Hours T.F Also the price trying to retest the area now and giving a good bullish price action on smaller time frames , , So i see it`s a good chance to buy this pair now and we can targeting from 70 to 150 pips . and if we have a daily closure again below my new res then this idea will not be valid anymore .

audjpy sell signal. Don't forget about stop-loss.
Write in the comments all your questions and instruments analysis of which you want to see.
Friends, push the like button, write a comment, and share with your mates - that would be the best THANK YOU.
P.S. I personally will open entry if the price will show it according to my strategy.
Always make your analysis before a trade

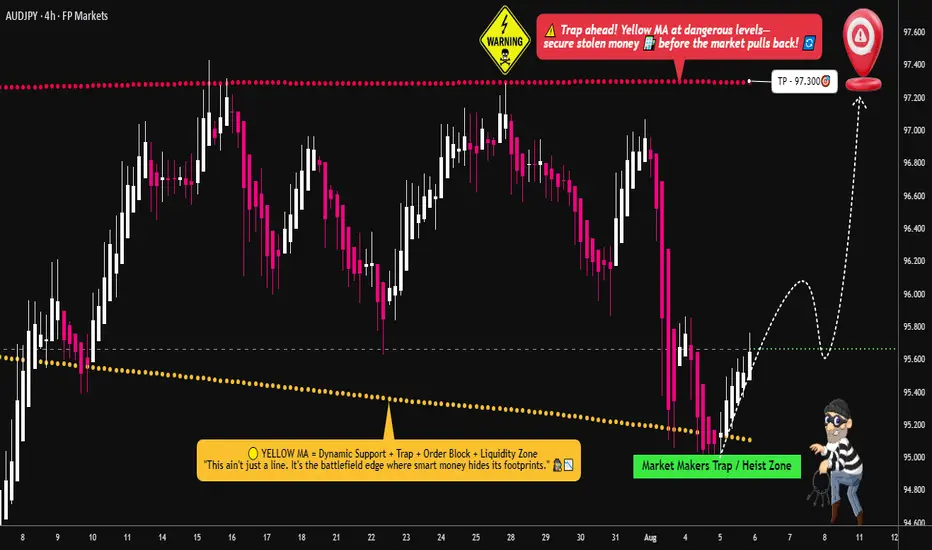
Cracking the Aussie-Yen Vault: Bullish Heist Setup in Progress🔓💸 AUD/JPY "Aussie vs Yen" Forex Bank Heist 💸🔓
🎯 Plan: Bullish Robbery | Targeting 97.300 | Stop Loss: 95.000
💰 Layered Entries | Precision Robbery | No Mercy
🚨🧠 Attention Robbers, Looters & Forex Mercenaries! 🧠🚨
The AUD/JPY vault is open, and Thief Trader is back with a multi-layer LIMIT ENTRY STRATEGY – stacking orders like cash in a briefcase. 💼💷💣
👀 We ain’t sniping one entry – we’re building an army of LIMITS. Every dip? A robbery opportunity.
💥 ENTRY: Any Price is a Good Price 💥
"Aussie Bull" on steroids – grab the loot on any pullback!
Set buy limits across key dips in liquidity pockets, swing zones, or even psychological levels.
Thief-style: Entries aren’t missed, they’re planned.
🛑 STOP LOSS: 95.000 🔐
Locked tight at the institutional panic zone – let them get triggered, we reload with confidence.
Built for multiple orders – size wisely, survive the fakeouts.
🎯 TARGET: 97.300 💸
Targeting the upper vault room, stacked with JPY weakness.
Ride the bullish getaway car all the way to the Tokyo vault rooftop.
🧠 Scalpers? Ride the trend. Swingers? Load your clip. Investors? Sit back and sip that profit. ☕💵
Use trailing SL to protect the bag as price moves in your favor.
🕵️♂️ THIEF TRADER SECRETS:
📊 Backed by technicals, macro juice, and liquidity-sniffing analysis.
🗞️ Don’t forget: News releases = volatility = sniper mode ON.
⚠️ MONEY HEIST PROTOCOL:
✅ Avoid entries during high-impact news 📉
✅ Use risk-adjusted sizing on your orders
✅ Be patient – layering needs discipline, not desperation
❤️🔥 Hit that 💥 BOOST BUTTON 💥 if you're with the Thief Squad!
Support the robbery. Respect the style. Make money like a true Market Outlaw.
🔔 Follow for the next HEIST PLAN. Big bags only. 💼💰🚀
“Markets don’t move randomly – they move for the ones who rob it correctly.” – Thief Trader
🤑📈🐂 #AUDJPY #ForexHeist #ThiefTrader #BankTheMarket #LayeredEntries #ForexTrading #RobTheMarket
Aussie vs Yen: Setup for a Clean Long Robbery💣AUD/JPY Forex Heist: Aussie vs Yen 🔥Master Robbery Plan Unfolded!
🌟Hi! Hola! Ola! Bonjour! Hallo! Marhaba!🌟
Dear Money Makers, Bandits & Chart Pirates 🤑💰💸✈️
It's time to reload your gear and lock in the blueprint. Based on our 🔥Thief Trader Technical + Fundamental Intelligence🔥, we’re all set to ambush the AUD/JPY "Aussie vs Yen" battlefield. This ain’t no casual walk—it’s a full-scale market operation targeting the High Voltage Reversal Trap Zone⚡. The pressure is real: Overbought, Tricky Consolidation, and Bears camping at resistance. Your job? Steal profits before they smell the breakout! 🏆💪💵
🎯 Entry Point — "Let the Heist Begin"
🗝 Entry Level: Wait for the Breakout @ 94.500. When price shatters the Moving Average ceiling—that's your greenlight!
🚀 Execution Choices:
Place Buy Stop above the breakout point
Or, use Buy Limit Orders near recent swing highs/lows on the 15/30-min chart using Layering/DCA tactics (that’s how the real thieves sneak in 🕶️).
🔔 Set an alert to stay sharp—don’t miss the vault crackin’ open!
🛑 Stop Loss — “Cover Your Escape”
🎯 SL Level: Just under the recent swing low on the 3H timeframe (around 95.500)
🚫 Never place the SL before the breakout confirms! Let the move prove itself first.
🧠 SL sizing depends on your capital, lot size, and number of entries stacked. You control the risk, not the other way around!
🎯 Target — "Cash Out or Vanish"
💎 First Take-Profit: 99.000
🚪Optional Escape: Secure the bag early if momentum fades. Better leave rich than be late!
👀 For Scalpers & Swing Robbers Alike
🔍 Scalpers: Only ride the Long wave.
💼 Big pockets? Hit straight entry.
👟 Small capital? Tag in with swing trades and trail that SL like a pro.
🎣 Use a Trailing SL to lock profits as price sprints toward resistance.
📰 The Bigger Picture: Why AUD/JPY?
The pair is pumped by:
📈 Macro Economics
📊 Quant Analysis
📰 COT Reports
📉 Intermarket Correlations
🧠 Sentiment Heatmaps
🔥 Future Price Dynamics
Don’t pull the trigger blind. Read the battlefield before charging in.
⚠️ Thief’s Caution Zone: News Traps Ahead
🛎 News = chaos.
📌 Avoid entering fresh trades during major data drops.
🔐 Use Trailing SLs to protect ongoing plays.
📉 Let the market dance, but you control the music.
💥Hit the Boost Button!💥
If this heist plan pumps your portfolio, smash that boost. That’s how we fund more blueprints, fuel the Thief Gang’s vault, and keep the robbery cycle alive.
🤑💵 Together, let’s rob this market clean—Thief Style.
New plan drops soon. Stay locked. Stay sharp. Stay profitable.
🧠💰🏴☠️
— Thief Trader Out 🐱👤🔓🚀
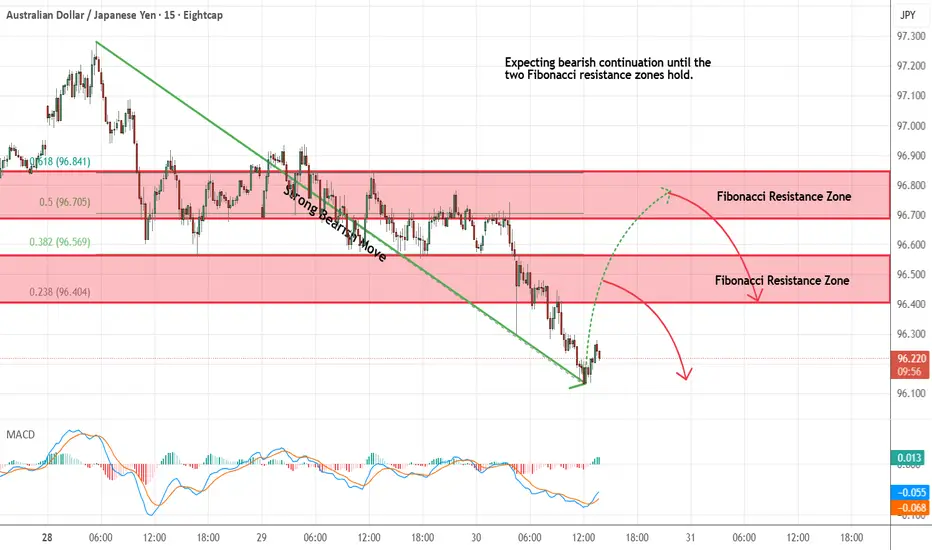
AUDJPY - Looking To Sell Pullbacks In The Short TermM15 - Strong bearish move.
No opposite signs.
Currently it looks like a pullback is happening.
Expecting bearish continuation until the two Fibonacci resistance zones hold.
If you enjoy this idea, don’t forget to LIKE 👍, FOLLOW ✅, SHARE 🙌, and COMMENT ✍! Drop your thoughts and charts below to keep the discussion going. Your support helps keep this content free and reach more people! 🚀
--------------------------------------------------------------------------------------------------------------------
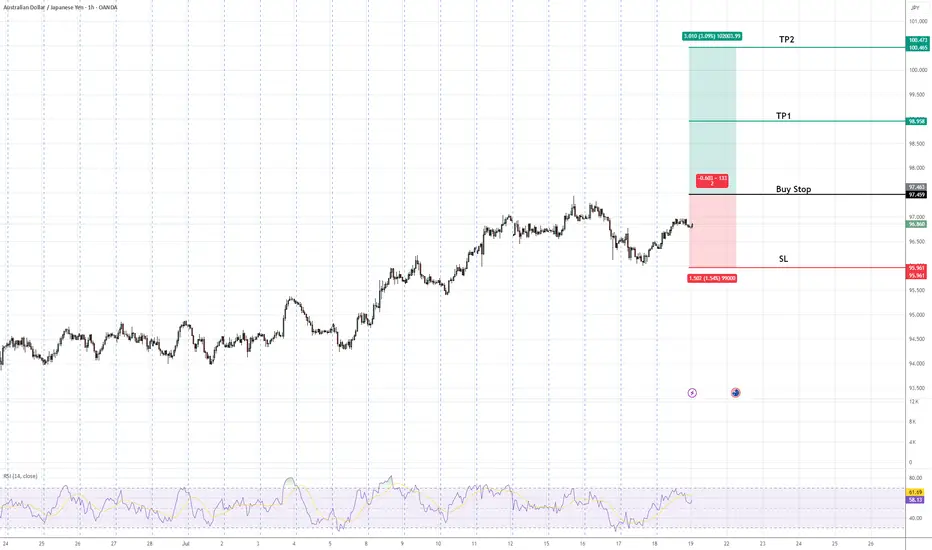
AUDJPY Buy Stop Setup | Trend Continuation in FocusAUDJPY is in an established uptrend, forming higher highs and higher lows. A buy stop is positioned above the recent swing high to confirm bullish continuation. The setup includes a defined stop-loss below the previous higher low to manage risk and two target profit levels (TP1 & TP2) aligned with key resistance zones. This approach favors trend-following traders seeking confirmation of upward momentum before entry.