AUDNZD: One Hour Timeframe, Possible Intraday Buying Setup! Dear traders,
The AUDNZD dropped in the hourly timeframe today following a heavy sell-off in metals like gold and silver. However, we anticipate a bullish trend for AUDNZD to begin next week as the market settles down. Please manage your risk accurately while trading in these current conditions. Good luck and trade safely!
If you enjoy our work, please like and comment on our ideas.
Team Setupsfx_
Audnzdanalysis

AUD/NZD - A QUICK SELL SET UP - 30-01-2026AUD/NZD - G-Money's short version analysis based purely on technical analysis only, no nonsense or "BS". I do totally ignore any fundamental analysis, technical analysis only
AUD/NZD - still kinda on the "move" and continue DOWN...
Who did enter this trade earlier congratulations! Who missed it... See you next time! ;)
Chart is itself explaining. Kept a "KISS" approach all the way ( "Keep It Simple, Stupid") & beginners friendly... ;)
I do hope that nobody ignoring SL ( Stop Loss) ! Without it, It is a fastest way to loose hard earned money...
;)
Trade safe & don't do "gambling". In the end it never pays, not worth it to risk loose all your $...
PS: above technical analysis is done for the community & educational purpose only! It is not a financial advice. Just share my very own insight to it.

AUDNZD Setup: Symmetrical Triangle + Bullish FundamentalsToday, I want to share a long idea on AUDNZD ( OANDA:AUDNZD ) with you.
Let’s walk through the fundamental and technical picture step by step.
From a fundamental perspective, AUDNZD maintains a mild bullish bias.
Australia’s monetary policy remains slightly more restrictive compared to New Zealand’s.
Persistent inflation pressures keep the RBA cautious about rate cuts, while recent inflation data in New Zealand has largely been priced in and has not provided a fresh advantage for the NZD.
Additionally, Australia continues to benefit from relatively stronger growth support driven by the commodity sector, which adds to AUD resilience.
Overall, the fundamental balance currently favors AUD over NZD, making a long AUDNZD position reasonable — though, as always, not without risk.
AUDNZD is currently trading near key support lines.
From a classic technical analysis perspective, the pair is consolidating inside a symmetrical triangle, signaling compression and a potential expansion phase ahead.
From an Elliott Wave perspective, AUDNZD appears to have completed the main wave 4, suggesting the market may be preparing for the next impulsive move.
If price breaks above the upper line of the symmetrical triangle, I expect AUDNZD to push at least toward the 1.16370 NZD as an initial upside target.
First Target: 1.16370 NZD
Second Target: 1.1668 NZD
Stop Loss(SL): 1.1547 NZD
Points may shift as the market evolves
Do you think AUDNZD can resume its upward trend?
💡 Please respect each other's opinions and express agreement or disagreement politely.
📌Australian Dollar/New Zealand Dollar Analysis (AUDNZD), 4-hour time frame.
🛑 Always set a Stop Loss(SL) for every position you open.
✅ This is just my idea; I’d love to see your thoughts too!
🔥 If you find it helpful, please BOOST this post and share it with your friends.

#AUDNZD: Strong Bullish Impulse Will Continue!! AUDNZD is in steady bullish move and it is likely to continue the move since we witness small price correction, now since the correction is completed we can now see price continue the uptrend.
Use risk management and do your own research while trading forex market.
Team Setupsfx_
Can AUD/NZD Extend Its Bullish Structure From Here?AUD/NZD Bullish Continuation | Swing & Day Trade Opportunity
📊 TRADINGVIEW IDEA DESCRIPTION
🏦 Asset Overview
AUD/NZD – “AUSSIE VS KIWI DOLLAR”
Forex Market Trade Opportunity Guide
⏳ Timeframe: Swing / Day Trade
📈 Market Bias
🟢 Bullish Plan Active
Trend structure remains supportive of upside continuation while pullbacks offer participation zones.
🎯 Entry Strategy
🟢 Entry: YOU CAN ANY PRICE LEVEL ENTRY
➡️ Suitable for both scaling-in and momentum-based traders depending on individual execution style.
🛑 Risk Management
🔴 Stop Loss: This is thief SL @ 194.000
⚠️ Dear Ladies & Gentlemen (Thief OG’s),
Adjust your SL based on your own strategy & risk profile.
I am not recommending using only my SL. Risk control remains your responsibility.
🎯 Profit Objective
🟡 Target Zone: 200.000
📌 Rationale:
Strong resistance zone ahead
Overbought conditions likely near highs
Trap + correction probability increases
➡️ Escape with profits, not greed
⚠️ Note:
I am not recommending using only my TP. You decide when and how to secure profits.
🔗 RELATED PAIRS TO WATCH (CORRELATION MAP)
💱 AUD-Driven Pairs
AUD/USD 💵 → Strength supports AUD/NZD upside
AUD/JPY 💵 → Risk-on sentiment confirmation
AUD/CAD 💵 → Commodity-linked AUD momentum check
💱 NZD-Driven Pairs
NZD/USD 💵 → NZD weakness strengthens AUD/NZD bullish bias
NZD/JPY 💵 → Risk sentiment + carry trade flow insight
📌 Key Correlation Insight
AUD/NZD is a relative strength battle
AUD strength + NZD weakness = bullish acceleration
Divergence between AUD/USD and NZD/USD often leads AUD/NZD moves
🧠 Pro Trading Notes
✔️ Ideal for trend continuation traders
✔️ Works best with price action + structure confirmation
✔️ Always align execution with your risk rules
💬 If this idea adds value, support with a 👍 Like & 💾 Save
📡 Follow for consistent market structure & clean setups
Trade smart. Manage risk. Stay disciplined.

AUD/NZD Rising Structure — Layered Entry Setup Confirmed!🎯 AUD/NZD: The Trans-Tasman Layering Heist 🦘🥝
Market: FOREX | Pair: AUD/NZD (Aussie vs Kiwi Dollar)
Strategy Type: Swing/Day Trade | Bias: BULLISH 🐂
Risk Profile: Medium | Trade Style: Thief Layering Method 🎭
📊 THE SETUP
The Trans-Tasman neighbors are setting up for an interesting bullish move. The Aussie is showing relative strength against the Kiwi, and we're positioning for a tactical upside play using a layered entry approach.
🎯 TRADE PLAN: THE LAYERING HEIST
Entry Strategy: Multi-Layer Limit Orders 🪜
This isn't your standard one-click entry—we're spreading risk across multiple price levels:
Layer 1: 1.13000
Layer 2: 1.13200
Layer 3: 1.13400
Layer 4: 1.13600
You can add more layers based on your account size and risk appetite. The beauty of layering? You average in as price moves, reducing timing risk.
Stop Loss: 1.12800 🛑
⚠️ Risk Disclaimer: This SL is MY level based on MY analysis. YOU control your own risk management. Adjust according to your strategy and account size.
Take Profit Target: 1.15000 🎯
This zone has confluence: strong historical resistance + potential overbought conditions + liquidity trap territory. Take your profits before the crowd does!
⚠️ Profit Disclaimer: This TP is MY target. YOU decide when to bank profits. Scale out, trail stops, or take it all at once—your money, your rules.
🔍 TECHNICAL ANALYSIS
Why This Setup Works:
AUD showing relative strength vs NZD on macro fundamentals
Key support holding at lower levels
Room to run before hitting major resistance cluster at 1.15000
Multi-layer entry reduces timing risk and improves average entry price
Risk-Reward Profile:
With layered entries averaging around 1.13150, we're looking at roughly 1:4 R/R to target, making this an asymmetric opportunity worth watching.
🌏 CORRELATED PAIRS TO WATCH
Keep these pairs on your radar for confluence and confirmation:
Direct Correlations:
OANDA:AUDUSD 💵 - If Aussie is strong globally, it confirms our bias
OANDA:NZDUSD 💵 - Kiwi weakness here supports our long AUD/NZD position
OANDA:AUDCAD 🍁 - Another commodity currency pair showing Aussie strength
Inverse Correlations:
FX:USDJPY 🇯🇵 - Risk-on sentiment helps commodity currencies
Gold ( OANDA:XAUUSD ) 🥇 - Aussie correlates with gold; watch for confirmation
Why These Matter: When AUD/USD rises and NZD/USD lags, AUD/NZD naturally climbs. Cross-check these pairs before executing.
⚡ KEY POINTS TO REMEMBER
1️⃣ Layering = Patience: Don't FOMO into one entry. Let the layers fill as price moves.
2️⃣ Position Sizing: Each layer should be sized so your TOTAL position aligns with your risk model.
3️⃣ This Isn't Set-and-Forget: Monitor correlation pairs and news from RBA and RBNZ.
4️⃣ Know When to Fold: If structure breaks below 1.12800, we were wrong. Exit cleanly.
5️⃣ Scale Out Strategy: Consider taking partial profits at psychological levels like 1.14000.
🎭 ABOUT THE "THIEF STYLE"
The layering method is about being strategic and patient—like a calculated heist, not a smash-and-grab. We're not market makers, but we can think like them by spreading our orders across zones instead of chasing candles.
This approach:
Reduces emotional trading
Improves average entry price
Manages risk across multiple levels
Allows for partial fills in volatile markets
🚀 TRADE MANAGEMENT CHECKLIST
✅ Set all limit orders
✅ Configure stop loss
✅ Set alerts at key levels
✅ Monitor correlated pairs
✅ Review daily before London/NY sessions
✅ Have an exit plan beyond just TP/SL
✨ If you find value in my analysis, a 👍 and 🚀 boost is much appreciated — it helps me share more setups with the community!
#AUDNZD #ForexTrading #SwingTrading #DayTrading #LayeringStrategy #ThiefStyle #AussieVsKiwi #ForexAnalysis #TradingSetup #RiskManagement #PriceAction #ForexSignals #TradingIdeas #CurrencyTrading #ForexStrategy
mrmoney limited AUDNZD trading ideaprice filled our weekly volume imbalance and formed a double bottom causing a bullish momentum

AUDNZD Rally Losing Steam – Watch This Reversal Zone!As we’ve seen, AUDNZD ( OANDA:AUDNZD ) recently began an upward move after forming a Falling Wedge Pattern , and it’s been in an Ascending Channel for about the past 16 days.
Currently, AUDNZD is moving into a Heavy Resistance zone(1.1662 NZD-1.1340 NZD) and a Potential Reversal Zone(PRZ) .
From an Elliott Wave perspective, it seems like AUDNZD is completing the microwave 5 of the main wave 3 . Once it breaks below the lower line of the ascending channel, we can somewhat confirm the end of the main wave 3.
Additionally, we can see a Negative Regular Divergence(RD-) forming between two consecutive peaks.
I expect that in the coming hours, AUDNZD might decline at least to the Support zone(1.1480 NZD-1.1444 NZD) . If it breaks that Support zone, we could see it dropping toward around 1.1353 NZD(Second Target) .
Stop Loss(SL): 1.16403 NZD
Please respect each other's ideas and express them politely if you agree or disagree.
Australian Dollar/New Zealand Dollar Analyze (AUDNZD), 4-hour time frame.
Be sure to follow the updated ideas.
Do not forget to put a Stop loss for your positions (For every position you want to open).
Please follow your strategy and updates; this is just my Idea, and I will gladly see your ideas in this post.
Please do not forget the ✅' like '✅ button 🙏😊 & Share it with your friends; thanks, and Trade safe.

AUDNZD - EXTENDS RALLY AMID HAWKISH RBA TONESymbol - AUDNZD
AUDNZD continues to hold its upward momentum, supported by fundamental divergence between the two economies. The Australian dollar remains strong and has been outperforming the New Zealand dollar since the RBNZ implemented an aggressive 50 basis-point rate cut, while the RBA has stayed on hold due to persistent inflation concerns.
Today’s move is largely driven by the Reserve Bank of Australia’s hawkish tone, which has further strengthened the AUD. The pair has been trending higher without any notable pullbacks or corrections, and several technical indicators now suggest potential exhaustion in the ongoing uptrend.
A possible reversal setup could form if price action begins to show rejection patterns near key resistance zones, offering short-term trading opportunities.
Resistance levels: 1.1485, 1.1500
Support levels: 1.1427, 1.1378
However, keep in mind that if the RBA issues any additional hawkish statements or policy measures, it could further boost AUD strength - potentially driving AUDNZD higher before any meaningful correction takes place.

AUDNZD: Extended Impulse Trend, We are still buying! The price is in a bullish impulse range, and we’re at the end of the final move. It’s unlikely to retrace anytime, and this trend is likely to continue being bullish. Please use accurate risk management.
If you like our work, consider liking and commenting on this idea. It will encourage us to post more such analysis.
Good luck and trade safely!
Team Setupsfx_

AUDNZD - the squeeze will soon end.We have witnessed how this pair has been in a squeeze to the downside for over 2 weeks. The highs have been consistently lower while the bottom (yellow) zone around 1.130 has been firmly holding price above it. This will change soon as price breaks below this zone.
We can trade the break out (below) or wait for a retest; depends on our own trading style and preference. Either way, hopefully this will be a good trade with positive risk/reward.
This is not a trade recommendation; it’s merely my own analysis. Trading carries a high level of risk so carefully managing your capital and risk is important. If you like my idea, please give a “boost” and follow me to get even more.

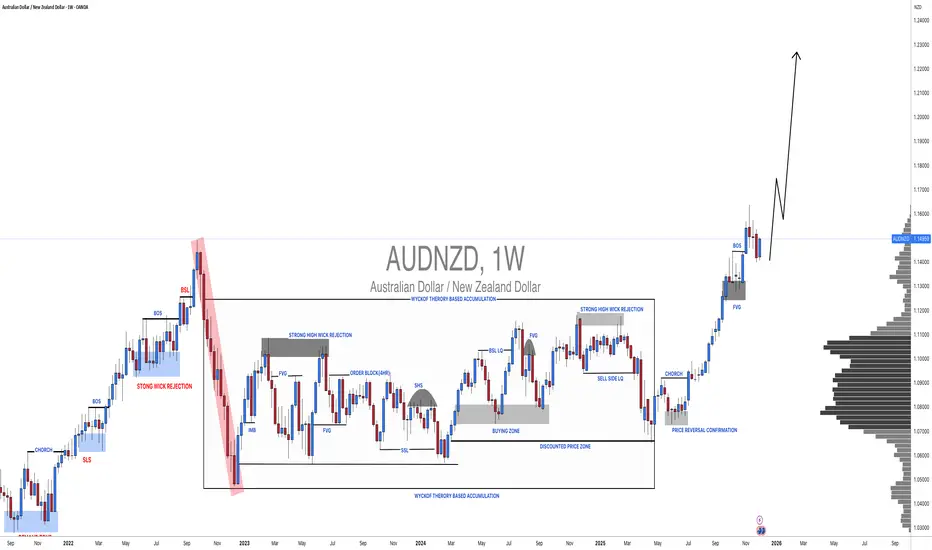
AUDNZD: Triple Confluence Sell –Monthly, Weekly & MACD All AlignPrice has been locked in a long-term range between 1.14 and 1.02 since 2013, with several spikes above and below this zone—but every time, price has ultimately closed back inside the range.
On the Monthly chart, we can see that price broke through the 1.11 resistance in September, which opened the door for a 300-pip rally up toward the major range top at 1.14.
Since reaching this key level, the Weekly candles have shown clear signs of exhaustion — three consecutive topping-tail candles, followed by a spinning-top last week, suggesting momentum is stalling.
Zooming into the 2-Day chart, as explained in the video, we now have a MACD bearish crossover forming right at resistance — a strong confluence with the monthly level and the weekly rejection candles.
This combination makes for a high-probability sell setup.
My Trading Plan
Looking for one final pop toward 1.14 (or slightly below) to initiate shorts.
First target: 1.115 — the previous resistance turned support, which also aligns with the 50% FIB retracement of the current leg up.
If 1.115 breaks: next levels to watch are 1.105, then 1.06, which marks the bottom of the long-term range.
📉 Summary:
All major timeframes are aligning — monthly resistance, weekly exhaustion, and a 2-day MACD crossover.
If we see a rejection near 1.14, this could develop into a powerful swing short back into the middle and potentially the bottom of the multi-year range.
Stop loss will be well above 1.15 and will be based on what price I get in.
Let me know what you think below

Will The Aussie Outperform The Kiwi This Week? (AUD/NZD)Title: AUD/NZD Heist: The Great Aussie-Kiwi Money Grab 🦘🥝💰
Forex Pair: AUD/NZD (Aussie vs. Kiwi)
Bias: Bullish (Swing Trade)
The Master Plan (The "Thief's" Blueprint) 👑
Ladies and Gentlemen, Thief OGs! 👋 Ready to execute a perfectly laid plan? We're looking for a bullish continuation on the AUD/NVD. The strategy is all about stealthy entries using a layered approach—because why enter all at once when you can average in like a pro?
Entry Protocol (The Layered Ambush) 🎯
We're setting multiple BUY LIMIT orders at key levels to build a strong position. Think of it as picking the lock instead of kicking the door down.
Layer 1: 1.11300
Layer 2: 1.11350
Layer 3: 1.11400
Layer 4: 1.11450
Layer 5: 1.11500
(You can add or adjust layers based on your own capital and risk appetite!)
Escape Route (Stop Loss) 🚨
Every good thief needs a clean exit. Place your stop loss below the recent structure to protect your capital.
Suggested SL: 1.11100 (Place after a confirmed breakout above our entry zone).
⚠️ IMPORTANT: This is MY stop loss. You MUST adjust your SL based on your own strategy and risk tolerance. Protect your capital at all costs.
Profit Zone (Take Profit) 🤑
The goal is to escape with the loot before the market cops show up! We're targeting a key resistance confluence.
Primary TP: 1.12000
Why? This area aligns with a moving average resistance, potential overbought conditions, and could be a trap for late bulls. Let's grab the money and run!
✨ Pro Thief Tip: Consider scaling out your position (e.g., 50% at 1.11850, 50% at 1.12000) to secure profits.
Related Pairs to Watch & Why ($) 🔍
AUD/USD ( OANDA:AUDUSD ): The Aussie's direct strength. A strong AUD/USD can fuel this cross.
NZD/USD ( OANDA:NZDUSD ): The Kiwi's direct strength. Weakness here can give AUD/NZD a boost.
USD/CNH ( FX:USDCNH ): A key proxy for Chinese economic health, which heavily influences the Australian Dollar.
**Correlation Key Point: This trade is essentially a bet on the AUD outperforming the NZD. Watch for relative strength/weakness in the two primary pairs ( OANDA:AUDUSD vs. OANDA:NZDUSD ).
Final Disclaimer / Risk Warning ⚠️
This is my personal analysis and not financial advice. I am not a licensed financial advisor. The "Thief" strategy is a metaphor for a layered entry system.
YOU are solely responsible for your own trades.
YOU must decide your own entry, stop loss, and take profit levels based on your risk management.
Trading forex involves significant risk and is not suitable for all investors. You can lose more than your initial investment.
✨ “If you find value in my analysis, a 👍 and 🚀 boost is much appreciated — it helps me share more setups with the community!”
#AUDNZD #Forex #Trading #SwingTrading #DayTrading #TechnicalAnalysis #AUD #NZD #TradingPlan

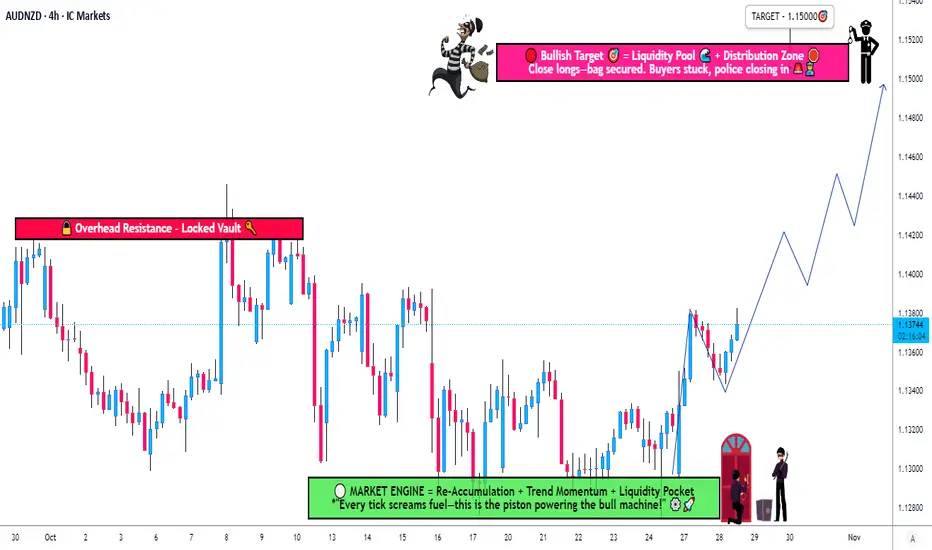
AUD/NZD Heist: Bullish Loot Ready for the Taking?🔥 AUD/NZD "Aussie vs Kiwi" Forex Bank Heist Plan (Swing/Day Trade) 🤑💰
Dear Thief Traders & Money Snatchers, 🐱👤💸
Get ready to crack the vault with our Thief Trading Style! This is the ultimate heist plan for the AUD/NZD, driven by slick technicals and sneaky fundamentals. We’re going BULLISH to steal the loot! 💪🚨
🏦 The Heist Plan: Bullish Breakout
Asset: AUD/NZD "Aussie vs Kiwi" 🌏
Strategy: Layering multiple buy limit orders for maximum loot! 🎯
Timeframe: Swing/Day Trade ⏰
📈 Entry: Crack the Vault Wide Open!
Swipe the loot at these levels using the Thief Layering Strategy! Place multiple buy limit orders:
1.10400 💰
1.10300 💰
1.10200 💰
1.10100 💰
Pro Tip: Add more layers based on your risk appetite and market recon! 🕵️♂️
Enter at any price level if you spot a clean pullback or swing low on a 15M/30M timeframe. The vault’s open, so don’t hesitate! 🚪💥
🛑 Stop Loss: Thief’s Escape Route
Thief SL: Set at 1.09800 (recent swing low on 4H timeframe). 🛡️
OG Advice: Adjust your SL based on your lot size, risk tolerance, and number of layered entries. Stay sharp, thieves! 🔍
🎯 Target: Escape Before the Electric Fence!
Take Profit: 1.11200 ⚡️
Hit the target and escape with the cash before the market’s high-voltage fence zaps you! 💨💰
📰 Why This Heist Works
Bullish Momentum: AUD/NZD is primed for a breakout, backed by solid technicals and fundamentals. 📊
Key Drivers: Check the latest COT Report, Macro Outlook, Sentimental Analysis, and Intermarket Trends for confirmation. Stay ahead of the game! 🗞️
Market Edge: Our layering strategy maximizes entries while dodging traps set by bearish robbers. 🕸️
⚠️ Heist Alerts: News & Risk Management
News Releases: Avoid new trades during high-impact news to dodge volatility spikes. 🚨
Protect the Loot: Use trailing stop-losses to lock in profits and keep your positions safe. 🔒
Stay Agile: Markets move fast—update your plan with real-time data to avoid getting caught! ⏳
💥 Boost the Heist!
Hit the Boost Button to power up our Thief Trading crew! 🚀 Every like and view strengthens our robbery squad. Let’s make bank daily with the slickest trading style in the game! 🤑💪
Stay sneaky, stay sharp, and I’ll catch you at the next heist! 🐱👤🔥

AUDNZD Technical OutlookWhat I See!
AUDNZD is showing a rising wedge formation after an extended move higher from the May swing low. Price is reacting around the 1.1000 psychological level, which overlaps with a daily Fair Value Gap (FVG) and a prior supply zone.
From a structural perspective, a move toward the bullish daily FVG near 1.0850 is a possible short-term development. If this zone holds, the chart could continue to build toward the equal highs around 1.1181.
Alternatively, invalidation of the 1.0850 daily FVG could open the door for a deeper decline, potentially completing the wedge pattern and drawing price toward lower demand areas.
This chart is presented for educational discussion of market structure and technical patterns only. It is not a trade signal or financial advice.
💬 Got questions? You’re welcome to share your thoughts in the comments.

AUDCHFTHE SWING ANALYSIS
Follow for more Simple And accurate swing analysis on Indices, Currency, Commodities.

AUDUSD SWING THE SWING TRADES
Follow for more Simple And accurate swing analysis on Indices, Currency, Commodities.

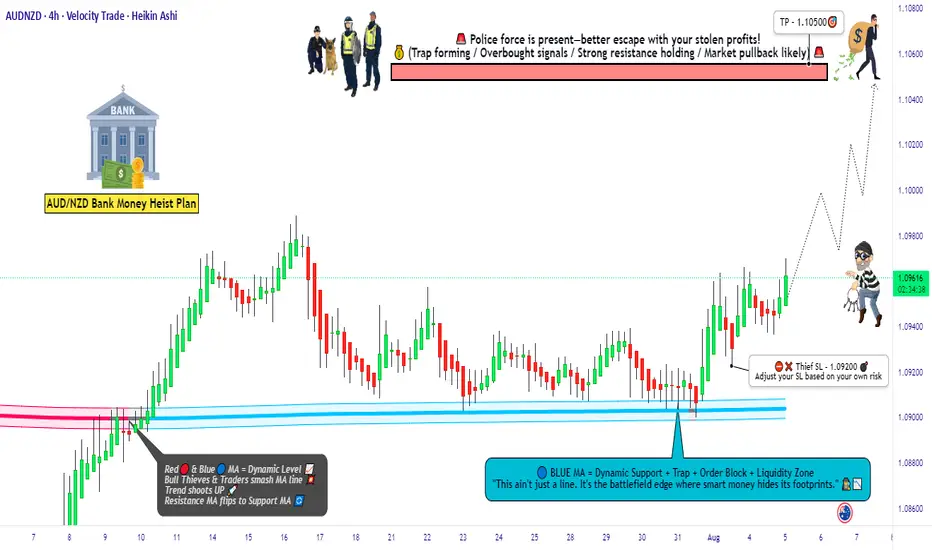
AUD/NZD Heist Loading... Will the Kiwi Surrender to the Aussie?🦘💵 AUD/NZD BULLISH LOOT RAID – THIEF TRADER ENTRY ACTIVE! 🔓🧠
🧭 Asset: AUD/NZD
📊 Plan: Bullish Heist in Progress
🎯 Entry: Thief dives in at any price – using layered limit orders to trap the perfect fill.
🛑 Stop Loss: 1.09200 – Emergency exit if alarms go off 🚨
💰 Target: 1.10500 – Vault full of pips awaiting collection! 💼💸
🕵️♂️ THIEF STRATEGY SNAPSHOT:
The Aussie is loading up the bags and the Kiwi’s guard is down 🐨🆚🥝.
This isn't just a trade—it’s a covert FX raid. Thief is stalking price silently, placing sneaky limit orders in layers—waiting for the market to slip up.
🚪 No fixed door in—every pullback is a crack in the vault.
⚔️ Patience is the blade—entries are stealthy, exits are explosive.
🧠 Using both market structure + sentiment, we sniff out the liquidity stash!
💡 TRADE TIPS FROM THE THIEF'S VAULT:
📉 Layer entries across minor dips (M15-H1 zones) – never chase.
🏃♂️ Price nearing reversal zones? Use tight stops and trail profits like a pro.
📰 Avoid entries during red news – get in before the crowd, not with them.
🧭 This pair respects structure. Don't fight momentum—ride it like a bandit horse.
🔔 THIEF CODE: “We don’t predict—we prepare.”
🎯 Lock in, layer deep, loot fast.
💬 Drop your setup thoughts below 💣
❤️ Like this? Smash that 👍 and join the thief crew!
📌 Save this plan & follow for more stealth market raids.
🕶️ Stay sharp. Stay hidden. Stay profitable.
💼 Next vault breach loading... 👇
📍#ThiefTrader #AUDNZD #LayeredLootPlan #ForexHeist #MarketRaiders
AUDNZD Technical + Fundamental Align for DownsideToday I want to analyze a short position on the AUDNZD ( OANDA:AUDNZD ) pair, first, let's look at it from a fundamental analysis perspective .
Fundamental View on AUDNZD
Key reasons to short AUDNZD:
Australian weakness:
Recent data show weakening consumer sentiment and declining building approvals. The RBA seems hesitant to hike further, putting pressure on the Aussie.
New Zealand resilience:
The RBNZ maintains a relatively hawkish stance. Inflation is still a concern, and the central bank is committed to keeping rates high, supporting NZD strength.
Monetary policy divergence:
The divergence between RBA’s dovish stance and RBNZ’s hawkish approach supports further downside in AUDNZD.
----------------------
Now let's take a look at AUDNZD from a technical analysis perspective on the 4-hour timeframe .
AUDNZD is currently trading in a Heavy Resistance zone(1.0963 NZD-1.0870 NZD) near the upper line of the Range Channel , Potential Reversal Zone(PRZ) and Yearly Pivot Point .
In terms of Elliott Wave theory , AUDNZD appears to be completing microwave B of microwave Y of the main wave 4 .
I expect AUDNZD to drop to at least 1.0904 NZD(First Target) based on the above explanation .
Second Target: 1.0886 NZD
Note: Stop Loss(SL): 1.0963 NZD
Please respect each other's ideas and express them politely if you agree or disagree.
Australian Dollar/New Zealand Dollar Analyze (AUDNZD), 4-hour time frame.
Be sure to follow the updated ideas.
Do not forget to put a Stop loss for your positions (For every position you want to open).
Please follow your strategy and updates; this is just my Idea, and I will gladly see your ideas in this post.
Please do not forget the ✅' like '✅ button 🙏😊 & Share it with your friends; thanks, and Trade safe.

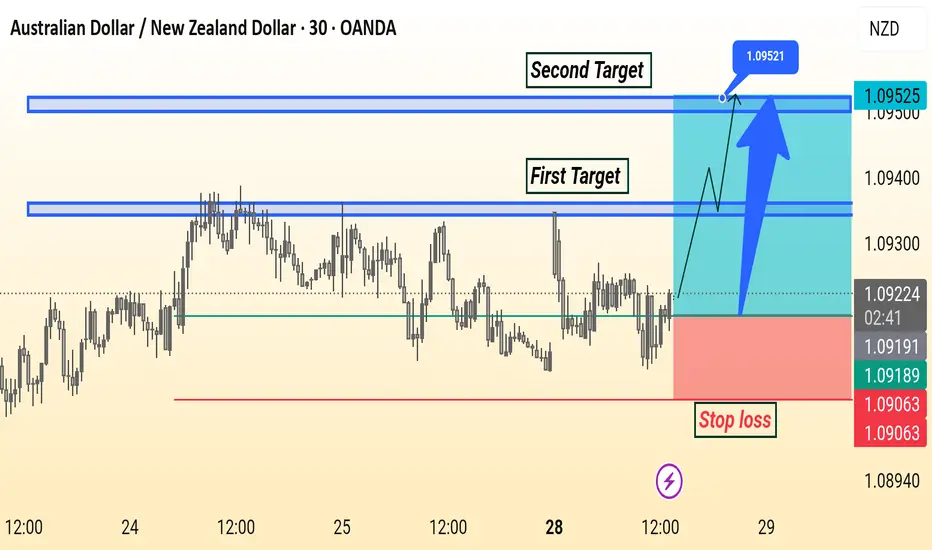
AUD/NZD Analysis is Ready Move Will Be Fly This AUD/NZD 30-minute chart shows a bullish setup with entry around 1.09216. The first target is near 1.09400 and the second target is at 1.09521. A stop loss is placed below support at 1.09063. The analysis suggests a potential upward move after a breakout.
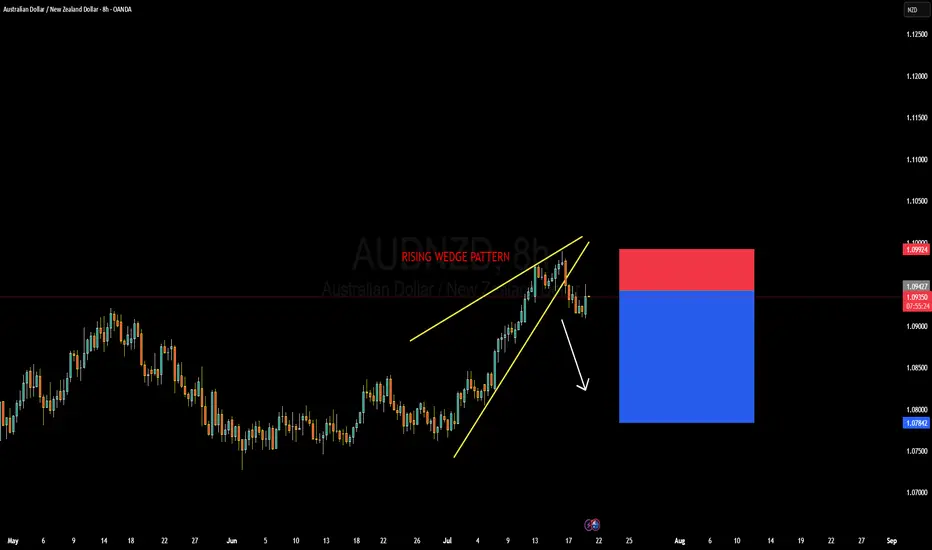
AUDNZD Forming Rising Wedge PatternAUDNZD has formed a textbook rising wedge pattern on the 8H chart and has now broken to the downside, signaling potential bearish continuation. This setup typically indicates a loss of momentum in the prevailing bullish trend, and with the clean structure break now confirmed, the bears seem ready to take control. I’ve already entered short positions from the top edge of the pattern and am currently floating in profit, anticipating further downside toward the 1.0780–1.0800 zone.
From a fundamental perspective, the Australian dollar has been relatively stable but lacks a strong bullish catalyst at this point. The Reserve Bank of Australia is holding a cautious tone amid mixed inflation signals, while New Zealand’s economy is showing signs of potential resilience. The RBNZ remains committed to tighter monetary conditions for longer as inflation continues to hover above their comfort zone, which provides some support to NZD in the near term.
Technically, the break of the lower wedge support is significant. Price failed to sustain higher highs near 1.1000 and quickly retraced, showing bearish rejection. With the RSI diverging and volume fading near the top of the wedge, this was a high-probability reversal zone. As long as price stays below 1.0950, the bias remains bearish, and further sell pressure is expected.
I'm targeting 1.0780 as the next key liquidity level. It aligns with previous structure support and provides a favorable risk-to-reward setup. This setup is a clear example of price-action-driven reversal trading, paired with macroeconomic alignment. I’ll continue to trail stops as price progresses, but so far, AUDNZD is playing out exactly as anticipated.
AUDNZD Breakout: Long Opportunity in Ascending ChannelToday I want to share with you a Long position opportunity in AUDNZD ( OANDA:AUDNZD ).
Let's first take a brief look at the AUDNZD fundamentals .
RBNZ kept rates at 3.25% , signaling likely further cuts in August.
RBA paused at 3.60% , but dovish bias remains; markets expect more easing ahead.
As NZD is more pressured by immediate rate cuts than AUD, the fundamental setup favors a bullish AUDNZD.
Now let's find a long position for AUDNZD using technical analysis .
AUDNZD seems to have managed to break through the Heavy Resistance zone(1.0963 NZD-1.0870 NZD) and is moving near the Support zone(1.0964 NZD-1.0954 NZD) on the 1-hour time frame .
AUDNNZD is also moving in an Ascending Channel .
I expect AUDNZD to rise at least to the Resistance lines , the second target is the Resistance zone(1.103 NZD-1.0993 NZD).
Note: Stop Loss(SL): 1.0944 NZD
Please respect each other's ideas and express them politely if you agree or disagree.
Australian Dollar/New Zealand Dollar Analyze (AUDNZD), 1-hour time frame.
Be sure to follow the updated ideas.
Do not forget to put a Stop loss for your positions (For every position you want to open).
Please follow your strategy and updates; this is just my Idea, and I will gladly see your ideas in this post.
Please do not forget the ✅' like '✅ button 🙏😊 & Share it with your friends; thanks, and Trade safe.

AUDNZD Local Long!
HI,Traders !
#AUDNZD made a bullish
Breakout of the key horizontal
Level of 1.09105 which is now a
Support and the pair is going down
To retest the level from where
We will be expecting a
Further bullish move up !
Comment and subscribe to help us grow !
