AUDUSD Daily Forecast Q3 | W37 | D9 | Y25📊 AUDUSD Daily Forecast Q3 | W37 | D9 | Y25
🔎 AUDUSD Focus:
Watching for a bearish 4H close at our POI. Eyes are on shorts — but only when timing aligns.
Plan: wait for the 4H bearish close → pullback into POI above → 1M break of structure to confirm entry.
Discipline first, execution second.
🔍 Analysis Approach:
I’m applying Smart Money Concepts, focusing on:
Identifying Points of Interest on the Higher Time Frames (HTFs) 🕰️
Using those POIs to define a clear trading range 📐
Refining those zones on Lower Time Frames (LTFs) 🔎
Waiting for a Break of Structure (BoS) for confirmation ✅
This method allows me to stay precise, disciplined, and aligned with the market narrative, rather than chasing price.
💡 My Motto:
"Capital management, discipline, and consistency in your trading edge."
A positive risk-to-reward ratio, paired with a high win rate, is the backbone of any solid trading plan 📈🔐
⚠️ Losses?
They’re part of the mathematical game of trading 🎲
They don’t define you — they’re necessary, they happen, and we move forward 📊➡️
🙏 I appreciate you taking the time to review my Daily Forecast.
Stay sharp, stay consistent, and protect your capital
— FRNGT 🚀
FX:AUDUSD
Audusdlong

AUDUSD Daily Forecast Q3 | W37 | D8 | Y25📊 AUDUSD Daily Forecast Q3 | W37 | D8 | Y25
🔍 Analysis Approach:
I’m applying Smart Money Concepts, focusing on:
Identifying Points of Interest on the Higher Time Frames (HTFs) 🕰️
Using those POIs to define a clear trading range 📐
Refining those zones on Lower Time Frames (LTFs) 🔎
Waiting for a Break of Structure (BoS) for confirmation ✅
This method allows me to stay precise, disciplined, and aligned with the market narrative, rather than chasing price.
💡 My Motto:
"Capital management, discipline, and consistency in your trading edge."
A positive risk-to-reward ratio, paired with a high win rate, is the backbone of any solid trading plan 📈🔐
⚠️ Losses?
They’re part of the mathematical game of trading 🎲
They don’t define you — they’re necessary, they happen, and we move forward 📊➡️
🙏 I appreciate you taking the time to review my Daily Forecast.
Stay sharp, stay consistent, and protect your capital
— FRNGT 🚀

Q3 | W37 | D5 | Y25 AUDUSD ForecastQ3 | W37 | D5 | Y25 AUDUSD Forecast
Moving into Week 37, my highest-probability bias is firmly long. The Week 36 candle closed bullish above the Weekly 50 EMA, signaling strong buying pressure around that level. Trading in line with the higher timeframe, liquidity clearly favors the buy side.
-Continued long breaks of structure confirm directional strength.
- Best long entries will come from the lows of the range, while best short term shorts will be from the highs.
This doesn’t rule out short opportunities, but they should be managed aggressively as they run counter to the overall bias.
Here’s how I plan to execute long positions: on the chart you’ll notice a mix of colors—this is my method of identifying and aligning order blocks and voids across multiple timeframes to build confluence for entries.
High-Probability Zones
Zone 1
Daily 50 EMA
Previous daily wick low
4H & 1H order blocks
4H 50 EMA
Final higher low before last market close
👉 Heavy confluence in this zone. I’ll look for longs from here during London Open, ideally price opens in the LDN session at the low of the Asia range. Adding further confluence to the positon.
Execution: Wait for a 1-min break of structure post London open inside the zone from a refined 15-min order block created in Asia or the 15' order block below the range.
Zone 2
Weekly 50 EMA
Previous week’s wick imbalance
4H & 1H order blocks
👉 Strong confluence but caution is needed: at this point, the daily candle may close below the Daily 50 EMA, reducing long confidence.
Execution: Safer play is to wait for the daily to reclaim above the Daily 50 EMA, then enter on an imbalance fill. Patience required—don’t rush.
Zone 3
Daily, 4H & 1H order blocks
Previous week’s wick imbalance
👉 At these ultimate lows, all EMA confluence is lost. Still, if price reaches this zone later in the week, I’ll be confident in a long. Why? Because the weekly candle is forecasted to close above the Weekly 50 EMA.
Execution: Wait for a clear break of structure in the zone before entering longs.
Key Notes
Zone 1 longs will be managed aggressively (scalps), as price may dip deeper towards Zones 2 or 3 before rejecting higher.
Expect possible fakeouts early in the week, with price dipping below the Weekly 50 EMA before rejecting upward.
Best setups will come from refined 15-min order blocks inside the higher-probability zones.
✅ Summary:
My Week 37 bias remains firmly bullish on AUDUSD. I’ll be focusing on long setups from Zones 1–3, refining with lower-timeframe order blocks and structure breaks. Shorts remain countertrend and will be managed tightly.
FRGNT
FX:AUDUSD

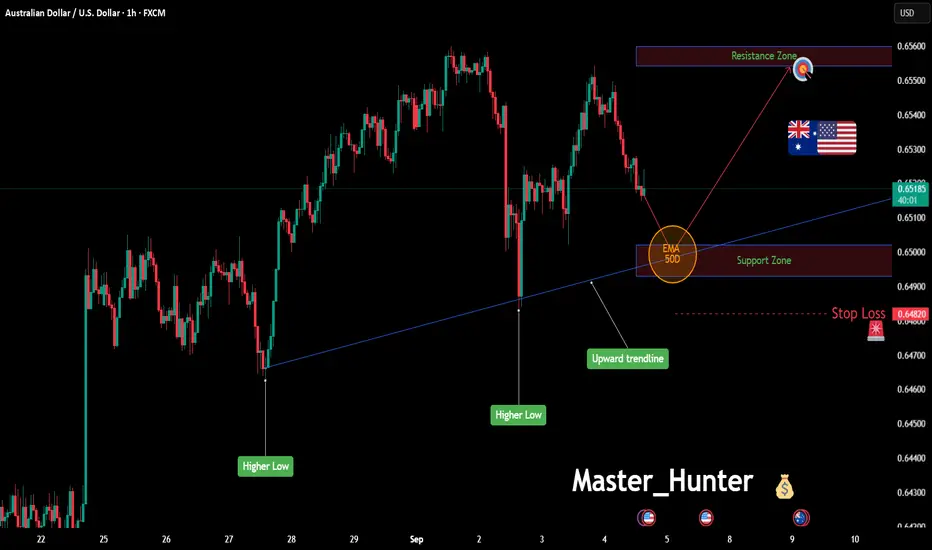
AUD/USD: Bullish Push to 0.65543?As the previous analysis worked exactly as predicted, FX:AUDUSD is setting up for a bullish move on the 1-hour chart , with an entry zone between 0.64930-0.65020 near a key support level.
The target at 0.65543 aligns with the next resistance, offering a solid upside play. Set a stop loss on a close below 0.6482 to manage risk effectively. 🌟
Watch economic data! 💡
📝 Trade Plan:
✅ Entry Zone: 0.64930 – 0.65020 (support area)
❌ Stop Loss: Daily close below 0.6482 to manage risk
🎯 Target: 0.65543 (next resistance)
Ready for this move? Drop your take below! 👇
AUDUSD Daily Forecast -Q3 | W36 | D4 | Y25📅 Q3 | W36 | D4 | Y25
📊 AUDUSD Daily Forecast
🔍 Analysis Approach:
I’m applying Smart Money Concepts, focusing on:
Identifying Points of Interest on the Higher Time Frames (HTFs) 🕰️
Using those POIs to define a clear trading range 📐
Refining those zones on Lower Time Frames (LTFs) 🔎
Waiting for a Break of Structure (BoS) for confirmation ✅
This method allows me to stay precise, disciplined, and aligned with the market narrative, rather than chasing price.
💡 My Motto:
"Capital management, discipline, and consistency in your trading edge."
A positive risk-to-reward ratio, paired with a high win rate, is the backbone of any solid trading plan 📈🔐
⚠️ Losses?
They’re part of the mathematical game of trading 🎲
They don’t define you — they’re necessary, they happen, and we move forward 📊➡️
🙏 I appreciate you taking the time to review my Daily Forecast.
Stay sharp, stay consistent, and protect your capital
— FRNGT 🚀
FX:AUDUSD

AUDUSD Daily Forecast -Q3 | W36 | D3 | Y25 NY FORECAST 📅 Q3 | W36 | D3 | Y25
📊 AUDUSD Daily Forecast
🔍 Analysis Approach:
I’m applying Smart Money Concepts, focusing on:
Identifying Points of Interest on the Higher Time Frames (HTFs) 🕰️
Using those POIs to define a clear trading range 📐
Refining those zones on Lower Time Frames (LTFs) 🔎
Waiting for a Break of Structure (BoS) for confirmation ✅
This method allows me to stay precise, disciplined, and aligned with the market narrative, rather than chasing price.
💡 My Motto:
"Capital management, discipline, and consistency in your trading edge."
A positive risk-to-reward ratio, paired with a high win rate, is the backbone of any solid trading plan 📈🔐
⚠️ Losses?
They’re part of the mathematical game of trading 🎲
They don’t define you — they’re necessary, they happen, and we move forward 📊➡️
🙏 I appreciate you taking the time to review my Daily Forecast.
Stay sharp, stay consistent, and protect your capital
— FRNGT 🚀
FX:AUDUSD

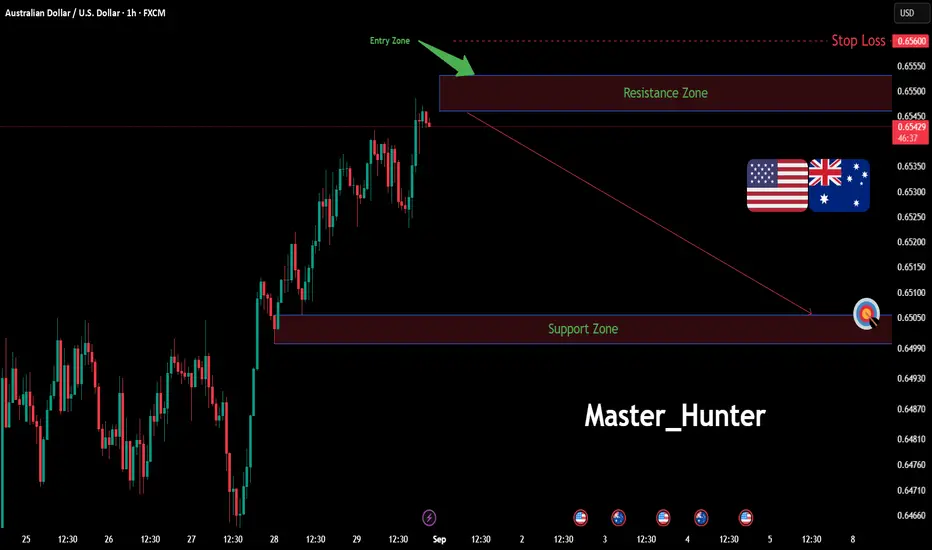
AUD/USD: Bearish Drop to 0.6506? FX:AUDUSD is signaling a bearish move on the 1-hour chart , with an entry zone between 0.6546-0.6553 near a resistance level.
The target at 0.6506 aligns with key support , offering a solid downside play. Set a stop loss at 0.6560 on a close above to manage risk.
This trade boasts an excellent risk-to-reward ratio, making it a compelling opportunity. 🌟 A break below 0.6540 with volume could confirm this drop, driven by USD strength and AUD weakness. Watch U.S. data releases!
💡 Traders can even enter now with proper risk management—adjust position size accordingly. Ready for this move? Drop your take below! 👇
📝 Trade Plan:
✅ Entry Zone: 0.6546 – 0.6553 (resistance area)
❌ Stop Loss: Close above 0.6560 to manage risk
🎯 Target: 0.6506 (key support zone)
Ready for this move? Drop your take below! 👇
AUDUSD Daily Forecast -Q3 | W35 | D2 | Y25
📅 Q3 | W35 | D2 | Y25
📊 AUDUSD Daily Forecast
🔍 Analysis Approach:
I’m applying Smart Money Concepts, focusing on:
Identifying Points of Interest on the Higher Time Frames (HTFs) 🕰️
Using those POIs to define a clear trading range 📐
Refining those zones on Lower Time Frames (LTFs) 🔎
Waiting for a Break of Structure (BoS) for confirmation ✅
This method allows me to stay precise, disciplined, and aligned with the market narrative, rather than chasing price.
💡 My Motto:
"Capital management, discipline, and consistency in your trading edge."
A positive risk-to-reward ratio, paired with a high win rate, is the backbone of any solid trading plan 📈🔐
⚠️ Losses?
They’re part of the mathematical game of trading 🎲
They don’t define you — they’re necessary, they happen, and we move forward 📊➡️
🙏 I appreciate you taking the time to review my Daily Forecast.
Stay sharp, stay consistent, and protect your capital
— FRNGT 🚀
FX:AUDUSD

AUDUSD Daily Chart Analysis -Q3 W35 D1 Y25📊 AUDUSD Daily Chart Analysis
📅 Q3 W35 D1 Y25
Good day, Traders 👋
AUDUSD is currently showing potential for both 🔼 long and 🔽 short positions, with a clearly defined trading range visible on the higher time frames 🕰️.
While the overall bias remains bullish 📈, a break in structure from the highs ⛔—paired with strong confirmation—could open the door to a short position 📉.
I trade and teach using SMC (Smart Money Concepts) 🧠💰, applying a top-down analysis 🔍 to identify high-probability areas. These zones are refined on the lower time frames ⏳, where I wait for a break of structure 🧱 that meets my entry criteria ✅ before executing any trades.
Wishing you the best on your trading journey 🚀📈
— FRGNT 🔐
FX:AUDUSD

AUDUSD Q3 W36 Y25 ForecastHigher Time Frame Overview (Weekly/Da🔎 AUDUSD Q3 W36 Y25 Forecast
🧠 Higher Time Frame Overview (Weekly/Daily)
There hasn’t been much aggressive movement on the higher timeframes, particularly the weekly and daily charts. That said:
The 50 EMA is sitting comfortably in the middle of price action for August, suggesting consolidation or a clear range-bound market.
This kind of environment offers defined trading ranges, making lower timeframe setups more actionable for both swing and intraday traders.
✅ Plan of Action
🔹 Bullish Bias on Higher Time Frames
Week 35 closed with strong bullish price action, pushing the daily candle above the 50EMA.
This provides confirmation for a higher-probability long setup from range lows.
The weekly candle also supports bullish continuation, forming a solid base and momentum structure.
🔔 Bias: Bullish on higher time frames — prefer buying from support levels or imbalance zones.
🔍 Lower Time Frame Strategy (4H / 15M)
🔸 4H Analysis
A clear 4H order block led to the creation of a lower low, identifying a potential point of interest (POI) for a pullback and intraday short.
Target for the short idea includes:
Weekly imbalance zone
Daily 50EMA
Weekly 50EMA
⚠️ Short positions should be considered countertrend, so:
Stop-losses should be moved to breakeven quickly once structural levels are broken.
Use tight risk management and watch for early signs of rejection from key zones.
🔸 15-Minute Confirmation
Looking for a break of structure (BOS) on the 15M chart to confirm bearish intent.
After BOS, wait for a pullback into a 15M POI before entering a continuation short.
FRGNT
FX:AUDUSD

AUDUSD – Plan Ready for Both ScenariosWe're patiently waiting for price to reach our key zone. If we get a valid sell signal, we’ll take the short.
But if the market breaks above this level with strength and gives us a clean pullback, we’re ready to go long.
No guessing. No hoping. Just reacting to what the market shows us.
📌 Discipline over prediction.

AUDUSD Bulls Wake Up | Long Setup After CPI ReportToday I want to share with you my LONG position on AUDUSD ( OANDA:AUDUSD ) on the pretext of the release of the CPI y/y index .
Let's take a look at the AUDUSD from a fundamental and technical perspective .
AUDUSD Fundamental Outlook:
Australia’s CPI surprised to the upside at 2.8% YoY (vs. 2.3% exp., 1.9% prev.), mainly boosted by higher electricity costs after rebates expired. Core inflation (trimmed mean) also rose to 2.7% , reducing the odds of a near-term RBA rate cut.
Short-term : Mildly bullish — strong CPI supports AUD as markets price out aggressive RBA easing.
Medium-term : Neutral-to-slightly bullish — sustainability of inflation is uncertain since part of the rise came from temporary energy factors.
----------------------------------------
Now let's take a look at the AUDUSD chart on the 1-hour time frame .
AUDUSD is approaching the Potential Reversal Zone(PRZ) , the Support zone($0.6450-$0.6437) , the Yearly Pivot Point , and a Heavy Support zone($0.6440-$0.6338) .
In terms of Elliott Wave theory , AUDUSD appears to be completing a corrective wave . The corrective wave on the 1-hour time frame is most likely an Expanding Flat(ABC/3-3-5) .
I expect AUDUSD to start rising to at least $0.6490 .
Second Target: $0.6514
Stop Loss(SL): $0.6425(Worst)
Please respect each other's ideas and express them politely if you agree or disagree.
Australian Dollar/U.S.Dollar Analyze (AUDUSD), 1-hour time frame.
Be sure to follow the updated ideas.
Do not forget to put a Stop loss for your positions (For every position you want to open).
Please follow your strategy and updates; this is just my Idea, and I will gladly see your ideas in this post.
Please do not forget the ✅' like '✅ button 🙏😊 & Share it with your friends; thanks, and Trade safe.

AUD/USD LONG IDEAAUD/USD is testing a strong resistance around 0.6520 that has capped price for months. A breakout looks imminent, and if confirmed, it could open the door for a strong bullish rally towards 0.6650 and beyond.

AUDUSD - LongAUDUSD – BUY Setup
📊 H4 Analysis by Nii_Billions
🔹 Outlook: BULLISH
Using multiple timeframe confirmation for direction.
Strategy blends technicals, fundamentals, and sentiment.
Entry, SL, and TP structured with risk management in mind.
🟢 Educational purposes only 🟢
❤️ Like & comment if this helps your trading journey.
👉 Follow for more swing trade ideas.

AUDUSD Breakout Setup: Ready for Lift-Off!Hey Guys,
I’ve analyzed the AUDUSD pair for you. If the 0.65245 level breaks to the upside, my target will be 0.65416.
If it doesn’t break, I’ll be looking to buy around 0.65047 or 0.64954.
Either way, my final target remains 0.65416.
In this analysis, I’ve highlighted two key levels and shared my target. I’m planning to buy from these zones.
Every single like from you is my biggest source of motivation to keep sharing these analyses. Huge thanks to everyone who supports by liking!

AUDUSD Continues the UP Move ??!!After touching strong downs on every larger time frame, AUDUSD Continues to catch the Bullish Momentum. Check your support and resistances and open positions accordingly. Wait for Price Again and strong solid breakouts to enter the market.
Disclaimer:
The content presented in this IMAGE is intended solely for educational and informational purposes. It does not constitute financial, investment, or trading advice.
Trading foreign exchange (Forex) on margin involves a high level of risk and may not be suitable for all investors. The use of leverage can work both for and against you. Before deciding to participate in the Forex market, you should carefully consider your investment objectives, level of experience, and risk tolerance.
There is a possibility that you may incur a loss of some or all of your initial investment, and therefore, you should not invest money that you cannot afford to lose. Be fully aware of all the risks associated with foreign exchange trading, and seek advice from a licensed and independent financial advisor if you have any doubts.
Past performance is not indicative of future results. Always trade responsibly.

Ready for the Aussie Heist? Is This the Perfect Entry?🚨💰 - "The Aussie Vault Raid: Bullish Robbery in Progress!" 💰🚨
AUD/USD Forex Trade Idea (Thief Style Swing/Day Plan)
📈🔥 Designed for Thief Traders, Market Robbers & Money Makers Worldwide 🤑🐱👤💸
🌍 Hello Global Robbers!
🌟 Hola! Ola! Bonjour! Hallo! Salaam! Konnichiwa! 🌟
Welcome to another bold heist plan from the Thief Trading Crew. This one’s a high-stakes raid on the AUD/USD — "The Aussie" — using our signature Thief Trading Style, combining raw technical setups with real macro/fundamental edge. We're eyeing the Bullish Vault Breakout, so tighten up your gloves — it’s time to rob smart, not hard.
🔓💸 ENTRY PLAN – “The Vault is Unlocked!”
Grab the bullish loot at any valid price zone — but here’s how real thieves move:
📍 Recommended Entry Style:
Use Buy Limit Orders near local swing lows, demand zones, or key pullback entries on the 15m to 30m chart.
Execute DCA (Dollar Cost Averaging) / Layered Orders for more precision.
Align with your MA lines & candle structures for max confirmation.
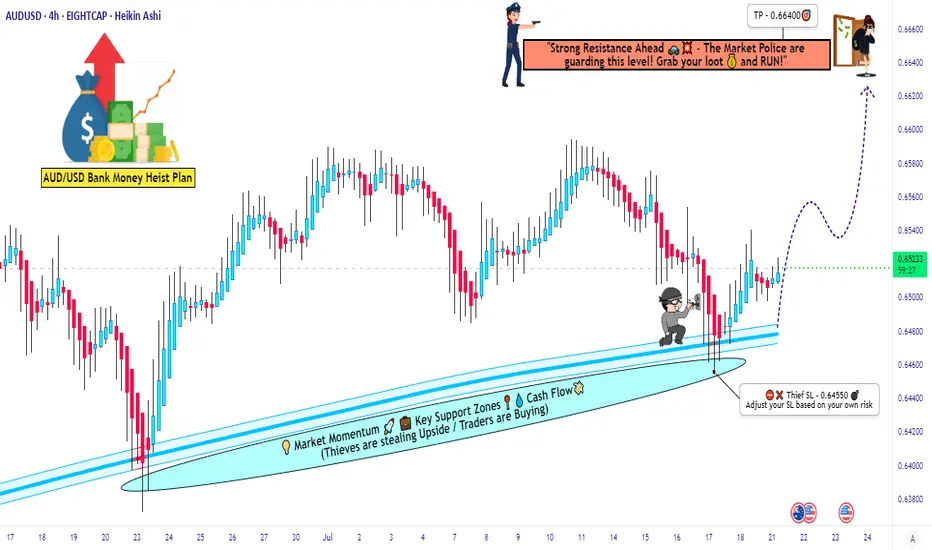
🛑 STOP LOSS – “Escape Route Secured”
📍 SL hidden beneath recent swing lows below MA (on 4H):
🎯 Suggested Level: 0.64550
💡 Custom-fit your SL based on:
Trade size
Number of active positions
Account risk strategy
🎯 PROFIT TARGET – “Cash Out Before the Cops Show!”
🏴☠️ Take-Profit Zone: 0.66400
This is our bullish breakout reward zone — a high-value zone where profit meets safety.
🔍 MARKET OUTLOOK – "Cops Are Watching, but We're Ahead..."
📈 The AUD/USD market is flashing bullish momentum, supported by:
✅ Risk sentiment flow
✅ US Dollar weakness and rate expectations
✅ Intermarket signals from commodities (Gold/Iron)
✅ Positive macro positioning from smart money (via COT)
✅ Technical demand forming reversal patterns from oversold zones
📎 For a deeper breakdown —
📰 Fundamentals | COT Reports | Sentiment | Intermarket Analysis — Check Klick 🔗
⚠️ THIEF ALERT – “Avoid Sirens. Watch the News.”
Stay out of trouble by following these protocols during major news events:
🚫 Don’t enter trades blindly before/after big news
📍 Use trailing stops to protect gains
🔄 Adjust SL/TP if price nears breakout points during volatility
💥 SUPPORT THE CREW – “Smash That Boost Button!”
Love the plan? Then Boost this chart to show love for the Thief Trading Movement.
Every like, comment, and boost adds power to our robbery network across the globe. 🌍❤️💰
⚖️ DISCLAIMER – “Not Financial Advice, Just Thief Vibes”
📌 This analysis is for educational and entertainment purposes only.
📌 Trade at your own risk and always do your own analysis.
📌 Market moves fast — stay sharp, stay stealthy.
**🎭 See you at the next heist.
Until then, trade rich. Rob wise.
Thief Trader out. 🐱👤💰📉📈**
AUDUSD Bullish Bias!
HI,Traders !
#AUDUSD is trading in a
Local uptrend and the
Pair made a retest of the
Horizontal support of 0.64796
And we are already seeing
A bullish rebound so we
Will be expecting a further
Bullish move up !
Comment and subscribe to help us grow !

AUD/USD Pullback or Trap? Key Level in FocusPrice has slipped below the rising channel and is now pulling back to retest the breakdown area. This retest could decide the next move.
If buyers fail to step in here, and price gets rejected again, it may signal the start of a deeper correction. However, reclaiming the channel could flip the bias back to bullish.

AUDUSD(20250807)Today's AnalysisMarket News:
Federal Reserve Chairman Neel Kashkari: A rate cut may be appropriate in the short term, and two rate cuts this year are reasonable. Trump: The new Fed governor will likely be temporary, and the appointment will be announced within 2-3 days.
Technical Analysis:
Today's Buy/Sell Levels:
0.6489
Support and Resistance Levels:
0.6538
0.6520
0.6508
0.6470
0.6458
0.6440
Trading Strategy:
If the price breaks above 0.6508, consider a buy entry, with the first target at 0.6520. If the price breaks below 0.6489, consider a sell entry, with the first target at 0.6470

Ready for the Aussie Heist? Is This the Perfect Entry?🚨💰 - "The Aussie Vault Raid: Bullish Robbery in Progress!" 💰🚨
AUD/USD Forex Trade Idea (Thief Style Swing/Day Plan)
📈🔥 Designed for Thief Traders, Market Robbers & Money Makers Worldwide 🤑🐱👤💸
🌍 Hello Global Robbers!
🌟 Hola! Ola! Bonjour! Hallo! Salaam! Konnichiwa! 🌟
Welcome to another bold heist plan from the Thief Trading Crew. This one’s a high-stakes raid on the AUD/USD — "The Aussie" — using our signature Thief Trading Style, combining raw technical setups with real macro/fundamental edge. We're eyeing the Bullish Vault Breakout, so tighten up your gloves — it’s time to rob smart, not hard.
🔓💸 ENTRY PLAN – “The Vault is Unlocked!”
Grab the bullish loot at any valid price zone — but here’s how real thieves move:
📍 Recommended Entry Style:
Use Buy Limit Orders near local swing lows, demand zones, or key pullback entries on the 15m to 30m chart.
Execute DCA (Dollar Cost Averaging) / Layered Orders for more precision.
Align with your MA lines & candle structures for max confirmation.
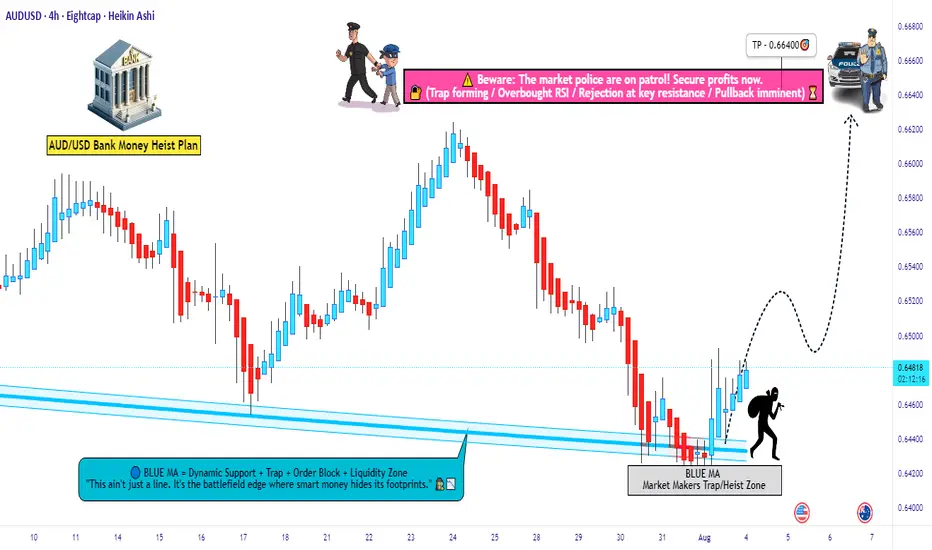
🛑 STOP LOSS – “Escape Route Secured”
📍 SL hidden beneath recent swing lows below MA (on 4H):
🎯 Suggested Level: 0.64170
💡 Custom-fit your SL based on:
Trade size
Number of active positions
Account risk strategy
🎯 PROFIT TARGET – “Cash Out Before the Cops Show!”
🏴☠️ Take-Profit Zone: 0.66400
This is our bullish breakout reward zone — a high-value zone where profit meets safety.
🔍 MARKET OUTLOOK – "Cops Are Watching, but We're Ahead..."
📈 The AUD/USD market is flashing bullish momentum, supported by:
✅ Risk sentiment flow
✅ US Dollar weakness and rate expectations
✅ Intermarket signals from commodities (Gold/Iron)
✅ Positive macro positioning from smart money (via COT)
✅ Technical demand forming reversal patterns from oversold zones
📎 For a deeper breakdown —
📰 Fundamentals | COT Reports | Sentiment | Intermarket Analysis — Check Klick 🔗
⚠️ THIEF ALERT – “Avoid Sirens. Watch the News.”
Stay out of trouble by following these protocols during major news events:
🚫 Don’t enter trades blindly before/after big news
📍 Use trailing stops to protect gains
🔄 Adjust SL/TP if price nears breakout points during volatility
💥 SUPPORT THE CREW – “Smash That Boost Button!”
Love the plan? Then Boost this chart to show love for the Thief Trading Movement.
Every like, comment, and boost adds power to our robbery network across the globe. 🌍❤️💰
⚖️ DISCLAIMER – “Not Financial Advice, Just Thief Vibes”
📌 This analysis is for educational and entertainment purposes only.
📌 Trade at your own risk and always do your own analysis.
📌 Market moves fast — stay sharp, stay stealthy.
**🎭 See you at the next heist.
Until then, trade rich. Rob wise.
Thief Trader out. 🐱👤💰📉📈**
AUDUSD – DAILY FORECAST Q3 | W31 | D29 | Y25📊 AUDUSD – DAILY FORECAST
Q3 | W31 | D29 | Y25
Daily Forecast 🔍📅
Here’s a short diagnosis of the current chart setup 🧠📈
Higher time frame order blocks have been identified — these are our patient points of interest 🎯🧭.
It’s crucial to wait for a confirmed break of structure 🧱✅ before forming a directional bias.
This keeps us disciplined and aligned with what price action is truly telling us.
📈 Risk Management Protocols
🔑 Core principles:
Max 1% risk per trade
Only execute at pre-identified levels
Use alerts, not emotion
Stick to your RR plan — minimum 1:2
🧠 You’re not paid for how many trades you take, you’re paid for how well you manage risk.
🧠 Weekly FRGNT Insight
"Trade what the market gives, not what your ego wants."
Stay mechanical. Stay focused. Let the probabilities work.
FX:AUDUSD

This Chart Screams Breakout – Are You In?AUD/USD – Bullish Setup Brewing
AUD/USD has been respecting this rising channel beautifully, with clean higher highs and higher lows.
Back in April, we saw a classic bear trap, price wicked below support, lured in shorts, and then reversed sharply. That fakeout sparked a strong rally and confirmed demand.
Currently, price is consolidating near the Key Resistance Zone and bouncing off the lower trendline again a sign of strength.
If this pattern continues, we could soon see a breakout above the upper trendline, potentially sending AUD/USD flying toward 0.68+.
Outlook:
As long as the structure holds, dips are for buying. Bulls remain in control.
DYOR, NFA
Thanks for the reading
