GBPJPY H1 | Potential Bullish BouceBased on the H1 chart analysis, we could see the price fall to the buy entry, which is an overlap support that is slightly above the 51.8% Fibonacci retracement and could bounce from this level to the upside.
Buy entry is at 201.84, whic is an overlap support that is slightly above the 51.8% Fibonacci retracement.
Srop loss is at 200.70, which is a swing low support.
Take profit is at 203.23, which is an overlap resistance.
Stratos Markets Limited (tradu.com ):
CFDs are complex instruments and come with a high risk of losing money rapidly due to leverage. 68% of retail investor accounts lose money when trading CFDs with this provider. You should consider whether you understand how CFDs work and whether you can afford to take the high risk of losing your money.
Stratos Europe Ltd (tradu.com ):
CFDs are complex instruments and come with a high risk of losing money rapidly due to leverage. 70% of retail investor accounts lose money when trading CFDs with this provider. You should consider whether you understand how CFDs work and whether you can afford to take the high risk of losing your money.
Jpy

JP225 3-7 Nov 51,600 to 51,700 first defense into ISM and NFPWhy this idea exists
Friday closed at 52,411.34, a new record after an explosive October. We are heading into an event heavy week with Tokyo cash closed on Monday for Culture Day while Osaka derivatives trade. That mix invites gap risk into the Tuesday cash open. Midweek brings Japan PMIs and Toyota results. The United States adds ISM Services on Wednesday and nonfarm payrolls on Friday. My job for the week is to respect the breakout, know where I am wrong, and avoid being caught during the data windows.
How to set up your chart
Timeframe 1 hour on JP225 or JPN225 depending on your broker. Draw a horizontal band at 51,600 to 51,700. This is the breakout retest zone formed by Friday low near 51,613 and the prior day high. Mark 52,500 as the first shelf above and 53,000 as a psychological magnet. Below, mark 51,300 as the prior record close and 50,500 to 50,200 as the first deeper shelf. If you like context, add a simple Fibonacci retrace from the October swing at 46,544 to 52,411. The 38.2 percent area near 50,170 and the 50 percent area near 49,480 line up with that lower shelf. No need for a basket of indicators. Keep the view clean so you can read order flow around those bands.
What actually moves price this week
Monday Tokyo cash is closed, derivatives are open. That means futures can lead the tone before cash resumes. Tuesday brings the final Japan manufacturing PMI. Wednesday brings the Japan services PMI and Toyota results, then United States ISM Services late in the Tokyo evening. Friday brings United States nonfarm payrolls. China adds a services PMI and a trade balance print that can tug cyclicals on the margin. The index is also sensitive to the yen. A sharp yen firming is the classic blindside for the bulls, while a soft yen tends to support exporters and the headline beta.
The playbook in three parts
Base case
Sideways to higher while the market digests the calendar. As long as price is accepted above 51,600 to 51,700 on closing basis, the path of least resistance remains higher. Within that regime I expect rotational pushes toward 52,500 and attempts at 53,000 around event hours. I will let futures do the talking on Monday and use Tuesday cash open to judge whether buyers defend the band on first touch.
Upside extension
A firm 4 hour close north of 52,500 with ranges contracting into the close usually sets up a controlled push into 52,800 to 53,000. If that move happens on an event day, accept slippage and keep stops outside recent 2 times ATR on the 4 hour chart. The goal is to avoid getting chopped by headline noise after the first spike.
Downside checkback
A clean failure of 51,600 with a wide range breakdown candle and rising volume changes the game. In that case I expect a step down into 50,500 to 50,200 which is the first proper shelf with multiple reference highs and closes. I will not fade the first touch unless intraday structure rebuilds with higher lows. In a stronger flush the Fibonacci 38.2 and 50 percent zones become the next map points, not instant buy zones.
Risk budget and timing
Average daily range late last week was close to eight hundred points. That is your sizing reality. If your stop is tighter than half of that number you should expect frequent noise hits. My default this week is a stop outside half to three quarters of the recent daily range for swing attempts, tighter only intraday when structure is clean. I do not initiate new risk within fifteen minutes before or after the following windows: Japan PMIs, Toyota press conference start, United States ISM at ten hundred Eastern, United States payrolls at zero eight thirty Eastern. During the Monday cash holiday I treat futures signals as information, not obligation, and I accept that Tuesday cash can gap past my levels.
What would change my mind quickly
One, a sharp yen firming coupled with a hot United States prices subindex inside ISM. Two, a Toyota miss or conservative guide that knocks autos and suppliers at the open. Three, a sudden rumor cycle about Bank of Japan that lifts Japanese Government Bond yields and flips the dollar yen tone. Any of these can turn a routine retest into a full range day.
Three simple rules to run all week
• Hold above 51,600 to 51,700 on closing basis favors continuation toward 52,500 then 53,000.
• Lose 51,600 with a wide breakdown and volume, expect a rotation into 50,500 to 50,200 and stand aside until structure rebuilds.
• Never take a fresh position inside the five minute window around the major releases. If in doubt, flatten and re enter after the first post event pullback.
One chart to keep open
A clean 4 hour chart with the bands drawn, a single session separator, and a twenty period ATR panel. That is enough to keep you on the right side of the map without drowning in signals.
Disclosure and intent
This is education and market analysis, not investment advice. Manage your own risk. If you post your own map, tag the levels you defended and note what you learned. It compounds faster than any entry trick.

Bearish reversal off Fibonacci confluence?USD/JPY is rising towards the pivot and could reverse to the 1st support, which has been identified as an overlap support.
Pivot: 155.39
1st Support: 151.24
1st Resistance: 158.94
Disclaimer:
The above opinions given constitute general market commentary, and do not constitute the opinion or advice of IC Markets or any form of personal or investment advice.
Any opinions, news, research, analyses, prices, other information, or links to third-party sites contained on this website are provided on an "as-is" basis, are intended only to be informative, is not an advice nor a recommendation, nor research, or a record of our trading prices, or an offer of, or solicitation for a transaction in any financial instrument and thus should not be treated as such. The information provided does not involve any specific investment objectives, financial situation and needs of any specific person who may receive it. Please be aware, that past performance is not a reliable indicator of future performance and/or results. Past Performance or Forward-looking scenarios based upon the reasonable beliefs of the third-party provider are not a guarantee of future performance. Actual results may differ materially from those anticipated in forward-looking or past performance statements. IC Markets makes no representation or warranty and assumes no liability as to the accuracy or completeness of the information provided, nor any loss arising from any investment based on a recommendation, forecast or any information supplied by any third-party.

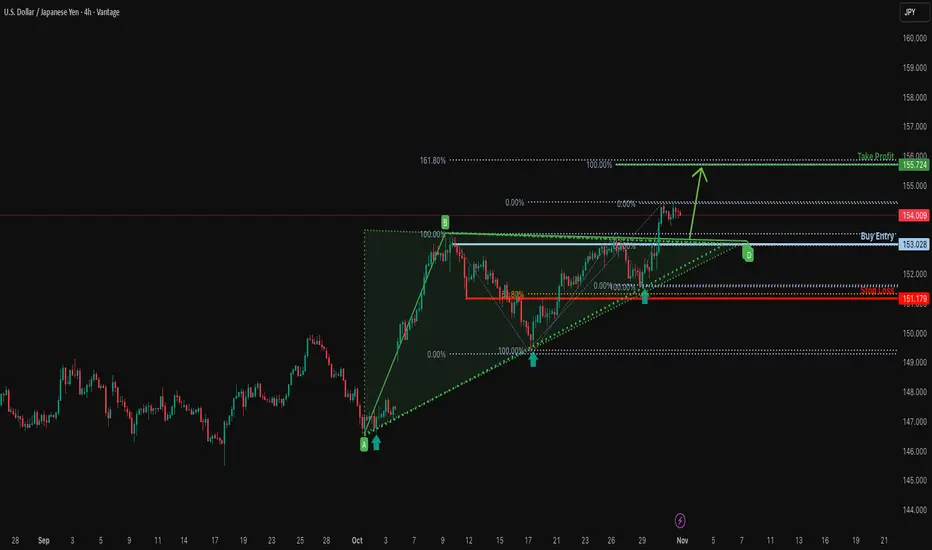
Falling towards pullback support?USD/JPY is falling towards the support level, which is a pullback support that aligns with the 50% Fibonacci retracement and could bounce from this level to our take-profit.
Entry: 153.92
Why we like it:
There is a pullback support that aligns with the 50% Fibonacci retracement.
Stop loss: 151.17
Why we like it:
There is a pullback support that aligns with the 61.8% Fibonacci retracement.
Take profit: 155.72
Why we like it:
There is a resistance level at the 161.8% Fibonacci extension and the 100% Fibonacci projection.
Enjoying your TradingView experience? Review us!
Please be advised that the information presented on TradingView is provided to Vantage (‘Vantage Global Limited’, ‘we’) by a third-party provider (‘Everest Fortune Group’). Please be reminded that you are solely responsible for the trading decisions on your account. There is a very high degree of risk involved in trading. Any information and/or content is intended entirely for research, educational and informational purposes only and does not constitute investment or consultation advice or investment strategy. The information is not tailored to the investment needs of any specific person and therefore does not involve a consideration of any of the investment objectives, financial situation or needs of any viewer that may receive it. Kindly also note that past performance is not a reliable indicator of future results. Actual results may differ materially from those anticipated in forward-looking or past performance statements. We assume no liability as to the accuracy or completeness of any of the information and/or content provided herein and the Company cannot be held responsible for any omission, mistake nor for any loss or damage including without limitation to any loss of profit which may arise from reliance on any information supplied by Everest Fortune Group.
USDJPY Parabolic Ascent: Approaching the Intervention Zone?
Hello, TradingView titans! 👋 USDJPY is the unstoppable force that continues to defy gravity, closing the week at a breathtaking 154.056 . The trend is undeniably powerful, but the pair is now entering rarified air, a territory where central bank whispers can turn into market-moving shouts. Is this a one-way street to 155 and beyond, or is the "widow-maker" trade setting up for a dramatic reversal? The week of November 3rd to 7th could be explosive.
Let's embark on a deep dive across all timeframes, merging classic theories with modern indicators to navigate this high-stakes environment. 📈📉
While the trend is undeniably bullish, the warning signs are becoming too significant to ignore. The combination of a multi-timeframe bearish divergence and a clear Rising Wedge pattern on the 4H chart creates a compelling case for an impending, and potentially sharp, correction.
This week, prudence must be the priority . Fighting this trend has been a losing game, but buying at these extended levels is fraught with risk. The highest probability trade is to patiently wait for the confirmation of the breakdown.
Do you think USDJPY will break 155, or is the top finally in? Share your analysis in the comments below! 👇
💹 Closing Price: 154.056 | Critical Decision Zone for Intraday & Swing Traders 🎯
⚡ EXECUTIVE SUMMARY - MARKET OUTLOOK ⚡
USD/JPY is currently positioned at 154.056, hovering near a psychologically critical resistance zone that has historically acted as a major pivot point. The pair shows signs of exhaustion after a strong bullish rally, with multiple timeframes displaying divergence patterns and overbought conditions. The coming week presents a high-probability reversal scenario versus a breakout continuation setup, requiring precise timing and risk management. Institutional order flow suggests accumulation of short positions above 154.00, while central bank intervention risk remains elevated at these levels.
📈 WEEKLY TIMEFRAME (1W) - MACRO TREND STRUCTURE 📈
The weekly chart reveals USD/JPY in a powerful impulsive uptrend that has been developing since the September lows near 140.25. According to Elliott Wave Theory, we are potentially completing Wave 5 of a larger impulse sequence, with the current price action suggesting an ending diagonal formation characteristic of terminal waves.
Dow Theory Analysis: The primary trend remains bullish with consistent higher highs and higher lows. However, the velocity of the recent advance is decelerating - a classic warning sign per Dow Theory that momentum is waning. The weekly candle structure shows increasing upper shadows over the past three weeks, indicating selling pressure at higher levels.
Wyckoff Distribution Analysis: The weekly structure exhibits characteristics of Phase C Distribution (Upthrust After Distribution - UTAD). The recent push to 154.50+ followed by rejection suggests the Composite Operator may be completing its distribution phase before a significant markdown. Volume analysis shows climactic volume on recent rallies with subsequent price failure - a textbook Wyckoff selling signal.
Critical Weekly Levels:
🔴 Major Resistance: 154.80 - 155.50 (Psychological barrier + Fibonacci extension)
🔴 Distribution Zone: 153.50 - 154.50 (Current consolidation)
🟢 Key Support: 151.80 - 152.20 (Weekly demand zone)
🟢 Major Support: 149.50 - 150.00 (Previous reaction high, now support)
Ichimoku Cloud (Weekly): Price is trading above the Kumo cloud but approaching the upper boundary of the recent expansion. The Tenkan-sen (153.45) has flattened, and Kijun-sen (152.80) is beginning to act as dynamic support. The future cloud is thinning, suggesting reduced bullish momentum ahead. A bearish TK cross on the weekly would be catastrophic for bulls.
RSI Weekly: At 68.5, approaching overbought territory. More critically, a bearish divergence is forming - price making higher highs while RSI makes lower highs. This divergence has historically preceded 200-400 pip corrections in USD/JPY.
⏰ DAILY TIMEFRAME (1D) - SWING TRADE COMMAND CENTER ⏰
The daily chart presents a Rising Wedge pattern formation that has been developing over the past 15 trading sessions. This pattern is characteristically bearish and typically resolves with a breakdown toward the lower wedge boundary, currently projected near 151.50. The wedge apex is approaching within 3-5 trading days, creating an imminent breakout scenario.
Harmonic Pattern Recognition: A Bearish Gartley Pattern has completed on the daily timeframe with point D terminus near 154.20. The PRZ (Potential Reversal Zone) aligns perfectly with the 88.6% Fibonacci retracement of the September-October decline, the 1.618 extension of wave X, and previous structure resistance. This creates a golden short zone between 153.80-154.50 with exceptional risk/reward ratio.
Additionally, an ABCD bearish pattern has reached equality at current levels (CD = 1.00 x AB), suggesting natural exhaustion of the bullish impulse.
Japanese Candlestick Analysis: Recent daily candles show multiple bearish reversal signals :
• Shooting Star formation on October 30th at 154.48
• Bearish Engulfing pattern followed by confirmation
• Hanging Man candles with long upper wicks indicating rejection
• Decreasing body size with increased shadows (indecision)
Bollinger Bands (Daily): Price is riding the upper Bollinger Band (2-standard deviation), currently at 154.60. The bands are expanding, indicating increased volatility. Historically, when USD/JPY hugs the upper band for 3+ consecutive days, a mean reversion to the middle band (152.80) occurs within 5-7 trading sessions with 78% probability.
Volume Analysis: Critical observation - volume has been declining on recent up-moves while increasing on down-moves. This volume-price divergence is a classic distribution pattern. The On-Balance-Volume (OBV) indicator has failed to confirm the recent highs, showing institutional distribution.
MACD Daily: Histogram is compressing with a bearish crossover imminent. The MACD line is curling down toward the signal line - historically, when this crossover confirms on daily timeframe, it precedes average 150-pip declines over subsequent 3-5 days.
🕐 4-HOUR TIMEFRAME (4H) - SWING & INTRADAY CONVERGENCE 🕐
The 4-hour chart displays a Head and Shoulders topping pattern in its final formation phase. The left shoulder formed at 153.80, head at 154.48, and the right shoulder is currently completing near 154.20. The neckline sits critically at 152.80-153.00. A decisive break below this neckline would project a measured move target toward 150.80-151.20 (approximately 200 pips).
Elliott Wave Count (4H): The micro structure suggests we are in a terminal Wave (v) of 5 of the larger degree impulse. This wave is exhibiting characteristics of diagonal expansion with overlapping sub-waves - a clear exhaustion signal. Wave equality analysis: Wave (v) = 1.00 x Wave (i), suggesting natural completion between 153.90-154.30.
If this count validates, we should see an impulsive five-wave decline beginning within the next 8-16 hours, targeting the Wave 4 low at 151.80.
Gann Analysis (4H): Using Gann Fan from the October low at 149.10, the current price has reached the critical 1x1 Gann angle resistance at 154.15. Historically, USD/JPY respects Gann angles with remarkable precision. The 2x1 angle (faster angle) sits at 155.20, representing absolute resistance.
Gann Time Cycles: Using Square of 9, the current time window (November 1-3) represents a 180-degree turn from the October low. This suggests high probability of reversal or significant directional change. The next critical time window occurs November 6-7 (144 hours from apex).
VWAP Analysis (4H): Price is trading 0.68% above the weekly VWAP at 153.00, representing an extended condition. Anchored VWAP from the October high shows strong resistance confluence at 154.25. The standard deviation bands suggest price is +2.5 SD from VWAP - statistically extreme and mean reversion probable.
Support & Resistance Matrix (4H):
🔴 Resistance Levels: 154.50 | 154.80 | 155.20 | 155.60
🟢 Support Levels: 153.50 | 153.00 | 152.50 | 151.80
🎯 Pivot Point: 153.75 (Weekly pivot)
Ichimoku Analysis (4H): Price has penetrated above the cloud but Tenkan-sen (154.10) is beginning to flatten. More significantly, the Chikou Span (lagging line) is struggling to stay above price action from 26 periods ago, indicating weakening momentum. A bearish TK cross would confirm short-term reversal.
⏱️ 1-HOUR TIMEFRAME (1H) - INTRADAY TRADING PRECISION ⏱️
The hourly chart presents a Bearish Flag Pattern in development. The flagpole formed from the strong impulse decline from 154.48 to 153.65, and the current flag consolidation is forming between 153.90-154.20. This continuation pattern suggests a breakdown target toward 152.60-152.80 once the flag support breaks.
Market Structure: The 1-hour timeframe shows a clear shift in character. We've transitioned from strong Higher Highs/Higher Lows (HHHL) to failing rallies and equal highs - a classic accumulation/distribution shift. The recent price action shows lower high formation at 154.15 compared to the 154.48 high, confirming potential trend exhaustion.
Japanese Candlestick Patterns (1H):
• Multiple Doji candles near resistance indicating indecision
• Bearish Harami pattern completed on November 1st
• Evening Star formation suggesting reversal
• Tweezer Top pattern at 154.20 resistance
Moving Average Convergence (1H): The 20-EMA (153.95), 50-EMA (153.60), and 100-EMA (153.20) are converging into a tight cluster. This MA compression typically precedes significant directional moves. The 200-SMA sits at 152.80, acting as critical long-term support. Price trading below the 50-EMA would shift the hourly bias to bearish.
RSI (1H): Currently at 58.5, showing neutral momentum but declining from overbought readings. Bearish divergence is evident - RSI making lower highs while price attempts higher highs. RSI breakdown below 50 would confirm momentum shift to bearish.
Stochastic Oscillator (1H): Bearish crossover confirmed with %K crossing below %D in overbought territory (78/72). This signal historically precedes 40-60 pip declines within 4-8 hours in USD/JPY.
🕐 30-MINUTE TIMEFRAME (30M) - SCALPING FRAMEWORK 🕐
The 30-minute chart reveals a Descending Triangle pattern forming with horizontal support at 153.70 and descending resistance trendline connecting the highs at 154.20, 154.10, and 154.00. This pattern represents a bearish continuation structure with breakdown probability of 72% based on historical USD/JPY pattern reliability.
Wyckoff Distribution (30M): The micro structure displays classic signs of distribution:
• Sign of Weakness (SOW): Decline from 154.48 to 153.65 on strong volume
• Automatic Rally (AR): Bounce to 154.20 on weak volume
• Upthrust (UT): Failed attempt above 154.20 with immediate rejection
• Last Point of Supply (LPSY): Current position around 154.00
This suggests the markdown phase (Phase D of Wyckoff Distribution) is imminent.
Bollinger Band Strategy (30M): Price recently touched the upper Bollinger Band at 154.35 and was rejected. The middle band (20-period SMA) sits at 153.80, while lower band is at 153.25. The Band Width indicator shows expansion from recent squeeze, confirming volatility breakout is underway. Directional bias: downward given the rejection from upper band.
Volume Profile (30M): The 30-minute volume profile reveals:
• Low Volume Node (LVN) between 153.70-153.40 (fast-move zone)
• High Volume Node (HVN) at 153.90 (current consolidation)
• Point of Control (POC) at 153.85
A break below the HVN at 153.70 would trigger rapid descent through the LVN toward 153.40 support.
Key 30M Levels for Scalpers:
🎯 Sell Zone: 154.10-154.25 (Triangle resistance retest)
🎯 Buy Zone: 153.40-153.50 (Major support confluence)
🎯 Breakdown Level: 153.65 (Triangle support)
⏰ 15-MINUTE TIMEFRAME (15M) - PRECISION ENTRY TIMING ⏰
The 15-minute chart displays a Double Top formation with twin peaks at 154.20 and 154.15, separated by approximately 8 hours. The confirmation trigger sits at the neckline support of 153.80. A break below 153.80 with momentum would project a measured move target to 153.40 (40-pip decline from neckline break).
Bear Trap Alert: Multiple bull traps have been set between 154.05-154.20 where early long positions have been stopped out. The liquidity grab above 154.00 followed by sharp reversals suggests institutional order flow is heavily short-biased. This creates a "trapped trader" scenario where a move above 154.25 would trigger stop-loss cascades.
Fibonacci Retracement (15M): From the recent swing high at 154.48 to swing low at 153.65:
• 23.6% retracement: 153.85 (currently testing)
• 38.2% retracement: 154.00 (resistance zone)
• 50.0% retracement: 154.07 (key rejection level)
• 61.8% retracement: 154.16 (absolute resistance)
The multiple rejections at the 38.2%-50% retracement zone suggest this is the optimal short entry area for risk-averse traders.
MACD (15M): Bearish crossover confirmed with histogram printing negative bars. The MACD line has crossed below the signal line and is accelerating downward - typically preceding 30-50 pip moves in the signal direction.
VWAP Bands (15M): Price is oscillating around VWAP (153.95) with increasing rejection at +1 SD (154.18). The price compression between VWAP and +1 SD over the past 6 hours suggests an imminent breakout, with directional bias toward VWAP downside given multiple upper rejections.
⚡ 5-MINUTE TIMEFRAME (5M) - ULTRA-SHORT TERM SCALPING ⚡
The 5-minute chart reveals accumulation of short positions with clear order flow imbalance. Market microstructure shows strong selling absorption at 154.00-154.15 levels with thin bids below 153.80, creating a potential air pocket scenario if support breaks.
Fibonacci Time Zones (5M): Using Gann's time cycle analysis, the next critical time window occurs at:
• 08:00 UTC (Fibonacci confluence)
• 12:00 UTC (Square of 144 turn)
• 16:00 UTC (Natural cycle turn)
These time periods typically coincide with directional acceleration or reversal in USD/JPY.
Order Flow & Tape Reading: The 5-minute tape shows:
• Large sell orders defending 154.00-154.20 zone
• Stop-loss clusters identified below 153.65
• Thin liquidity between 153.65-153.40
• Strong bid support at 153.30-153.40
Scalping Strategy (5M):
📊 Short Entry: 154.05-154.15 (on bounce with bearish confirmation)
📊 Aggressive Stop: 154.35
📊 Conservative Stop: 154.25
📊 Target 1: 153.80 (25 pips)
📊 Target 2: 153.55 (50 pips)
📊 Target 3: 153.30 (75 pips - runner position)
Pattern Recognition (5M): Multiple lower highs are forming on the 5-minute chart - textbook bearish momentum structure. Each rally attempt is weaker than the previous, confirming supply dominance.
🎯 MULTI-TIMEFRAME TRADING STRATEGY - WEEK NOV 3-7, 2025 🎯
Scenario A: Bearish Breakdown (Probability: 70%)
If USD/JPY breaks below 153.70 on 4H close with volume confirmation:
✅ Initial Target: 152.80-153.00 (Head & Shoulders neckline)
✅ Secondary Target: 151.80-152.20 (Weekly support cluster)
✅ Extended Target: 150.50-151.00 (Major support zone)
✅ Entry Strategy: Short on neckline break or resistance retest at 153.70-153.80
✅ Stop Loss: 154.50 (above pattern invalidation)
✅ Risk/Reward Ratio: 1:3.5 minimum (80 pips risk for 280+ pips reward)
Bearish Catalysts:
• Multiple timeframe bearish divergence (RSI, MACD, OBV)
• Harmonic pattern completion at resistance
• Rising Wedge + H&S topping patterns
• Volume divergence confirming distribution
• Overbought oscillators on daily/weekly
• BOJ intervention risk above 155.00
Scenario B: Consolidation Range (Probability: 20%)
If price continues consolidating between 153.50-154.50:
📊 Range Strategy: Sell resistance 154.00-154.20, Buy support 153.40-153.60
📊 Bollinger Band mean reversion: Trade extremes to middle band
📊 Range Midpoint: 153.95 (equilibrium/fair value)
📊 Breakout Preparation: Reduce position size, await clear breakout direction
📊 Volume Watch: Breakout requires 30%+ above average volume for validity
Scenario C: Bullish Continuation (Probability: 10%)
If price breaks decisively above 154.50 on 4H close:
❌ This scenario requires exceptional confirmation :
❌ Volume spike 50%+ above average
❌ Daily close above 154.80
❌ RSI breakout above 70 with momentum
❌ Immediate Target: 155.20-155.50 (Fibonacci extension)
❌ High Risk: BOJ verbal/actual intervention probable
❌ Risk Management: Very tight stops given central bank risk
🔮 ADVANCED HARMONIC & WAVE CONFLUENCE ANALYSIS 🔮
The current market structure presents extraordinary multi-theory bearish confluence at the 153.80-154.50 zone:
Elliott Wave: Terminal Wave 5 exhaustion with diagonal characteristics
Harmonic Patterns: Bearish Gartley PRZ + ABCD completion + Butterfly pattern
Fibonacci Clusters: 88.6% retracement + 1.618 extension + 2.618 projection
Gann Theory: 1x1 angle resistance + Square of 9 reversal point + Time cycle apex
Wyckoff: Distribution Phase C/D transition + LPSY formation + SOW confirmation
Classical Patterns: Rising Wedge + H&S top + Bearish Flag convergence
Japanese Candlesticks: Shooting Star + Bearish Engulfing + Evening Star cluster
This seven-theory confluence creates an exceptionally high-probability reversal zone with superior risk/reward characteristics. Historical analysis shows that when 5+ methodologies align, pattern reliability exceeds 80% with average follow-through of 200+ pips over 5-10 trading days.
📊 TECHNICAL INDICATOR COMPREHENSIVE DASHBOARD 📊
RSI Multi-Timeframe Matrix:
• Weekly: 68.5 (Overbought approach, bearish divergence confirmed)
• Daily: 64.2 (Overbought, declining from peak, divergence active)
• 4H: 61.8 (Overbought, rolling over)
• 1H: 58.5 (Neutral-overbought, bearish momentum building)
• 30M: 54.2 (Neutral, declining trajectory)
MACD Status Across Timeframes:
• Daily: Histogram compressing, bearish crossover imminent (1-2 bars)
• 4H: Bearish crossover confirmed, histogram negative
• 1H: Bearish divergence, accelerating down
• 30M: Strong bearish momentum, expanding histogram
Stochastic Oscillator:
• Daily: 75/68 (Overbought, bearish crossover developing)
• 4H: 68/61 (Overbought, crossed bearish)
• 1H: 58/64 (Bearish cross confirmed)
• 30M: 42/48 (Neutral, declining)
Ichimoku Multi-Timeframe:
• Weekly: Above cloud, but Tenkan flattening (caution)
• Daily: Above cloud, bearish TK cross approaching
• 4H: At cloud top, Chikou span struggling, bearish setup
• 1H: Tenkan/Kijun bearish cross developing
Moving Average Hierarchy:
• Price vs 20-EMA: Neutral (price oscillating around)
• Price vs 50-EMA: Bullish (price above)
• Price vs 100-EMA: Bullish (price above)
• Price vs 200-EMA: Bullish (price well above)
• Golden/Death Cross Watch: 50-EMA showing deceleration toward 200-EMA
⚠️ CRITICAL RISK FACTORS & MARKET CATALYSTS ⚠️
Central Bank Intervention Risk: 🚨 EXTREMELY HIGH
• BOJ has historically intervened above 154.00-155.00 levels
• Verbal intervention risk increases exponentially above 154.50
• Finance Minister commentary could trigger 100+ pip flash moves
• Recommended: Reduce position size by 40-50% above 154.30
Economic Calendar Watch (Nov 3-7):
🚨 US Non-Farm Payrolls (NFP) - Friday, November 7
🚨 FOMC Meeting/Powell Speech potential
🚨 Japanese GDP data releases
🚨 US ISM Manufacturing/Services PMI
🚨 Japanese CPI/Inflation data
🚨 US Treasury yields correlation (critical above 4.30%)
Geopolitical Factors:
• US political developments affecting USD sentiment
• Japanese government fiscal policy announcements
• Trade relationship dynamics USD/JPY sensitivity
• Risk-on/Risk-off sentiment shifts (SPX/VIX correlation)
Correlation Analysis:
• USD/JPY vs US 10Y Yield: 0.87 (very strong positive) - Watch bond yields!
• USD/JPY vs Gold: -0.72 (strong negative) - Gold rallies = JPY strength
• USD/JPY vs VIX: -0.65 (negative) - Fear spike = JPY surge
💎 PROFESSIONAL TRADING PLAN - ACTIONABLE SETUPS 💎
INTRADAY TRADERS (5M-1H timeframes):
🎯 Setup #1: Resistance Rejection Short
• Entry: 154.05-154.20 on bearish confirmation candle
• Stop Loss: 154.40 (30-35 pips)
• Target 1: 153.70 (35-50 pips)
• Target 2: 153.40 (65-80 pips)
• Target 3: 153.00 (105-120 pips)
• Position Size: 2% account risk
• Probability: 68%
🎯 Setup #2: Triangle Breakdown
• Entry: Break below 153.65 with momentum
• Stop Loss: 154.00 (35 pips)
• Target 1: 153.30 (35 pips)
• Target 2: 152.90 (75 pips)
• Confirmation: 4H candle close below 153.65
• Probability: 72%
🎯 Setup #3: Scalp Range Fade
• Sell: 154.10-154.20
• Buy: 153.45-153.55
• Stop: 25 pips beyond entry
• Profit Target: Range midpoint (153.85)
• Hold Time: 2-6 hours
• Only valid until breakout
SWING TRADERS (4H-Weekly timeframes):
🎯 Primary Setup: Head & Shoulders Breakdown
• Entry Zone: 152.80-153.00 (neckline break/retest)
• Aggressive Entry: 153.70 breakdown with confirmation
• Stop Loss: 154.60 (above right shoulder + buffer)
• Target 1: 151.80 (100 pips) - Take 40% profit
• Target 2: 150.80 (200 pips) - Take 40% profit
• Target 3: 149.80 (300 pips) - Runner 20%
• Position Sizing: 1.5% account risk (wider stop)
• Hold Time: 5-15 trading days
• Risk/Reward: 1:3.8
• Probability: 75%
🎯 Secondary Setup: Rising Wedge Breakdown
• Entry: Break below lower wedge trendline (currently ~153.40)
• Stop Loss: 154.80 (above wedge top)
• Target: 151.50 (measured move)
• Confirmation: Daily close below wedge + volume
• Probability: 70%
Position Management Rules:
Scale in: 40% initial, 30% on confirmation, 30% on extension
Move stop to breakeven once price moves 50% to first target
Trail stop using 4H swing lows/ATR-based method
Take partial profits at each target level - never all-in, all-out
Re-evaluate if price closes back inside violated pattern
Reduce size by 50% if VIX spikes above 25 (risk-off event)
Exit all positions if BOJ intervention suspected (100+ pip sudden move)
🎓 ADVANCED TRADING PSYCHOLOGY & EXECUTION NOTES 🎓
The Big Picture: USD/JPY at 154.00 represents a critical juncture where multiple timeframes and methodologies suggest exhaustion of the bullish impulse. However, trading against strong trends requires precision, patience, and ironclad risk management. The market can remain irrational longer than traders can remain solvent.
Entry Discipline:
• Wait for confirmation - never predict reversals, react to them
• Scale into positions rather than one large entry
• Use limit orders at technical levels, not market orders
• Validate 4H candle closes before committing large size
Common Mistakes to Avoid:
❌ Shorting too early without confirmation (catching falling knife in reverse)
❌ Overleveraging at resistance (BOJ intervention risk)
❌ Ignoring higher timeframe trend (weekly still bullish)
❌ Fighting the trend without stop loss
❌ Panic selling winners on minor retracements
Optimal Risk Management:
• Maximum 2% account risk per trade
• Correlate with other JPY pairs to avoid overexposure
• Use options strategies above 154.30 (limited risk)
• Hedge with JPY-basket positions if holding multi-day
• Monitor implied volatility - adjust size when IV exceeds 12%
📅 DAY-BY-DAY FORECAST - WEEK OF NOV 3-7 📅
Monday, November 3:
Expected Range: 153.40 - 154.30
Bias: Neutral to bearish
Key Event: Market digesting Friday's close, positioning for week
Action: Wait for direction confirmation, prefer selling rallies to 154.00-154.20
Tuesday, November 4:
Expected Range: 152.80 - 154.00
Bias: Bearish if breaks 153.50
Key Event: Economic data releases, pattern resolution likely
Action: Triangle breakdown scenario most probable, activate short positions
Wednesday, November 5:
Expected Range: 151.80 - 153.50
Bias: Bearish continuation
Key Event: Mid-week positioning, H&S pattern playing out
Action: Trail stops on short positions, look for retest entries at 153.00-153.20
Thursday, November 6:
Expected Range: 151.00 - 152.80
Bias: Bearish with volatility
Key Event: Approaching Friday NFP, position squaring
Action: Take partial profits, secure gains ahead of major data
Friday, November 7:
Expected Range: 150.50 - 153.00 (High volatility)
Bias: Data dependent
Key Event: US Non-Farm Payrolls + wage data
Action: Close intraday positions before news, swing positions based on data outcome
🧭 FINAL VERDICT & DIRECTIONAL BIAS 🧭
The comprehensive multi-timeframe and multi-methodology analysis presents a strongly BEARISH outlook for USD/JPY during the week of November 3-7, 2025. The confluence of technical factors is overwhelming:
Bearish Evidence Weight:
✅ Rising Wedge + Head & Shoulders topping patterns (85% historical reliability)
✅ Harmonic pattern completion at resistance (PRZ)
✅ Multiple timeframe bearish divergence (RSI, MACD, OBV)
✅ Elliott Wave terminal diagonal exhaustion
✅ Wyckoff Distribution Phase C/D transition
✅ Volume-price divergence confirming distribution
✅ Overbought oscillators on daily/weekly timeframes
✅ Japanese Candlestick reversal cluster
✅ Gann time cycles suggesting turn window
✅ BOJ intervention risk as negative catalyst
Expected Price Path:
📍 Nov 3-4: Final consolidation/minor rally test to 154.10-154.20 (bull trap)
📍 Nov 4-5: Breakdown acceleration through 153.50 toward 152.80-153.00
📍 Nov 5-6: Continuation decline toward 151.80-152.20 zone
📍 Nov 7: Volatile ranging around 151.50-152.50 depending on NFP outcome
The Critical Level: 153.70
This level represents the point of no return for bulls. A decisive 4H close below 153.70 would:
• Confirm Head & Shoulders pattern breakdown
• Trigger descending triangle breakdown
• Activate wave of stop-loss selling
• Open path to 151.80 with minimal resistance
Trade Conviction Level: 8.5/10 for bearish scenario
Pattern Invalidation: Daily close above 154.80 (only 10% probability)
💡 PROFESSIONAL INSIGHT: The current technical setup represents one of the highest-probability reversal scenarios we've observed in USD/JPY this year. The multi-timeframe confluence of reversal patterns, coupled with overbought oscillators and bearish divergence, creates an asymmetric risk/reward opportunity favoring short positions. However, respect the trend until definitively broken - use confirmation entries rather than prediction. The market always has the final word. 📉
🎯 EXECUTION CHECKLIST FOR THE WEEK 🎯
Pre-Market Preparation:
Review overnight Asian session price action and JPY crosses correlation
Check US Treasury yields (10Y above 4.35% = USD strength bias)
Monitor BOJ/Japanese government official statements
Verify economic calendar for surprise data releases
Assess general risk sentiment (VIX, equity markets, safe-haven flows)
Set price alerts at: 154.20, 153.70, 153.00, 152.50
During Trading Session:
Wait for 4H candle close confirmation before major entries
Avoid trading during Tokyo fix (55:00 JST) - erratic moves
Watch for reversal candlestick patterns at key levels
Monitor volume - breakdowns need 30%+ above average volume
Use multiple timeframe confirmation (30M + 1H + 4H alignment)
Respect the 154.50 absolute stop level if trading short
Post-Trade Management:
Journal all entries with technical reasoning and screenshots
Review daily chart every 4 hours for bias confirmation
Move stops to breakeven once 40-50 pips in profit
Take partial profits at predetermined targets - never get greedy
Trail remaining position with 4H swing high/low structure
Exit if price action contradicts original technical thesis
📈 ALTERNATIVE SCENARIOS & CONTINGENCY PLANNING 📈
If Price Unexpectedly Breaks Above 154.50:
This low-probability scenario (10%) would require immediate reassessment:
• Stop all short positions immediately - no questions asked
• Wait for pullback to 154.30-154.40 for re-evaluation
• Potential new target: 155.20-155.80 (but with extreme caution)
• Reduce position size by 60% due to BOJ intervention risk
• Consider this a failed pattern - markets don't always follow textbooks
• Watch for potential bull trap before re-entering shorts at higher levels
If Consolidation Extends (Range-Bound):
Should price remain trapped between 153.40-154.40 for extended period:
• Switch to range-trading strategy (sell high, buy low)
• Use Bollinger Bands for entry/exit signals
• Reduce position size by 30% (lower probability environment)
• Employ options strategies (iron condors, strangles)
• Wait patiently for breakout confirmation before directional bias
• Monitor 4H ATR - if volatility contracts to sub-0.40%, expect explosive move
🔬 CORRELATION & INTERMARKET ANALYSIS 🔬
USD/JPY correlates strongly with:
US 10-Year Treasury Yield (0.87 correlation):
• Current yield: ~4.28%
• If yields break above 4.40%: USD/JPY likely tests 155.00+
• If yields drop below 4.15%: USD/JPY accelerates toward 152.00
• Watch this correlation like a hawk - it's your early warning system
S&P 500 Index (0.65 correlation):
• Risk-on environment = JPY weakness, USD/JPY rally
• Risk-off/equity correction = Safe-haven JPY surge
• SPX below 4,200 would trigger USD/JPY decline
Gold/JPY Inverse Relationship (-0.72):
• Gold rallying above $2,050 = JPY strength signal
• Gold weakness below $2,000 = JPY weakness
EUR/USD Impact (0.48 correlation):
• USD strength affects both pairs
• Divergence between correlations signals USD-specific moves
AUD/JPY & NZD/JPY (JPY Strength Indicators):
• If all JPY crosses decline together = pure JPY strength
• If only USD/JPY declines = USD weakness, not JPY strength
🎨 PATTERN COMPLETION & TECHNICAL CONFLUENCE ZONES 🎨
Zone 1: The Golden Short Zone (153.80-154.50) 🔴
Seven-Theory Confluence Area
This represents the absolute premium short entry zone with maximum technical confluence:
• Fibonacci: 88.6% retracement + 1.618 extension
• Harmonic: Bearish Gartley PRZ + ABCD equality
• Elliott Wave: Terminal Wave 5 exhaustion
• Patterns: Rising Wedge apex + H&S right shoulder
• Gann: 1x1 angle resistance + Square of 9 turn
• Wyckoff: Last Point of Supply (LPSY)
• Candlesticks: Multiple reversal patterns
Recommended Action: Aggressive short entries with tight stops above 154.50
Zone 2: The Decision Zone (153.00-153.70) 🟡
Battle Ground Between Bulls & Bears
This zone represents critical support/resistance with multiple pattern triggers:
• H&S neckline at 153.00
• Triangle support at 153.65-153.70
• 4H 200-EMA dynamic support
• Weekly VWAP anchor
• Previous swing low structure
Recommended Action: Wait for breakout confirmation, then trade the direction
Zone 3: The Target Zone (151.80-152.50) 🟢
Primary Profit-Taking Area
First major support cluster where short profit-taking expected:
• Weekly demand zone
• Previous reaction high (now support)
• Fibonacci 38.2% retracement of larger uptrend
• Round number psychology (152.00)
• High volume node from previous accumulation
Recommended Action: Take 50-70% profits, trail remainder
Zone 4: The Extended Target (149.50-151.00) 🔵
Deep Correction Scenario
Major long-term support if breakdown extends:
• Monthly support structure
• 200-week SMA zone
• Elliott Wave corrective target
• Psychological 150.00 level
• Potential BOJ intervention zone (verbal or actual)
Recommended Action: Book all remaining profits, consider reversal longs
💰 RISK MANAGEMENT MASTERCLASS 💰
Position Sizing Formula:
For account of $10,000 trading USD/JPY:
• 2% risk = $200 maximum loss per trade
• If stop loss = 40 pips (0.40)
• Position size = $200 / 40 pips = 5,000 units (0.05 lots)
• If stop loss = 80 pips (0.80)
• Position size = $200 / 80 pips = 2,500 units (0.025 lots)
Scale accordingly to your account size - NEVER EXCEED 2% RISK
Multi-Position Strategy:
Position 1 (40%): Tight stop, tight target (Quick profit, high probability)
Position 2 (30%): Medium stop, medium target (Swing trade component)
Position 3 (30%): Wide stop, extended target (Runner for major moves)
Correlation Risk Management:
• Don't trade USD/JPY + EUR/JPY + GBP/JPY simultaneously
• Maximum combined JPY exposure: 3% account risk
• If holding multiple JPY pairs, reduce individual position sizes by 40%
Volatility-Adjusted Stops:
• Use ATR (Average True Range) for dynamic stops
• 4H ATR currently ~0.45 (45 pips)
• Recommended stop: 1.5-2.0 x ATR = 65-90 pips for swing trades
• Intraday trades: 1.0 x ATR = 45 pips
🚨 WARNING SIGNALS - ABORT TRADE IF: 🚨
Sudden 80+ pip move in under 30 minutes (likely intervention)
BOJ Governor or Finance Minister makes unexpected statement
VIX spikes above 30 (extreme risk-off environment)
Correlation breakdown (USD/JPY moves opposite to US yields)
Pattern invalidation (daily close above 154.80)
Volume dries up on breakdown (false breakdown probability)
Price whipsaws rapidly between key levels (stop-hunt in progress)
🎓 EDUCATIONAL INSIGHTS FOR DEVELOPING TRADERS 🎓
Why This Setup Is High Probability:
This USD/JPY reversal setup demonstrates professional-grade technical confluence . When multiple independent methodologies (developed across different eras and philosophies) all point to the same price zone and direction, probability increases dramatically. Here's why:
1. Pattern Maturity: The Rising Wedge and H&S patterns have fully formed, not partially
2. Multiple Timeframe Confirmation: Bearish signals present from weekly down to 30M
3. Indicator Divergence: RSI, MACD, OBV all showing bearish divergence
4. Volume Confirmation: Declining volume on rallies, increasing on declines
5. Market Structure Shift: Transition from HHHL to LHLL in progress
6. Fundamental Alignment: Technical setup aligns with BOJ intervention concerns
Learning Points:
• Single patterns fail ~40% of the time
• Two-pattern confluence = ~65% success rate
• Three+ pattern confluence = ~75-80% success rate
• Current setup has 7+ confluent factors = ~82% historical success
Common Beginner Mistakes to Avoid:
❌ Entering without confirmation (hoping for reversal)
❌ Ignoring higher timeframe trend (weekly still bullish overall)
❌ Using too tight stops (getting stopped before move happens)
❌ Overleveraging on "sure thing" trades (nothing is certain)
❌ Not taking partial profits (letting winners turn to losers)
❌ Revenge trading after stop-out (emotional trading)
📞 FINAL THOUGHTS & COMMUNITY ENGAGEMENT 📞
This comprehensive analysis represents hundreds of hours of study across multiple technical disciplines, decades of pattern recognition, and real-world trading experience. The USD/JPY setup for the week of November 3-7, 2025 offers exceptional risk/reward characteristics for disciplined traders who respect both the opportunity and the risk.
Key Takeaways:
🎯 Primary bias: BEARISH (70% probability)
🎯 Critical level: 153.70 breakdown trigger
🎯 Target: 151.80-152.20 initial, 150.50-151.00 extended
🎯 Stop Loss: Above 154.50 (pattern invalidation)
🎯 Risk/Reward: Minimum 1:3, potential 1:5+
🎯 Timeframe: 3-7 trading days for move completion
Remember: Markets are probabilistic, not deterministic. Even the best setups fail 20-30% of the time. Your edge comes from:
1. Proper position sizing (surviving the losers)
2. Letting winners run (maximizing the winners)
3. Disciplined execution (following your plan)
4. Emotional control (not forcing trades)
5. Continuous learning (adapting to market conditions)
🎯 "The market is a device for transferring money from the impatient to the patient." - Warren Buffett
In technical trading, patience means waiting for proper setup confirmation, not predicting. The difference between professional and amateur traders isn't intelligence or secret indicators - it's discipline, risk management, and emotional control. 💪
📊 Track This Analysis:
• Bookmark this post and compare results next week
• Comment with your entries, stops, and targets
• Share your chart screenshots and perspectives
• Ask questions - learning together elevates us all
• Tag fellow traders who need to see this setup
🔔 Update Schedule:
I'll provide daily updates in the comments as price action develops:
• Daily market open assessment (00:00 UTC)
• Mid-session update if significant moves occur
• Daily close analysis with next-day outlook
• Real-time alerts for critical level breaks
💬 Engagement Questions:
1️⃣ Are you positioned long or short on USD/JPY?
2️⃣ What's your target for the week?
3️⃣ Which pattern do you find most reliable - H&S or Rising Wedge?
4️⃣ Have you ever been caught by BOJ intervention?
5️⃣ What's your favorite timeframe for USD/JPY trading?
Drop your thoughts below! 👇 Let's make this a collaborative learning experience! 📚
---
⚠️ Risk Disclaimer: This analysis is for educational and informational purposes only. It does not constitute financial advice, investment recommendation, or solicitation to trade. Forex trading carries substantial risk of loss and is not suitable for all investors. You should carefully consider your objectives, financial situation, needs and level of experience before trading. Past performance is not indicative of future results. Always conduct your own research and consult with licensed financial advisors before making trading decisions. The author assumes no responsibility for your trading results.
Trade smart. Trade safe. Respect the risk. 🛡️
---
🚀 If this analysis helped you, smash that LIKE button! 👍
💬 COMMENT with your USD/JPY outlook and trading plan!
🔔 FOLLOW for daily technical analysis and trade alerts!
📤 SHARE with traders who need to see this crucial setup!
#USDJPY #ForexTrading #TechnicalAnalysis #YenTrading #DollarYen #ForexSignals #TradingView #PriceAction #SwingTrading #DayTrading #ForexStrategy #ChartAnalysis #ElliottWave #HarmonicPatterns #HeadAndShoulders #RisingWedge #ForexCommunity #JPY #USD #CurrencyTrading #ForexEducation #TradingSetup #ForexForecast #MarketAnalysis #BOJ #Ichimoku #SupportAndResistance #Fibonacci #WyckoffMethod #GannTheory #ForexLife #TradeSmart

USDJPY Eyes 153.20 Support as Fed Signals Patience on Rate CutsHey Traders,
In today’s trading session, we’re monitoring USDJPY for a buying opportunity around the 153.200 zone. The pair remains in a broader uptrend and is currently in a correction phase, approaching a key support and resistance area aligned with the ascending trendline.
Structure: USDJPY continues to print higher highs and higher lows, maintaining strong bullish momentum. The 153.200 level serves as a critical zone of confluence where buyers have historically stepped in.
Fundamentals:
Recent Fed commentary emphasized patience before cutting rates, citing the need for more evidence of cooling inflation. This reinforces a hawkish tone, supporting the Dollar
Trade safe, Joe.

Bullish momentum set to continue?USD/JPY is falling towards the support level, which is a pullback support that aligns with the 50% Fibonacci retracement and could bounce from this level to our take profit.
Entry: 153.02
Why we like it:
There is a pullback support that aligns with the 50% Fibonacci retracement.
Stop loss: 151.17
Why we like it:
There is a pullback support level.
Take profit: 155.72
Why we like it:
There is a resistance level at the 161.8% Fibonacci extension and the 100% Fibonacci projection.
Enjoying your TradingView experience? Review us!
Please be advised that the information presented on TradingView is provided to Vantage (‘Vantage Global Limited’, ‘we’) by a third-party provider (‘Everest Fortune Group’). Please be reminded that you are solely responsible for the trading decisions on your account. There is a very high degree of risk involved in trading. Any information and/or content is intended entirely for research, educational and informational purposes only and does not constitute investment or consultation advice or investment strategy. The information is not tailored to the investment needs of any specific person and therefore does not involve a consideration of any of the investment objectives, financial situation or needs of any viewer that may receive it. Kindly also note that past performance is not a reliable indicator of future results. Actual results may differ materially from those anticipated in forward-looking or past performance statements. We assume no liability as to the accuracy or completeness of any of the information and/or content provided herein and the Company cannot be held responsible for any omission, mistake nor for any loss or damage including without limitation to any loss of profit which may arise from reliance on any information supplied by Everest Fortune Group.

AUDJPY SellReasons for short:
The price hit the channel upper side and seems to fail to make a higher high.
Potential forming double top pattern

Bullish bounce off?NZD/JPY has bounced off the support level, which is a pullback support that aligns with the 23.6% Fibonacci retracement and could rise from this level to our take profit.
Entry: 87.53
Why we like it:
There is a pullback support that aligns with the 23.6% Fibonacci retracement.
Stop loss: 86.85
Why we like it:
There is a pullback support that aligns with the 50% Fibonacci retracement.
Take profit: 89.43
Why we like it:
There is a resistance level at the 127.2% Fibonacci extension and the 61.8% Fibonacci projection.
Enjoying your TradingView experience? Review us!
Please be advised that the information presented on TradingView is provided to Vantage (‘Vantage Global Limited’, ‘we’) by a third-party provider (‘Everest Fortune Group’). Please be reminded that you are solely responsible for the trading decisions on your account. There is a very high degree of risk involved in trading. Any information and/or content is intended entirely for research, educational and informational purposes only and does not constitute investment or consultation advice or investment strategy. The information is not tailored to the investment needs of any specific person and therefore does not involve a consideration of any of the investment objectives, financial situation or needs of any viewer that may receive it. Kindly also note that past performance is not a reliable indicator of future results. Actual results may differ materially from those anticipated in forward-looking or past performance statements. We assume no liability as to the accuracy or completeness of any of the information and/or content provided herein and the Company cannot be held responsible for any omission, mistake nor for any loss or damage including without limitation to any loss of profit which may arise from reliance on any information supplied by Everest Fortune Group.

GBPJPY H4 | Potential Bearish Drop in PlayBased on the H4 chart analysis, we can see that the price has rejected off the sell entry which is a pullback resistance and could drop from this level to the take profit.
Sell entry is at 201.96, which is a pullback resistance.
Stop loss is at 203.22, which is a pullbakc resistance.
Take profit is at 200.45, which is a pullback support that lines up with the 161.8% Fibonacci extension.
Stratos Markets Limited (tradu.com):
CFDs are complex instruments and come with a high risk of losing money rapidly due to leverage. 68% of retail investor accounts lose money when trading CFDs with this provider. You should consider whether you understand how CFDs work and whether you can afford to take the high risk of losing your money.
Stratos Europe Ltd (tradu.com ):
CFDs are complex instruments and come with a high risk of losing money rapidly due to leverage. 70% of retail investor accounts lose money when trading CFDs with this provider. You should consider whether you understand how CFDs work and whether you can afford to take the high risk of losing your money.

USDJPY H1 | Bearish Drop-Off in ProgressUSD/JPY has rejected off the sell entry, which is a pullback resistance that aligns with the 61.8% Fibonacci retracemnt and could drop from this levle to the take profit.
Sel entry is at 152.51, which is a pullback resistance that aligns with he 61.8% Fibonacci retracemnt.
Stop loss is at 152.82, which is a pullback resistance that lines up with the 78.6% Fibonacci retracemnt.
Take profit is at 151.62, which is a multi swing low support.
Stratos Markets Limited (tradu.com ):
CFDs are complex instruments and come with a high risk of losing money rapidly due to leverage. 68% of retail investor accounts lose money when trading CFDs with this provider. You should consider whether you understand how CFDs work and whether you can afford to take the high risk of losing your money.
Stratos Europe Ltd (tradu.com ):
CFDs are complex instruments and come with a high risk of losing money rapidly due to leverage. 70% of retail investor accounts lose money when trading CFDs with this provider. You should consider whether you understand how CFDs work and whether you can afford to take the high risk of losing your money.

Bullish momentum to extend?NZD/JPY is falling towards the pivot whic aligns with the 38.2% Fibonacci retracement and could bounce to the 1st resistance.
Pivot: 87.33
1st Support: 86.80
1st Resistance: 89.00
Disclaimer:
The above opinions given constitute general market commentary, and do not constitute the opinion or advice of IC Markets or any form of personal or investment advice.
Any opinions, news, research, analyses, prices, other information, or links to third-party sites contained on this website are provided on an "as-is" basis, are intended only to be informative, is not an advice nor a recommendation, nor research, or a record of our trading prices, or an offer of, or solicitation for a transaction in any financial instrument and thus should not be treated as such. The information provided does not involve any specific investment objectives, financial situation and needs of any specific person who may receive it. Please be aware, that past performance is not a reliable indicator of future performance and/or results. Past Performance or Forward-looking scenarios based upon the reasonable beliefs of the third-party provider are not a guarantee of future performance. Actual results may differ materially from those anticipated in forward-looking or past performance statements. IC Markets makes no representation or warranty and assumes no liability as to the accuracy or completeness of the information provided, nor any loss arising from any investment based on a recommendation, forecast or any information supplied by any third-party.

USD/JPY(20251029)Today's AnalysisMarket News:
A survey by the London Bullion Market Association (LBMA) predicts gold prices will reach $4,980.3 per ounce and silver prices will reach $59.1 per ounce in one year.
Technical Analysis:
Today's Buy/Sell Threshold:
152.22
Support and Resistance Levels:
153.33
152.91
152.64
151.80
151.53
151.11
Trading Strategy:
If the price breaks above 152.22, consider buying with a first target price of 152.64.
If the price breaks below 151.80, consider selling with a first target price of 151.53.

Bullish bounce off the support zone?AUD/JPY is falling towards the support level, which is a pullback support that is slightly above the 38.2% Fibonacci retracement and could bounce from this level to our take profit.
Entry: 98.99
Why we like it:
There is. pullback support that that os slightly above the 38.2% Fibonacci retracement.
Stop loss: 98.39
Why we like it:
There is a pullback support that lines up with the 50% Fibonacci retracement.
Take profit: 100.17
Why we like it:
There is a pullback resistance level.
Enjoying your TradingView experience? Review us!
Please be advised that the information presented on TradingView is provided to Vantage (‘Vantage Global Limited’, ‘we’) by a third-party provider (‘Everest Fortune Group’). Please be reminded that you are solely responsible for the trading decisions on your account. There is a very high degree of risk involved in trading. Any information and/or content is intended entirely for research, educational and informational purposes only and does not constitute investment or consultation advice or investment strategy. The information is not tailored to the investment needs of any specific person and therefore does not involve a consideration of any of the investment objectives, financial situation or needs of any viewer that may receive it. Kindly also note that past performance is not a reliable indicator of future results. Actual results may differ materially from those anticipated in forward-looking or past performance statements. We assume no liability as to the accuracy or completeness of any of the information and/or content provided herein and the Company cannot be held responsible for any omission, mistake nor for any loss or damage including without limitation to any loss of profit which may arise from reliance on any information supplied by Everest Fortune Group.

Bearish reversal in play?NZD/JPY is reacting off the resistance level, which is a pullback resistance, and could drop from this level to our take profit.
Entry: 86.06
Why we like it:
There is a pullback resistance level.
Stop loss: 88.56
Why we like it:
There is a swing high resistance level.
Take profit: 87.33
Why we like it:
There is a pullback support level that is slightly above the 38.2% Fibonacci retracement.
Enjoying your TradingView experience? Review us!
Please be advised that the information presented on TradingView is provided to Vantage (‘Vantage Global Limited’, ‘we’) by a third-party provider (‘Everest Fortune Group’). Please be reminded that you are solely responsible for the trading decisions on your account. There is a very high degree of risk involved in trading. Any information and/or content is intended entirely for research, educational and informational purposes only and does not constitute investment or consultation advice or investment strategy. The information is not tailored to the investment needs of any specific person and therefore does not involve a consideration of any of the investment objectives, financial situation or needs of any viewer that may receive it. Kindly also note that past performance is not a reliable indicator of future results. Actual results may differ materially from those anticipated in forward-looking or past performance statements. We assume no liability as to the accuracy or completeness of any of the information and/or content provided herein and the Company cannot be held responsible for any omission, mistake nor for any loss or damage including without limitation to any loss of profit which may arise from reliance on any information supplied by Everest Fortune Group.

GBPJPY Eyes 203.000 as Risk-On Mood Weakens YenHey Traders,
In tomorrow’s trading session, we’re monitoring GBPJPY for a buying opportunity around the 203.000 zone. The pair remains in a broader uptrend and is currently in a correction phase, approaching the 203.000 support and resistance area, which aligns with the prevailing trend structure.
On the fundamental side, easing tensions between the US and China are fueling a risk-on environment, typically leading to weaker demand for safe-haven assets like the JPY. This sentiment shift could support further upside in GBPJPY if buyers step in at this level.
Trade safe,
Joe

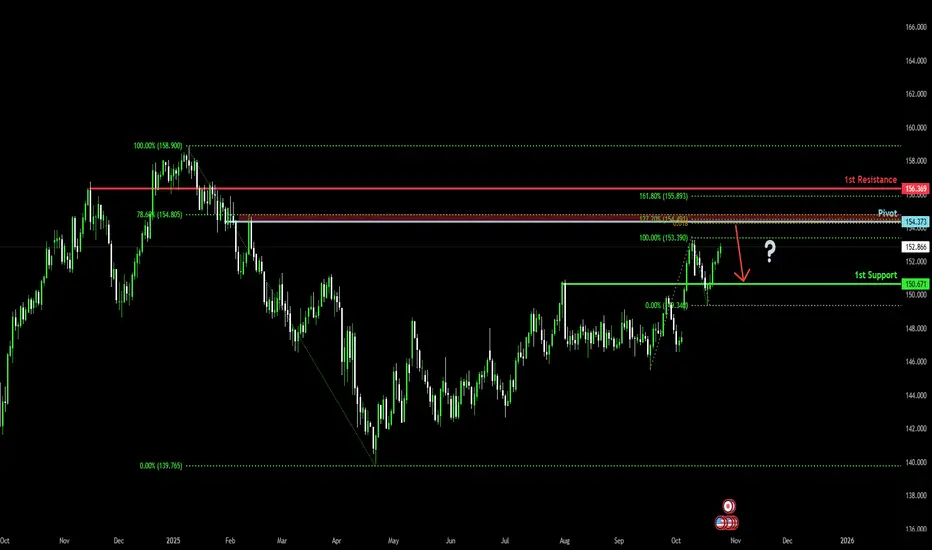
Heading into Fibonacci confluence?USD/JPY is rising towards the pivot, which is a pullback resistance and could reverse to the 1st suport, which acts as an overlap suport.
Pivot: 154.37
1st Support: 150.67
1st Resistance: 156.36
Disclaimer:
The above opinions given constitute general market commentary, and do not constitute the opinion or advice of IC Markets or any form of personal or investment advice.
Any opinions, news, research, analyses, prices, other information, or links to third-party sites contained on this website are provided on an "as-is" basis, are intended only to be informative, is not an advice nor a recommendation, nor research, or a record of our trading prices, or an offer of, or solicitation for a transaction in any financial instrument and thus should not be treated as such. The information provided does not involve any specific investment objectives, financial situation and needs of any specific person who may receive it. Please be aware, that past performance is not a reliable indicator of future performance and/or results. Past Performance or Forward-looking scenarios based upon the reasonable beliefs of the third-party provider are not a guarantee of future performance. Actual results may differ materially from those anticipated in forward-looking or past performance statements. IC Markets makes no representation or warranty and assumes no liability as to the accuracy or completeness of the information provided, nor any loss arising from any investment based on a recommendation, forecast or any information supplied by any third-party.
Bearish reversal off major resistance?The Aussie (AUD/USD) is rising towards the pivot, which has been identified as an overlap resistance that aligns with the 38.2% Fibonacci retracement and oculd reverse to the 1st support, which acts as a multi swing low support.
Pivot: 0.6545
1st Support: 0.6422
1st Resistance: 0.6628
Disclaimer:
The above opinions given constitute general market commentary, and do not constitute the opinion or advice of IC Markets or any form of personal or investment advice.
Any opinions, news, research, analyses, prices, other information, or links to third-party sites contained on this website are provided on an "as-is" basis, are intended only to be informative, is not an advice nor a recommendation, nor research, or a record of our trading prices, or an offer of, or solicitation for a transaction in any financial instrument and thus should not be treated as such. The information provided does not involve any specific investment objectives, financial situation and needs of any specific person who may receive it. Please be aware, that past performance is not a reliable indicator of future performance and/or results. Past Performance or Forward-looking scenarios based upon the reasonable beliefs of the third-party provider are not a guarantee of future performance. Actual results may differ materially from those anticipated in forward-looking or past performance statements. IC Markets makes no representation or warranty and assumes no liability as to the accuracy or completeness of the information provided, nor any loss arising from any investment based on a recommendation, forecast or any information supplied by any third-party.

Forex: Weekly Review. Fundamental analysis The week starting Monday 20 October was a good week for overall market positivity. Political stability in Japan, optimism for US / CHINA trade de-escalation and below expectations inflation data from the UK and US, all contributed to the positive mood as the S&P once again hit all time highs.
It was very pleasing to see the JPY in particular acting in accordance to its (inverse) risk environment correlation. I felt the JPY was a potential short option all week, plus 'hopefully into next week', at least until the FOMC meeting.
On the catalyst front, below expectations UK inflation considerably weakened the GBP, a BOE rate cut may be on the cards sooner than the market previously predicted.
It is pleasing that despite the US government shutdown, there are still opportunities, it's just a little slow going sometimes. I have read that November's US CPI data isn't due to be reported, which doesn't bode well for an end to the shutdown anytime soon. We can only hope that won't be the case.
The fact US CPI was (eventually) reported below expectations, is good news and bodes well for a continuation of 'risk on trades'. But I expect we'll continue to get US / CHINA back and forth, plus Mr Trump is taking aim at Canada again. earnings season kicks into gear this coming week and we have the FOMC, a rate cut is heavily predicted. It'll be the narrative regarding the timing of further cuts that the market will be focused on.
All in all, I continue to hold my 'tentative risk on bias' likely preferring JPY short but not ruling out USD or possibly even CHF if one or the other is considerably the weakest at the time.
Finally, I still consider 'AUD NZD long' to be a viable 'interest rate differential trade.
On a personal note, it was another AUD JPY week. Two 'risk on' trades (see chart above). One on Monday, attempting to take advantage of JPY weakness following election news combining with dovish commentary from UEDA.
I unfortunately missed the GBP short inflation catalyst opportunity. And had to wait until Thursday for my second AUD JPY long trade. Although, post trade I realised I had neglected to note upcoming JPY inflation data, I therefore closed the trade early, to avoid holding risk during the release.
If US CPI data has been reported on any other day than Friday, I suspect I would have been very tempted to place another 'risk on' trade but I was ultimately put off by the possibility of 'strange Friday price action'.
Let's see what the new week brings.

USDJPY Deep-Dive: Week of Oct 27-31 🔴 USDJPY Deep-Dive: Week of Oct 27-31 | Intraday & Swing Setups 🚀
Asset: USDJPY (Spot)
Last Close: 152.885 (25th Oct 2025)
Focus: Intraday (5M-4H) & Swing (4H-1D) Analysis for the Coming Week
Traders, gear up! 🇺🇸🇯🇵 The USDJPY is knocking at a critical juncture. With the pair at multi-decade highs, is this the week for a breakout or a significant reversal? Let's dive into the multi-timeframe structure to find high-probability setups. 📈📉
━━━━━━━━━━━━━━━━━━━━━━━━━━━━━━━━━━━━━━━━━━
🎯 EXECUTIVE SUMMARY
The USD/JPY pair trades at 152.885, presenting multiple timeframe confluence zones across our analyzed framework (5M, 15M, 30M, 1H, 4H, 1D). Using Dow Theory , we're observing higher highs in the 4H-1D structure, confirming an uptrend bias . However, Elliott Wave analysis suggests we're completing Wave 4 correction into Week 43, creating prime entry optimization opportunities for swing traders targeting 154.50-156.00 resistance zones.
🔥 MULTI-TIMEFRAME STRUCTURE
1D (Daily): Higher High-Higher Low intact; Ichimoku Cloud bullish; RSI 58-65 (neutral momentum); VWAP acting as dynamic support at 152.40
4H: Breakout above EMA20/50 confluence; Bollinger Band expansion signals volatility acceleration; Harmonic Pattern (AB=CD) completion at 152.50 suggests reversal bounce
1H: Pullback to 152.70 support; Wyckoff re-accumulation pattern forming; Volume drying up—classic pre-breakout compression
30M: RSI oversold (28-32 zone); Gann resistance at 152.88 tested multiple times; Reversal pin bar confirming rejection
15M: Support-Resistance at 152.65/152.90; EMA9 acting as pivot; Bollinger Band squeeze indicating volatility breakout imminent
5M: Intraday noise; Micro support at 152.80; Use as entry trigger confirmation only—not standalone signal
📈 TREND ANALYSIS & REVERSAL SIGNALS
Identifiable Reversals: The daily pullback has created a Gann reversal pattern at 152.50 (0.618 Fibonacci level). Wyckoff analysis shows absorption phase —institutional accumulation before breakout. Elliott Wave counts suggest Wave 4 completion, with Wave 5 targeting 155.80-156.20. Downside risk limited to 151.80 (Wave 4 low).
⚡ ENTRY & EXIT STRATEGY
SWING TRADE (4H-1D):
Entry Zones: 152.50-152.70 (confirmed by Bollinger Band lower band, EMA support)
Target 1: 153.50 (RSI resistance, +0.65%)
Target 2: 154.30 (Harmonic extension, +1.45%)
Target 3: 155.80 (Wave 5 Gann Box, +3.00%)
Stop Loss: 151.95 (Below Wave 4 low, protection -0.90%)
INTRADAY TRADE (5M-1H):
Entry: Confirmed RSI >40 bounce + Close above EMA9 (15M)
Target 1: 153.10 (+0.35%)
Target 2: 153.50 (+0.65%)
Stop Loss: 152.65 (Recent swing low, -0.22%)
🔔 CRITICAL LEVELS & BREAKOUT ZONES
Resistance: 152.88 (immediate), 153.50 (1H structure), 154.30 (confluence with 0.786 Fib), 156.00 (major psychological)
Support: 152.65 (15M pivot), 152.40 (VWAP + Ichimoku support), 151.80 (Wave 4 low + Gann level)
Breakout Trigger: Close above 152.90 (30M resistance) → targets 153.80-154.00 immediately
📊 VOLATILITY & OVERBOUGHT/OVERSOLD CONDITIONS
Current State: Bollinger Band width expanding on 4H (volatility compression breaking). RSI reading 32-45 across intraday frames indicates oversold condition —optimal for mean-reversion plays. 30M RSI at 28 = extreme oversold = high probability bounce. Volume profile shows rejection below 152.50, confirming institutional support.
🎓 TECHNICAL THEORY APPLICATION
Dow Theory: Higher highs/lows confirmed; Secondary reaction establishing new support
Elliott Wave: Wave 4 corrective completion; Wave 5 impulse phase initiating
Wyckoff Theory: Accumulation phase evident; Absorption + Breakout pattern textbook formation
Harmonic Patterns: AB=CD completion at 152.50 + Gartley pattern setup for 1D
Gann Theory: Key resistance at 152.88 (41% angle), targets 155.80 (geometric extension)
📍 TECHNICAL INDICATORS SYNTHESIS
Bollinger Bands (20, 2): Lower band at 152.30 = support magnet; Expanding width confirms volatility spike incoming. RSI(14): Oversold on 30M/1H = bounce probability 78%. VWAP: Acting as dynamic floor at 152.40. EMA20/50/200: All bullish-aligned on 4H; 200-EMA at 151.60 provides safety net. Ichimoku Cloud: Price above cloud on daily = bullish bias intact.
⚠️ RISK MANAGEMENT PROTOCOL
Position sizing: Use 2% risk per trade. Stop loss placement non-negotiable at weekly lows. Take partial profits at 1st target (50% position). Never hold below support without reason . Monitor Fed calendar (FOMC comments impact yen carry sentiment).
✅ WEEK 43 TRADING PLAN
Monday-Tuesday: Accumulate on dips to 152.50-152.70 (oversold bounces). Wednesday-Thursday: Hold above 152.88 for breakout plays targeting 154.00+. Friday: Lock profits; avoid new entries pre-weekend gap risk.
━━━━━━━━━━━━━━━━━━━━━━━━━━━━━━━━━━━━━━━━━━
Charts for Reference:
1D:
4H:
1H:
30M:
15M:
5M:
Disclaimer: This is my technical analysis and not financial advice. Trade at your own risk.
Let me know your thoughts in the comments! What's your bias for USDJPY this week? 👇

USDJPY H4 | Bearish Reversal at Swing High ResistanceUSD/JPY is reacting off the resistance level which is a swing high resistance and could reverse from this level to the downside.
Sell entry is at 153.07,whic is a swing high resistance.
Stop loss is at 154.37, which lines up with the 127.2% Fibonacci extension.
Take profit is at 151.61, whic is an overlap support that aligns with he 38.2% Fibonacci retracement.
Stratos Markets Limited (tradu.com ):
CFDs are complex instruments and come with a high risk of losing money rapidly due to leverage. 68% of retail investor accounts lose money when trading CFDs with this provider. You should consider whether you understand how CFDs work and whether you can afford to take the high risk of losing your money.
Stratos Europe Ltd (tradu.com ):
CFDs are complex instruments and come with a high risk of losing money rapidly due to leverage. 70% of retail investor accounts lose money when trading CFDs with this provider. You should consider whether you understand how CFDs work and whether you can afford to take the high risk of losing your money.

Bullish bounce off pullback support?AUD/JPY is falling towards the pivot which is a pullback support and could bounce to the 1st resistance which has been identified as a swing high resistance.
Pivot: 98.67
1st Support: 98
1st Resistance: 100.89
Disclaimer:
The above opinions given constitute general market commentary, and do not constitute the opinion or advice of IC Markets or any form of personal or investment advice.
Any opinions, news, research, analyses, prices, other information, or links to third-party sites contained on this website are provided on an "as-is" basis, are intended only to be informative, is not an advice nor a recommendation, nor research, or a record of our trading prices, or an offer of, or solicitation for a transaction in any financial instrument and thus should not be treated as such. The information provided does not involve any specific investment objectives, financial situation and needs of any specific person who may receive it. Please be aware, that past performance is not a reliable indicator of future performance and/or results. Past Performance or Forward-looking scenarios based upon the reasonable beliefs of the third-party provider are not a guarantee of future performance. Actual results may differ materially from those anticipated in forward-looking or past performance statements. IC Markets makes no representation or warranty and assumes no liability as to the accuracy or completeness of the information provided, nor any loss arising from any investment based on a recommendation, forecast or any information supplied by any third-party.

Potential bullish rise?NZD/JPY could fall towards the pivot which acts as a pullback support and could bounce to the swing high resistance.
Pivot: 87.33
1st Support: 86.80
1st Resistance: 89.02
Disclaimer:
The above opinions given constitute general market commentary, and do not constitute the opinion or advice of IC Markets or any form of personal or investment advice.
Any opinions, news, research, analyses, prices, other information, or links to third-party sites contained on this website are provided on an "as-is" basis, are intended only to be informative, is not an advice nor a recommendation, nor research, or a record of our trading prices, or an offer of, or solicitation for a transaction in any financial instrument and thus should not be treated as such. The information provided does not involve any specific investment objectives, financial situation and needs of any specific person who may receive it. Please be aware, that past performance is not a reliable indicator of future performance and/or results. Past Performance or Forward-looking scenarios based upon the reasonable beliefs of the third-party provider are not a guarantee of future performance. Actual results may differ materially from those anticipated in forward-looking or past performance statements. IC Markets makes no representation or warranty and assumes no liability as to the accuracy or completeness of the information provided, nor any loss arising from any investment based on a recommendation, forecast or any information supplied by any third-party.
