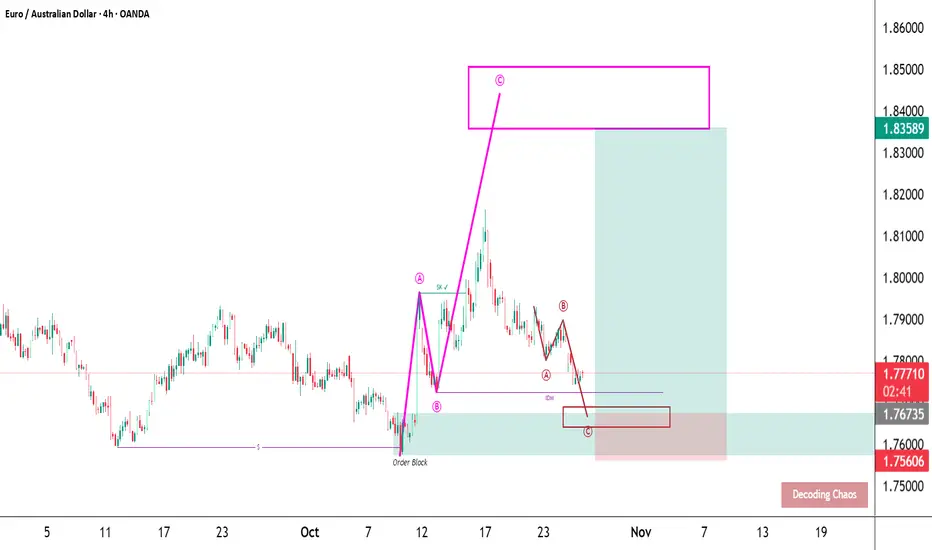
AUDUSD – corrective math in motion.Price retraces into the prior order block that broke structure, completing a textbook ABC correction inside a premium zone. Liquidity pools just above IDM hint at a sweep before continuation toward 0.63.
Strengths :
Confluence between wave symmetry, premium retracement, and liquidity structure. Clear invalidation point above IDM keeps risk defined.
Weaknesses :
AUD fundamentals (RBA policy shifts, USD softness) could disrupt structure-based setups. No confirmed momentum shift yet on lower timeframes — patience required.
SmellyTaz — decoding chaos .
Marketstructure

ADAUSDT — Dual Wave ConfluenceTwo independent cycles now point to the same liquidity zone.
The wine wave (macro) has entered its BC retracement phase, and its BC target aligns perfectly with the green micro-wave’s C-target , forming a rare dual confluence at the same level. This overlap creates a liquidity magnet — a structural point where both wave systems expect equilibrium before a bullish expansion.
Price is currently reacting inside the BC demand zone , finalizing the correction before expansion toward the macro C projection at 0.7575 .
The alignment between both scales confirms that momentum and liquidity are synchronized for continuation.
Strengths :
Perfect alignment of macro BC and micro C targets
Discount entry within structural demand
Defined invalidation below BC low
High asymmetric RR toward 0.7575
Weaknesses :
Requires bullish displacement confirmation from demand zone
Possible short-term inducement before expansion
Invalidation if structure breaks below BC
Bias : Bullish continuation
Target : 0.7575 (macro C projection zone)

EURNZD potential for the upside.Currently taking long positions upon the retest of the 1h low that formed after retesting the 4h broken structure.Use proper risk management should you decide to join me.

ETH Daily Technical Overview — Cycle & Box AnalysisCycle Structure:
HWC (Higher Wave Cycle – Long-Term): Bullish 🔼
MWC (Middle Wave Cycle – Mid-Term): Range 🔁
LWC (Lower Wave Cycle – Short-Term): Bearish 🔽
Market Context:
The first step is to assess the market from a cycle and wave perspective 🧐. Recent sharp down moves are ignored as they are emotional reactions.
The current support is a box 📦 that has been tested for around 35 days with four significant touches. My bias is long here 🚀.
Long Setup:
Weakness in the short-term MWC 🔁 could trigger a bullish move if 4232 resistance is broken and confirmed ✅.
The next resistance at 4757 🚧 could turn all cycles bullish 🔼🔼🔼 if broken, offering strong upside potential 📈.
Short Consideration:
The market is unpredictable ⚠️, so short scenarios should be considered too.
Until price reaches 3708 ⬇️, I won’t consider shorts ❌.
Shorts require more structure and confirmation.
Remember, downside moves are still possible ⚡, so risk management is key 🛡️.
📌 Signature:
If you want a specific coin analyzed, drop a comment 💬👇 and I’ll cover it.
⚠️ Without proper risk management, you're just a ticking time bomb 💣

EURAUD – structure breathes in waves.Price retraces toward a clean order block within a discount zone after a strong impulsive leg. Correction is forming a precise ABC pattern, likely to complete near 1.767 before the next wave resumes toward 1.835.
Strengths:
Wave symmetry, confluence with order block, and IDM liquidity structure all align. Setup maintains bullish context from higher timeframe while defining risk clearly below C.
Weaknesses:
Momentum confirmation pending; daily RSI could signal exhaustion if recovery stalls. EUR fundamentals remain sensitive to data shocks that can distort technical structure.
SmellyTaz — decoding chaos.
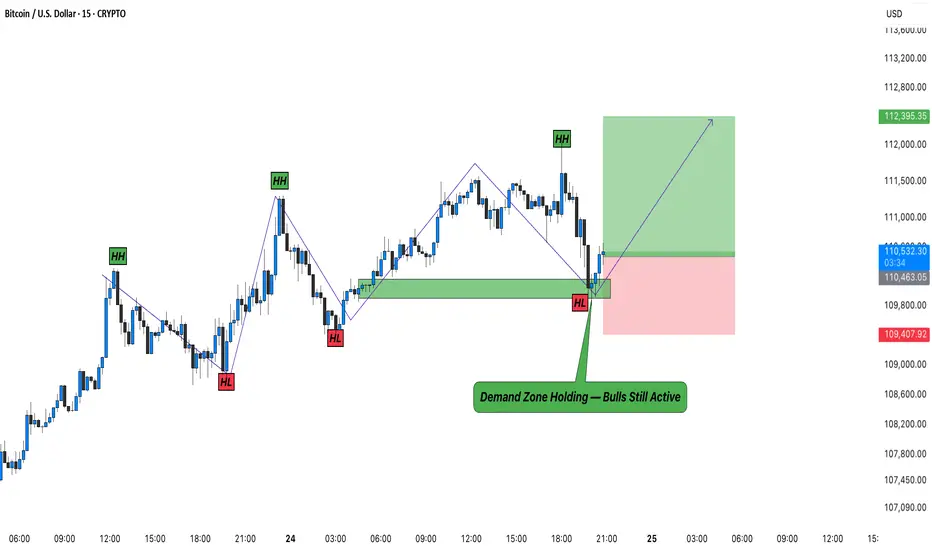
BTC – Demand Zone Holding Firm, Bulls Still in Control!Bitcoin (BTCUSD) continues to respect its demand zone around 110K–109.4K , where buyers have stepped in once again to defend the short-term structure. This area has acted as a reliable reaction point multiple times, confirming that smart money is active around this region.
Price recently dipped into the green zone and showed a quick rebound, forming a possible higher low structure. As long as BTC stays above this zone, the short-term bias remains bullish with immediate targets near 112.3K .
If the momentum continues to build, we might see another impulsive leg to the upside. However, any sustained close below 109.4K would invalidate this setup.
Remember: structure defines direction, not emotions.
Rahul’s Tip:
The best trades often form when most traders panic. Let the market test patience, not your conviction.
Disclaimer: This analysis is for educational purposes only and is not financial advice. Always trade with risk management.
How Smart Money Moves Gold (XAUUSD)🟡 Gold never moves randomly — it moves with intention.
Every spike, every fake breakout, every sharp reversal… it’s all part of a bigger plan by smart money (institutions) to trap emotional traders and collect liquidity.
Let’s break it down 👇
⚡ 1️⃣ Liquidity Grab (The Trap Phase)
Before any real move, gold sweeps stop-losses above highs or below lows.
Retail traders think it’s a breakout — but it’s actually a liquidity hunt.
Smart money fills large positions here while emotions run high.
⚡ 2️⃣ Market Structure Shift (The Clue)
After collecting liquidity, watch for a BOS (Break of Structure) or CHoCH (Change of Character) — these reveal when the real move is starting.
⚡ 3️⃣ Smart Money Entry (The Real Move)
Once the trap is set, gold often makes a strong impulsive push.
This is where institutions enter — and where smart traders follow with confirmation, not emotion.
⚡ 4️⃣ Emotional Traders Lose, Logical Traders Win
The market doesn’t hate you — it simply feeds on emotional reactions.
Be patient, wait for liquidity sweep ➜ structure shift ➜ confirmation entry.
🧭 Pro Tip:
👉 Stop chasing candles.
👉 Study liquidity and market structure.
👉 Let the chart show who’s trapped — and then trade against them.
💬 Remember:
“The market rewards patience, not panic.”
💎 Gold (XAUUSD) moves on liquidity — not luck.
#TradeSmart #ThinkLikeInstitutions #XAUUSD

Why Prices Move Up or Down: Order Flow and Liquidity█ Why Prices Move Up or Down: Understanding Order Flow and Liquidity
Most traders are told that prices rise because “there are more buyers than sellers,” and that prices fall because “there are more sellers than buyers.” But that’s not how markets actually work. In every transaction, there’s always one buyer and one seller; what really matters is which side is more aggressive and how liquidity responds to that aggression.
Price movement is the result of order flow interacting with liquidity. When buyers use market orders and aggressively lift the available sell orders (the ask), the price moves up. When sellers hit the bid with market orders, the price moves down.
In short, price moves in the direction of the side that consumes liquidity.
█ The Engine Behind Price Movement
When buyers and sellers agree on price, the market ranges, there’s a balance. When one side becomes more aggressive, an imbalance occurs, and the price must adjust until new liquidity appears.
Imagine the market like a ladder made of buy and sell orders. Each rung shows where traders are waiting, buyers below the current price, and sellers above it. These waiting orders are what we call liquidity.
When a trader sends a market buy order, they’re not waiting; they want to buy immediately. That order takes the best available sell price (the ask). If more traders keep doing this — buying aggressively — those sell orders get used up faster than new ones appear. As a result, the next available sell price is higher, and the price moves up until new sellers fill the gap.
The same logic applies in reverse: when aggressive market sell orders hit the bids, they consume the buy-side liquidity. Once those bids are gone, the next available buyer is lower, and the price moves down.
This continuous back-and-forth, liquidity being consumed, replaced, or withdrawn, is the real engine of every price movement.
█ Why Prices Move Up
1. Aggressive Buying (New Longs)
When new participants enter with market buys, they lift the offers, consuming sell-side liquidity. If this continues, the price climbs until enough new sellers appear to absorb demand. This is the cleanest form of demand-driven uptrend, with new buyers initiating positions.
2. Short Covering
The price moves higher as short sellers buy back positions. This can happen when stops are triggered after a price rise or when shorts take profits after a decline. In both cases, their buying adds upward pressure. When many cover at once, the move can accelerate into a short squeeze — higher prices trigger stops, which trigger even more buy orders, creating a self-reinforcing rally.
Profit Taking Phase
Short Squeeze Phase
3. Stop-Loss Triggers
Clusters of stop-loss orders above previous highs act as “fuel.” When price breaks those levels, automatic buy orders fire off. These aren’t new investors; they’re forced buyers closing shorts. The result is a fast, often exaggerated upward burst.
4. Thin Liquidity and Pulled Offers
Sometimes, price surges not because of huge buying, but because there’s nobody selling. If the sell side of the order book is thin, or if large resting orders get canceled, even small buys can sweep multiple levels. This creates those “air pockets” where price jumps several ticks in seconds.
5. Algorithmic and Institutional Flows
Institutions use automated execution algorithms like VWAP or TWAP to buy steadily throughout the day. These constant flows absorb liquidity over time, creating a slow upward bias. Similarly, option dealers who are short gamma must buy as prices rise to stay hedged, adding even more mechanical buying pressure.
█ Why Prices Move Down
1. Aggressive Selling (New Shorts)
When traders use market sells, they consume buy-side liquidity. If this persists, the price naturally ticks lower as bids disappear, and the next buyer will be willing only at a cheaper level.
2. Long Profit-Taking
At some point, long traders sell to realize profits. These sales add supply, which can cap or reverse an uptrend. It’s not bearish conviction; it’s simply existing longs exiting their positions.
3. Long Stop-Loss Cascades
If prices fall to where many long traders placed stops, those automatic sell orders trigger, creating a chain reaction of forced selling. This is the mirror image of a short squeeze — a long liquidation cascade.
4. Thin Bid Liquidity or Pulled Bids
When buy orders disappear, the market has no floor. Even modest selling pressure can make the price fall through several levels until new bids emerge. This is how “flash drops” occur during low-liquidity periods.
5. Algorithmic and Mechanical Selling
Negative news or risk events can activate automated sell programs, from funds rebalancing to dealers hedging short options exposure. These trades can intensify selling, even without new bearish sentiment.
█ New Positions vs. Exits — The Hidden Difference
Not every up-move means new buyers are coming in, and not every down-move means new shorts.
Some moves happen because existing positions are being closed, not opened. and that distinction matters.
New Positions (Initiative Flow): Create real trends, since they bring new demand or supply.
Position Exits (Reactive Flow): Often short-lived, they relieve pressure rather than add it.
One way to tell the difference is through open interest (in futures or options):
Price up + Open Interest up → new longs entering (sustainable).
Price up + Open Interest down → short covering (temporary).
Price down + Open Interest down → long liquidation (often near exhaustion).
Price down + Open Interest up → new shorts entering (trend formation).
█ The Real Takeaway
Price doesn’t rise because “buyers beat sellers.” It rises because buyers were more aggressive, consuming available sell orders faster than they were replaced. It falls when sellers become more aggressive, taking out the bids.
Both entries and exits can push the price the same way:
New longs and shorts covering both create buy pressure.
New shorts and longs taking profit both create sell pressure.
To truly understand a move, traders must ask:
Who initiated it, new positions or forced exits?
Was liquidity added or withdrawn?
Did open interest confirm new participation or show a squeeze?
Once you start thinking in these terms, price becomes more than a random chart line; it becomes a story of liquidity and intent unfolding in real time.
█ Multiple Forces in Motion
While each example above highlights a single mechanism in isolation, the market rarely moves for one reason alone. In real trading, several of these forces often act simultaneously, new longs entering, shorts covering, stops triggering, algorithms executing, and liquidity thinning.
When multiple flows align in the same direction, the result is acceleration, price moves rapidly as liquidity vanishes, and reactions compound. When opposing forces meet, price can stall, consolidate, or violently whip as both sides compete for control.
In essence, market movement is the sum of overlapping liquidity events, not isolated causes. Understanding how these factors interact in real time is key to reading true intent behind every move.
█ In summary:
Markets move not because of “more buyers” or “more sellers,” but because one side becomes impatient, consumes liquidity, and forces repricing until balance returns.
Understanding who’s moving the market and why — new positioning, forced exits, or vanished liquidity — is the foundation of reading true market intent.
-----------------
Disclaimer
The content provided in my scripts, indicators, ideas, algorithms, and systems is for educational and informational purposes only. It does not constitute financial advice, investment recommendations, or a solicitation to buy or sell any financial instruments. I will not accept liability for any loss or damage, including without limitation any loss of profit, which may arise directly or indirectly from the use of or reliance on such information.
All investments involve risk, and the past performance of a security, industry, sector, market, financial product, trading strategy, backtest, or individual's trading does not guarantee future results or returns. Investors are fully responsible for any investment decisions they make. Such decisions should be based solely on an evaluation of their financial circumstances, investment objectives, risk tolerance, and liquidity needs.
EURUSD | Key Zone Reaction SetupMonitoring a potential reaction at the marked zone on the 15-minute chart.
The setup remains valid only if price leaves a wick into the zone and closes below it, confirming rejection.
Execution will occur on the next candle, even with a slight (1 pip) move in my direction.
Stop-loss: above the wick.
Take-profit: the marked low.
Precision. Patience. Execution.
That’s the blueprint behind every setup.
⚠️ Disclaimer: This analysis is for educational purposes only. Always manage your risk and trade responsibly.

21 OCT 2025: US100 MARKET RECAPNOT A DAY FOR THE FAINT HEARTED
Study through the consolidation!
DISCLAIMER:
The owner of this page is an authorised Representative under supervision of TD MARKETS (PTY) LTD, an authorised Financial Services Provider (FSP No. 49128) licensed by the Financial Sector Conduct Authority (FSCA) under the Financial Advisory and Intermediary Services Act (FAIS).
The FSP is licensed to provide advice and intermediary services in respect of Category I financial products, including but not limited to derivative instruments, long-term deposits, and short-term deposits.
All investment ideas are provided in accordance with the scope of the FSP's license and applicable regulatory requirements. Derivative instruments is a leveraged products that carry high risks and could result in losing all of your capital, and past performance is not indicative of future results.
This idea and any attachments are informational/education and does not constitute a recommendation to buy/sell.
No guarantee is made regarding the accuracy or outcome of this trade idea.
If you choose to accept this idea, please do so at your own risk.

GoldGold 🥇 | Comprehensive Technical Analysis - Setting a Significant Rejection Zone
Current Price: Around $4,353 | Timeframe: Daily - Weekly
Date: October 21, 2025
══════
📊 Overview On the Market:
Gold has completed an exceptional bullish cycle, reaching new all-time highs above 4,400, which I believe represents the local high for the current phase.
However, several technical factors now point to an imminent correction before any potential continuation.
══════
🔍 Key Technical Notes:
▪️ Price Zone:
The stock is currently trading in a bullish zone—an area where institutional investors historically tend to take profits and open short positions.
▪️ Market Sentiment:
Fear and Greed Index: 78/100 (Extreme Greed)
These extreme readings in bullish zones precede corrections in 85% of historical cases.
▪️ Structural Analysis:
- Overall Structure: Bullish (higher timeframes)
- Internal Structure: Showing signs of weakness and bearish divergence
- A potential Change in Personality (CHoCH) is forming on medium timeframes
▪️ Supply and Demand Zones:
Multiple untested resistance zones below, as well as unfilled fair value gaps that act as price magnets.
▪️ Multiple Timeframe Analysis:
Price is analyzed across multiple timeframes (4-hour, 1-day, 1-week, etc.) using advanced order flow techniques and proprietary market structure mapping tools—all of which point to a potential upcoming correction.
══════
🎯 Expected Scenario (High Probability):
Stage 1 - Initial Correction:
📍 Target 1: $3,777-$3,816
(Balance Zone)
📍 Target 2: $3,688-$3,749
(Discount Zone - Optimal Entry)
Stage 2 - Deeper Correction (Moderate Probability):
📍 Target 3: $3,465-$3,580
(Strong Institutional Demand - Buy Orders)
In addition to unfilled fair value gaps that act as price magnets.
Note: Additional Confirmation Required
After Reaching the Discount Zones:
The possibility of a continued uptrend exists, but is not currently highly likely. The situation will be reassessed upon reaching the demand zones.
══════
⚡ Why this analysis?
This analysis is based on:
✓ Advanced order flow analysis techniques
✓ Professional tools for mapping market structure
✓ Premium/Discount Zone Theory
✓ Detecting institutional order blocks
✓ Market sentiment analysis
✓ Liquidity level mapping
These are not traditional retail trading tools; they are institutional analysis techniques used by professional traders.
═════
📚 Previous Record:
Some may remember my previous analysis of gold in August 2023:
📌 Analysis for August 13 2023:
- Expectations: Rise from 1780
- Targets: 2500 → 2800 → Over 3800
- Result: ✅ 100% Success Rate
- Actual Movement: Reaching over 4400 (147% Profit)
- Update (April 2024): "Trade Closed at Target"
This analysis is based on the same institutional framework applied to this current situation. The methodology is effective because it tracks actual cash flow—not trader sentiment.
═════ ═════
⚠️ Risk Management (Mandatory):
Regardless of your confidence level, risk management is non-negotiable:
✓ Don't risk more than 1-2% of your capital on each trade.
✓ Always set a stop-loss before entering.
✓ Avoid excessive leverage.
✓ Maximize your profits. Steps
✓ Research yourself (DYOR)
══════════════════════════════════════ ═════
⚖️ Disclaimer:
This is educational technical analysis and does not constitute financial advice or an investment recommendation.
Trading carries a significant risk of capital loss.
Past performance does not guarantee future results.
Trade at your own risk.
Consult a licensed financial advisor before making any investment decisions.
══════
💬 Share your opinion with us:
What do you think of gold at these levels?
📊 If you found this analysis helpful, don't forget to like and follow it for more analysis.
🔔 Turn on notifications to receive updates as soon as this setting develops.
═════

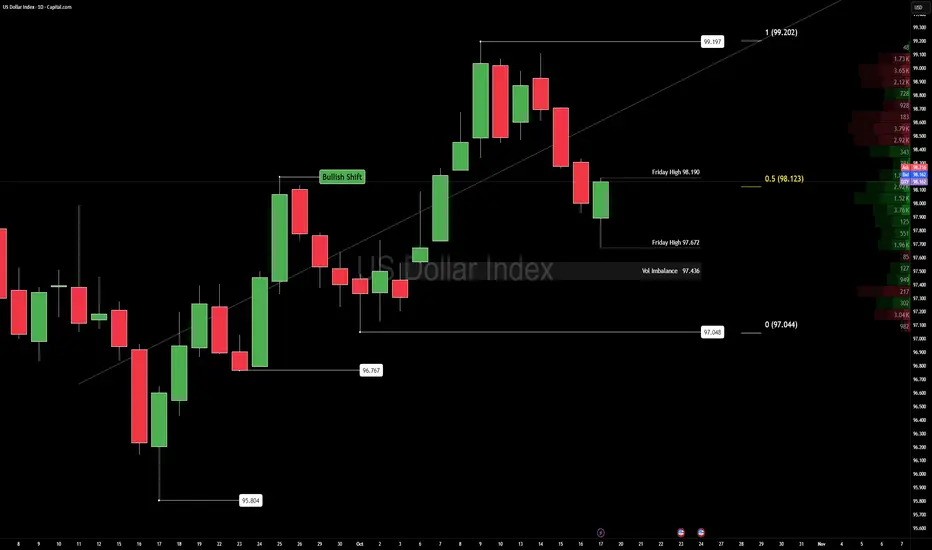
DXY — Between Balance and Breakout
Date: Sunday, October 19
Timeframe: Daily
Analyst: @CORE5DAN
Context
The U.S. Dollar Index holds a bullish daily range between 99.197 and 97.048, now sitting around the Fibonacci 50% retracement at 97.044.
Friday’s session formed a tight box — high 98.190, low 97.672 — showing compression inside balance conditions.
Price trades above mid-range, with a volume imbalance near 97.436 acting as a magnet for short-term rotation.
Key liquidity rests just below 97.700, and reactions there could define early-week direction.
Technical Map
• Structure: Short-term bullish, still inside a broader weekly bearish framework. Watch 97.436–97.700 — a clean reaction zone where imbalance and liquidity converge.
• Momentum: Range-bound bullish, confirming control but lacking expansion. A daily close above 98.190 opens the path toward the range high at 99.197.
• Volume: Imbalance remains unfilled — ideal for mean-reversion setups before any breakout impulse.
Fundamental Pulse (Week Ahead)
• Macro Drivers:
— US GDP advance data: key for growth tone.
— Core PCE inflation: the Fed’s favored inflation gauge.
— Fed speakers and PMIs: tone setters for November rate outlook.
• Yields:
— The 10-year sits near 4.6%.
— A push higher = bullish Dollar, stronger short-term flows.
— A pullback = potential consolidation across USD pairs.
• Global Flows:
— Mild rotation out of risk assets and emerging markets supports the Dollar.
— EURUSD and XAUUSD both reflect this hesitation near key supports.
Plan
Bias stays bullish in the short term, bearish in the long term.
We favor volume imbalance fills and reaction trades at 97.436–97.700 before re-evaluating structure.
If macro data or yield spikes support Dollar demand, expect continuation toward 98.190+.
Otherwise, a drift below 97.436 would signal distribution and confirm corrective pressure.
“Structure is the compass; sentiment is the weather.”
Mindset Pulse
“Authority comes from clarity, not prediction.”
Trade what’s confirmed — not what’s comfortable.
EURAUD 4H – Long ideaPrice is bouncing from the lower rail of the 4H ascending channel that aligns with the weekly trendline. After a short liquidity sweep, the structure flipped bullish, and an H4 fair-value gap sits at 1.77–1.78 .
Plan: buy the pullback into the FVG ~1.774 (E: 1.77415). SL: 1.7363 —below the channel base and last swing low. TP: 1.8889 , targeting the channel top/previous supply and full FVG fill. Partial profits can be taken on the way at ~1.825/1.845 . Bias is invalidated on a daily close below 1.74 .

XAUUSD Outlook: Bullish Leg in Play, But Patience PaysHello Traders 👋
Hope your week is off to a strong start!
In last week’s analysis, price respected the continuation demand zone—right in line with the bullish sentiment we observed around gold. That zone held beautifully.
Now, price has broken above the Buy Side Liquidity (BSL), forming a fresh bullish leg. However, before jumping into any buy trades, it’s wise to wait for price to mitigate the nearby continuation demand zone and look for confirmation on the lower time frame (LTF) before entering.
Let’s stay patient and let the market come to us. Trade safe and stay disciplined 💪

Gold (XAUUSD) – 13 Oct | Key Supply Zone in Focus🟡 Gold (XAUUSD) Analysis – 13 October
Hello Disciplined Traders,
Welcome to the Chart Is Mirror Community 👋
Market Context
• Gold remains in a H4 pullback phase , with M15 structure bearish after clear ChoCH + BoS confirmation — both aligned to the downside.
• Price is currently trading inside a strong supply + M15 LH zone 4048.8–4058.1 .
Key Observations
• A micro structure shift downside has already occurred on M1.
• Now waiting for a clean break of structure to confirm continuation of bearish momentum.
• Once confirmed, we’ll mark the micro POI and plan a short setup on the M1 pullback.
Execution Plan
• If price respects the current 4048.8–4058.1 supply zone and confirms on LTF, plan for shorts accordingly.
• If price breaks and sustains above the zone, that will be a M15 structure shift upside — no shorts, stay out and reassess for long setups.
Discipline means waiting for clarity — let confirmation lead, not bias.
📘 Shared by @ChartIsMirror

GBP JPY - Wave D forming?Daily chart image shows my thought pattern and an opportunity I am waiting for price to revert to.
I'm referring to the Daily price chart and key counts are in line with Wave counting and supply and demand curve trading levels based on fair value gap intervals of weekly trading sessions plotted to a daily chart at intervals of 60.
Current wave -
Wave A: The first correction test (200+) - where a rejection into the impulse high - to form a weekly supply.
- Wave B: Deep testing of the lows into 184 territory, but keeps the rising channel weekly in tact.
- Wave C: Technical rebound exactly to the higher wick on the max top of the supply and settled in the marked zone - of a large volume of sell orders.
- Now to Wave D formation: 190? or below 189*? showing the weekly trend down to where the wav could end?
Master Key for zones
Red = Three Month
Blue = Monthly
Purple = weekly
Pink = Consolidative box example (Daily)
Orange = Daily
Risk Warning
Trading leveraged products such as Forex, commodities and CFDs, carries with it a high level of risk and so may not be suitable for every investor. Prior to trading the foreign exchange, commodity or CFD market, consider your investment objectives, level of experience and risk appetite. You should never risk more than you can afford to lose. If you fail to understand or are uncertain of the risks involved, please seek independent advice and remember to conduct due diligence as criteria varies to suit the individual.
Below are some of the take aways from the video - please listen again incase any detail is missed.
Do you enjoy the setups?
Professional analyst with 8+ years experience in the capital markets
Focus on technical output not fundamentals
Focus on investing for long term positional moves
Provide updates where necessary - with new updated ideas tracking the progress.
If you like the idea, please leave a like or comment.
To all the followers, thank you for your continued support.
Thanks,
LVPA MMXXIV

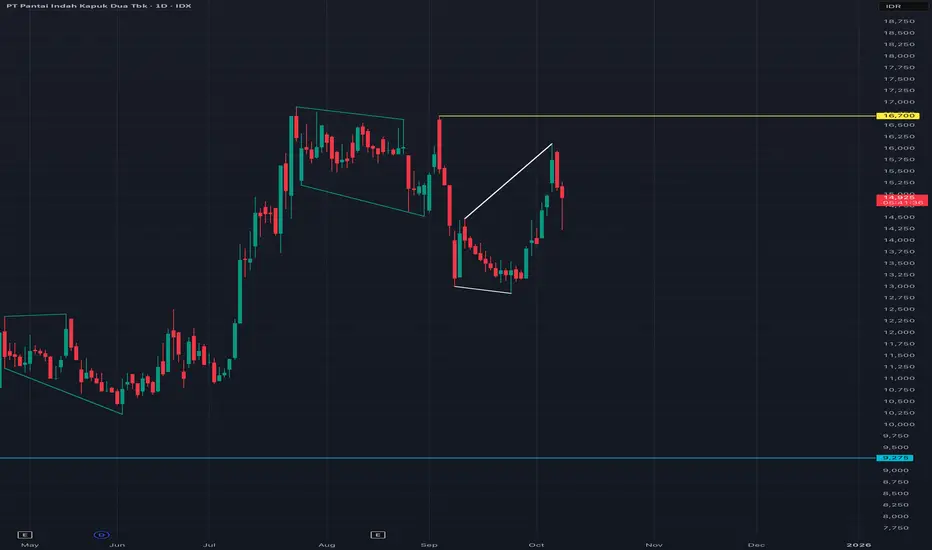
PANI UPDATE I expect this stock to drop below 12,850 without breaking above 16,700 for the moment.
If you plan to buy this stock, in my opinion, it’s a no buy for me at least until 12,850.
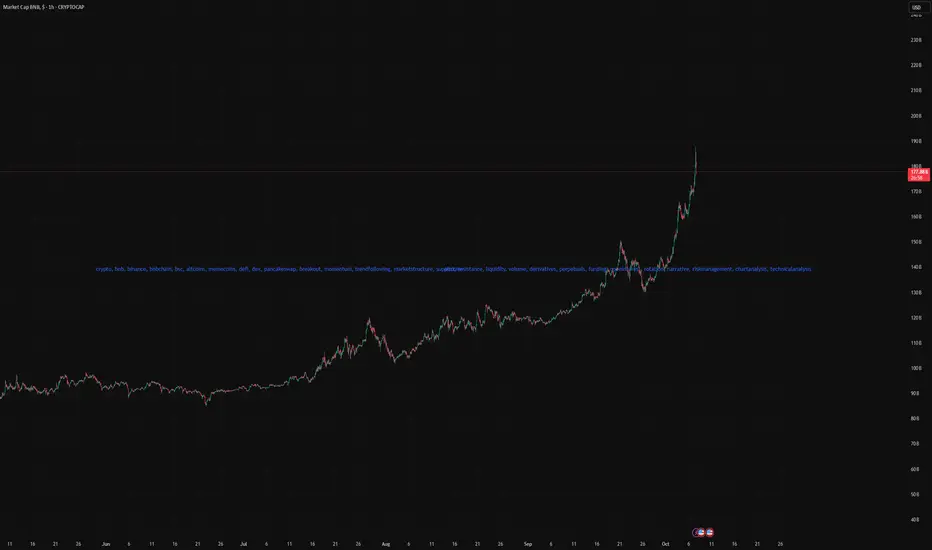
It's BNB SZ Real Flow. Perps >$100B, Memes ExplodingSummary
BNB just put in a vertical move on market cap and the BNB Chain narrative has flipped risk-on. Perp flow spiked, memecoin breadth exploded, and CEX/Wallet primitives are amplifying the loop. I’m positioning for continuation with a “buy dips / rotate to BNB Chain beta” plan, with clear invalidations.
What’s happening (from the provided charts)
Perp flow: Daily perp volume on BSC crossed ~$100B two days ago (screenshot from @BNBCHAIN). Liquidity + leverage are back, and that historically fuels multi-day trend moves.
Market cap structure: BNB market cap chart (1h) shows a clean breakout to ~$180B after a month of stair-step advances. Vertical extension suggests momentum, but also raises the odds of sharp pullbacks.
Breadth / heat: Multiple watchlists show BNB memecoins ripping (Palu, “4”, BINA, GIGGLE, etc.). You’ve got 100–200M MC runners across the board and “OKX Wallet Trending” screenshots with BNB-pairs at the top.
Distribution layer: Trust Wallet is actively pushing SOL→BNB swaps (giveaway post), which validates and accelerates the rotation flow.
Narrative lock-in: Multiple posts repeat “BNB Szn” with compounding social proof (CMC Boosts, DEXScreener Boosts/Ads on $SZN, “BNB > XRP/USDT market-cap rank #3” callouts). This is the reflexive feedback loop you want during the early innings of a chain season.
Thesis
BNB is entering a chain-season regime: high perp activity → higher spot liquidity → memecoin breadth → more attention → more perp activity. Until perp volumes cool and breadth narrows, continuation is the base case.
Levels & structure (using the market-cap chart)
Breakout area: ~$170–172B mcap (prior ceiling). First buy-the-dip zone if momentum cools.
Trend support: rising 1h/4h structure sits roughly mid-170s B. Lose this with heavy perp unwind = momentum broken.
Upside magnet: $200B psychological round number. Extension targets beyond that depend on breadth staying hot.
Rotations
Core beta: BNB spot/perp on dips to prior highs.
Chain beta: BNB memecoins with liquidity + CEX/Wallet visibility. Names in your screenshots (Palu, “4”, BINA, GIGGLE) are already in motion; stick to rule-based entries (liquidity > $1–3M, no stealth revokes, active socials).
Tools signal: “Trending” tabs (OKX Wallet, Dexscreener Boosts, CMC boosts) are acting like momentum filters this week—lean into them while the season is hot.
Catalysts to monitor
More DEXScreener/CMC boosts for BNB-pairs.
CEX wallet trending panels featuring BNB tokens.
Trust Wallet / Binance ecosystem promos (SOL→BNB incentives).
Bottom line
As long as perp flow stays elevated and breadth remains wide, trend-following + dip-buying BNB and rotating into liquid BNB-chain beta is the optimal stance. Lose trend support + perp dries up → exit to strength and wait for the next setup.
Gold (XAUUSD) – 3 October | Bearish Shift After Sharp Drop🟡 Gold (XAUUSD) Analysis – 3 October
Hello Disciplined Traders,
Welcome to the Chart Is Mirror Community 👋
Market Context
• Yesterday our M15 HL zone 3858.5–3853.5 played out perfectly, and the long setup hit TP ✅.
• Later in the session, Gold retested the all-time high 3895.5 before dropping sharply by nearly 770 pips .
• This move shifted the M15 internal structure bearish , confirming short-term downside momentum.
Key Observations
• My marked M15 POI 3863.5–3873.5 for shorts was tested in the early session.
• With LTF confirmation, a sell setup was executed and hit 120 pips TP cleanly.
• Current structure favors further short opportunities if supply zones hold.
Execution Plan
• Next POI to watch for shorts: 3859.8–3851.7 zone .
• If price retests and respects with LTF confirmation, another sell setup can be planned.
• If invalidated, reassess the price action for new structure shifts.
Discipline is patience — let the market confirm your plan before execution.
📘 Shared by @ChartIsMirror

Long term uptrend 15m Valid order block
Us national shutdown equity building
Daily Channel
Unbroken Recent Low
Tariffs effected the market but needs a stronger catalyst
Possible recession from national shutdown in US
Break of recent low possible but unlikely based on current state of US markets

Sell Opportunity in USDCHF Looking for Sell in Premium Zone with Proper Risk management. This is a Continuation Setup as per Market Structure.

EURUSD BullishGoing for Long Trade with Limit Order in Discount Zone with Proper Risk Management, let's see what Price do next.

Gold (XAUUSD) – 29 Sep | Key Demand Zones in Focus🟡 Gold (XAUUSD) Analysis – 29 September
Hello Disciplined Traders,
Welcome to the Chart Is Mirror Community 👋
Market Context
• Gold remains in bullish momentum with H4 and M15 structure aligned.
• Price printed a Change of Character (ChoCh) + Break of Structure (BoS) along with a new all-time high at 3798.79 , confirming bullish intent.
Key Zones to Watch
• Primary POI for Long Setup: 3770.8–3759.8 demand zone (also M15 HL).
• Secondary POI for Long Setup: 3752.5–3743 strong demand zone.
– Below this zone sits unmitigated sell-side liquidity . Price could sweep this liquidity before a strong up-move.
Execution Plan
• Wait for price to pull back to either POI.
• Look for clear LTF confirmation before executing a buy setup.
• If price stays above 3795 and forms new price action, reassess and look for fresh opportunities — as long as bullish structure remains intact .
Stay patient and let price come to your levels — discipline is your edge.
📘 Shared by @ChartIsMirror
