Bullish analysis (5M) GOLDStructure & Narrative:
Price grabbed external liquidity (Buy-side Liquidity) creating a new HH, followed by an aggressive displacement leaving a 4H-FVG (imbalance). We are now looking for a high-precision entry based on a liquidity hunt of the previous support zone (Sell-side Liquidity Sweep).
The Setup:
• Entry (POI): 5,272. We are waiting for a retest of the 5M Order Block following the Change of Character (Choch).
• Management: We take partial profits at TP1 (5,390) and move the Stop Loss to Break Even (BE) to secure a risk-free trade.
• Targets: The final target is 5,590, aiming to fill the price inefficiency and ride the bullish order flow. Good luck traders
Motivation

Trade Breakdown: XAU/USD (Gold) – High Stakes at All-Time HighsGold is in price discovery mode, smashing All-Time Highs. But Smart Money doesn't chase; it waits for liquidity. We’ve identified a New HH that looks like a trap for retail buyers (Fake out). Our play is to wait for the Sweep to flush out weak hands right into our 5m POI, backed by a 1H FVG. We enter where others panic.
🛠 The Game Plan
• Entry / Entrada: 5,390 After Sweep
• Stop Loss: 5,300 Protecting the house
• Targets
• TP1 (5,520): Move to BE
• TP2 (5,597): Partial profits
• TP3 (5,670): To the moon
• Risk/Reward (R:R): 1:3 📈
GOOD LUCK TRADERS…

Short-Gold (5M) Bias: Bearish (Short-term Correction)
1. Point of Interest (POI): Price hit a new All-Time High (HH) followed by a Choch (Change of Character), signaling a shift in momentum.
2. Liquidity: We’ve seen Buy-side Liquidity grabbed and a clear "Sweep" before the breakdown, confirming Smart Money distribution.
3. Target: There is a massive 1H-FVG (Fair Value Gap) below. My thesis is that the market will move to fill this imbalance and hunt for liquidity before continuing its long-term bullish trend.
4. Execution: Entry at the 5M POI, targeting a 1:3 Risk/Reward ratio.
GOOD LUCk TRADERS…..;)

XAU/USD Analysis (Gold) 5MXAU/USD Analysis (Gold)
Title: High Probability Setup - 5M SMC Strategy
Hey team! We are looking at a very clean institutional setup on Gold today. Here is the breakdown of our bullish thesis:
• Structural Shift: After some consolidation, we got a Choch (Change of Character) and a subsequent BOS (Break of Structure). Bulls are clearly in charge.
• Demand Zone (POI): Our Point of Interest is set at 5,066. This is the origin of the last impulsive move where we expect price to react.
• Liquidity Sweep: Patience is key. We are waiting for a Sweep of previous lows to grab liquidity from early retail buyers before the price pushes toward the 5,150 target.
• Confluence: There is a clear FVG (Fair Value Gap) on the left acting as a price magnet, increasing the probability of a healthy retracement.
Key Levels:
• Entry: 5,066
• TP 1: 5,111 (Partial profits)
• TP 2: 5,150 (Final target)
• Stop Loss: 5,038 (Protected below the structure)

XAUUSD (GOLD) – High Probability Long SetupTechnical Analysis:
We are monitoring a bullish structure forming after a significant liquidity sweep. Following a Choch and an aggressive displacement that left a 15m FVG, the price is confirming strong buying pressure.
The Strategy:
We don't chase the market. We are waiting for a liquidity Sweep back into our 15m Order Block (OB) at the 4,788 level. This is our high-confluence support zone.
Risk Management:
• Entry: 4,788.00 (At the OB)
• SL: 4,758.00 (Below the support zone)
• R/R: 1:3
• Action Plan: Once TP1 is hit, we will secure the trade by moving our Stop Loss to Breakeven (BE), ensuring a risk-free position.
Niveles / Targets:
• 🎯 TP1: 4,826.00 (Partial profits & BE)
• 🎯 TP2: 4,857.00
• 🎯 TP3: 4,888.00

Bullish analysis (gold) Re-Entry Re-entry Strategy (SMC)
• Context: Price hit our First TP (4,621) following a clear bullish expansion.
• Narrative: We are witnessing a technical pullback into a high-demand zone after a consolidation phase.
• Confluences:
1. Liquidity Sweep: Market swept internal liquidity before reaching our POI.
2. Mitigation: Price returned to the 15M POI (4,581) to pick up institutional orders.
3. Structure: The previous BOS (Break of Structure) confirms the overall bullish bias remains intact.
• Target: Looking for a new HH (Higher High) towards Second TP at 4,660.
• Risk Management: SL at 4,550 (protected below structural support) and moving to BE once the price confirms the reaction. GOOD LUCK TRADERS

Bullish Analysis Gold-15M🟡 XAUUSD: Liquidity Sweep Before New ATH? | SMC 15M Setup
Analysis Body:
Hello traders. Gold (XAUUSD) is showing a very clear Smart Money Concepts (SMC) delivery on the 15M timeframe. After a distribution phase and a clear Change of Character (Choch), price is currently engineering liquidity before the next big move.
Key Narrative:
• Liquidity Hunt: We have identified "Buy-side Liquidity" sitting above the recent highs. However, price needs to tap into a high-probability demand zone to gather the necessary momentum.
• The Trap (Fake Out): I'm expecting a sweep of the current support zone to induce early sellers and hunt the stop losses of impatient buyers.
• POI (Point of Interest): The 4,581 level is our key Order Block. This is where the institutional "re-accumulation" is expected to happen.
Trade Parameters:
• 🔵 Entry Zone: 4,581.00 (Look for LTF confirmation on 1M/5M).
• 🔴 Stop Loss: 4,549.00 (Validation point below structural lows).
• 🟢 Take Profit 1: 4,621.00 (Secure partials + Move to Break Even).
• 🚀 Take Profit 2: 4,660.00 (Targeting New All-Time Highs).
Risk Strategy: Risk-to-Reward Ratio of 1:2.47. Watch for RSI divergence and volume climax at the POI. Trade safe!

Bullish analysis XAU/USD (GOLD)Bias: Bullish
Main timeframe: 15M
Model: Liquidity → Structure Shift → Expansion
Price fully executed a sell-side liquidity sweep, trapping late sellers.
After this manipulation phase, the market delivered a clear Change of Character (CHOCH) followed by a strong Break of Structure (BOS), confirming a genuine shift in market intent.
Following the BOS, price retraced into a 15M institutional Order Block, where a fake out occurred to remove weak hands before continuation.
The entry was executed at the POI 4,454, with disciplined risk management and structural protection.
Trade results:
• Entry: 4,454
• Stop Loss: 4,425 (below structure)
• TP1: 4,492 → hit
• TP2: 4,521 → hit
• Risk/Reward: 1:2
Price respected the plan precisely and expanded into buy-side liquidity, validating the institutional narrative.

Bullish Analysis XAU/USD (15M)📈 Bias: Bullish
🕒 Timeframe: 15 minutes
Price successfully swept sell-side liquidity, indicating a manipulation phase before the real directional move.
After that, the market delivered a clear Change of Character (CHOCH) followed by a valid Break of Structure (BOS), confirming a bullish shift in market structure.
Following the impulse, price retraced into a key Point of Interest (POI – 15M) around 4,454, where we observed:
• Liquidity sweep
• Fake out (seller trap)
• Strong rejection from support
📍 Entry: 4,454
🛑 Stop Loss: 4,425
🎯 TP1: 4,492
🎯 TP2: 4,521 (Buy-side liquidity / new higher highs)
⚖️ Risk/Reward: 1:2+
📌 Market narrative:
Manipulation → Confirmation → Mitigation → Expansion

XAU/USD BULLISH ANALYSIS – PROFESSIONAL TRADE MANAGEMENTThis trade was not luck — it was structure, liquidity, and patience.
🧠 MARKET CONTEXT
Price was coming from a distribution phase, where the market:
• Took buy-side liquidity
• Trapped late buyers
• Prepared the real move
Then we had:
✅ Sell-side liquidity sweep
✅ CHOCH (Change of Character)
✅ BOS (Break of Structure)
This confirmed a clear shift to a bullish bias.
🎯 ENTRY
📍 Buy POI (15M): 4,328
After:
• Fakeout
• Liquidity sweep
• Structural confirmation
🎯 Risk / Reward: 1:3
🟢 TRADE MANAGEMENT
✔️ TP1 mitigated: 4,390
✔️ TP2 mitigated: 4,458
🔒 Stop moved to BE at 4,345
➡️ Capital protected, risk-free trade.
⏳ CURRENT SCENARIO
📌 Price is consolidating above TP2, showing bullish strength.
🎯 Waiting for TP3: 4,521
Area of buy-side liquidity / previous HH.
As long as structure holds:
➡️ Bullish bias remains intact.

Analysis XAU/USD (SMC) Bias: Bullish
Main timeframe: 15M (LTF confirmations)
Narrative: Manipulation → Accumulation → Expansion
The XAU/USD market has fully completed the sell-side liquidity mitigation, sweeping previous lows and trapping late sellers.
After this move, price delivered a clear Change of Character (CHOCH) followed by a Break of Structure (BOS), confirming a genuine shift in market structure.
The final downside move acted as a fake out, combined with a liquidity sweep into a 15M Point of Interest (POI) — a classic sign of institutional accumulation.
With liquidity absorbed and structure respected, price is now positioned for a bullish expansion, targeting buy-side liquidity zones above.
🎯 Targets
• TP1: 4,390 → partial profit & risk reduction
• TP2: 4,458 → intermediate mitigation / prior structure
• TP3: 4,521 → buy-side liquidity & potential new highs
🛡️ Risk management
• SL: 4,266 (below structural support)
• R:R: 1:3
• Trade executed based on confirmation, not anticipation.
📌 As long as price continues to print higher lows on lower timeframes, the bullish bias remains valid.

TRADE BREAKDOWN – XAU/USD (15M)1️⃣ Market context
Gold is in a bullish structure on the 15M timeframe.
Price has been forming higher highs and higher lows, showing that institutional flow remains bullish.
2️⃣ Manipulation and liquidity
The bearish move is not a trend reversal.
The market creates:
• A bearish CHoCH
• A sell-side liquidity sweep
• Stop hunts on weak long positions
This move is designed to clean liquidity before continuation.
3️⃣ Point of Interest (POI)
Price reaches a 15M institutional support zone (POI), where strong buying previously occurred.
This area:
• Aligns with prior structure
• Represents institutional mitigation
📌 No market entries — confirmation is required.
4️⃣ Entry confirmation
The trade is executed only after:
• A fake out inside the POI
• A clear rejection (long wick or strong close)
• Confirmation on 5M–15M
🟢 BUY Entry: 4,458
5️⃣ Risk management
• Stop Loss: 4,424
(Below structure and POI)
• Logical and protected risk for gold volatility
6️⃣ Targets (Take Profit)
• TP1 – 4,504:
Internal level to secure partial profits
• TP2 – 4,549:
Buy-side liquidity, main institutional target
📊 Risk/Reward: 1:2.5
7️⃣ Trade plan summary
This trade is based on:
✔️ Structure
✔️ Liquidity
✔️ Patience
✔️ Confirmation
No chasing price.
We wait for the market to reveal intention.

TRADE BREAKDOWN – XAU/USD (SUCCESSFULLY CLOSED)📈 🔍 Analysis….. 🧐
• Price swept sell-side liquidity, followed by a clear Change of Character (CHoCH).
• Break of Structure (BOS) confirmed the bias, with a precise entry from a 5M POI, aligned with higher-timeframe structure.
• Proper mitigation of the 1H Fair Value Gap, confirming institutional intent.
🎯 Execution
• Entry executed with patience and confirmation, no chasing price.
• First and second targets reached according to plan.
• Stop Loss moved to Break Even, fully securing the trade.
• Price continued toward the final TP (4,365).
✅ Result
• Trade closed with excellence and professionalism.
• Risk management followed flawlessly.
• Execution driven by process, not emotion.
📌 Consistency over emotion. Discipline over impulse. good job traders

Bullish Analysis GOLD-15M (SMC)🔍 Current trade status
✔️ TP1 hit (4,336)
✔️ TP2 hit (4,348)
✔️ Partial profits secured
✔️ Stop Loss moved to BE (Break Even)
At this stage, the trade is fully protected.
Risk has been removed, and now we let the market do the work while targeting the final objective at 4,365, where buy-side liquidity remains.
The current pullback is normal and healthy after mitigating two targets.
As long as there is no clear bearish CHoCH, the bullish bias remains valid.
GOOD JOB TRADERS 🦾😉☝🏻

Bullish analysis GOLD-SMCBULLISH BREAKDOWN – XAU/USD (15M)
1️⃣ Sell-Side Liquidity Sweep
Price sweeps previous lows, taking out retail sellers’ stops.
This provides liquidity for institutional long accumulation.
2️⃣ Change of Character (CHoCH)
After the sweep, price prints a bullish CHoCH, signaling an early shift in market intent.
3️⃣ Break of Structure (BOS)
The BOS confirms buyers are now in control, validating the bullish bias.
4️⃣ 5M POI + Fakeout
Retracement into the 5M POI with a fakeout clears weak hands before the real move.
Precise entry at 4,320 with defined risk.
5️⃣ Targets (TPs)
• 🎯 TP1: 4,336 → partial profits / SL to BE
• 🎯 TP2: 4,348 → structural continuation
• 🎯 TP3: 4,365 → buy-side liquidity & new HH
🛑 SL: 4,305
📐 R/R: 1:3 → solid and professional

BULLISH ANALYSIS-15M XAU/USDIn this analysis, price first moves down to collect sell-side liquidity.
Many traders sell in fear, and institutions use that liquidity to buy at better prices.
After the liquidity sweep:
• Price shows a CHoCH, signaling a potential trend change.
• Then a BOS confirms bullish intent.
Price retraces into the POI at 4,331, an area where:
• Support is present
• Price is at a discount
• Buyers are likely to step in again
Before moving higher, price creates a fake out to remove impatient traders.
Then it continues toward its natural targets:
• TP1: 4,338
• TP2: 4,344
• TP3: 4,349 (buy-side liquidity)
👉 Price moves with purpose, toward liquidity, not randomly.

Bullish Analysis – XAU/USD (15M)📈 Two-target setup with active risk management
This setup is based on a clear institutional liquidity and market structure narrative.
1️⃣ Manipulation and fake out
Price creates a fake out at a key level, trapping late sellers. This manipulation provides the liquidity needed for the bullish move.
2️⃣ Strong impulse + FVG (15M)
After the fake out, price delivers a strong impulsive move, leaving a 15-minute Fair Value Gap, confirming institutional intent.
3️⃣ Entry at POI (4,329)
Price retraces into the Point of Interest, located at a discount and support zone.
The entry is planned and patient, not chased.
4️⃣ Risk management
• SL: 4,309
• Initial R:R: 1:2.5
Defined risk with a structured execution plan.
5️⃣ Targets
• 🎯 TP1: 4,350
→ Once reached, stop loss is moved to breakeven, securing the position.
• 🎯 TP2: 4,380
→ Target aligned with buy-side liquidity and an unmitigated higher high.
📌 Strategy focused on locking partial profits while allowing the trade to run toward its higher-timeframe objective. GOOD LUCK TRADERS…

🇺🇸 BULLISH ANALISIS- GOLD BREAKDOWN – XAU/USD
📌 1. Liquidity Sweep + Institutional Discount
The market completed a deep retracement that fully mitigated all the sell-side liquidity zone.
This allows institutions to accumulate long positions at discount prices.
A CHoCH + BOS sequence confirms that the bearish leg has finished.
📌 2. Fake-Out + Rejection at the POI (4,202)
Price delivered a clean fake-out, grabbed liquidity, and immediately rejected from the POI.
This rejection is a strong sign of institutional absorption.
The POI is aligned with:
✔ Discount zone
✔ Support
✔ Previous imbalance
👉 A high-probability entry is formed.
📌 3. Bullish Targets (Mitigation & Liquidity)
The upside roadmap is clear and progressive:
• TP1: 4,230 → first mitigation
• TP2: 4,254 → liquidity resting above
• TP3: 4,277 → full mitigation of imbalance + expected HH
Price is targeting the FVG on the 4H timeframe.
This is where institutions are expected to complete mitigation.
📌 4. Risk Management
SL at 4,180 protects the structure:
• Below support zone
• Below rejection wick
• Below liquidity
👉 If price breaks that level, the narrative changes.
🧮 Risk/Reward: 1:3
Excellent ratio aligned with institutional swing logic.
No forcing, clean and natural. GOOD LUCK TRADERS…

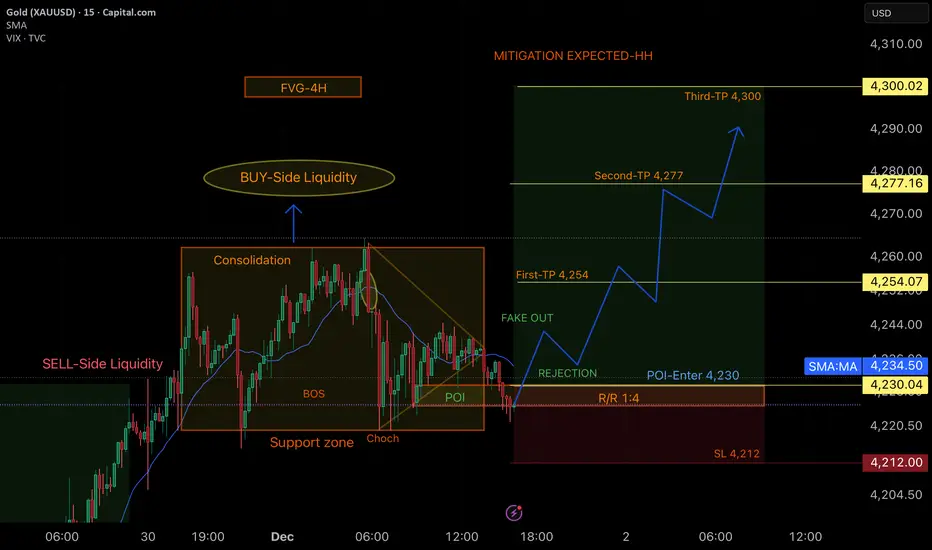
Bullish Analysis Gold-15M (SMC)Breakdown
On the 15-minute chart, I’m seeing a very clean accumulation → manipulation → expansion sequence that aligns perfectly with institutional behavior. 📈✨
The market first formed a consolidation range, building both buy-side and sell-side liquidity. 💧⬆️⬇️ After that liquidity was engineered, price delivered a Buy-Side Liquidity sweep, followed by a strong move down that broke structure, giving me a clear BOS and shortly after a CHOCH, signaling a potential shift in momentum. ⚡🔄
Once the shift was confirmed, price tapped directly into my POI at 4,230, which aligns with an order block and a previous support zone that has shown strong reactions. 🎯📍 This is the level I’m interested in for entries because institutions often return here to mitigate before starting their expansion phase.
Inside this POI we got a small fake out, followed by a clean rejection, confirming the setup. From here, I project a bullish move with a 1:4 R/R, protected with a stop-loss at 4,212. 🛡️📊
I set three take-profit levels based on liquidity and imbalances:
• TP1: 4,254 → first reaction zone & nearby liquidity. 🥇📌
• TP2: 4,277 → unmitigated imbalance and previous liquidity. 🥈📈
• TP3: 4,300 → expected mitigation at the previous higher highs; major liquidity target. 🥇🎯✨
My bullish bias remains intact as long as price respects the POI. Liquidity, structure, and the unmitigated 4H FVG above all support the idea of price pushing toward those higher highs. 🚀💚
💬 Motivational Message
Every analysis—win or loss—brings you one step closer to mastery.
Trust your process, stay disciplined, and remember: the market rewards those who stay consistent even when the setup takes time.
You’re leveling up every single day. Keep pushing.
GOOD LUCK TRADERS…. 💪🔥📈
Bullish Analysis gold-SMCPROFESSIONAL BREAKDOWN
Step-by-step analysis – Gold (XAUUSD)
1. Initial accumulation + Buy-Side Liquidity
Price consolidated and built buy-side liquidity above previous highs—classic institutional preparation for expansion.
2. ChoCH + BOS confirming bullish intention
After sweeping liquidity, market structure shifted with a ChoCH followed by a BOS, validating the bullish scenario.
3. Perfect Fake Out + Precision POI
A clean manipulation (fake out) pushed sellers in, then price returned perfectly into our POI at 4,129, where we executed the entry.
4. Protected RR 1:4
Stop loss placed at 4,103, maintaining a disciplined 1:4 R/R exactly according to plan.
5. 4H FVG mitigation + Clean expansion
Price reacted beautifully and continued to fill the 4H FVG, fueling the bullish expansion.
6. TPs being hit one by one
• First TP – 4,171 ✔️
• Second TP – 4,202 ✔️
• Third TP – 4,230 ⏳ Just a couple pips away…
7. Expected mitigation at the HH
We’re approaching the final Higher High mitigation, the completion of the institutional target.
GREAT JOB TRADERS.. 🫡🖤

Bullish Analysis – XAU/USD (15M) SMC🇺🇸 FULL BREAKDOWN
In this new setup I’m following the same institutional sequence that the market has been respecting. Price first took liquidity with a clean bullish ChoCH, giving me the first shift in intent. Then we got a BOS, confirming the structural break to the upside.
Price entered a consolidation phase, the typical stage where institutions accumulate orders while inducing liquidity on both sides. That consolidation trapped buyers above and sellers below, setting up the perfect fake out.
After that trap, price comes right back into my POI at 4,129, a zone that aligns with:
• Previous order block
• Institutional support
• Resting liquidity
• The origin of the previous impulse
That’s where I expect the institutional rejection, ideally followed by a bullish ChoCH or BOS on lower timeframes to confirm upward intent.
From that point, the projection is clear: a clean bullish expansion mitigating higher-timeframe imbalances.
My three targets are based on real liquidity:
TP1 – 4,171
First logical mitigation area and minor imbalance.
TP2 – 4,202
Expansion level where the second leg of the push usually completes.
TP3 – 4,230
Final and most important objective: the 4H FVG and the previous Higher High, where institutions typically offload positions.
The setup carries a 1:4 R/R, totally professional and realistic.
Structure, intent, and narrative are all aligned with bullish continuation.
If price respects the POI and confirms on LTF, this becomes an A+ setup, fully aligned with current gold behavior. GOOD LUCK TRADERS…

Bullish Analysis – XAU/USD (15M) SMC🇺🇸 BREAKDOWN
After the market swept all the sell-side liquidity below the previous lows, it became clear that institutions were accumulating longs at discounted prices. Right after that sweep, we got a clean bullish ChoCH, signaling the first shift in intent.
Then price left an FVG unmitigated, and as usual, the market created a manipulative bearish BOS—a classic fake-out designed to induce shorts and grab more liquidity before moving in the real direction. That manipulation brings price directly into the 15M Order Block, which aligns with a clean support area.
My entry is positioned at 4,039, exactly where I expect the institutional reaction:
• 15M OB
• Support zone
• Liquidity sweep
• Clear rejection
From that point, I’m expecting the typical sequence:
fake out → rejection → lower-timeframe confirmation → bullish expansion.
For exits, I’m targeting two key zones:
• TP1 at 4,073 for the first FVG mitigation and liquidity grab.
• TP2 at 4,101, a level with higher-timeframe inefficiencies waiting to be filled.
The setup gives me an R/R of 1:3, totally professional and risk-controlled.
This analysis follows the classic institutional flow:
liquidity → manipulation → return to origin → bullish continuation.
If I get a bullish BOS on 1M or 5M, this becomes an A+ setup.
GOOD LUCK TRADERS 🦾😎🖤

BULLISH ANALYSIS GOLD (SMC)🇺🇸 PROFESSIONAL BREAKDOWN
(XAU/USD – 15M: Accumulation → Manipulation → Rejection → Expansion into 1H FVG)
🔸 1. Accumulation Phase
Price developed a clean range where liquidity was built on both sides.
This is the foundation of the eventual institutional move.
🔸 2. Institutional Manipulation (Fake Out)
A sweep above the consolidation highs confirms the classic liquidity grab.
This fake breakout is a signature SMC behavior before a directional move.
🔸 3. ChoCH + BOS
After the sweep, price prints:
• a Break of Structure, and
• a Change of Character
Clear confirmation of bullish intent.
🔸 4. Rejection Zone
The current pullback shows early signs of a bullish rejection pattern, pointing toward a potential retest of the buy zone.
🔸 5. Buy Setup at 4,068
Your BUY level is placed precisely where support, demand and previous imbalance converge — a high-probability entry zone.
🔸 6. Stop-Loss Updated: 4,036
The 8-pip buffer gives protection from typical gold volatility.
🔸 7. R/R 1:2.8
The new setup maintains a realistic and well-structured risk-to-reward:
• TP1: 4,111
• TP2: 4,150
Both levels align with liquidity pools and the unmitigated 1-hour FVG above.
🔸 8. 1H FVG Mitigation Expected
The unfilled imbalance above is a strong magnet, reinforcing the bullish projection.
🌟 Motivational Message
“Mastery comes from repetition and refinement. Every chart tells a story — and you’re learning to read it with institutional precision. Keep going.” GOOD LUCK TRADERS
