OPEN-SOURCE SCRIPT
Updated Volume Profile [ActiveQuants]
The Volume Profile indicator visualizes the distribution of trading volume across price levels over a user-defined historical period. It identifies key liquidity zones, including the Point of Control (POC) (price level with the highest volume) and the Value Area (price range containing a specified percentage of total volume). This tool is ideal for traders analyzing support/resistance levels, market sentiment, and potential price reversals.
█ CORE METHODOLOGY
█ KEY FEATURES
- Customizable Lookback & Resolution
- Configurable Profile Width & Horizontal Offset
- Value Area & POC Highlighting
- Flexible Display Options
- Gradient Coloring
- Real-Time Adjustments
█ USAGE EXAMPLES
Example 1: Basic Volume Profile with Value Area
Settings:
Image Context:
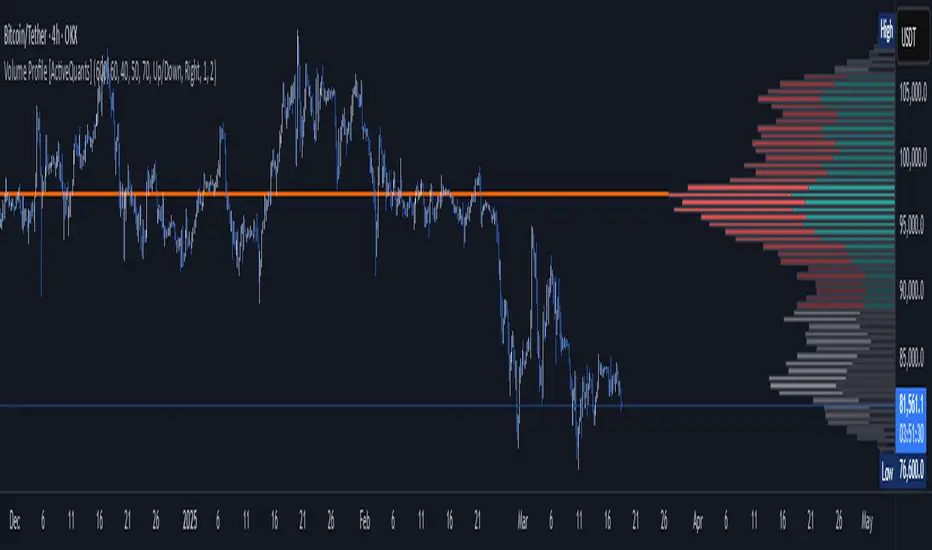
The profile appears on the right side of the chart. The POC (orange line) marks the highest volume row. Value Area rows (green/red) extend above/below the POC, containing 70% of total volume.

Example 2: Total Volume with Gradient Colors
Settings:
Image Context:
Rows display total volume in a single color with gradient transparency. Darker rows indicate higher volume concentration.

Example 3: Left-Aligned Profile with Narrow Value Area
Settings:
Image Context:
The profile shifts to the left, with a tighter Value Area (50%).

█ USER INPUTS
Calculation Settings
Appearance
█ CONCLUSION
The Volume Profile indicator provides a dynamic, customizable view of market liquidity. By highlighting the POC and Value Area, traders can identify high-probability reversal zones, gauge market sentiment, and align entries/exits with key volume levels.
█ IMPORTANT NOTES
⚠ Lookback Period: Shorter lookbacks prioritize recent activity but may omit critical levels.
⚠ Horizontal Offset Limitation: Avoid excessively high offsets (e.g., close to ±300). TradingView restricts plotting indicators more than 500 bars into the future, which may truncate or hide the profile.
⚠ Risk Management: While the indicator highlights areas of concentrated volume, always use it in combination with other technical analysis tools and proper risk management techniques.
█ RISK DISCLAIMER
Trading involves substantial risk. The Volume Profile highlights historical liquidity but does not predict future price movements. Always use stop-loss orders and confirm signals with additional analysis. Past performance is not indicative of future results.
📊 Happy trading! 🚀
█ CORE METHODOLOGY
- Vertical Price Rows: Divides the price range of the selected lookback period into equal-height rows.
- Volume Aggregation: Accumulates bullish/bearish or total volume within each price row.
- POC: The row with the highest total volume.
- Value Area: Expands from the POC until cumulative volume meets the user-defined threshold (e.g., 70%).
- Dynamic Visualization: Rows are plotted as horizontal boxes with widths proportional to their volume.
█ KEY FEATURES
- Customizable Lookback & Resolution
- Adjust the historical period (Lookback) and granularity (Number of Rows) for precise analysis.
- Configurable Profile Width & Horizontal Offset
- Control the relative horizontal length of the profile rows, and set the distance from the current bar to the POC row’s anchor.
Important: Do not set the horizontal offset too high. Indicators cannot be plotted more than 500 bars into the future.
- Value Area & POC Highlighting
- Set the percentage of total volume required to form the Value Area, ensuring that key volume levels are clearly identified.
- Value Area rows are colored distinctly, while the POC is marked with a bold line.
- Flexible Display Options
- Show bullish/bearish volume splits or total volume.
- Place the profile on the right or left of the chart.
- Gradient Coloring
- Rows fade in color intensity based on their relative volume strength.
- Real-Time Adjustments
- Modify horizontal offset, profile width, and appearance without reloading.
█ USAGE EXAMPLES
Example 1: Basic Volume Profile with Value Area
Settings:
- Lookback: 500 bars
- Number of Rows: 100
- Value Area: 70%
- Display Type: Up/Down
- Placement: Right
Image Context:
The profile appears on the right side of the chart. The POC (orange line) marks the highest volume row. Value Area rows (green/red) extend above/below the POC, containing 70% of total volume.
Example 2: Total Volume with Gradient Colors
Settings:
- Lookback: 800 bars
- Number of Rows: 100
- Profile Width: 60
- Horizontal Offset: 20
- Display Type: Total
- Gradient Colors: Enabled
Image Context:
Rows display total volume in a single color with gradient transparency. Darker rows indicate higher volume concentration.
Example 3: Left-Aligned Profile with Narrow Value Area
Settings:
- Lookback: 600 bars
- Number of Rows: 100
- Profile Width: 45
- Horizontal Offset: 500
- Value Area: 50%
- Profile Placement: Left
Image Context:
The profile shifts to the left, with a tighter Value Area (50%).
█ USER INPUTS
Calculation Settings
- Lookback: Historical bars analyzed (default: 500).
- Number of Rows: Vertical resolution of the profile (default: 100).
- Profile Width: Horizontal length of rows (default: 50).
- Horizontal Offset: Distance from the current bar to the POC (default: 50).
- Value Area (%): Cumulative volume threshold for the Value Area (default: 70%).
- Volume Display: Toggle between Up/Down (bullish/bearish) or Total volume.
- Profile Placement: Align profile to the Right or Left of the chart.
Appearance
- Rows Border: Customize border width/color.
- Gradient Colors: Enable fading color effects.
- Value Area Colors: Set distinct colors for bullish and bearish Value Area rows.
- POC Line: Adjust color, width, and visibility.
█ CONCLUSION
The Volume Profile indicator provides a dynamic, customizable view of market liquidity. By highlighting the POC and Value Area, traders can identify high-probability reversal zones, gauge market sentiment, and align entries/exits with key volume levels.
█ IMPORTANT NOTES
⚠ Lookback Period: Shorter lookbacks prioritize recent activity but may omit critical levels.
⚠ Horizontal Offset Limitation: Avoid excessively high offsets (e.g., close to ±300). TradingView restricts plotting indicators more than 500 bars into the future, which may truncate or hide the profile.
⚠ Risk Management: While the indicator highlights areas of concentrated volume, always use it in combination with other technical analysis tools and proper risk management techniques.
█ RISK DISCLAIMER
Trading involves substantial risk. The Volume Profile highlights historical liquidity but does not predict future price movements. Always use stop-loss orders and confirm signals with additional analysis. Past performance is not indicative of future results.
📊 Happy trading! 🚀
Release Notes
Updates:
Updated row volume calculation method
Open-source script
In true TradingView spirit, the creator of this script has made it open-source, so that traders can review and verify its functionality. Kudos to the author! While you can use it for free, remember that republishing the code is subject to our House Rules.
TradingView Tools by ActiveQuants | activequants.com
Disclaimer
The information and publications are not meant to be, and do not constitute, financial, investment, trading, or other types of advice or recommendations supplied or endorsed by TradingView. Read more in the Terms of Use.