🔍 Technical Overview
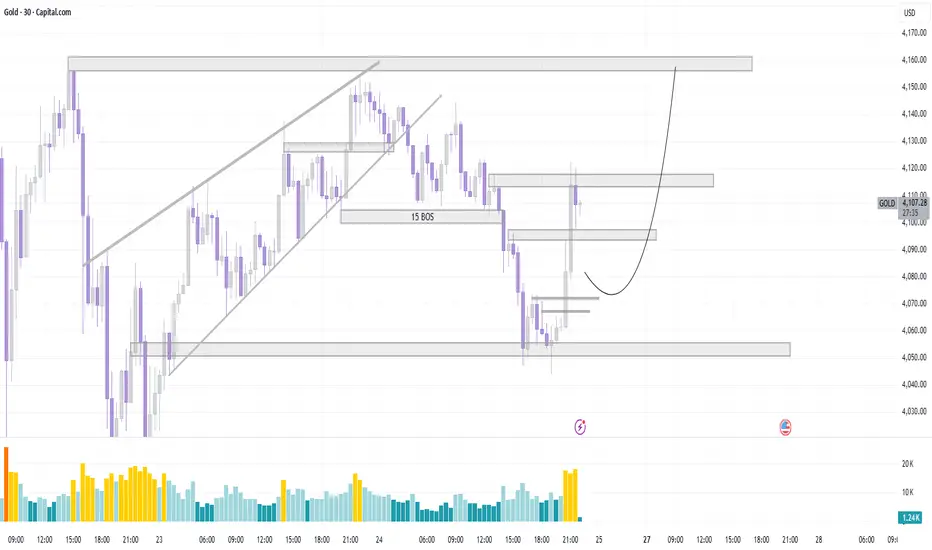
Structure: The market previously formed a bearish structure, confirmed by a Break of Structure (BOS) labeled near the 15-min level.
Recent Move: Price made a strong impulsive bullish push upward, showing a clear change in short-term momentum.
Volume Spike: Noticeable increase in volume during the breakout — this often signals smart money entering the market or short covering.
📈 Current Scenario
Support Zone (Demand Area): Around 4,090–4,095, marked as a potential retest area where price could pull back before continuing higher.
Resistance Zones:
Minor resistance near 4,115–4,120
Major resistance / liquidity zone around 4,165–4,175
Projection: The curved arrow suggests a bullish retracement scenario — a pullback into the 4,090–4,100 area followed by continuation to the 4,170 zone.
🧭 Trading Idea
Bullish Bias as long as price holds above 4,085 (previous breakout base).
Look for:
Pullback entry: around 4,095–4,100
Target 1: 4,130 (intra-day resistance)
Target 2: 4,170 (major liquidity area)
Invalidation: If price breaks below 4,080, structure may shift bearish again.
Disclaimer
The information and publications are not meant to be, and do not constitute, financial, investment, trading, or other types of advice or recommendations supplied or endorsed by TradingView. Read more in the Terms of Use.
Disclaimer
The information and publications are not meant to be, and do not constitute, financial, investment, trading, or other types of advice or recommendations supplied or endorsed by TradingView. Read more in the Terms of Use.