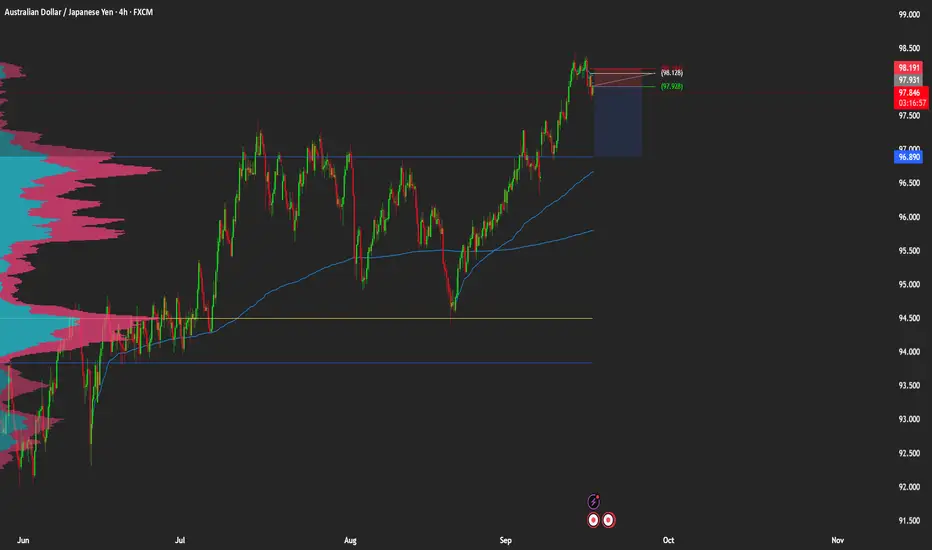
AUDJPY SELL opportunity There is a sell opportunity arround
Based on supply zone level
Entry: 98.150
Stoploss: 98.300
Take profit: 97.250
Comment your opinion pls
AUDJPY


AUDJPY: Sell SignalLast week we did get a bearish CHoCH followed by new LHs and LLs. We are currently in this trade...
🔴 Entry 97.422
SL 97.9
TP1 96.122
TP2 96.822
TP3 96.422
TP4 95.63
If you decide to enter, make sure you are managing your trades.

AUD/JPY Bullish Breakout, Bulls Eye 99Earlier this week I outlined my bias for a bounce ahead of another leg lower on AUD/JPY. but looking at the strength of the bounce, I suspect we've already seen the corrective low.
AUD/JPY bounced cleanly from 97.40 support and posted its strongest session in five weeks. A Morning Star reversal formed at the 20-day EMA, HVN, and July high, suggesting the correction is complete. Bulls now eye resistance at 99.00, with a breakout targeting the 100.00 handle.
Matt Simpson, Market Analyst at City Index and Forex.com

AUDJPY: Weak Market & Bearish Continuation
The recent price action on the AUDJPY pair was keeping me on the fence, however, my bias is slowly but surely changing into the bearish one and I think we will see the price go down.
Disclosure: I am part of Trade Nation's Influencer program and receive a monthly fee for using their TradingView charts in my analysis.
❤️ Please, support our work with like & comment! ❤️

AUDJPY Daily Forecast -Q3 | W39 | D24 | Y25| 📅 Q3 | W39 | D24 | Y25|
📊 AUDJPY Daily Forecast
🔍 Analysis Approach:
I’m applying Smart Money Concepts, focusing on:
Identifying Points of Interest on the Higher Time Frames (HTFs) 🕰️
Using those POIs to define a clear trading range 📐
Refining those zones on Lower Time Frames (LTFs) 🔎
Waiting for a Break of Structure (BoS) for confirmation ✅
This method allows me to stay precise, disciplined, and aligned with the market narrative, rather than chasing price.
💡 My Motto:
"Capital management, discipline, and consistency in your trading edge."
A positive risk-to-reward ratio, paired with a high win rate, is the backbone of any solid trading plan 📈🔐
⚠️ Losses?
They’re part of the mathematical game of trading 🎲
They don’t define you — they’re necessary, they happen, and we move forward 📊➡️
🙏 I appreciate you taking the time to review my Daily Forecast.
Stay sharp, stay consistent, and protect your capital
— FRNGT 🚀
FX:AUDJPY

GBP/JPY, AUD/JPY Price Action SetupsThe rally on GBP/JPY has stalled around a major resistance level, which could give bears the upper hand over the near term. While AUD/JPY looks like it could go on to push higher, it also looks like it is in need of at least a minor pullback.
Matt Simpson, Market Analyst at City Index and Forex.com

AUDJPY: Long Trade Explained
AUDJPY
- Classic bullish formation
- Our team expects pullback
SUGGESTED TRADE:
Swing Trade
Long AUDJPY
Entry - 97.434
Sl - 97.350
Tp - 97.587
Our Risk - 1%
Start protection of your profits from lower levels
Disclosure: I am part of Trade Nation's Influencer program and receive a monthly fee for using their TradingView charts in my analysis.
❤️ Please, support our work with like & comment! ❤️

AUDJPY Momentum Weakens, Sellers Eye Deeper PullbackAUDJPY has lost steam after a strong recovery rally, with sellers now pressing back below trendline support. The recent rejection near 98.40 signals exhaustion, and the pair looks set for a corrective leg lower toward key support zones. Unless buyers reclaim higher ground quickly, the near-term risk is skewed to the downside.
Current Bias
Bearish – price action shows a breakdown from recent upward momentum, with downside targets opening below 97.10.
Key Fundamental Drivers
RBA Policy: Australia’s central bank remains cautious with no immediate tightening bias, limiting AUD support.
BOJ Policy: Still ultra-loose but rising JGB yields and quiet speculation about adjustments give JPY some underlying support.
Commodities: Weakness in iron ore and concerns around Chinese growth cap AUD upside.
Macro Context
Interest Rates: RBA is holding rates steady, while markets anticipate the Fed and ECB easing earlier than BOJ. Yield differentials still favor AUDJPY upside, but recent data has weakened AUD’s momentum.
Economic Growth: Australia’s growth is slowing; Japan is stable but not accelerating, making yield spreads the main driver.
Geopolitics: Trade tensions and tariff-related uncertainty push investors toward JPY during risk-off episodes, undermining AUD.
Primary Risk to the Trend
A rebound in Chinese demand or a risk-on rally in equities could boost AUD and derail the bearish setup.
Most Critical Upcoming News/Event
Australian retail sales and CPI updates
Japanese inflation data
China PMIs for growth signals impacting AUD
Leader/Lagger Dynamics
AUDJPY is a lagger compared to USDJPY and EURJPY, which tend to set the tone for yen pairs. It is also influenced by AUDUSD moves, making it sensitive to Chinese and commodity-linked headlines.
Key Levels
Support Levels: 97.10, 96.29
Resistance Levels: 97.90, 98.40
Stop Loss (SL): 98.72 (above recent highs)
Take Profit (TP): 97.10 (first target), 96.29 (secondary target)
Summary: Bias and Watchpoints
AUDJPY is turning bearish after losing momentum at 98.40, with sellers eyeing 97.10 and 96.29 as key downside targets. A stop above 98.72 helps protect against sharp rebounds, while risk sentiment and China data remain the main watchpoints. The pair is more of a lagger, following broader yen moves and AUD commodity flows, so traders should watch USDJPY and AUDUSD closely for signals.

Short Idea On AUDJPYBased on :
- Supply zone and weekly avwap as entry level
- VP target 4rr
- Cot Analysis
- Quantitative Analysis
AUD/JPY SHORT FROM RESISTANCE
Hello, Friends!
The BB upper band is nearby so AUD-JPY is in the overbought territory. Thus, despite the uptrend on the 1W timeframe I think that we will see a bearish reaction from the resistance line above and a move down towards the target at around 96.239.
Disclosure: I am part of Trade Nation's Influencer program and receive a monthly fee for using their TradingView charts in my analysis.
✅LIKE AND COMMENT MY IDEAS✅

AUDJPY Retracement RoadmapPrice has dropped into my marked retracement zone.
I see strong chances of a bounce from this area.
My expectation → pullback towards 97.550 (Fib 0.382 level).
👉 Watching carefully how price reacts near the 0.5–0.618 zone for confirmation.

18.09.2025 #AUDJPY🆓 Sell Entry: 98.1000
⏹️ Stop Loss: 98.8000
*️⃣ Take Profit-1: 97.4300
*️⃣ Take Profit-2: 97.0000

AUDJPY Strong cyclical Sell SignalLast time we made a call on the AUDJPY pair was 6 months ago (March 28, see chart below), giving a sell signal that quickly hit our 91.000 Target:
This time we have the price trading near the Top (Higher Highs trend-line) of a 4-month Channel Up but in the past 2 days has seen a minor pull-back on its 4H MA50 (blue trend-line).
This can be explained cyclically as based on the previous two Higher Highs and using the Time Cycles, the pattern topped exactly 2 days ago (just under the 1.382 Fib extension) and is technically in need of a correction towards its 0.5 Fibonacci retracement level.
As a result, and since the 1D RSI also dipped below its MA (consistent with both previous tops), we turn bearish on this pair, targeting 96.500.
-------------------------------------------------------------------------------
** Please LIKE 👍, FOLLOW ✅, SHARE 🙌 and COMMENT ✍ if you enjoy this idea! Also share your ideas and charts in the comments section below! This is best way to keep it relevant, support us, keep the content here free and allow the idea to reach as many people as possible. **
-------------------------------------------------------------------------------
💸💸💸💸💸💸
👇 👇 👇 👇 👇 👇

AUDJPY Bullish continuation breakoutThe AUDJPY remains in a bullish trend, with recent price action showing signs of a corrective pullback within the broader uptrend.
Support Zone: 97.45 – a key level from previous consolidation. Price is currently testing or approaching this level.
A bullish rebound from 97.45 would confirm ongoing upside momentum, with potential targets at:
98.50 – initial resistance
98.80 – psychological and structural level
99.00 – extended resistance on the longer-term chart
Bearish Scenario:
A confirmed break and daily close below 97.45 would weaken the bullish outlook and suggest deeper downside risk toward:
97.20 – minor support
96.90 – stronger support and potential demand zone
Outlook:
Bullish bias remains intact while the AUDJPY holds above 97.45. A sustained break below this level could shift momentum to the downside in the short term.
This communication is for informational purposes only and should not be viewed as any form of recommendation as to a particular course of action or as investment advice. It is not intended as an offer or solicitation for the purchase or sale of any financial instrument or as an official confirmation of any transaction. Opinions, estimates and assumptions expressed herein are made as of the date of this communication and are subject to change without notice. This communication has been prepared based upon information, including market prices, data and other information, believed to be reliable; however, Trade Nation does not warrant its completeness or accuracy. All market prices and market data contained in or attached to this communication are indicative and subject to change without notice.

AUDJPY – SHORTA short position is proposed upon price rejection from the key resistance area. This area is defined by the confluence of the Supply Zone's POC level and a Dynamic Gann Resistance angle. The target is at the POC level within the next significant Demand Zone.
AUDJPY – SHORT
ENTRY PRICE - 98.150
SL - 99.400
TP - 94.400
Always follow the 6 Golden Rules of Money Management:
1. Protect your gains and never enter into a position without setting a stop loss.
2. Always trade with a Risk-Reward Ratio of 1 to 1.5 or better.
3. Never over-leverage your account.
4. Accept your losses, move on to the next trade and trust the software.
5. Make realistic goals that can be achieved within reason.
6. Always trade with money you can afford to lose.
Please leave your comment and support me with like if you agree with my idea. If you have a different view, please also share with me your idea in the comments.
Have a nice day!

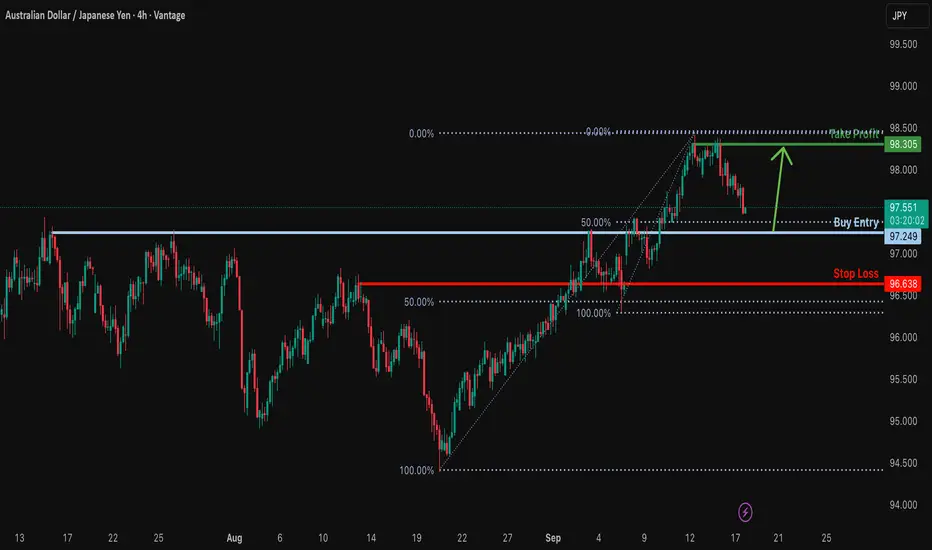
Falling towards major support?AUD/JPY is falling towards the support level which his a pullback support that is slightly below the 50% Fibonacci retracement and could bounce from this level to our take profit.
Entry: 97.24
Why we like it:
There is a pullback support that is slightly below the 50% Fibonacci retracement.
Stop loss: 96.63
Why we like it:
There is an overlap support that is slightly above the 50% Fibonacci retracement.
Take profit: 98.30
Why we like it:
There is a swing high resistance.
Enjoying your TradingView experience? Review us!
Please be advised that the information presented on TradingView is provided to Vantage (‘Vantage Global Limited’, ‘we’) by a third-party provider (‘Everest Fortune Group’). Please be reminded that you are solely responsible for the trading decisions on your account. There is a very high degree of risk involved in trading. Any information and/or content is intended entirely for research, educational and informational purposes only and does not constitute investment or consultation advice or investment strategy. The information is not tailored to the investment needs of any specific person and therefore does not involve a consideration of any of the investment objectives, financial situation or needs of any viewer that may receive it. Kindly also note that past performance is not a reliable indicator of future results. Actual results may differ materially from those anticipated in forward-looking or past performance statements. We assume no liability as to the accuracy or completeness of any of the information and/or content provided herein and the Company cannot be held responsible for any omission, mistake nor for any loss or damage including without limitation to any loss of profit which may arise from reliance on any information supplied by Everest Fortune Group.
AUD_JPY SWING LONG|
✅AUD_JPY is trading in an
Uptrend and the pair was
Making a bearish correction
But is now about to retest
A horizontal support
Level of 97.400 from where
I am expecting the pair to go up
LONG🚀
✅Like and subscribe to never miss a new idea!✅

Bullish continuation?AUD/JPY is falling towards the pivot, which acts as a pullback support that aligns with the 23.6% Fibonacci retracement and oculd bounce to the 1st resistance.
Pivot: 97.43
1st Support: 96.83
1st Resistance: 98.30
Disclaimer:
The above opinions given constitute general market commentary, and do not constitute the opinion or advice of IC Markets or any form of personal or investment advice.
Any opinions, news, research, analyses, prices, other information, or links to third-party sites contained on this website are provided on an "as-is" basis, are intended only to be informative, is not an advice nor a recommendation, nor research, or a record of our trading prices, or an offer of, or solicitation for a transaction in any financial instrument and thus should not be treated as such. The information provided does not involve any specific investment objectives, financial situation and needs of any specific person who may receive it. Please be aware, that past performance is not a reliable indicator of future performance and/or results. Past Performance or Forward-looking scenarios based upon the reasonable beliefs of the third-party provider are not a guarantee of future performance. Actual results may differ materially from those anticipated in forward-looking or past performance statements. IC Markets makes no representation or warranty and assumes no liability as to the accuracy or completeness of the information provided, nor any loss arising from any investment based on a recommendation, forecast or any information supplied by any third-party.

AUDJPY - SELL OPPORTUNITYShorting AJ to TP Area 96.7
Entry Criteria:
Sell executed (swing)
Looking to re-enter on further reversals/ rejections to confirm bearish downtrend
Will be looking to stack up further sell positions according to my stack-up strategy
Trade Safe

Is This Your Entry for the AUD/JPY Bull Run?🔓💸 AUD/JPY "Aussie vs Yen" Forex Bank Heist 💸🔓
🎯 Plan: Bullish Robbery | Targeting 97.500 | Stop Loss: 95.000
💰 Multi-Layer Limit Entry | Precision Heist | No Mercy
🚨🧠 Attention Thieves, Looters & Forex Mercenaries! 🧠🚨
The AUD/JPY vault is cracked, and the Thief Trader blueprint is live! We're executing a multi-layer LIMIT ENTRY HEIST – stacking orders like stolen cash in a briefcase. 💼💷💣
👀 We ain't chasing price – we're setting a TRAP with layers. Every dip? A planned robbery opportunity.
💥 ENTRY: The Thief's Layered Ambush 💥
"Aussie Bull" on a bank job – we loot using precise limit orders!
Thief Layer Entry Zones: 95.500 | 95.800 | 96.000 | 96.100
Pro Thief Move: You can increase your limit layers based on your own capital. More layers, more loot!
🛑 STOP LOSS: This is Thief SL @95.000 🔐
Dear Ladies & Gentleman (Thief OG's), this is the panic room. Adjust your SL based on your own strategy & risk. Let the amateurs get shaken out, we hold firm or reload.
🎯 TARGET: Escape Before The Cops Arrive! 💸
The police barricade is set @98.000. Kindly escape with the stolen money before that! OUR target is a clean getaway @97.500.
🧠 Scalpers? Take partials on the way up. Swingers? Let the layers ride. Investors? You're the mastermind behind the heist. ☕💵
Use a trailing SL to protect your stolen profits as the market moves.
🕵️♂️ THIEF TRADER PROTOCOL:
📊 This heist is backed by technicals, liquidity grabs, and pure audacity.
🗞️ Remember: High-impact news = volatility = adjust your layers accordingly.
⚠️ MONEY HEIST RULES:
✅ Avoid placing new layers during news events 📉
✅ Use risk-adjusted sizing on each limit order
✅ Patience is key – a layered heist requires discipline, not desperation
❤️🔥 Hit that 💥 BOOST BUTTON 💥 if you're riding with the Thief Squad!
Support the robbery. Respect the style. Make money like a true Market Outlaw.
🔔 Follow for the next HEIST PLAN. Big bags only. 💼💰🚀
“The market is a bank, not a casino. Act accordingly.” – Thief Trader
🤑📈🐂 #AUDJPY #ForexHeist #ThiefTrader #LayeredEntry #LimitOrders #SwingTrading #ForexTrading #RobTheMarket #DayTrading #BankTheProfit

AUDJPY bullish breakout supported at 96.66The AUDJPY remains in a bullish trend, with recent price action showing signs of a corrective pullback within the broader uptrend.
Support Zone: 96.66 – a key level from previous consolidation. Price is currently testing or approaching this level.
A bullish rebound from 96.66 would confirm ongoing upside momentum, with potential targets at:
97.90 – initial resistance
98.20 – psychological and structural level
98.50 – extended resistance on the longer-term chart
Bearish Scenario:
A confirmed break and daily close below 96.66 would weaken the bullish outlook and suggest deeper downside risk toward:
96.33 – minor support
96.00 – stronger support and potential demand zone
Outlook:
Bullish bias remains intact while the AUDJPY holds above 96.66. A sustained break below this level could shift momentum to the downside in the short term.
This communication is for informational purposes only and should not be viewed as any form of recommendation as to a particular course of action or as investment advice. It is not intended as an offer or solicitation for the purchase or sale of any financial instrument or as an official confirmation of any transaction. Opinions, estimates and assumptions expressed herein are made as of the date of this communication and are subject to change without notice. This communication has been prepared based upon information, including market prices, data and other information, believed to be reliable; however, Trade Nation does not warrant its completeness or accuracy. All market prices and market data contained in or attached to this communication are indicative and subject to change without notice.

AUD_JPY BULLISH BREAKOUT|LONG|
✅AUD_JPY is going up
Now and the pair made a bullish
Breakout of the key horizontal
Level of 97.400 and the breakout
Is confirmed so we are bullish
Biased and we will be expecting
A further bullish move up
LONG🚀
✅Like and subscribe to never miss a new idea!✅
