AUDNZD: One Hour Timeframe, Possible Intraday Buying Setup! Dear traders,
The AUDNZD dropped in the hourly timeframe today following a heavy sell-off in metals like gold and silver. However, we anticipate a bullish trend for AUDNZD to begin next week as the market settles down. Please manage your risk accurately while trading in these current conditions. Good luck and trade safely!
If you enjoy our work, please like and comment on our ideas.
Team Setupsfx_
Audnzdlong

AUDNZD - CB Divergence & USD Neutrality Narrative: RBA is hawkish on inflationary pressure and labor strength, RBNZ - stagflation struggles
Sentiment: Mixed Risk-off, risk is supported by strength in precious metals
Pattern: TC(B)
Time: EU session lunch

+50 pips without usI'll keep repeating this over and over again.
The Origin of Displacement never lies
• Whether it's for reversals
• Whether it's for continuations
The Origin of Displacement never lies

#AUDNZD: Strong Bullish Impulse Will Continue!! AUDNZD is in steady bullish move and it is likely to continue the move since we witness small price correction, now since the correction is completed we can now see price continue the uptrend.
Use risk management and do your own research while trading forex market.
Team Setupsfx_
Long Signal AUDNZDWe have just received a long signal for AUDNZD. This trade has a 80% profitability rate with a average trade profit of 2.8%.

AUDNZD - Bullish continuation after pullback (Trade Idea)
Buy Zone: 1.1600–1.1620 (lower green demand)
Confirmation: Bullish H1 close / rejection from demand
Stop Loss: Below 1.1580
TP1: 1.1660 (range high)
TP2: 1.1690–1.1700 (next supply)
RR: ~1:2 to 1:3
RSI: Oversold → supports bounce
Wait for confirmation candle; no blind buys.
NFA - For educational purposes only

Can AUD/NZD Extend Its Bullish Structure From Here?AUD/NZD Bullish Continuation | Swing & Day Trade Opportunity
📊 TRADINGVIEW IDEA DESCRIPTION
🏦 Asset Overview
AUD/NZD – “AUSSIE VS KIWI DOLLAR”
Forex Market Trade Opportunity Guide
⏳ Timeframe: Swing / Day Trade
📈 Market Bias
🟢 Bullish Plan Active
Trend structure remains supportive of upside continuation while pullbacks offer participation zones.
🎯 Entry Strategy
🟢 Entry: YOU CAN ANY PRICE LEVEL ENTRY
➡️ Suitable for both scaling-in and momentum-based traders depending on individual execution style.
🛑 Risk Management
🔴 Stop Loss: This is thief SL @ 194.000
⚠️ Dear Ladies & Gentlemen (Thief OG’s),
Adjust your SL based on your own strategy & risk profile.
I am not recommending using only my SL. Risk control remains your responsibility.
🎯 Profit Objective
🟡 Target Zone: 200.000
📌 Rationale:
Strong resistance zone ahead
Overbought conditions likely near highs
Trap + correction probability increases
➡️ Escape with profits, not greed
⚠️ Note:
I am not recommending using only my TP. You decide when and how to secure profits.
🔗 RELATED PAIRS TO WATCH (CORRELATION MAP)
💱 AUD-Driven Pairs
AUD/USD 💵 → Strength supports AUD/NZD upside
AUD/JPY 💵 → Risk-on sentiment confirmation
AUD/CAD 💵 → Commodity-linked AUD momentum check
💱 NZD-Driven Pairs
NZD/USD 💵 → NZD weakness strengthens AUD/NZD bullish bias
NZD/JPY 💵 → Risk sentiment + carry trade flow insight
📌 Key Correlation Insight
AUD/NZD is a relative strength battle
AUD strength + NZD weakness = bullish acceleration
Divergence between AUD/USD and NZD/USD often leads AUD/NZD moves
🧠 Pro Trading Notes
✔️ Ideal for trend continuation traders
✔️ Works best with price action + structure confirmation
✔️ Always align execution with your risk rules
💬 If this idea adds value, support with a 👍 Like & 💾 Save
📡 Follow for consistent market structure & clean setups
Trade smart. Manage risk. Stay disciplined.

AUD/NZD Rising Structure — Layered Entry Setup Confirmed!🎯 AUD/NZD: The Trans-Tasman Layering Heist 🦘🥝
Market: FOREX | Pair: AUD/NZD (Aussie vs Kiwi Dollar)
Strategy Type: Swing/Day Trade | Bias: BULLISH 🐂
Risk Profile: Medium | Trade Style: Thief Layering Method 🎭
📊 THE SETUP
The Trans-Tasman neighbors are setting up for an interesting bullish move. The Aussie is showing relative strength against the Kiwi, and we're positioning for a tactical upside play using a layered entry approach.
🎯 TRADE PLAN: THE LAYERING HEIST
Entry Strategy: Multi-Layer Limit Orders 🪜
This isn't your standard one-click entry—we're spreading risk across multiple price levels:
Layer 1: 1.13000
Layer 2: 1.13200
Layer 3: 1.13400
Layer 4: 1.13600
You can add more layers based on your account size and risk appetite. The beauty of layering? You average in as price moves, reducing timing risk.
Stop Loss: 1.12800 🛑
⚠️ Risk Disclaimer: This SL is MY level based on MY analysis. YOU control your own risk management. Adjust according to your strategy and account size.
Take Profit Target: 1.15000 🎯
This zone has confluence: strong historical resistance + potential overbought conditions + liquidity trap territory. Take your profits before the crowd does!
⚠️ Profit Disclaimer: This TP is MY target. YOU decide when to bank profits. Scale out, trail stops, or take it all at once—your money, your rules.
🔍 TECHNICAL ANALYSIS
Why This Setup Works:
AUD showing relative strength vs NZD on macro fundamentals
Key support holding at lower levels
Room to run before hitting major resistance cluster at 1.15000
Multi-layer entry reduces timing risk and improves average entry price
Risk-Reward Profile:
With layered entries averaging around 1.13150, we're looking at roughly 1:4 R/R to target, making this an asymmetric opportunity worth watching.
🌏 CORRELATED PAIRS TO WATCH
Keep these pairs on your radar for confluence and confirmation:
Direct Correlations:
OANDA:AUDUSD 💵 - If Aussie is strong globally, it confirms our bias
OANDA:NZDUSD 💵 - Kiwi weakness here supports our long AUD/NZD position
OANDA:AUDCAD 🍁 - Another commodity currency pair showing Aussie strength
Inverse Correlations:
FX:USDJPY 🇯🇵 - Risk-on sentiment helps commodity currencies
Gold ( OANDA:XAUUSD ) 🥇 - Aussie correlates with gold; watch for confirmation
Why These Matter: When AUD/USD rises and NZD/USD lags, AUD/NZD naturally climbs. Cross-check these pairs before executing.
⚡ KEY POINTS TO REMEMBER
1️⃣ Layering = Patience: Don't FOMO into one entry. Let the layers fill as price moves.
2️⃣ Position Sizing: Each layer should be sized so your TOTAL position aligns with your risk model.
3️⃣ This Isn't Set-and-Forget: Monitor correlation pairs and news from RBA and RBNZ.
4️⃣ Know When to Fold: If structure breaks below 1.12800, we were wrong. Exit cleanly.
5️⃣ Scale Out Strategy: Consider taking partial profits at psychological levels like 1.14000.
🎭 ABOUT THE "THIEF STYLE"
The layering method is about being strategic and patient—like a calculated heist, not a smash-and-grab. We're not market makers, but we can think like them by spreading our orders across zones instead of chasing candles.
This approach:
Reduces emotional trading
Improves average entry price
Manages risk across multiple levels
Allows for partial fills in volatile markets
🚀 TRADE MANAGEMENT CHECKLIST
✅ Set all limit orders
✅ Configure stop loss
✅ Set alerts at key levels
✅ Monitor correlated pairs
✅ Review daily before London/NY sessions
✅ Have an exit plan beyond just TP/SL
✨ If you find value in my analysis, a 👍 and 🚀 boost is much appreciated — it helps me share more setups with the community!
#AUDNZD #ForexTrading #SwingTrading #DayTrading #LayeringStrategy #ThiefStyle #AussieVsKiwi #ForexAnalysis #TradingSetup #RiskManagement #PriceAction #ForexSignals #TradingIdeas #CurrencyTrading #ForexStrategy
mrmoney limited AUDNZD trading ideaprice filled our weekly volume imbalance and formed a double bottom causing a bullish momentum

AUDNZD: Extended Impulse Trend, We are still buying! The price is in a bullish impulse range, and we’re at the end of the final move. It’s unlikely to retrace anytime, and this trend is likely to continue being bullish. Please use accurate risk management.
If you like our work, consider liking and commenting on this idea. It will encourage us to post more such analysis.
Good luck and trade safely!
Team Setupsfx_

Weekly Insights EUR USD AUD NZD BTC ETH (22nd-25th septemer2025)Get ready for the week ahead — in this video we break down the technical outlook and key levels for major currencies and markets including EUR/USD, AUD, NZD, as well as S&P 500 and Bitcoin (BTC). We analyze recent price action, highlight important support & resistance zones, and discuss possible scenarios you’ll want to watch from September 22–26, 2025. Whether you trade forex, crypto, or equities, these insights will help you stay informed and better positioned for whatever the markets throw next.
If you want, I can give you a more detailed summary (key levels, possible trades, etc.) of the video.

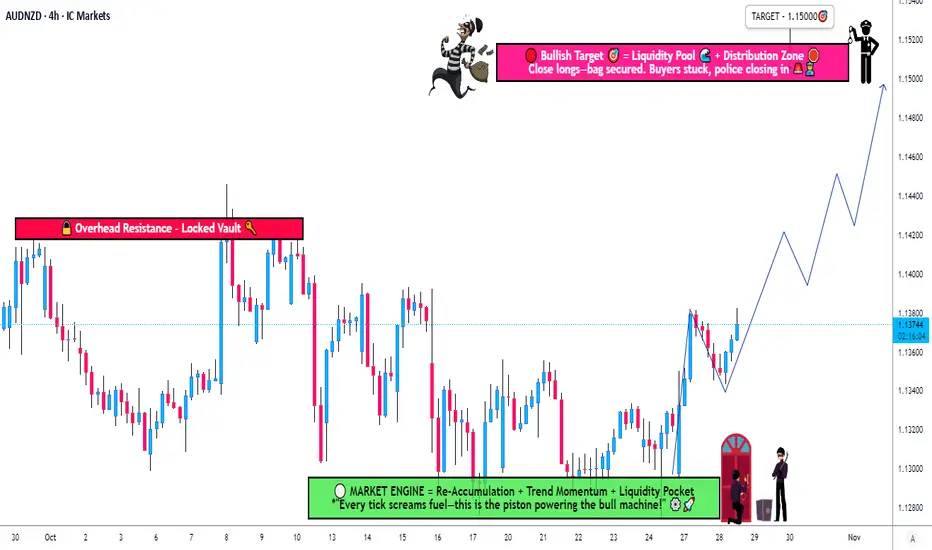
AUD/NZD Heist: Bullish Loot Ready for the Taking?🔥 AUD/NZD "Aussie vs Kiwi" Forex Bank Heist Plan (Swing/Day Trade) 🤑💰
Dear Thief Traders & Money Snatchers, 🐱👤💸
Get ready to crack the vault with our Thief Trading Style! This is the ultimate heist plan for the AUD/NZD, driven by slick technicals and sneaky fundamentals. We’re going BULLISH to steal the loot! 💪🚨
🏦 The Heist Plan: Bullish Breakout
Asset: AUD/NZD "Aussie vs Kiwi" 🌏
Strategy: Layering multiple buy limit orders for maximum loot! 🎯
Timeframe: Swing/Day Trade ⏰
📈 Entry: Crack the Vault Wide Open!
Swipe the loot at these levels using the Thief Layering Strategy! Place multiple buy limit orders:
1.10400 💰
1.10300 💰
1.10200 💰
1.10100 💰
Pro Tip: Add more layers based on your risk appetite and market recon! 🕵️♂️
Enter at any price level if you spot a clean pullback or swing low on a 15M/30M timeframe. The vault’s open, so don’t hesitate! 🚪💥
🛑 Stop Loss: Thief’s Escape Route
Thief SL: Set at 1.09800 (recent swing low on 4H timeframe). 🛡️
OG Advice: Adjust your SL based on your lot size, risk tolerance, and number of layered entries. Stay sharp, thieves! 🔍
🎯 Target: Escape Before the Electric Fence!
Take Profit: 1.11200 ⚡️
Hit the target and escape with the cash before the market’s high-voltage fence zaps you! 💨💰
📰 Why This Heist Works
Bullish Momentum: AUD/NZD is primed for a breakout, backed by solid technicals and fundamentals. 📊
Key Drivers: Check the latest COT Report, Macro Outlook, Sentimental Analysis, and Intermarket Trends for confirmation. Stay ahead of the game! 🗞️
Market Edge: Our layering strategy maximizes entries while dodging traps set by bearish robbers. 🕸️
⚠️ Heist Alerts: News & Risk Management
News Releases: Avoid new trades during high-impact news to dodge volatility spikes. 🚨
Protect the Loot: Use trailing stop-losses to lock in profits and keep your positions safe. 🔒
Stay Agile: Markets move fast—update your plan with real-time data to avoid getting caught! ⏳
💥 Boost the Heist!
Hit the Boost Button to power up our Thief Trading crew! 🚀 Every like and view strengthens our robbery squad. Let’s make bank daily with the slickest trading style in the game! 🤑💪
Stay sneaky, stay sharp, and I’ll catch you at the next heist! 🐱👤🔥

AUDCHFTHE SWING ANALYSIS
Follow for more Simple And accurate swing analysis on Indices, Currency, Commodities.

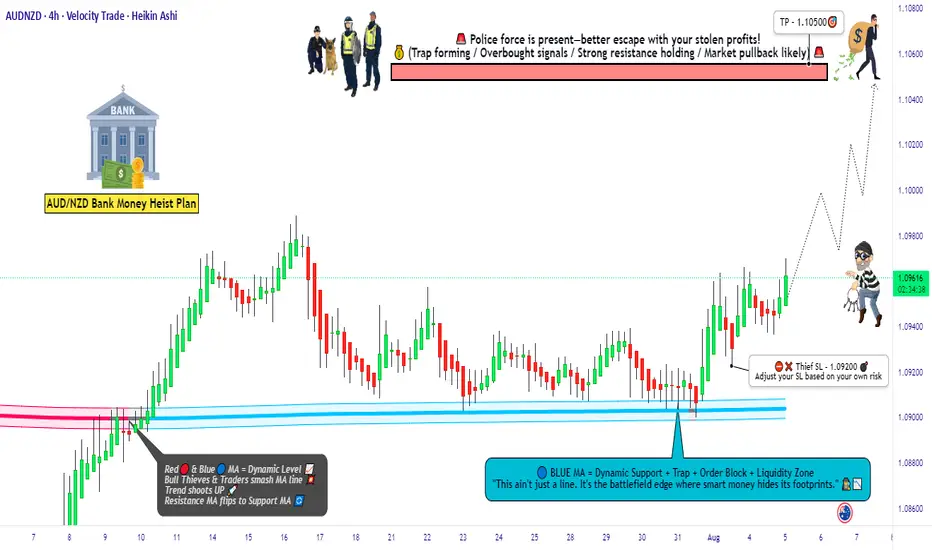
AUD/NZD Heist Loading... Will the Kiwi Surrender to the Aussie?🦘💵 AUD/NZD BULLISH LOOT RAID – THIEF TRADER ENTRY ACTIVE! 🔓🧠
🧭 Asset: AUD/NZD
📊 Plan: Bullish Heist in Progress
🎯 Entry: Thief dives in at any price – using layered limit orders to trap the perfect fill.
🛑 Stop Loss: 1.09200 – Emergency exit if alarms go off 🚨
💰 Target: 1.10500 – Vault full of pips awaiting collection! 💼💸
🕵️♂️ THIEF STRATEGY SNAPSHOT:
The Aussie is loading up the bags and the Kiwi’s guard is down 🐨🆚🥝.
This isn't just a trade—it’s a covert FX raid. Thief is stalking price silently, placing sneaky limit orders in layers—waiting for the market to slip up.
🚪 No fixed door in—every pullback is a crack in the vault.
⚔️ Patience is the blade—entries are stealthy, exits are explosive.
🧠 Using both market structure + sentiment, we sniff out the liquidity stash!
💡 TRADE TIPS FROM THE THIEF'S VAULT:
📉 Layer entries across minor dips (M15-H1 zones) – never chase.
🏃♂️ Price nearing reversal zones? Use tight stops and trail profits like a pro.
📰 Avoid entries during red news – get in before the crowd, not with them.
🧭 This pair respects structure. Don't fight momentum—ride it like a bandit horse.
🔔 THIEF CODE: “We don’t predict—we prepare.”
🎯 Lock in, layer deep, loot fast.
💬 Drop your setup thoughts below 💣
❤️ Like this? Smash that 👍 and join the thief crew!
📌 Save this plan & follow for more stealth market raids.
🕶️ Stay sharp. Stay hidden. Stay profitable.
💼 Next vault breach loading... 👇
📍#ThiefTrader #AUDNZD #LayeredLootPlan #ForexHeist #MarketRaiders
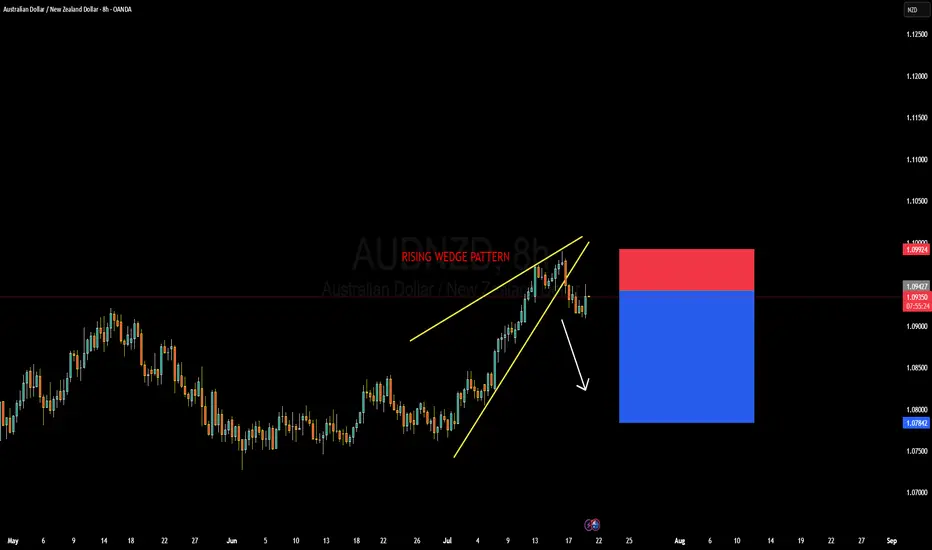
AUDNZD Forming Rising Wedge PatternAUDNZD has formed a textbook rising wedge pattern on the 8H chart and has now broken to the downside, signaling potential bearish continuation. This setup typically indicates a loss of momentum in the prevailing bullish trend, and with the clean structure break now confirmed, the bears seem ready to take control. I’ve already entered short positions from the top edge of the pattern and am currently floating in profit, anticipating further downside toward the 1.0780–1.0800 zone.
From a fundamental perspective, the Australian dollar has been relatively stable but lacks a strong bullish catalyst at this point. The Reserve Bank of Australia is holding a cautious tone amid mixed inflation signals, while New Zealand’s economy is showing signs of potential resilience. The RBNZ remains committed to tighter monetary conditions for longer as inflation continues to hover above their comfort zone, which provides some support to NZD in the near term.
Technically, the break of the lower wedge support is significant. Price failed to sustain higher highs near 1.1000 and quickly retraced, showing bearish rejection. With the RSI diverging and volume fading near the top of the wedge, this was a high-probability reversal zone. As long as price stays below 1.0950, the bias remains bearish, and further sell pressure is expected.
I'm targeting 1.0780 as the next key liquidity level. It aligns with previous structure support and provides a favorable risk-to-reward setup. This setup is a clear example of price-action-driven reversal trading, paired with macroeconomic alignment. I’ll continue to trail stops as price progresses, but so far, AUDNZD is playing out exactly as anticipated.
AUDNZD Local Long!
HI,Traders !
#AUDNZD made a bullish
Breakout of the key horizontal
Level of 1.09105 which is now a
Support and the pair is going down
To retest the level from where
We will be expecting a
Further bullish move up !
Comment and subscribe to help us grow !

AUD/USD at Critical Resistance — Bearish Outlook Below 0.65381. Major Resistance Zone: 0.65380
Price is currently testing a strong horizontal resistance level at 0.65380, a level that has been tested multiple times (as shown by the pink circles).
This level has acted as a historical turning point, which increases its significance.
2. Price Structure: Lower Highs and Equal Highs
The chart reveals a potential double top or distribution pattern, forming under the 0.65380 resistance.
This suggests weakening bullish momentum and increases the probability of a bearish reversal.
3. Projected Bearish Path (White Dotted Lines):
If price fails to break above 0.65380 decisively, the expected move is a stepwise decline.
The projected path targets several support levels:
0.65003
0.64647
0.64213
0.63957
Final target: 0.63627, a key support from early May.
4. Support & Resistance Zones:
Resistance Levels:
0.65380 (Major)
0.65003
Support Levels (Sequential Targets):
0.64647
0.64213
0.63957
0.63627
5. Confluence with Fundamentals:
U.S. economic events (highlighted at the bottom with calendar icons) may act as volatility triggers, potentially accelerating this move.
✅ Summary & Trading Implications:
Bias: Bearish below 0.65380
Trade Idea: Watch for rejection at resistance or break below 0.65003 for confirmation.
Bearish Targets: Gradual move toward 0.63627 with key pauses at intermediate support levels.
Invalidation: Daily close above 0.65380 would negate the bearish setup and open potential for new highs.

Watch This Wedge! AUDNZD Primed for Upside PushThe AUDNZD pair forms a falling wedge pattern, a bullish reversal formation that typically occurs after a downtrend. The price action is being squeezed between a descending resistance line and a descending support line, creating a narrowing range. The market is now attempting to break out of the wedge, with the current price testing the resistance line. A breakout and close above this trendline would signal bullish strength and could lead to a reversal of the recent downtrend.
Targets:
TP1: 1.07605
TP2: 1.07922
Stop Loss: Below the recent low at 1.06542

AUDNZD Rejected – CPI & RBA Dovish Bias Pressures AussieKey Resistance Zone: 1.0780 – 1.0800
The pair tested this area twice and failed to break above, forming a clear double-top pattern. This is a bearish signal suggesting buyers are exhausted.
Price Action:
A strong bearish rejection candle followed the second resistance test, aligning with historical resistance and structure. The pair is now showing signs of reversal.
Support Levels to Watch:
🥅 Target 1: 1.0707 – Previous consolidation zone
🥅 Target 2: 1.0677 – Key swing low
📉 Stop Loss: Above 1.0800
Pattern: Rising wedge structure breaking down, signaling downside continuation.
🔍 Fundamental Analysis
🇦🇺 Australia (AUD) – Weakness Potential
RBA’s Dovish Leaning:
RBA Assistant Governor Kent emphasized external FX market risks and cautious positioning on monetary tightening, which dampens rate hike expectations【source: RBA speech】.
Key Data Incoming:
April 30: Quarterly CPI data
Forecasts suggest core inflation might ease, reducing pressure on the RBA to act. If CPI undershoots, it could trigger AUD selling.
AUD also faces pressure from global growth fears and risk-off sentiment.
🇳🇿 New Zealand (NZD) – Relative Strength
While the RBNZ has already started easing, the NZD has shown resilience amid improving trade balance and stable economic performance.
NZ Business Confidence is also due, which could influence near-term NZD moves, but broader positioning supports the Kiwi.
🧠 Sentiment Overview
The risk-reward favors shorts here:
Clear technical rejection
Bearish macro backdrop for AUD
Relative NZD strength
CPI data will be the key catalyst, and positioning ahead of it looks justified given current chart structure.
📝 Conclusion:
AUDNZD looks primed for a downside correction after repeated rejections at a major resistance zone. With dovish RBA commentary and potential soft inflation data ahead, short setups are favored with targets at 1.0707 and 1.0677.

AUD/NZD "Aussie-Kiwi" Forex Bank Heist Plan (Swing/Day)🌟Hi! Hola! Ola! Bonjour! Hallo! Marhaba!🌟
Dear Money Makers & Robbers, 🤑 💰💸✈️
Based on 🔥Thief Trading style technical and fundamental analysis🔥, here is our master plan to heist the AUD/NZD "Aussie-Kiwi" Forex Bank. Please adhere to the strategy I've outlined in the chart, which emphasizes long entry. Our aim is the high-risk ATR Red Zone. It's Risky level, overbought market, consolidation, trend reversal, trap at the level where traders and bearish robbers are stronger. 🏆💸"Take profit and treat yourself, traders. You deserve it!💪🏆🎉
Entry 📈 : "The heist is on! Wait for the MA breakout then make your move - Bullish profits await!"
however I advise to Place Buy stop orders above the Moving average 1.10400 (or) Place buy limit orders within a 15 or 30 minute timeframe most recent or swing, low or high level.
📌I strongly advise you to set an "alert (Alarm)" on your chart so you can see when the breakout entry occurs.
Stop Loss 🛑:
Thief SL placed at the nearest / swing low level Using the 4H timeframe (1.09700) Day / swing trade basis.
SL is based on your risk of the trade, lot size and how many multiple orders you have to take.
🏴☠️Target 🎯: 1.11700 (or) Escape Before the Target
🧲Scalpers, take note 👀 : only scalp on the Long side. If you have a lot of money, you can go straight away; if not, you can join swing traders and carry out the robbery plan. Use trailing SL to safeguard your money 💰.
💵💰AUD/NZD "Aussie-Kiwi" Forex Bank Heist Plan (Swing / Day Trade) is currently experiencing a bullishness,., driven by several key factors.
📰🗞️Get & Read the Fundamental, Macro, COT Report, Quantitative Analysis, Sentimental Outlook, Intermarket Analysis, Future trend targets.... go ahead to check 👉👉👉🔗
⚠️Trading Alert : News Releases and Position Management 📰 🗞️ 🚫🚏
As a reminder, news releases can have a significant impact on market prices and volatility. To minimize potential losses and protect your running positions,
we recommend the following:
Avoid taking new trades during news releases
Use trailing stop-loss orders to protect your running positions and lock in profits
💖Supporting our robbery plan 💥Hit the Boost Button💥 will enable us to effortlessly make and steal money 💰💵. Boost the strength of our robbery team. Every day in this market make money with ease by using the Thief Trading Style.🏆💪🤝❤️🎉🚀
I'll see you soon with another heist plan, so stay tuned 🤑🐱👤🤗🤩

We’re bullish on AUDUSDTechnical Analysis
AUDUSD lies below 50 - period SMA (0.6324, declining) and 100 - day SMA (0.6512, falling), indicating a downward trend yet short - term upside potential. January 2025 RSI bullish divergence shows weakening downward momentum. Break above 0.6340 could push it to 0.6400; otherwise, it may range 0.6131 - 0.6302.
Economic Fundamentals
Australia: Its economic growth, inflation and export prices affect the Aussie. Growth aids appreciation; inflation undermines it. Higher resource prices boost the currency.
US: Strong US data strengthens the dollar, weakening AUD/USD; weak data has the opposite effect.
Market & Geopolitical Factors
High risk appetite benefits the Aussie; low appetite favors the dollar. Geopolitical tensions prompt a flight to the dollar, hurting the Aussie.
💎💎💎 AUDUSD 💎💎💎
🎁 Buy@0.62500 - 0.62800
🎁 TP 0.63500 - 0.64000
The market has been extremely volatile lately. If you can't figure out the market's direction, you'll only be a cash dispenser for others. If you also want to succeed,Follow the link below to get my daily strategy updates

AUD/NZD Made Double Bottom , Long Setup To Get 150 Pips !This Is An Educational + Analytic Content That Will Teach Why And How To Enter A Trade
Make Sure You Watch The Price Action Closely In Each Analysis As This Is A Very Important Part Of Our Method
Disclaimer : This Analysis Can Change At Anytime Without Notice And It Is Only For The Purpose Of Assisting Traders To Make Independent Investments Decisions.

AUDNZD LONG ReboundAUDNZD Rebound to the 60% fibbonacci level on daily timeframe. This is an entry against the trend. Moreover, we have Bullisgh divergence on RSI.
