AUDUSD FRGNT Daily Forecast -Q4 | W45 | D5| Y25 |📅 Q4 | W45 | D5| Y25 |
📊 AUDUSD FRGNT Daily Forecast
🔍 Analysis Approach:
I’m applying Smart Money Concepts, focusing on:
Identifying Points of Interest on the Higher Time Frames (HTFs) 🕰️
Using those POIs to define a clear trading range 📐
Refining those zones on Lower Time Frames (LTFs) 🔎
Waiting for a Break of Structure (BoS) for confirmation ✅
This method allows me to stay precise, disciplined, and aligned with the market narrative, rather than chasing price.
💡 My Motto:
"Capital management, discipline, and consistency in your trading edge."
A positive risk-to-reward ratio, paired with a high win rate, is the backbone of any solid trading plan 📈🔐
⚠️ Losses?
They’re part of the mathematical game of trading 🎲
They don’t define you — they’re necessary, they happen, and we move forward 📊➡️
🙏 I appreciate you taking the time to review my Daily Forecast.
Stay sharp, stay consistent, and protect your capital
— FRNGT 🚀
OANDA:AUDUSD
Audusdforecast

AUDUSD(20251105)Today's AnalysisMarket News:
The US government shutdown stalemate continues, with the 35-day record about to be broken.
Technical Analysis:
Today's Buy/Sell Threshold:
0.6502
Support and Resistance Levels:
0.6560
0.6538
0.6524
0.6479
0.6465
0.6443
Trading Strategy:
Consider buying if the price breaks above 0.6502, with a first target price of 0.6524.
Consider selling if the price breaks below 0.6479, with a first target price of 0.6465.

AUDUSD FRGNT Daily Forecast -Q4 | W45 | D3| Y25 |📅 Q4 | W45 | D3| Y25 |
📊 AUDUSD FRGNT Daily Forecast
🔍 Analysis Approach:
I’m applying Smart Money Concepts, focusing on:
Identifying Points of Interest on the Higher Time Frames (HTFs) 🕰️
Using those POIs to define a clear trading range 📐
Refining those zones on Lower Time Frames (LTFs) 🔎
Waiting for a Break of Structure (BoS) for confirmation ✅
This method allows me to stay precise, disciplined, and aligned with the market narrative, rather than chasing price.
💡 My Motto:
"Capital management, discipline, and consistency in your trading edge."
A positive risk-to-reward ratio, paired with a high win rate, is the backbone of any solid trading plan 📈🔐
⚠️ Losses?
They’re part of the mathematical game of trading 🎲
They don’t define you — they’re necessary, they happen, and we move forward 📊➡️
🙏 I appreciate you taking the time to review my Daily Forecast.
Stay sharp, stay consistent, and protect your capital
— FRNGT 🚀
OANDA:AUDUSD

SELL AUDUSD - Good trade for this week aheadAUDUSD Has broken through a powerful support zone (the green trendline) and has failed to break through the upper trend line (the resistance zone)... It is very likely to keep dropping towards the next major support level which is shown on the chart as the "take profit level"... AUDUSD has shown many clear signs of a downward trend ahead.

AUDUSD FRGNT Weekly Forecast -Q4 | W45 | Y25 |📅 Q4 | W45 | Y25 |
📊 AUDUSD FRGNT Weekly Forecast
🔍 Analysis Approach:
I’m applying Smart Money Concepts, focusing on:
Identifying Points of Interest on the Higher Time Frames (HTFs) 🕰️
Using those POIs to define a clear trading range 📐
Refining those zones on Lower Time Frames (LTFs) 🔎
Waiting for a Break of Structure (BoS) for confirmation ✅
This method allows me to stay precise, disciplined, and aligned with the market narrative, rather than chasing price.
💡 My Motto:
"Capital management, discipline, and consistency in your trading edge."
A positive risk-to-reward ratio, paired with a high win rate, is the backbone of any solid trading plan 📈🔐
⚠️ Losses?
They’re part of the mathematical game of trading 🎲
They don’t define you — they’re necessary, they happen, and we move forward 📊➡️
🙏 I appreciate you taking the time to review my Daily Forecast.
Stay sharp, stay consistent, and protect your capital
— FRNGT 🚀
OANDA:AUDUSD

AUDUSD is heading DOWN! time to sellAUDUSD was stuck in-between 2 powerful support and resistance zones and struggled to break through either for a while, but the price has now finally broken down below the support zone which shows that eurusd is ready for a bearish move all the way to the downside (taking profit at the green take profit line) - the next major support zone!

AUDUSD FRGNT Daily Forecast - Q4 | W44 | D31| Y25 |📅 Q4 | W44 | D31| Y25 |
📊 AUDUSD FRGNT Daily Forecast
🔍 Analysis Approach:
I’m applying Smart Money Concepts, focusing on:
Identifying Points of Interest on the Higher Time Frames (HTFs) 🕰️
Using those POIs to define a clear trading range 📐
Refining those zones on Lower Time Frames (LTFs) 🔎
Waiting for a Break of Structure (BoS) for confirmation ✅
This method allows me to stay precise, disciplined, and aligned with the market narrative, rather than chasing price.
💡 My Motto:
"Capital management, discipline, and consistency in your trading edge."
A positive risk-to-reward ratio, paired with a high win rate, is the backbone of any solid trading plan 📈🔐
⚠️ Losses?
They’re part of the mathematical game of trading 🎲
They don’t define you — they’re necessary, they happen, and we move forward 📊➡️
🙏 I appreciate you taking the time to review my Daily Forecast.
Stay sharp, stay consistent, and protect your capital
— FRNGT 🚀
OANDA:AUDUSD

AUDUSD FRGNT Daily Forecast -Q4 | W44 | D31| Y25 |📅 Q4 | W44 | D31| Y25 |
📊 AUDUSD FRGNT Daily Forecast
🔍 Analysis Approach:
I’m applying Smart Money Concepts, focusing on:
Identifying Points of Interest on the Higher Time Frames (HTFs) 🕰️
Using those POIs to define a clear trading range 📐
Refining those zones on Lower Time Frames (LTFs) 🔎
Waiting for a Break of Structure (BoS) for confirmation ✅
This method allows me to stay precise, disciplined, and aligned with the market narrative, rather than chasing price.
💡 My Motto:
"Capital management, discipline, and consistency in your trading edge."
A positive risk-to-reward ratio, paired with a high win rate, is the backbone of any solid trading plan 📈🔐
⚠️ Losses?
They’re part of the mathematical game of trading 🎲
They don’t define you — they’re necessary, they happen, and we move forward 📊➡️
🙏 I appreciate you taking the time to review my Daily Forecast.
Stay sharp, stay consistent, and protect your capital
— FRNGT 🚀
OANDA:AUDUSD

AUDUSD is ready to drop to the downside! Good trade opportunity AUDUSD has broken below a very strong support trendline which held the price for many weeks. It then also tried to test a powerful resistance level (the red trendline) but it failed to break through. It is now very likely to head all the way down to the next major support zone (which is the while line drawn below) - Great sell opportunity trade.

AUDUSD sell signal. Don't forget about stop-loss.
Write in the comments all your questions and instruments analysis of which you want to see.
Friends, push the like button, write a comment, and share with your mates - that would be the best THANK YOU.
P.S. I personally will open entry if the price will show it according to my strategy.
Always make your analysis before a trade

AUDUSD FRGNT Daily Forecast -Q4 | W44 | D30| Y25 |📅 Q4 | W44 | D30| Y25 |
📊 AUDUSD FRGNT Daily Forecast
🔍 Analysis Approach:
I’m applying Smart Money Concepts, focusing on:
Identifying Points of Interest on the Higher Time Frames (HTFs) 🕰️
Using those POIs to define a clear trading range 📐
Refining those zones on Lower Time Frames (LTFs) 🔎
Waiting for a Break of Structure (BoS) for confirmation ✅
This method allows me to stay precise, disciplined, and aligned with the market narrative, rather than chasing price.
💡 My Motto:
"Capital management, discipline, and consistency in your trading edge."
A positive risk-to-reward ratio, paired with a high win rate, is the backbone of any solid trading plan 📈🔐
⚠️ Losses?
They’re part of the mathematical game of trading 🎲
They don’t define you — they’re necessary, they happen, and we move forward 📊➡️
🙏 I appreciate you taking the time to review my Daily Forecast.
Stay sharp, stay consistent, and protect your capital
— FRNGT 🚀
OANDA:AUDUSD

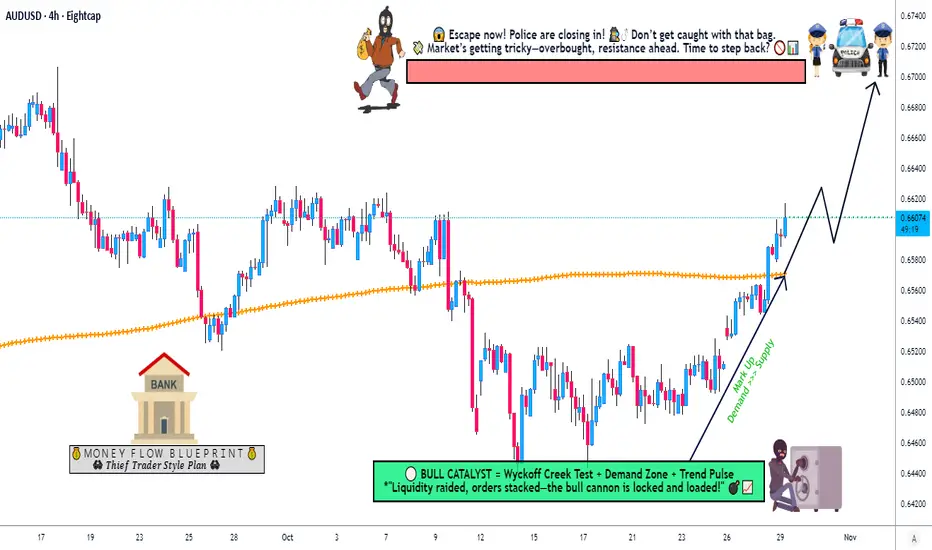
Is the Aussie Dollar Ready for a Strong Upside Push?🎯 AUD/USD: The Great Heist Setup | 200 SMA Breakout in Play! 💰
📊 Market Overview
The Aussie Dollar is making moves, ladies and gents! We've got a confirmed bullish breakout above the 200 Simple Moving Average — and you know what that means... it's time to plan our strategic entry! 🚀
🎭 The "Thief Strategy" Breakdown
🔍 Asset Analysis
Pair: AUD/USD (Aussie Dollar vs. US Dollar)
Market Type: Forex
Trade Style: Swing/Day Trade
Setup: Capital Flow Blueprint
📈 Technical Outlook
✅ Bullish bias confirmed with price breaking and holding above the 200 SMA
✅ Momentum building as buyers step in
✅ Higher timeframe structure supporting upside potential
🎯 Entry Strategy: "The Layering Heist"
The Thief Strategy uses multiple limit orders (layering technique) to scale into positions like a pro! Here's the blueprint:
💎 Multi-Layer Entry Zones:
Layer 1: 0.65400
Layer 2: 0.65600
Layer 3: 0.64800
Layer 4: 0.66000
Note: You can add more layers based on your capital allocation and risk appetite. Scale in smart, scale out smarter! 😎
🛡️ Risk Management
⛔ Stop Loss: 0.65200
Disclaimer: This is the Thief's SL level for reference. However, OG Thieves — set your own stop loss based on YOUR risk tolerance. Your capital, your rules! 🎲
🎯 Take Profit Target: 0.67000
Why 0.67000? This level acts as:
🚧 Strong resistance zone ("Police Barricade")
📊 Potential overbought territory
Historical trap zone — secure profits before the reversal!
Disclaimer: This is a suggested TP level. Trail your stops, scale out partially, or set your own target. Take money when you make money — it's your game! 💵
🔗 Correlated Pairs to Watch
Keep an eye on these related markets for confluence:
OANDA:NZDUSD — Commodity currency cousin, often moves in tandem with AUD
OANDA:AUDJPY — Risk-on sentiment gauge
OANDA:AUDCAD — Inter-commodity pair correlation
USD Index ( TVC:DXY ) — Inverse correlation with AUD/USD
Gold ( OANDA:XAUUSD ) — Aussie correlates with gold due to mining exports
💡 Pro Tip: If USD weakens broadly and gold rallies, AUD/USD typically benefits!
🔑 Key Points Summary
✨ Bullish breakout above 200 SMA = momentum shift
✨ Layering strategy allows better average entry price
✨ Risk-to-reward favors bulls with clear targets
✨ Watch DXY weakness and gold strength for confirmation
✨ Resistance at 0.67000 — bank profits before reversal zones!
✨ If you find value in my analysis, a 👍 and 🚀 boost is much appreciated — it helps me share more setups with the community!
#AUDUSD #ForexTrading #SwingTrading #DayTrading #ThiefStrategy #200SMA #Breakout #TechnicalAnalysis #ForexSignals #AussieDollar #LayeringStrategy #RiskManagement #ForexSetup #TradingIdeas #PriceAction
AUDUSD FRGNT Daily Forecast - Q4 | W44 | D29| Y25 |📅 Q4 | W44 | D29| Y25 |
📊 AUDUSD FRGNT Daily Forecast
🔍 Analysis Approach:
I’m applying Smart Money Concepts, focusing on:
Identifying Points of Interest on the Higher Time Frames (HTFs) 🕰️
Using those POIs to define a clear trading range 📐
Refining those zones on Lower Time Frames (LTFs) 🔎
Waiting for a Break of Structure (BoS) for confirmation ✅
This method allows me to stay precise, disciplined, and aligned with the market narrative, rather than chasing price.
💡 My Motto:
"Capital management, discipline, and consistency in your trading edge."
A positive risk-to-reward ratio, paired with a high win rate, is the backbone of any solid trading plan 📈🔐
⚠️ Losses?
They’re part of the mathematical game of trading 🎲
They don’t define you — they’re necessary, they happen, and we move forward 📊➡️
🙏 I appreciate you taking the time to review my Daily Forecast.
Stay sharp, stay consistent, and protect your capital
— FRNGT 🚀
OANDA:AUDUSD

QUICK BUY TRADE OPPORTUNITY FOR AUDUSDAUDUSD has broken a very powerful resistance level (red trendline).. and is very likely to test the next powerful resistance zone which is all the way up at 0.66600. great time to buy now (low risk high reward)

AUDUSD potential move in short term Had test of OB and trend shift on LTF, ptentially move to take buyside liqudity

AUDUSD Trade Plan - Waiting for a Pullback & Structure Break.The AUDUSD has officially broken structure to the upside, signaling bullish momentum ✅.
I’m currently waiting for price to retrace back into equilibrium within the previous swing range before considering any long positions—price is overextended at current levels and chasing here wouldn’t be smart ⚖️📉.
Patience is key as I wait for premium liquidity zones to be tapped for a high-probability entry setup 🎯.
⚠️ Disclaimer: This is market analysis and not financial advice.
AUDUSD Trade Plan - Waiting for a Pullback & Structure Break.

AUDUSD FRGNT Daily Forecast -Q4 | W44 | D27| Y25 | GAP FILL !📅 Q4 | W44 | D27| Y25 |
📊 AUDUSD FRGNT Daily Forecast
🔍 Analysis Approach:
I’m applying Smart Money Concepts, focusing on:
Identifying Points of Interest on the Higher Time Frames (HTFs) 🕰️
Using those POIs to define a clear trading range 📐
Refining those zones on Lower Time Frames (LTFs) 🔎
Waiting for a Break of Structure (BoS) for confirmation ✅
This method allows me to stay precise, disciplined, and aligned with the market narrative, rather than chasing price.
💡 My Motto:
"Capital management, discipline, and consistency in your trading edge."
A positive risk-to-reward ratio, paired with a high win rate, is the backbone of any solid trading plan 📈🔐
⚠️ Losses?
They’re part of the mathematical game of trading 🎲
They don’t define you — they’re necessary, they happen, and we move forward 📊➡️
🙏 I appreciate you taking the time to review my Daily Forecast.
Stay sharp, stay consistent, and protect your capital
— FRNGT 🚀
OANDA:AUDUSD

AUDUSD FRGNT Daily Forecast -Q4 | W43 | D24| Y25 |📅 Q4 | W43 | D24| Y25 |
📊 AUDUSD FRGNT Daily Forecast
🔍 Analysis Approach:
I’m applying Smart Money Concepts, focusing on:
Identifying Points of Interest on the Higher Time Frames (HTFs) 🕰️
Using those POIs to define a clear trading range 📐
Refining those zones on Lower Time Frames (LTFs) 🔎
Waiting for a Break of Structure (BoS) for confirmation ✅
This method allows me to stay precise, disciplined, and aligned with the market narrative, rather than chasing price.
💡 My Motto:
"Capital management, discipline, and consistency in your trading edge."
A positive risk-to-reward ratio, paired with a high win rate, is the backbone of any solid trading plan 📈🔐
⚠️ Losses?
They’re part of the mathematical game of trading 🎲
They don’t define you — they’re necessary, they happen, and we move forward 📊➡️
🙏 I appreciate you taking the time to review my Daily Forecast.
Stay sharp, stay consistent, and protect your capital
— FRNGT 🚀
OANDA:AUDUSD

AUDUSD FRGNT Daily Forecast -Q4 | W43 | D23| Y25 |📅 Q4 | W43 | D23| Y25 |
📊 AUDUSD FRGNT Daily Forecast
🔍 Analysis Approach:
I’m applying Smart Money Concepts, focusing on:
Identifying Points of Interest on the Higher Time Frames (HTFs) 🕰️
Using those POIs to define a clear trading range 📐
Refining those zones on Lower Time Frames (LTFs) 🔎
Waiting for a Break of Structure (BoS) for confirmation ✅
This method allows me to stay precise, disciplined, and aligned with the market narrative, rather than chasing price.
💡 My Motto:
"Capital management, discipline, and consistency in your trading edge."
A positive risk-to-reward ratio, paired with a high win rate, is the backbone of any solid trading plan 📈🔐
⚠️ Losses?
They’re part of the mathematical game of trading 🎲
They don’t define you — they’re necessary, they happen, and we move forward 📊➡️
🙏 I appreciate you taking the time to review my Daily Forecast.
Stay sharp, stay consistent, and protect your capital
— FRNGT 🚀
OANDA:AUDUSD

AUDUSD(20251023)Today's AnalysisMarket News:
The US Senate rejected the temporary funding bill for the 12th time as the shutdown continues.
Technical Analysis:
Today's Buy/Sell Levels:
0.6491
Support and Resistance Levels:
0.6524
0.6512
0.6504
0.6478
0.6470
0.6458
Trading Strategy:
If the price breaks above 0.6491, consider a buy entry with the first target at 0.6512.
If the price breaks below 0.6478, consider a sell entry with the first target at 0.6458

AUDUSD FRGNT Daily Forecast -Q4 | W43 | D22| Y25 |📅 Q4 | W43 | D22| Y25 |
📊 AUDUSD FRGNT Daily Forecast
🔍 Analysis Approach:
I’m applying Smart Money Concepts, focusing on:
Identifying Points of Interest on the Higher Time Frames (HTFs) 🕰️
Using those POIs to define a clear trading range 📐
Refining those zones on Lower Time Frames (LTFs) 🔎
Waiting for a Break of Structure (BoS) for confirmation ✅
This method allows me to stay precise, disciplined, and aligned with the market narrative, rather than chasing price.
💡 My Motto:
"Capital management, discipline, and consistency in your trading edge."
A positive risk-to-reward ratio, paired with a high win rate, is the backbone of any solid trading plan 📈🔐
⚠️ Losses?
They’re part of the mathematical game of trading 🎲
They don’t define you — they’re necessary, they happen, and we move forward 📊➡️
🙏 I appreciate you taking the time to review my Daily Forecast.
Stay sharp, stay consistent, and protect your capital
— FRNGT 🚀
OANDA:AUDUSD

AUDUSD FRGNT Daily Forecast -Q4 | W43 | D21| Y25 | 📅 Q4 | W43 | D21| | Y25 |
📊 AUDUSD FRGNT Daily Forecast
🔍 Analysis Approach:
I’m applying Smart Money Concepts, focusing on:
Identifying Points of Interest on the Higher Time Frames (HTFs) 🕰️
Using those POIs to define a clear trading range 📐
Refining those zones on Lower Time Frames (LTFs) 🔎
Waiting for a Break of Structure (BoS) for confirmation ✅
This method allows me to stay precise, disciplined, and aligned with the market narrative, rather than chasing price.
💡 My Motto:
"Capital management, discipline, and consistency in your trading edge."
A positive risk-to-reward ratio, paired with a high win rate, is the backbone of any solid trading plan 📈🔐
⚠️ Losses?
They’re part of the mathematical game of trading 🎲
They don’t define you — they’re necessary, they happen, and we move forward 📊➡️
🙏 I appreciate you taking the time to review my Daily Forecast.
Stay sharp, stay consistent, and protect your capital
— FRNGT 🚀
OANDA:AUDUSD

AUDUSD(20251022)Today's AnalysisMarket News:
Citigroup has turned bearish on gold prices, predicting a drop to $4,000 within the next three months.
Technical Analysis:
Today's Buy/Sell Levels:
0.6493
Support and Resistance Levels:
0.6545
0.6526
0.6513
0.6473
0.6461
0.6441
Trading Strategy:
If the price breaks above 0.6493, consider a buy entry, with the first target at 0.6513.
If the price breaks below 0.6473, consider a sell entry, with the first target at 0.6461.
