TRADE BREAKDOWN – XAU/USD (SUCCESSFULLY CLOSED)📈 🔍 Analysis….. 🧐
• Price swept sell-side liquidity, followed by a clear Change of Character (CHoCH).
• Break of Structure (BOS) confirmed the bias, with a precise entry from a 5M POI, aligned with higher-timeframe structure.
• Proper mitigation of the 1H Fair Value Gap, confirming institutional intent.
🎯 Execution
• Entry executed with patience and confirmation, no chasing price.
• First and second targets reached according to plan.
• Stop Loss moved to Break Even, fully securing the trade.
• Price continued toward the final TP (4,365).
✅ Result
• Trade closed with excellence and professionalism.
• Risk management followed flawlessly.
• Execution driven by process, not emotion.
📌 Consistency over emotion. Discipline over impulse. good job traders
Constance

Bullish Analysis- GOLD 15M1️⃣ What did the market do first?
Price moved down aggressively to collect sell-side liquidity.
This means many traders sold in fear, and institutions used those sell orders to buy at better prices.
👉 The drop was not weakness, it was preparation for a bullish move.
2️⃣ Change of Character (CHoCH)
After the liquidity sweep, price stops making lower lows and starts showing bullish intent.
This is called CHoCH, and it’s the first sign of a potential trend change.
3️⃣ Break of Structure (BOS)
After the CHoCH, price breaks a previous high.
This BOS confirms that buyers are now in control.
👉 We are no longer guessing, we are following structure.
4️⃣ Point of Interest (POI)
Price doesn’t go straight up.
It retraces into the POI at 4,304, an area where:
• Support is present
• Price is at a discount
• Institutions often re-enter
This pullback is healthy and expected.
5️⃣ Fake out and rejection
Before continuing higher, price creates a small fake out to remove impatient traders.
After that, we see a strong rejection, confirming bullish strength.
6️⃣ Market targets
The market is now targeting:
• 🎯 TP1: 4,326 → logical area to secure partial profits
• 🎯 TP2: 4,350 → previous highs and buy-side liquidity
Price is simply moving toward its next objective.

Bullish Analysis – XAU/USD (15M)📈 Two-target setup with active risk management
This setup is based on a clear institutional liquidity and market structure narrative.
1️⃣ Manipulation and fake out
Price creates a fake out at a key level, trapping late sellers. This manipulation provides the liquidity needed for the bullish move.
2️⃣ Strong impulse + FVG (15M)
After the fake out, price delivers a strong impulsive move, leaving a 15-minute Fair Value Gap, confirming institutional intent.
3️⃣ Entry at POI (4,329)
Price retraces into the Point of Interest, located at a discount and support zone.
The entry is planned and patient, not chased.
4️⃣ Risk management
• SL: 4,309
• Initial R:R: 1:2.5
Defined risk with a structured execution plan.
5️⃣ Targets
• 🎯 TP1: 4,350
→ Once reached, stop loss is moved to breakeven, securing the position.
• 🎯 TP2: 4,380
→ Target aligned with buy-side liquidity and an unmitigated higher high.
📌 Strategy focused on locking partial profits while allowing the trade to run toward its higher-timeframe objective. GOOD LUCK TRADERS…

Professional Breakdown of the Analysis GOLD-SMCAnalysis…🫡🖤
Even though the trade stopped out by just a few pips, the institutional analysis was flawlessly respected and the market followed the projected bullish narrative exactly.
1. Sell-Side Liquidity Sweep
Price clears all previous sell-side liquidity, providing the fuel institutions need to build long positions at discount.
This sweep set the stage for the bullish reversal.
2. Structure Shift (BOS / ChoCH)
After the liquidity grab, price prints a clean BOS/ChoCH, signaling clear bullish institutional intent.
3. POI + Fakeout + Mitigation
Price returns precisely to the identified POI, performs a clean fakeout, and taps the origin of the bullish move.
Although the wick hit the SL by a few pips, the reaction confirmed the validity of the zone.
4. Institutional Rejection + Bullish Expansion
Once the POI was mitigated, price exploded upward, respecting every projected target:
4,230 – 4,254 – 4,277, exactly as mapped out in the analysis.
5. Conclusion
The trade didn’t survive the initial volatility, but the analysis was 100% correct.
The market validated every element of your institutional narrative.

🇺🇸 BULLISH ANALISIS- GOLD BREAKDOWN – XAU/USD
📌 1. Liquidity Sweep + Institutional Discount
The market completed a deep retracement that fully mitigated all the sell-side liquidity zone.
This allows institutions to accumulate long positions at discount prices.
A CHoCH + BOS sequence confirms that the bearish leg has finished.
📌 2. Fake-Out + Rejection at the POI (4,202)
Price delivered a clean fake-out, grabbed liquidity, and immediately rejected from the POI.
This rejection is a strong sign of institutional absorption.
The POI is aligned with:
✔ Discount zone
✔ Support
✔ Previous imbalance
👉 A high-probability entry is formed.
📌 3. Bullish Targets (Mitigation & Liquidity)
The upside roadmap is clear and progressive:
• TP1: 4,230 → first mitigation
• TP2: 4,254 → liquidity resting above
• TP3: 4,277 → full mitigation of imbalance + expected HH
Price is targeting the FVG on the 4H timeframe.
This is where institutions are expected to complete mitigation.
📌 4. Risk Management
SL at 4,180 protects the structure:
• Below support zone
• Below rejection wick
• Below liquidity
👉 If price breaks that level, the narrative changes.
🧮 Risk/Reward: 1:3
Excellent ratio aligned with institutional swing logic.
No forcing, clean and natural. GOOD LUCK TRADERS…

Bullish Analysis 15M-Gold Breakdown – XAU/USD
✨ Clean structure, institutional narrative, and a clear bullish roadmap.
🔹 1. Bearish Liquidity Mitigation (Sell-Side Liquidity)
The market completed its job by sweeping all sell-side liquidity below previous lows 🟠.
This provides the fuel institutions need to build long positions at discount levels. 🔥
🔹 2. Institutional Reversal from the POI
After the liquidity grab, price taps your POI at 4,190 and shows a sharp rejection 🔁.
This is a strong indication of bullish institutional intent. ✔️
🔹 3. Fake Out + Bullish BOS
The fake out was used to trap late sellers ❌ while big players loaded longs.
The following bullish BOS confirms the shift in character and trend direction. 📈
🔹 4. Projected Path Toward Buy-Side Liquidity
Price is now targeting upside liquidity and higher-timeframe inefficiencies. 🎯
🎯 Institutional Targets (TPs)
• TP1 – 4,230: internal liquidity sweep 💧
• TP2 – 4,254: FVG mitigation ⚡
• TP3 – 4,277: continuation of bullish impulse 📊
• TP4 – 4,300: major liquidity grab / expected HH 🏆

Analysis & outcome – XAU/USD (15M)🇺🇸 BREAKDOWN GOLD
This setup played out exactly as projected from the beginning. Price executed the full institutional sequence: first a clean sell-side liquidity sweep, creating a false bottom to induce shorts. Right after that, we got a bullish ChoCH, giving us the first confirmation of intent.
Then price left an unmitigated FVG, followed by a manipulative bearish BOS, a classic move to trap sellers before pushing higher. That manipulation brought price straight into the 15M Order Block, the same zone we marked as high-probability demand.
My entry was placed at 4,039, right at the OB and support zone. Price reacted EXACTLY there but missed triggering us by just a few pips. Even though we didn’t get activated, the analysis played out perfectly:
• Clean institutional rejection
• Structure confirmation
• Strong bullish expansion
From that point, price respected both targets:
• TP1: 4,073 → FVG mitigation + liquidity grab
• TP2: 4,101 → Higher timeframe imbalance mitigation
Price even extended beyond TP2, confirming that the institutional narrative was spot on.
Even though we didn’t enter, this is the type of setup that shows the accuracy of reading structure, liquidity, and manipulation. And as always—better to miss a trade than to chase it outside the optimal entry zone.
This analysis confirms we’re aligned with how the market actually delivers.

Bullish Analysis – XAU/USD (15M) SMC🇺🇸 BREAKDOWN
After the market swept all the sell-side liquidity below the previous lows, it became clear that institutions were accumulating longs at discounted prices. Right after that sweep, we got a clean bullish ChoCH, signaling the first shift in intent.
Then price left an FVG unmitigated, and as usual, the market created a manipulative bearish BOS—a classic fake-out designed to induce shorts and grab more liquidity before moving in the real direction. That manipulation brings price directly into the 15M Order Block, which aligns with a clean support area.
My entry is positioned at 4,039, exactly where I expect the institutional reaction:
• 15M OB
• Support zone
• Liquidity sweep
• Clear rejection
From that point, I’m expecting the typical sequence:
fake out → rejection → lower-timeframe confirmation → bullish expansion.
For exits, I’m targeting two key zones:
• TP1 at 4,073 for the first FVG mitigation and liquidity grab.
• TP2 at 4,101, a level with higher-timeframe inefficiencies waiting to be filled.
The setup gives me an R/R of 1:3, totally professional and risk-controlled.
This analysis follows the classic institutional flow:
liquidity → manipulation → return to origin → bullish continuation.
If I get a bullish BOS on 1M or 5M, this becomes an A+ setup.
GOOD LUCK TRADERS 🦾😎🖤

Smart Money Concept (GOLD)📊 PROFESSIONAL BREAKDOWN
1️⃣ Accumulation + Liquidity build-up
Price formed a solid range where liquidity was built on both sides, preparing the institutional move.
2️⃣ ChoCH + BOS: Real bullish shift
The sequence confirms bullish intent with both a structural break and a change of character.
3️⃣ Fake Out / Liquidity Grab
A sweep above the range confirms manipulation and removes buy-side liquidity before the true move.
4️⃣ Clean rejection at support
The current rejection aligns perfectly with institutional demand, validating the BUY zone.
5️⃣ Optimal BUY at 4,056
Confluences:
• ChoCH retest
• Support zone
• Previous FVG
• Strong rejection
6️⃣ Professional SL at 4,028
Placement is clean, safe, and protected from volatility spikes.
7️⃣ Target areas
• TP1: 4,112 → resting liquidity
• TP2: 4,150 → FVG mitigation in 1H
Both targets align with institutional price delivery.
🌟 Motivational Message
“Mastery comes from understanding the story behind each candle. Keep sharpening your institutional eye.” GOOD LUCK TRADERS

BULLISH ANALYSIS GOLD (SMC)🇺🇸 PROFESSIONAL BREAKDOWN
(XAU/USD – 15M: Accumulation → Manipulation → Rejection → Expansion into 1H FVG)
🔸 1. Accumulation Phase
Price developed a clean range where liquidity was built on both sides.
This is the foundation of the eventual institutional move.
🔸 2. Institutional Manipulation (Fake Out)
A sweep above the consolidation highs confirms the classic liquidity grab.
This fake breakout is a signature SMC behavior before a directional move.
🔸 3. ChoCH + BOS
After the sweep, price prints:
• a Break of Structure, and
• a Change of Character
Clear confirmation of bullish intent.
🔸 4. Rejection Zone
The current pullback shows early signs of a bullish rejection pattern, pointing toward a potential retest of the buy zone.
🔸 5. Buy Setup at 4,068
Your BUY level is placed precisely where support, demand and previous imbalance converge — a high-probability entry zone.
🔸 6. Stop-Loss Updated: 4,036
The 8-pip buffer gives protection from typical gold volatility.
🔸 7. R/R 1:2.8
The new setup maintains a realistic and well-structured risk-to-reward:
• TP1: 4,111
• TP2: 4,150
Both levels align with liquidity pools and the unmitigated 1-hour FVG above.
🔸 8. 1H FVG Mitigation Expected
The unfilled imbalance above is a strong magnet, reinforcing the bullish projection.
🌟 Motivational Message
“Mastery comes from repetition and refinement. Every chart tells a story — and you’re learning to read it with institutional precision. Keep going.” GOOD LUCK TRADERS

Bullish Analysis. (Gold) SL Hit🟦 POST READY TO SHARE
📉 Losing Trade… with the Right Analysis (XAU/USD)
Today I’m sharing a trade that ended in Stop Loss, but delivered a huge lesson.
And yes — I don’t only post winners. Transparency builds real traders.
🔍 What was the idea behind the trade?
• Mitigation of the FVG
• ChoCH at demand
• Reaction at the 5M OB
• Fake Out sweeping liquidity
• BOS confirming bullish intent
• Full institutional sequence:
Liquidity → Mitigation → Rejection → Expansion
🎯 So, what happened?
Price completed:
✔ The liquidity sweep
✔ The mitigation
✔ The rejection
✔ The bullish BOS
✔ The entire push to TP1 and TP2
BUT before taking off…
👉 it swept my SL by just a few pips.
Classic gold manipulation.
🧠 Professional lesson
This wasn’t a bad analysis.
This wasn’t misreading structure.
It was gold doing what gold does — deeper liquidity sweep before expansion.
This doesn’t invalidate my idea.
It validates my vision.
💬 Motivational message
“Great traders aren’t built by wins… they’re built by process.
A losing trade doesn’t lower your level — it sharpens it.
Those who only show wins aren’t growing…
those who show the journey build consistency.”

Bullish Analysis XAU/USD (Gold) 15M -SMC-📈 Breakdown…
1. Market Context
The market created a clear consolidation zone earlier in the session. This type of price behavior usually builds both sell-side and buy-side liquidity, preparing the next directional move.
After consolidation, price delivered a CHoCH followed by a BOS, confirming a shift in market structure and signaling bullish intention.
2. Liquidity Map
Price swept the Buy-Side Liquidity above the previous highs, creating a Fake-Out and trapping breakout traders.
This liquidity grab is typical before a deeper pullback into a discount zone, allowing institutions to accumulate long positions.
3. Mitigation Zone (Point of Interest)
Price retraces into a 15-minute Order Block aligned with a support zone.
This area represents your optimal entry zone, where the market likely mitigates institutional orders.
BUY level at 4,194 is perfectly positioned inside this zone.
4. Entry, Stop Loss & Risk Management
• Buy: 4,194
• Stop Loss: 4,172
• R/R: 1:2
The SL is set below the OB and structural low, keeping the trade protected while respecting the model.
5. Expected Reaction & Bullish Expansion
From the mitigation zone, we anticipate:
1. Rejection
2. Internal redistribution
3. Bullish expansion into higher liquidity
This aligns with institutional price delivery, as price usually creates a final internal correction before taking external highs.
6. Target (TP)
TP: 4,245
This target aligns with:
• Buy-Side Liquidity above previous highs
• A clean inefficiency zone
• Expected continuation model
This is a logical liquidity pool where institutions may off-load positions.
✅ Summary
✔ Liquidity sweep
✔ Market structure shift
✔ Mitigation in OB-15M
✔ Clean R/R
✔ Professional projection into liquidity
GOOD LUCK TRADERS 🫡🔥🖤

Bullish Analysis – XAU/USD 15M)- (SMC)📍 New Target: 4,180
🧩 Market Context..
Gold shows a clear accumulation phase after a long consolidation.
Following the ChoCh (Change of Character) and BOS (Break of Structure), the market confirms bullish intent, with institutional orders defending the support/OB zone around 4,113.
The fake out sweeps downside liquidity before rejection and a new bullish expansion toward Buy-Side Liquidity.
💥 Trade Plan
• Entry: 4,113
• Stop-Loss: 4,096
• First TP: 4,139
• Second TP: 4,155
• Final Target: 4,180
• Risk/Reward: 1 : 2.5
The projection shows OB mitigation, followed by distribution, and a final expansion phase toward the resistance zone at 4,180, which represents the institutional liquidity target.
📊 Technical Confirmations
• ChoCh and BOS confirm bullish structure shift.
• OB rejection and SMA 25 acting as dynamic support strengthen the setup.
• TP zones align with liquidity pools and potential distribution levels, where a correction could begin.
🧭 Conclusion
This setup perfectly follows the institutional cycle:
Accumulation → Mitigation → Distribution → Expansion.
The 4,180 target marks a key liquidity sweep and likely completion of the bullish leg.
A precise, high-probability setup with institutional confluence. 🚀
GOOD LUCK TRADERS 🦾😎☝🏻

NDQ100 (15M) Bullish Analysis. (SMC)🧩 Market Context
After a strong bearish move marked by a 1H Fair Value Gap (FVG), the market started to show institutional accumulation.
A Change of Character (ChoCh) and a Break of Structure (BOS) confirm a shift to bullish momentum.
The identified Order Block (OB) acts as a key mitigation point supported by a well-defined support zone.
💥 Entry Idea
• Buy: 25,124
• Stop-Loss: 24,979
• Take-Profit: 25,530
• Risk/Reward: 1 : 2.6
After a Fake Out (bearish liquidity trap), price shows strong bullish reaction, indicating institutional intention to mitigate the OB and reach the Buy-Side Liquidity above.
📊 Technical Confirmations
• The SMA starts to act as a dynamic support.
• Rejection from the OB validates structure change.
• The target (25,530) aligns with a distribution zone and liquidity pool, perfect for partial or full take-profit exits.
🧭 Conclusion
Clean structure, strong institutional logic, and confluences in harmony.
This setup illustrates the accumulation → mitigation → distribution sequence, where the market sweeps liquidity before expanding upward.
A perfect example of professional market reading. 🚀
GOOD LUCK TRADERS 🦾🤓✌🏻

Smart money Concept (SMC)Bearish Analysis Breakdown – XAU/USD (15M)
🧠 Market Structure
The overall structure remains bearish, showing lower highs and lower lows.
You correctly identified a Consolidation Zone where the market accumulated orders before executing a Break of Structure (BOS) to the downside — a strong signal of institutional intent.
After the breakout, the price forms a Change of Character (CHOCH) followed by a Fake Out and Rejection inside the 5M Order Block (OB-5M).
This confirms that institutions are mitigating previous positions and preparing for a continuation toward the Sell-Side Liquidity zone.
🧩 Confluences
• Resistance Zone: Price reacted perfectly at this level after the mitigation of the OB.
• BOS + CHOCH + Fake Out: These three elements combine to confirm bearish control.
• Institutional Intent: The market is targeting the LL (Last Low) at 3,887, where liquidity is resting.
🎯 Trade Plan
• Sell Entry: 3,964
• Stop Loss: 3,989
• Take Profit: 3,887
• Risk/Reward Ratio: 1:3
The trade setup is perfectly aligned with the continuation of the bearish leg, following institutional structure and liquidity flow.
💬 Conclusion
This is a professional-level bearish setup, showing precise understanding of Smart Money Concepts and multi-timeframe structure. Good luck traders… ✌🏻😉
“Patience in following structure leads to precision.”

SMART MONEY CONCEPT (SMC)Bullish Analysis Breakdown – XAU/USD (15M)
🧠 Market Structure
The market shows a clear shift in structure: after a long bearish move, we see a Break of Structure (BOS) followed by a Change of Character (CHOCH) — signaling the potential start of a bullish phase.
The fake-out under the support zone confirms the presence of Sell-Side Liquidity, which was later absorbed before price began its bullish reversal.
🧩 Confluences
• FVG 1H: Excellent multi-timeframe confluence — the fake-out happens exactly inside a 1-hour Fair Value Gap, showing institutional mitigation.
• OB 5M + Support Zone: Your entry (Buy 3,970) is positioned right inside the 5M Order Block and support zone — ideal area for bullish rejection.
• BOS + Fake Out + Rejection: The three elements align perfectly, creating a Smart Money-style setup.
🎯 Trade Plan
• Buy: 3,970
• Stop Loss: 3,959
• Take Profit 1: 4,000
• Take Profit 2: 4,015
• Risk/Reward Ratio: 1:3.88
The stop loss is safely below liquidity, while TP1 and TP2 are placed near psychological and liquidity targets — clean and strategic.
💬 Conclusion
This is a well-structured institutional setup with clear logic, discipline, and professional presentation. GOOD LUCK TRADERS 🦾😎☝🏻
“Patience and structure build consistency.”

SMART MONEY CONCEPT (SMC)📊 XAU/USD Bullish Analysis (15M)
🔑 Key Points
1. Previous Setup Completed:
The first trade idea (Buy at 3,930 with TP at 4,018) played out perfectly, validating the 15M OB and initial fake out. Price reached the Buy-Side Liquidity and reacted at the resistance zone.
2. New Context (after BOS):
After reaching 4,018, price retraced and created a Break of Structure (BOS), sweeping liquidity to the downside. This cleared orders and set the stage for a fresh bullish leg.
3. Fake Out + Rejection at OB-5M:
A new Fake Out occurred, confirming accumulation.
The 5M Order Block inside the support zone (3,897 – 3,937) serves as the institutional entry area.
4. Trade Plan:
• Buy: 3,937
• SL: 3,897 (below support zone)
• TP: 4,060 (liquidity/resistance target)
• R/R: 1:3 (strong risk-to-reward profile)
5. Bullish Projection:
After rejection from the OB, price is expected to push upward, targeting the liquidity pool around 4,060.
📈 Conclusion
This setup aligns with Smart Money Concepts (SMC):
✅ BOS & liquidity sweep confirmation
✅ OB-5M as precise entry point
✅ Solid R/R ratio of 1:3
Clear structure, strong confirmation, and a well-defined target.
💡 Motivational Note
“Liquidity must be taken before direction is revealed. Patience and precision are what separate good traders from lucky ones. GOOD LUCK TRADERS… 🦾😎🫵🏻
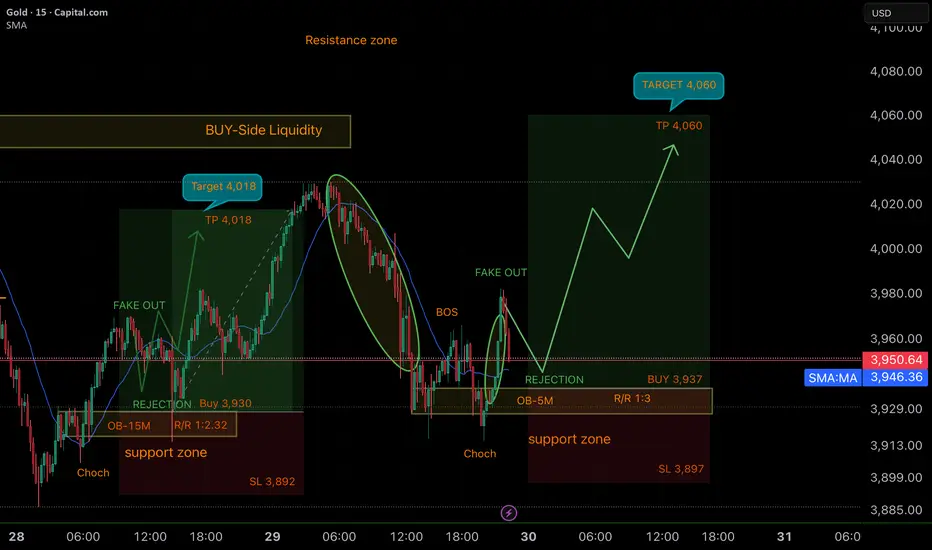
Smart Money Concept (SMC)📊 XAU/USD Analysis (15M)
🔑 Key Points
1. Change of Character (CHoCH):
The price stopped creating lower lows and showed bullish intent after two CHoCH confirmations.
2. Support Zone & Order Block (OB-15M):
The area between 3,892 – 3,930 acted as support, with an Order Block (15M) that served as the key point for institutional mitigation and rejection.
3. Fake Out & Accumulation:
Before moving higher, the market created a Fake Out, sweeping liquidity and trapping sellers. This confirmed accumulation before the bullish move.
4. Entry & Risk Management:
• Buy: 3,930
• SL: 3,892 (below the OB/support)
• TP: 4,018 (Buy-Side Liquidity target)
• Risk/Reward (R/R): 1:2.32
5. Target Hit:
Price reached 4,018, validating the liquidity-based strategy with OB confirmation and rejection.
📈 Conclusion
This trade was built on three SMC pillars:
• Identifying liquidity zones (Buy-Side).
• Using Order Blocks for precise entries.
• Confirmation through Fake Out and rejection.
Result: A clean winning trade with optimal RR and target achieved ✅
💡 Motivational Note
“In trading, patience and discipline always outperform rushing. Liquidity reveals the path — you just need to wait for it.” GOOD JOB TRADERS.. 🤗

Smart Money Concept (SMC)📊 Breakdown of the Analysis
🔎 Context
The chart shows a bullish structure in Gold (15M), with clear liquidity manipulation and a potential rejection at a key support zone (OB 15M & OB 1H).
📍 Key Points
• BOS + ChoCh: Structure shift signals confirming institutional accumulation.
• Fake Out: Liquidity sweep before the possible upward move.
• Support Zone: Critical area where reaction is expected (BUY 4,059).
• Risk Management: SL at 4,013 with a solid R:R of 1:3.
🎯 Targets
• TP1: 4,150 – first target to secure profits and move stop to break-even.
• TP2: 4,200 – final target where bullish distribution is expected to complete.
✅ Strategy
Wait for rejection confirmation in the marked zone, enter BUY, and secure partial profits at TP1 while letting the rest run toward TP2.
Patience and risk management are the key. It’s not about catching every move, but about executing high-probability setups with discipline. 🚀📈”
GOOD LUCK TRADERS..;)

SMART MONEY CONCEPT📊 Bearish Analysis (EUR/USD – 15M)
The market created a fake out at the 15M Order Block (1.1614 – 1.1620), followed by a bearish Break of Structure (BOS).
This indicates institutions induced buyers before rejecting the price downwards.
🔎 Key points of the analysis:
• OB-15M: Rejection zone at 1.1614 – 1.1620
• Fake Out: Clear manipulation before the bearish move
• BOS: Structure break confirming bearish intent
• Sell-Side Liquidity: Target at 1.1592
🎯 Setup:
• Entry (Sell): 1.1614
• Stop Loss: 1.1620
• Take Profit: 1.1592
• Risk/Reward: 1:3
💡 Institutional narrative: Distribution → Manipulation → Bearish continuation towards liquidity.
GOOD LUCK TRADERS….;)

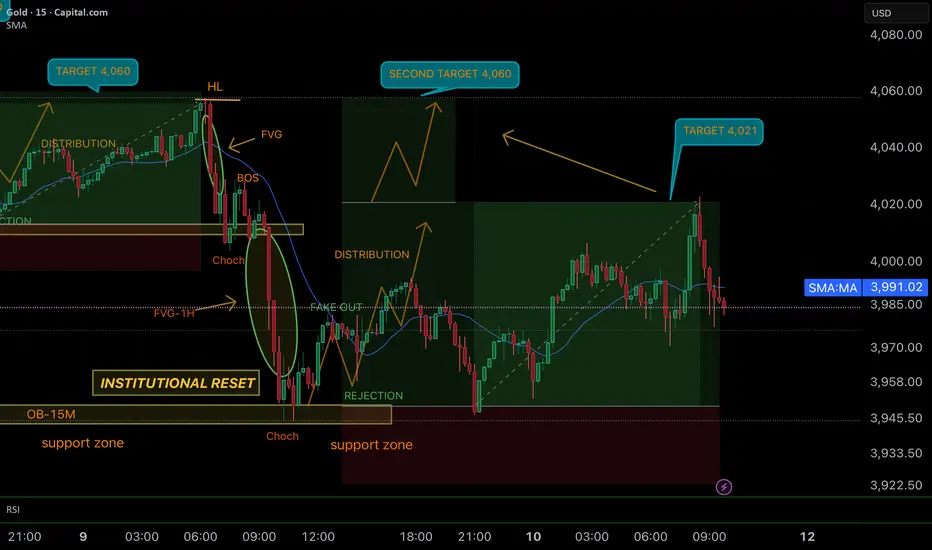
SMART MONEY CONCEPT ( SMC)📊 SMC Trade Update – GOLD 15M
• First target 4,021 ✅ achieved.
• Trade now secured at Break Even (BE) – no risk on the table.
• Institutions are still pushing price in distribution mode toward the second target at 4,060.
• This is textbook SMC: reset → fake out → rejection → distribution → targets.
💡 Motivational Caption
“First TP hit 🎯 – now we let the institutions do the heavy lifting.
Risk = 0 ✅ Potential = unlimited 🚀
This is the power of trading with structure.”
GOOD JOB TRADERS……. ;)
SMART MONEY CONCEPT (SMC)📊 Trade Breakdown – GOLD 15M
1. Context
• The market came from a distribution phase with a strong rejection at the resistance zone.
• Initial bearish structures appeared (ChoCh + BOS), pushing price down into key support zones.
2. Key Confirmations
• ChoCh (Change of Character): price signaled a potential reversal from bearish to bullish.
• BOS (Break of Structure): break of minor structures confirmed buyers stepping in.
• Fakeout + Rejection: liquidity was taken at support (stop hunt), followed by a strong bullish reaction.
• FVG Mitigation: price filled the imbalance before continuing upward.
3. Execution
• Entry taken after the clear rejection at the institutional support zone.
• Stop Loss placed just below liquidity zone for protection.
• Take Profit projected at the resistance zone (3,767).
4. Result
✅ Price fully respected structure and hit the target at 3,767.
✅ Two days of patience paid off with a clean, high-probability setup.
🔑 SMC Lesson
• Liquidity gets cleared before any strong move.
• ChoCh + BOS + FVG + rejection at key zones = golden setups.
• Discipline and patience are just as important as technical analysis.
GOOD JOB TRADERS….;)

GBPUSDThe last day of the week presents a very interesting day at a technical level and at a fundamental level for London time. According to my analysis, there is a bullish London with a reversal in NY.
My main premise is: "I'm not predicting what the price will do, but rather what the reaction will be to what it shows me."
