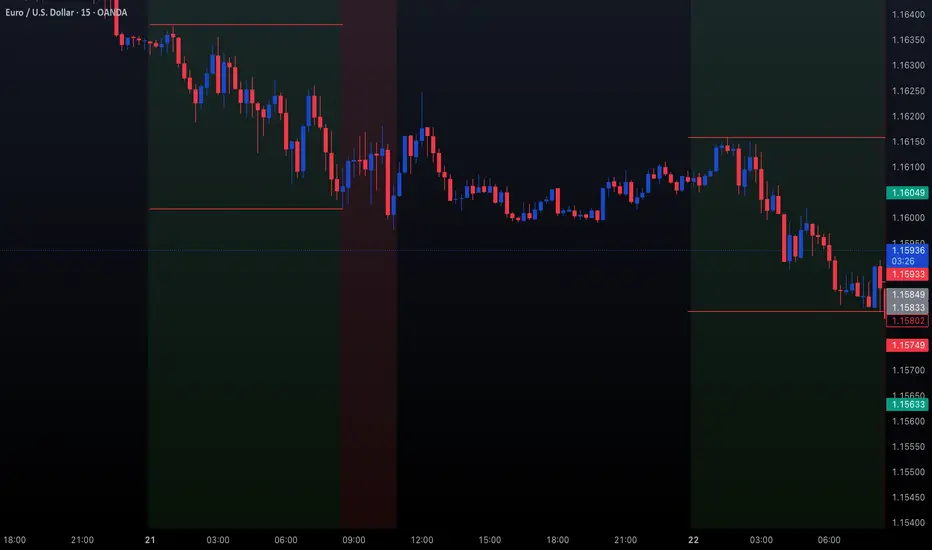
Trading EURUSD | Judas Swing Strategy 22/10/2025The Judas Swing strategy continues to show how patience and structure can consistently produce high-probability setups. Yesterday FX:EURUSD offered a clear example of how the market manipulates early liquidity before revealing its true move.
Heading into 08:30EST, price had been trading in a tight range throughout 00:00 - 08:30EST. Our attention was on the highs and lows, key zones that often set the stage for the Judas Swing’s liquidity sweep.
Price ran below the low at 08:35EST, taking out liquidity resting beneath those lows. This was our first signal, a potential false move designed to trap early sellers. Once that downside sweep occurred, we shifted our focus to the upside looking for buys. The key confirmation came shortly after with a clean break of structure to the upside, showing that momentum was reversing. At this point, all we needed was patience. We waited for price to retrace into the fair value gap (FVG) formed during the impulsive move up.
Once price tapped into the imbalance, we executed our long position with 1% risk, targeting a 2% reward. Initially, the market dipped slightly below our entry, testing our patience but our stop was well-placed beneath the liquidity sweep, giving the trade enough room to breathe
Within minutes, the bullish momentum kicked in. The move from discount pricing quickly turned into a strong rally as price reclaimed the earlier range and pushed firmly into premium levels.
Our target was hit decisively, delivering a +2R return in just an hour and 45 minutes. A clean execution, following the exact sequence of events the Judas Swing strategy thrives on:
1. Liquidity sweep
2. Break of structure
3. Retrace into FVG
This trade was a perfect reminder that discipline and structure always win. It’s easy to get tempted by early entries or impulsive setups, but the Judas Swing strategy continues to show that following your rules pays off
Judasswing
Trading GBPUSD | Judas Swing Strategy 15/10/2025This week’s FX:GBPUSD setup was another textbook example of how patience and discipline can turn a high-probability setup into gains. We marked out our range highs and lows, the key zones we monitor for potential manipulation going into New York open.
As Judas Swing session kicked off, price swept below the low of the zone, taking out resting liquidity. This was our first major clue. The Judas Swing strategy looks for these liquidity sweeps before positioning in the opposite direction of the trap.
Once that downside sweep occurred at 9:25EST, our focus shifted to potential long opportunities. We patiently waited for confirmation, specifically a break of structure to the upside before considering any entry. When that break came, all that was left was a retracement into the fair value gap (FVG) formed during the impulsive move up. Price retraced and filled the imbalance, and that’s where we executed our long after the candle closed. Risk was set at 1%, targeting a 2% return.
This entry could be considered a sniper entry because price barely moved against us. Within minutes, price began to rally, confirming the Judas reversal and validating our entry. Price continued climbing and reached our take-profit in less than an hour. The result was a +2R winner while maintaining disciplined risk management.
The Judas Swing strategy thrives on patience and structure. Wait for liquidity sweeps, confirm the break, and execute only when price revisits your FVG. You won’t catch every move, but you’ll catch the right ones and that’s what leads to consistency.

Trading GBPUSD EURUSD | Judas Swing Strategy 29/09/2025This week, the Judas Swing strategy delivered another set of textbook lessons on patience, execution, and discipline. We had two clear setups unfold on FX:GBPUSD and FX:EURUSD and both gave us valuable insight into how the market manipulates liquidity before revealing its true direction.
On Monday FX:GBPUSD initially consolidated during the Judas Swing period, giving us the perfect framework to anticipate manipulation. As the session started, we saw liquidity taken above the high of the Judas Swing zone.
From there, we immediately shifted our focus to potential selling opportunities. Once structure broke to the downside, all eyes were on the retrace into the imbalance left behind. We knew from experience that patience is key here, sometimes price runs away without giving the pullback, and forcing an entry in those situations usually leads to regret.
This time, we got the perfect retrace. Once price tapped back into the FVG and the candle closed, our short was executed with a clean 1% risk. The market briefly hovered near our entry, but the setup held strong. Soon after price dropped decisively, reaching our target and securing a solid 2% gain.
On Tuesday FX:EURUSD gave us a slightly different picture but the same Judas Swing principles applied. Price first ran the zone lows, grabbing liquidity before reversing sharply. Once we spotted that break of structure to the upside, our game plan was straightforward: wait for the retrace into imbalance, and execute.
The market made it easy this time, with zero to no drawdown, price quickly reversed in our favor, running straight to our target for another +2R trade.
Both FX:GBPUSD and FX:EURUSD reminded us why the Judas Swing strategy works, the markets lure traders into chasing breakouts before reversing into the true move of the day. By waiting for the sweep, confirmation, and retrace, we put ourselves on the right side of the move with defined risk. Two trades, two wins, and another week of staying disciplined to the plan. Consistency doesn’t come from predicting every market move, it comes from following a strategy that stacks the odds in your favor.

Trading EURUSD | Judas Swing Strategy 15/09/2025The Judas Swing strategy is all about discipline, patience, and trusting the process, and this FX:EURUSD setup from Monday’s session was a perfect reminder of why sticking to the rules matters more than chasing results.
As the Judas Swing session started, FX:EURUSD gave us the first clue we look for: a liquidity sweep above the zones high. Breakout buyers jumped in, only to find themselves trapped as price quickly reversed. This was our signal to get ready. But, as always, one signal isn’t enough. We needed the next confirmation: a break of structure to the downside. Once that shift in order flow printed, the setup was officially on our radar.
Next came the waiting game. The strategy demands patience until price retraces back into a Fair Value Gap (FVG) created on the price leg that broke structure. It didn’t take long FX:EURUSD pulled back neatly, tapped into the FVG, and our entry candle closed. That was the green light.
Risk per trade: 1%
Target: 2%
Risk-to-Reward: 1:2
Checklist complete. Trade executed.
Unlike some trades where price rockets instantly, this one tested our patience. FX:EURUSD moved in our favor but reversed and even pulled against us. Momentum returned, but instead of pushing toward our 2% target, price lost steam mid-way and reversed. The result: a 1% loss
The important lesson here is that a losing trade executed according to plan is still a successful trade. We didn’t chase the liquidity sweep. We didn’t anticipate the break of structure. We didn’t force an early entry. Every box was ticked, and the trade simply didn’t play out. That’s trading. The Judas Swing isn’t about winning every setup, it’s about trusting the process over the long run. By managing risk and staying consistent, we position ourselves for sustainable growth, even when individual trades don’t hit target.

Bearish USDThis pair has been in the same spot for some time but I think now it's just about ready to continue selling! The liquidity resting above the equal highs will drive price up, which is going to lead some unfortunate sheep to the slaughter.
Fibonacci level of 62% is the ideal price level to short this one, with a stop just above the recent high.
All the best.

Trading EURUSD | Judas Swing Strategy 20/08/2025The Judas Swing strategy delivered another clean setup this week on EURUSD, and this one perfectly highlighted why discipline and patience are the real edge in trading
As the Judas Swing session started, we saw exactly what we look for, a sweep of liquidity above the Judas swing zone high. That quick move higher trapped breakout buyers and set the stage for the Judas Swing reversal
But spotting the liquidity grab is only step one. As always, we waited for confirmation. Soon after, price gave us the break of structure to the downside we needed and a clear signal that the real move was likely underway. With the first two boxes checked all that was left was patience and waiting for the retrace into our Fair Value Gap (FVG)
The retrace came in clean, and once our entry candle closed, we executed without hesitation.
Risk per trade: 1%
Target: 2%
Risk-to-Reward: 1:2
This is the framework that keeps us consistent week after week, regardless of individual trade outcomes. After entry, price chopped around in consolidation for a while testing our patience, threatening the stop one time. Eventually, momentum kicked in, and EURUSD began sliding in our favor.
Hours later, our full 2% target was hit. Another textbook Judas Swing setup, executed to plan.
What made this trade work wasn’t luck it was process we follow
We didn’t chase the sweep. We didn’t anticipate the break of structure. We didn’t jump in early. We followed the checklist:
- Liquidity grab
- Break of structure
- Retrace into FVG
- Entry after candle close
One trade won’t make or break a trading career, but consistently following a proven edge will.
On to the next setup

USDZAR. The USDZAR is ready to rally but the daily equal lows are suspect. It would be great to see them swept before it rallies, but that will depend on how they use the news.

Trading EURUSD AUDUSD | Judas Swing Strategy 05/08/2025The Judas Swing strategy kicked off the new week with two solid setups on Monday, this time on OANDA:AUDUSD and FX:EURUSD While both played out beautifully from a structure and liquidity perspective, let’s walk through the reasoning behind each trade and how they unfolded
The first setup of the day formed on EURUSD during the early part of the New York session. Price had been ranging during the London hours, setting clear highs and lows. Just as expected, NY brought the liquidity sweep a sharp push above the range high, baiting breakout buyers and triggering stops.
That was our cue. Once the sweep completed, we watched closely for the break of structure to confirm the reversal. It came swiftly, followed by a retrace into the freshly formed Fair Value Gap the same confluence we wait for every time.
As price tapped into the imbalance and printed a bearish close, we executed the short. Risk: 1%. Target: 2R. Price moved cleanly in our direction, offering little drawdown and ultimately hitting our target in due time. A disciplined start to the week with a solid +2% gain.
Not long after we entered the FX:EURUSD position, OANDA:AUDUSD served up a nearly identical setup. Once again, we had a clear range established during the Judas Swing sessions. Then came the sweep price spiked above the range high, taking out buy-side liquidity before quickly reversing.
We marked our structure break and noted the FVG left behind. Just like before, we waited for the retrace no chasing.
Price pulled back, tapped the imbalance, and gave us a strong bearish entry signal. We entered short with the same parameters: 1% risk, aiming for a 2R return. The market delivered. The trade ran smoothly to target, netting our second +2% win of the day.

Trading NZDUSD | Judas Swing Strategy 10/07/2025Last week, we saw a textbook Judas Swing play out on OANDA:NZDUSD and this one checked every single box on our trading checklist. Let’s walk through the trade step by step
After a slow Asian session, NYO brought the kind of liquidity grab we look for. Price swept the low of our Judas swing zone, trapping early sellers and triggering stop hunts classic Judas behavior. As always, our first thought wasn’t to jump in it was to observe.
Once we spotted that liquidity sweep, our next confirmation came quickly: a clean break of structure to the upside. That shift in market sentiment was the green light to start prepping our entry. But, as we’ve learned from experience, patience is a trader’s superpower.
Instead of chasing the move, we waited for price to retrace into our Fair Value Gap (FVG) a key element in our Judas Swing checklist. No FVG touch, no trade. This time, price dipped right into our FVG zone. The moment the candle that entered the FVG closed, we executed with confidence.
Risk: 1%
Reward: 2%
Risk/Reward Ratio: 1:2
After executing the trade, there was a minor drawdown nothing major, just about 4 pips. Price never came close to our stop loss. Then came the move we were waiting for. OANDA:NZDUSD moved in our direction, and in an hour and 40 minutes, we hit our full target. A clean +2% gain added to the week’s tally.
This trade is a perfect example of how the Judas Swing strategy thrives especially after false moves into liquidity zones.
It was a clean setup:
- Sweep of liquidity
- Break of structure
- Retrace into FVG
- Controlled risk, solid R:R
If you’re still taking trades without a structured plan, now’s the time to consider building one. Strategies like this don’t just work because of entries they work because of discipline, timing, and consistency. We don’t trade everything. We trade the setups that check every box.

Trading AUDUSD NZDUSD | Judas Swing Strategy 25/06/2025This week the Judas Swing strategy has delivered two clean setups on OANDA:AUDUSD and $NZDUSD. Both trades played out beautifully, hitting their targets and ending the day with a solid +4% return (2% each), reinforcing the power of patience, structure, and sticking to the rules.
Let’s break down how each trade unfolded:
Trade 1: OANDA:AUDUSD Long — Textbook Setup
We kicked off Wednesday’s session watching OANDA:AUDUSD closely after identifying a classic Judas Swing scenario.
First, we saw liquidity swept below the previous session’s low, exactly what we’re looking for. This kind of move is crucial to the strategy, it grabs early sellers or stop orders and sets the stage for a reversal.
Right after the sweep, price broke structure to the upside, confirming our bullish bias. At this point, we didn’t rush in. We waited for price to retrace into our FVG (Fair Value Gap).
Patience paid off and price finally tapped into the FVG, and as soon as the entry candle closed in our direction, we executed the trade.
We risk 1% on every trade, aiming for a 2:1 reward-to-risk. After being in drawdown for a bit, price accelerated sharply and hit our target after being in the trade for 5 hours. Clean setup, clean execution, and a smooth +2% return.
Trade 2: OANDA:NZDUSD Long
OANDA:NZDUSD presented a near-identical setup. Price had been consolidating, but by the time the NY session rolled in, the stage was set.
Just like OANDA:AUDUSD , we saw a liquidity sweep at the lows, followed by a bullish break of structure, textbook Judas Swing again.
This time, the retracement into the FVG came swiftly. We executed as soon as we had confirmation on the candle close.
The trade barely hesitated, and price moved decisively in our direction, steadily climbing until our target was hit. Another +2% return, reinforcing the strategy’s strength when rules are respected
What This Week Reminds Us:
Discipline matters: We don’t chase trades. Both setups met all our checklist criteria
Patience is key: Waiting for the FVG entry and confirmation avoids emotional entries
Risk management is the foundation: With a 1% risk and 2:1 target, you only need to win half the time to be consistently profitable
When you follow a rules-based strategy like Judas Swing, you remove the guesswork and bring structure to your trading decisions.

Judas Swing Monday Recap – Sticking to the Plan Pays 09/06/2025In case you're new to the Judas Swing Strategy, here’s the strategy in a nutshell:
It’s a classic price manipulation strategy where the market fakes a move in one direction (the “Judas” move), usually after the 00:00–08:30 EST window, before sharply reversing. This tactic is often used by smart money to trap retail traders around key highs/lows, followed by a reversal into a Fair Value Gap (FVG) for entry confirmation.
We began Monday spotting a textbook Judas Swing on FX:EURUSD which was our first trade of the day. Price took out session lows, grabbing liquidity, then gave us a break of structure to the upside and a clean reversal into the FVG.
We entered long with our stop loss below the manipulation low. The trade moved nicely into profit and came within points of our target but just as we were anticipating a clean 1:2, price stalled and reversed aggressively, stopping us out.
Trade Outcome: Loss
Risk-Reward: -1%
Lesson: Even the most valid setups will sometimes fail
The next Judas swing setup came on $GBPUSD. Price swept the low of the zone, then gave a break of structure, with price retracing into the FVG. We entered long, placing the stop loss 10 pips below entry price.
The trade rallied hard post-entry, hitting our target with minimal drawdown
Trade Outcome: Win
Risk-Reward: +2%
This is why we take every valid setup. The win here offset the earlier FX:EURUSD loss, keeping us net even on the day at this point
The final Judas swing setup on Monday was on OANDA:AUDUSD , and it couldn’t have been cleaner. After a strong sweep of previous lows, price reversed and broke structure convincingly. An FVG formed and price retraced into it beautifully.
We entered long, placing the stop below the liquidity sweep. Price then rallied steadily throughout the session, and retraced almost hitting our stop loss but turned around and hit our 1:2 target.
Trade Outcome: Win
Risk-Reward: +2%
Despite starting the day with a loss, staying disciplined and trading all valid Judas setups left us with:
1 loss ( FX:EURUSD -1%)
2 wins ( FX:GBPUSD +2%, OANDA:AUDUSD +2%)
Net Gain: +3R
This is why a rules-based approach beats emotional trading. Stick to the process, and the edge takes care of the rest.

Trading AUDUSD | Judas Swing Strategy 26-28/05/2025Incase you're new to the Judas Swing Strategy and want to know what the strategy is about, it is a classic price manipulation concept where the market fakes a move in one direction (the “Judas” move), only to reverse and trend in the opposite direction. It’s common during 00:00 - 08:30 EST openings, often used by smart money to trap retail traders. It’s especially powerful when paired with liquidity grabs above/below key highs or lows, followed by a reversal into a FVG confirmation
On Monday, we identified a clean Judas Swing setup. Price spiked below previous lows, giving us a bias to look for potential buying setups after what looked like a classic liquidity grab. We got a break of structure and a reversal into the FVG created.
However, after entry, price failed to reject meaningfully and instead continued lower only after taking out the low, hitting our stop loss before any major move up. We lost 1% on this trade and the lesson all traders need to learn here is that even valid setups will fail and you'll lose money at some point when trading.
Fast forward to Wednesday
We saw a similar manipulation as price spiked below recent Judas swing zones during NY session, grabbing sell-side liquidity before reversing sharply. We waited for confirmation a strong bullish engulfing and break of minor structure. Entry was taken long, with stop loss 10 pips below the liquidity grab and target at previous structure highs.
The trade ran smoothly into profit, validating the setup and recovering the week's earlier loss.
Trade Outcome: Win
Risk-Reward: Clean 1:2
Notes traders need to take from this trade:
- Perfect Judas Swing after liquidity sweep
- Patience for confirmation paid off
- Structure shift confirmed smart money reversal

Trading AUDUSD NZDUSD | Judas Swing Strategy 20/05/2025We’re halfway through the week and already sitting on two clean setups, all rooted in the Judas Swing Strategy. After Monday gave us nothing worth trading, Tuesday served up textbook opportunities on OANDA:AUDUSD and $NZDUSD. In this breakdown, we’ll walk through two trades from Tuesday and highlight how they followed the exact Judas Swing playbook: manipulation first, then break of structure, retracement and execution
AUDUSD: The Classic Fakeout Reversal
Tuesday's OANDA:AUDUSD setup was as clean as they come. Price action leading into our session was heading downward. Liquidity had built up nicely above and below our zones giving us the bait we needed for the Judas Swing setup to trigger.
As expected, our session opened with a sharp fake move to the downside, sweeping the sell-side liquidity and trapping breakout sellers. What came next was the real clue: a decisive break of structure to the upside, signaling that the manipulation was complete and the true direction was about to unfold.
Price formed a Fair Value Gap (FVG) during the move up, and once it retraced into that imbalance, we executed our buy:
Entry: 0.64007
Stop Loss: 0.63907
Take Profit: 0.64207
The result? We faced some drawdown and a clean move into target. It was a low-stress trade that respected the plan from entry to exit
NZDUSD: Same Script
If OANDA:AUDUSD was the blueprint, OANDA:NZDUSD mirrored it almost exactly since they are closely correlated pairs.
Again, we started the session with a tight range. Liquidity had stacked nicely above and below the zone. Then, right on cue, the market delivered its Judas move, a fast pump below the pre-session lows, baiting in breakout shorts.
This was followed by a swift rejection and a clear break of structure to the upside. Once that displacement printed a Fair Value Gap, we knew where our opportunity lay.
Entry: 0.59002
Stop Loss: 0.58902
Take Profit: 0.59202
We entered on the retrace, and price moved smoothly in our favor. The difference here? We barely faced any drawdown on this trade as it moved straight to hit our TP putting us up 4% on the two trades
These setups reinforce why the Judas Swing Strategy is so effective in manipulated markets:
- We don’t chase breakouts we wait for the trap
- We don’t force trades we wait for displacement and confirmation
- We trust our backtested process even when we miss trades or price misses TP by a whisker
Not every trade will close out perfectly, but this method is built around structured logic and patience

Trading EURUSD AUDUSD NZDUSD | Judas Swing Strategy 22/04/2025We've executed 4 trades so far this week using the Judas Swing Strategy and in this write up, we're breaking down exactly how each one played out. We didn't get any trading opportunities on Monday but Tuesday gave us textbook setups on both FX:EURUSD and OANDA:AUDUSD , and if you’ve been following this series, you know the Judas Swing Strategy thrives where liquidity lies and manipulation gives way to opportunity.
Tuesday’s price action on FX:EURUSD opened with familiar signs: ranging structure and liquidity building on both sides. By 09:05 EST, price made the typical fakeout a sharp move to the downside that swept the lows and trapped breakout sellers.
This gave us confirmation to look for the real move, the reversal.
Price broke structure to the upside, creating a Fair Value Gap. As expected, price retraced into that imbalance, and we executed the buy.
Entry: 1.14677
SL: 1.14559
TP: 1.14913
Take profit was cleanly hit with minimal drawdown. No stress. No second-guessing
OANDA:AUDUSD printed a similar setup. The fake move to the downside swept liquidity below an earlier low and shifted structure to the upside. We entered buy once price returned to fill the Fair Value Gap
The trade nearly hit TP but reversed just shy of it, eventually stopping us out.
Entry: 0.63868
SL: 0.63770
TP: 0.64064
It stung a little, but here's where our data-driven edge comes in. We follow a set-and-forget execution model because our backtesting shows that this approach works more in our favor than not. Situations like this will happen. Sometimes price dances around your TP before flipping. It’s part of trading
The next day was a solid one using the Judas Swing strategy, this time across both OANDA:AUDUSD and $NZDUSD. Let’s walk through how the setups unfolded on Wednesday and why both trades played out almost identically in terms of narrative and structure.
The session kicked off with a consolidation forming, setting up a clean range to be targeted. Liquidity had built up nicely above the highs and lows of the pre-market structure. Classic.
As expected, once our session started, price punched higher, sweeping the buy-side liquidity above the early session range. This was our Judas move a strategic fakeout to trigger breakout longs and inject liquidity.
But the key here is what came next.
Price immediately stalled after the sweep and printed a clean break of structure to the downside. That shift was our clue that the buy-side move was done and the real selloff was likely on deck for OANDA:AUDUSD and $NZDUSD.
Price pulled back into the Fair Value Gap (FVG) formed during displacement, giving us a clean entry setup:
Entry: 0.64130
SL: 0.64360
TP: 0.63669
As soon as we entered, the trade moved with conviction minimal drawdown and a smooth ride into target but the OANDA:NZDUSD couldn't hit TP and the trade is still running

Trading AUDUSD | Judas Swing Strategy 15/04/2025Tuesday's price action on FX:AUDUSD , we got a textbook Judas Swing play and for those still getting used to spotting these setups in real-time, let’s break this one down and talk through what happened and more importantly, why it happened.
Going into the session open, we had a relatively tight consolidation, with the 00:00 - 08:30est range acting as a container for liquidity. Price had built up liquidity at the high and low of the zone. Whichever side gets swept first will determine our directional bias for the session
Just after the session began, we saw price aggressively push up taking out the buy side liquidity resting above those early highs. This is what is called the "Judas move", a false breakout meant to trap breakout buyers and entice liquidity into the market. This move is not random. It’s designed to induce traders into the wrong side of the market before the real direction reveals itself
As soon as that liquidity grab was complete, we noticed price begin to stall and form a shift in market structure. This is critical. Once you see a break of structure to the downside, followed by a lower high into a FVG, that’s your confirmation that the real move, the sell-off is in play. We then saw clean displacement to the downside, confirming the manipulation phase was over
Now we wait for a retracement into the Fair Value Gap (FVG). We'll only look to execute a trade once a candle enters the FVG and closes. After a few minutes of waiting, price finally retraced into the FVG, giving us the green light to execute the trade.
Entry: 0.63749
Stop loss: 0.63849
Take profit: 0.63549
This FX:AUDUSD trade gave us a smooth ride with minimal drawdown. Right after entry price moved swiftly into profit. Although there was a brief retrace back to our entry point, it quickly corrected, and we were back in the green. With just a 1% risk, the trade delivered a solid 2% return all within 1 hour and 20 minutes
This setup is an excellent example of why you don’t want to chase early session breakouts blindly. The Judas Swing strategy teaches us to look for the trap, wait for confirmation, and then trade in alignment with the real intention behind price. Beginners often get caught up in the initial move, thinking it’s the real trend. But if you can slow down, understand the time of day, the draw on liquidity, and the reaction around key highs/lows, you’ll start to see how often price manipulates before delivering.

Examples of invalid setups | Judas Swing Strategy 07/04/2025As traders, it's crucial to spend time in the lab backtesting your strategy and exploring ways to optimize it for better performance in live markets. You’ll start to notice recurring patterns, some that work in your favor, and others that consistently lead to unnecessary losses. It might take time to spot these patterns and even longer to refine them to fit your trading system, but going through this process is what helps you evolve. In the long run, this is what you need to do to become a better trader.
We spent a considerable amount of time refining our entry technique for the Judas Swing strategy after noticing a recurring issue where entering with a limit order sometimes gets us stopped out on the very same candle. After testing a few alternative entry methods and making some key adjustments, we finally found an approach that worked consistently for us. On Monday, April 7th, 2025, this refinement proved its worth by saving us from two potentially painful losses. In this post, we’ll walk you through exactly what happened and how the improved entry made all the difference.
We got to our trading desks ready to scout for setups and were drawn to promising setups forming on both FX:AUDUSD and $NZDUSD. This was exciting since the previous week offered no solid trading opportunities. As price swept the liquidity resting above the highs of the zone our bias quickly shifted toward potential selling setups for the session. But before taking any trade, we always ensure every item on our entry checklist is met. Here’s what we look for:
1. A break of structure to the sell side
2. The formation of a Fair Value Gap (FVG)
3. A retracement into the FVG
4. Entry only after a confirmed candle close
With the first two requirements on our checklist confirmed, all that remained were the final two and at this stage, patience is key. As price began retracing toward the FVG on both FX:AUDUSD and OANDA:NZDUSD , things got interesting. Price came into the Fair Value Gap on both pairs, checking off the third requirement. Now, all that was left was to wait for the current candle to close.
But that’s where things will be clear to you now.
Had we jumped in early with a limit order, we would’ve been stopped out on the same candle. This moment served as a perfect reminder of why we now wait for a confirmed candle close before taking any trade. It’s this extra step that helps us avoid unnecessary losses and stick to high-quality setups.
This entry technique like any other, comes with its own set of pros and cons. At times a limit order might offer a more favorable entry price compared to waiting for a candle close and that can influence both your stop-loss and take-profit placements. On the flip side, there are also instances where waiting for the candle close gives you a better entry than the limit order would have. That’s why it’s so important to backtest.
Your job as a trader is to put in the time to study and test what works best for your system. We chose this candle close entry method because we did the work. After extensive backtesting and data analysis, we found this approach aligns best with the results we aim for in the long run.

Trading GBPUSD | Judas Swing Strategy 25/03/2025We had a good trading session with the Judas Swing Strategy two weeks ago, as the strategy delivered 3 solid setups, 2 on FX:EURUSD and 1 on $GBPUSD. And guess what? All three hit their targets!
That’s a massive 6% gain for the week! And with these impressive results we wanted to see how the strategy will perform last week.
The strategy did not produce any setups on the currency pair we monitor ( FX:EURUSD , FX:GBPUSD , FX:AUDUSD , OANDA:NZDUSD ) on Monday 24th March and instead of forcing setups like other traders would we sat that day out. Why was this possible? we had backtested the strategy and had enough data to prove that when we stick to this strategy long term we'd be in putting ourselves in a profitable position.
On Tuesday, we returned to the trading desk, scouting for setups, when we noticed a potential opportunity on $GBPUSD. The currency pair had swept liquidity at the high of our zone, signaling a possible shift in direction. We then shifted our focus to selling opportunities for the session. Our strategy required waiting for a break of structure to the downside, followed by a retracement into the FVG before executing a trade
After waiting for an hour and 15 minutes, we finally got the break of structure to the downside. The only step left was a retrace into the FVG. After some patience, the retrace materialized, meeting all the criteria on our entry checklist. We executed the trade, risking 1% of our account with a target return of 2%
Trade Details:
Entry: 1.29513
Stop Loss: 1.29611
Take Profit: 1.29311
After entering the trade, price consolidated around our entry point for a while, showing no clear direction. However, we remained unfazed, trusting our well-backtested strategy, which has a 50% win rate. With a 1:2 risk-reward ratio, we know that consistently following our strategy will yield profits in the long run. Since we had risked only what we could afford to lose, the slow price movement didn’t shake our confidence
Unfortunately, this trade didn’t go in our favor and ended up hitting our stop loss. This serves as a reminder that not every trade will reach take profit and that’s perfectly okay. Losses are an inevitable part of trading, but what truly matters is maintaining a solid risk management strategy, sticking to a proven system, and thinking long-term. As traders, our edge comes not from winning every trade, but from executing consistently and letting probabilities play out over time

Trading GBPUSD | Judas Swing Strategy 18/03/2025Last week, the Judas Swing strategy only gave us 2 setups on FX:AUDUSD , but both hit their targets, locking in a solid 4% gain! Proof that patience and discipline always win in the long run. After these results, we were eager to see how the strategy would perform this week. And sure enough, a setup emerged on FX:GBPUSD on Tuesday! Let’s take you through how this trade played out
On Monday, we scanned our usual currency pairs ( FX:GBPUSD , FX:AUDUSD , FX:EURUSD , OANDA:NZDUSD ) for potential setups, but none met our criteria so we stayed on the sidelines. Then came Tuesday, and a promising setup started taking shape on $GBPUSD. That got us excited and we were eager to see how this trade would unfold!
After liquidity was swept from the lows of our range, our focus shifted to potential buying opportunities. To confirm our bias, we needed to see a break of structure to the upside before committing to the trade. Twenty-five minutes later, we got a break of structure to the upside, confirming our bias. This move left behind a Fair Value Gap (FVG), signaling an inefficiency in pricing. We now anticipate a retracement to fill this imbalance once that happens, we'll be ready to enter the trade
The next five minute candle entered and closed in the imbalance which meant we could execute our trade using 1% of our trading account and aiming for a 2% return, ensuring our winners outweigh our losers. With this strategy maintaining a win rate of around 50%, sticking to it consistently positions us for long-term profitability
After executing the trade, we faced a deep drawdown, a moment where many traders who over-leverage might panic as price edged closer to the stop loss. But we remained unfazed. Why? Because we only risked what we could afford to lose, staying disciplined and accepting whatever outcome the trade would bring—win or lose.
Upon checking the trade once again, we noticed price had turned around and begun moving in our intended direction which was good to see but the objective had not been met so we had to be patient and wait for the final outcome of the trade
After 3 hours and 15 minutes, our FX:GBPUSD trade finally hit take profit, securing a 2% gain so far this week, all from a well-managed 1% risk

Trading AUDUSD | Judas Swing Strategy 26/02/2025Last week the Judas Swing strategy had another action-packed week! As we took four trades across our selected currency pairs ( FX:GBPUSD , FX:AUDUSD , FX:EURUSD , OANDA:NZDUSD ), securing two wins and two losses, but still closing the week with a solid 2% gain.
Given the strategy’s consistency over the past few weeks and months, we were eager to see how it would perform this week. On Monday, we waited for a setup on FX:EURUSD , but it fell just a few pipettes short of meeting all the criteria on our checklist. Since one key requirement wasn’t met, we stayed disciplined and skipped the trade. Now, here’s the important part—although that trade ended up being a winner, it didn’t bother us. Why? Because it didn’t align with our strategy, and we don’t risk our hard-earned money on trades that don’t check all the boxes. If you find yourself entering random trades, it’s time to create a checklist and stick to it. Discipline is what separates consistent traders from gamblers.
Fast forward to Wednesday, we spotted a promising setup on FX:AUDUSD and we were eager to see how the session would unfold. After a sweep of liquidity at the lows, our focus immediately shifted to potential buying opportunities. Once we got a break of structure to the upside, all that was left was a retrace into the FVG before executing the trade. But patience was key—we reminded ourselves of Monday’s setup, where a similar scenario played out, yet the retrace never came. That trade had to be left behind, and we weren’t about to force an entry this time either
Finally, price retraced into the FVG, and as soon as that candle closed, we were ready to execute the trade. We risk 1% per trade with the goal of securing a 2% return ensuring our wins outweigh our losses over time. With this strategy’s win rate hovering around 50%, sticking to our rules keeps us on the path to long-term profitability
After entering the trade, we experienced a slight drawdown for less than five minutes, dipping just 2 pips nothing out of the ordinary. Our entry candle had closed in our intended direction, so we stayed patient. Soon after, price moved decisively in our favor, hitting our target in just 1 hour and 10 minutes. Our patience paid off this time with a solid 2% return on a trade where we had only risked 1%.

Trading EURUSD and AUDUSD | Judas Swing Strategy 18/02/2025The previous trading week wrapped up on a profitable note, delivering solid gains. We had the opportunity to take four trades on GBPUSD, NZDUSD, and AUDUSD, while EURUSD was the only pair that didn’t present any setups. Out of these four trades, three were winners, and only one resulted in a loss, allowing us to close the week with a 5% return.
With such strong results, we were eager to see what opportunities this trading week would bring. By Tuesday, we had already taken two trades, and in this post, we’ll walk you through how they played out
At 08:55 EST, both EURUSD and AUDUSD experienced a liquidity sweep, clearing out liquidity resting at the lows of their respective zones. This sweep on the lows directed our focus toward potential buying opportunities for the session on both pairs
After patiently waiting, all our trade entry requirements aligned for both currency pairs, giving us the green light to execute. If you're wondering what our entry criteria are, here’s our checklist:
1. Break of structure to the upside
2. A Fair Value Gap (FVG) must be formed
3. Price must retrace into the FVG
We don’t take trades unless all three conditions are met—no exceptions. Even if two out of three align, we stay on the sidelines. This disciplined approach helps us focus only on high-probability setups, increasing our edge in the market
After execution, EURUSD wasted no time, hitting our take profit in just 1 hour and 25 minutes. AUDUSD had barely reached 1R within the same timeframe, signaling that this trade would require more patience.
We were completely fine with this because we always risk only what we can afford to lose, which helps us stay detached from the outcome—win or lose. Plus, with EURUSD already securing a 2% gain, even a 1% loss on AUDUSD wouldn’t significantly impact our overall performance. Now, it’s just a matter of staying patient and letting the trade play out.
This trade truly tested our patience. After a period of consolidation, it finally moved in our favor, allowing us to lock in a 2% gain after 15 hours and 15 minutes. Our total gain for the day reached 4%, making the session a solid success

Trading AUDUSD | Judas Swing Strategy 29/01/2024Last week was a slow one for the Judas Swing strategy, with only a single trade across our key currency pairs—GBPUSD, EURUSD, AUDUSD, and NZDUSD. But here’s the good part: that one trade was a winner, closing the week up 2%
This is a perfect example of why sticking to your strategy matters. We didn’t force trades just because opportunities were scarce. Instead, we trusted our tested system and the data behind it. In trading, discipline is everything, short-term fluctuations don’t matter as much as the long-term edge. By staying patient and following the plan, we set ourselves up for consistent success. In this post, we’ll walk you through the entire process, from setup to outcome and share key insights from these trades
By 8:25 EST, we were already at our desks, prepping for the session. As always, we marked out our key zones, patiently waiting for either the high or low to be swept to establish a directional bias. By 8:45 EST, price had already taken out the liquidity resting at the low of our zone—our cue to start looking for potential buying opportunities
With our bias established, we don’t just jump into trades, we wait for our key conditions to be met:
1. Break of structure to the buy side
2. A Fair Value Gap (FVG) must be left behind
3. Price must retrace into the FVG
Until all three conditions align, no trade is taken. Even if two out of three are met, we stay on the sidelines. Following this plan ensures we only take high-probability setups.
By the close of the 9:35 EST candle, all the conditions on our entry checklist were met, confirming a valid trade setup. We executed the trade with a 1% risk on our account, aiming for a 2% return
Entry: 0.62168
Stop Loss: 0.62058
Take Profit: 0.62368
Now, it’s all about letting the trade play out according to the plan
After executing the trade, we saw minimal drawdown as price moved smoothly, printing higher highs (HHs) and higher lows (HLs), perfect for our buy position. A sharp drop suddenly sent price back to our entry point. But instead of pushing down further, price quickly rejected that level, leaving wicks behind before reversing back in our favor.
This trade is a prime example of why we don’t move our stop loss to breakeven just because a trade is moving well. Through extensive backtesting, we've observed for this strategy that these temporary pullbacks happen often, and in most cases, the trade still plays out as expected. Of course, there are times when price fully reverses and hits our stop loss but that doesn't happen often. Our patience paid off as our 1% risk translated into a 2% return, proving once again that disciplined execution and sticking to the plan yield results.

Trading EURUSD and NZDUSD | Judas Swing Strategy 17/01/2024Last Friday was an exciting day trading the Judas Swing strategy! We were fortunate to spot two solid opportunities, one on EURUSD and the other on NZDUSD. Both trades presented similar setups, and once they ticked all the boxes on our trading checklist, we didn’t hesitate to execute. In this post, we’ll walk you through the entire process, from setup to outcome and share key insights from these trades.
By 8:25 EST, we were at our trading desk, prepping for the session to kick off at 8:30 EST. During that brief wait, we marked our trading zones and patiently watched for liquidity resting at the highs or lows of the zones to be breached. It didn’t take long, NZDUSD breached its low within 20 minutes, while EURUSD followed suit just 40 minutes into the session. With the liquidity sweep at the lows complete, we quickly shifted our focus to spotting potential buying opportunities for the session ahead.
Even though we had a bullish bias for the session, we never jump into trades blindly. Instead, we wait for confirmation—a break of structure to the upside, accompanied by the formation of a Fair Value Gap (FVG). A retrace into the FVG serves as our signal to enter the trade. On this occasion, both currency pairs we were monitoring met these criteria perfectly. All that remained was for price to retrace into the FVG, setting us up to execute the trade with confidence.
Price retraced into the FVG on both EURUSD and NZDUSD, meeting all our entry requirements. We executed the trades risking 1% on each setup, putting a total of 2% on the line. Our target? A solid 4% return. The setup was clear, the risk was calculated, and we were ready to let the trades play out
After executing the NZDUSD trade, it was pure momentum—zero drawdown as the trade went straight into profit without hesitation. The same was true for EURUSD, which also faced minimal to no drawdown and quickly hit our take-profit target. Both trades wrapped up in just 25 minutes, netting us a solid 4% return. These are the kinds of sniper entries traders dream of!
But let’s be real, trading isn’t always this smooth. There will be times when you face deep drawdowns and even losses. The key is ensuring your strategy wins more often than it loses. And if your losses outweigh your wins, make sure your winners are big enough to cover those losses. Consistency and proper risk management are what keep traders in the game for the long haul

Trading AUDUSD | Judas Swing Strategy 15/01/2025Yesterday, we had an awesome trading session using the Judas swing strategy. We entered a trade on AUDUSD and secured a 2% gain! As is customary, at 8:25 AM EST, we commenced the day by reviewing the essential items on our Judas Swing strategy checklist, which comprises:
- Setting the timezone to New York time
- Confirming we're on the 5-minute timeframe
- Marking the trading period from 00:00 - 08:30
- Identifying the high and low of the zone
Once we’ve covered the basics on our checklist, the next step is to identify a sweep of liquidity on either side of the zones we’ve marked. For this trade, we observed a sweep of liquidity above the high of the zone, signaling a potential opportunity to focus on selling setups for this trading session.
To avoid getting ahead of ourselves, we patiently wait for a break of structure to the sell side as additional confirmation of our sell bias. Notice how we didn’t rush into the trade, despite having a bias for the session. Instead, we chose to wait for the market to validate our bias. After some time, the break of structure to the sell side occurred, leaving behind a FVG, further supporting our analysis
The next 5 minute candle retraced to fill the FVG left behind, completing all the requirements on our entry checklist. With our criteria met, we executed the trade, risking 1% of our trading account in pursuit of a 2% return
After executing the trade, we encountered minimal drawdown as it quickly began moving in our intended direction. From that point, all that was left was to patiently wait for the trade to reach our objective and secure the 2% return
Our patience paid off with this AUDUSD trade, as our take-profit target was hit after just 1 hour and 20 minutes in the trade. This reinforces the importance of sticking to your plan and trusting the process—discipline and patience are key to long-term trading success
