XAUUSD🔓 SHORT SETUP ACTIVATED | CLEAN RISK–REWARD TRADE
Market has reached a strong resistance zone and price action is showing signs of weak momentum. This setup is based on structure, rejection, and confluence, not emotions.
📌 Trade Plan
🔓 Entry Level: 4336
❌ Stop Loss: 4315
🎯 Target: 4350
📊 Why this trade?
✔ Resistance + rejection
✔ Momentum slowdown
✔ Favorable R:R
✔ Discipline over prediction
Remember: Trading is about probabilities, not certainty. Manage risk, follow your plan, and let the market do the rest.
👍 If this idea aligns with your analysis, hit like,
💬 share your view in comments,
🔔 and follow for more structured trade ideas.
⚠️Disclaimer: This is not financial advice; it reflects only my personal market analysis. Please do your own research before trading.
Tradeanalysis

ES (SPX, SPY) Analysis, Key Levels, Setups for (Nov 11th)S (Dec) Plan for Tue, Nov 11 — Level-KZ Protocol (15/5/1).
Bias is constructive while trading above the 6,838–6,845 range; the first test into 6,880–6,900 serves as a decision point. Thinner liquidity is expected around the U.S. holiday, so execute trades only within NY kill zones.
Setups (trade the level → next level; 15m→5m→1m sequence)
Long — Bounce at 6,838–6,845: sweep/quick-reclaim → 5m re-close → 1m HL entry. Hard SL below 6,830 wick. TP1 6,872–6,880, TP2 6,900, TP3 6,930. Viability gate: TP1 ≥ 2.0R.
Long — Acceptance above 6,900: full 15m body close >6,900 → hold the retest → 1m HL. SL below trigger wick. TP1 6,930, TP2 6,955–6,970, runner eyes weak-high cleanup.
Short — Rejection fade 6,900–6,930: wick through → 15m close back below 6,895 → 5m LH. SL above session high. TP1 6,872, TP2 6,845, TP3 6,805; lose 6,805 and momentum can slide toward 6,770 then 6,733.
News & session conditions (ET)
U.S. Veterans Day — equities open; U.S. bond market closed; U.S. macro slate is light. Overnight focus: NZ inflation expectations (evening ET), U.K. Labour Market (pre-London), Germany ZEW (pre-NY). Expect patchy liquidity around the holiday; be strict with the 2R viability gate and trade only inside NY AM/PM kill-zones.

Trades with B – Daily Recap (Nov 6 2025)Ticker: QQQ / NQ1! (5 min & 15 min TF)
Strategy: ORB Pro + Golden Pocket Retest + Volume Filter
Focus: Confirmation Entry + HTF Trend Confluence
🧭 Market Context
The Nasdaq futures (NQ1!) opened with a sharp push into a key supply zone marked by the previous day’s Golden Pocket.
After an early fake push up, the market rolled over cleanly beneath the EMA cluster and the ORB box on both timeframes.
The first true confirmation signal came mid-morning — the 15 min and 5 min timeframes synced short, and the volume aligned perfectly with trend continuation.
🧠 Trade Review
Entry: 11:02 EST QQQ $613 Put (ORB Pro Short Trigger)
Exit: 11:35 EST — ORB extension target hit → secured profit into momentum flush
System Validation: Perfect alignment across EMA trend + HTF bias + retest rejection signal
P/L: +$199.78 net profit ( + $289.94 closed gain – $190.05 entry cost )
This trade was clean — confirmation entry, defined risk, and no over-trading.
📊 Performance Snapshot
Metric Value
Win Rate 100 % (today’s single trade)
Best Trade +$289.94
Largest Loss – $190.05
Net Result +$199.78 (Realized)
Setup Accuracy Excellent – Full confirmation alignment
📈 Chart Breakdown
The ORB Pro short triggered as price retested the upper Golden Pocket zone and failed to hold above the purple EMA band.
Both the 15 min and 5 min charts show a clean EMA curl-down with volume confirmation.
The short target zone was hit precisely before a small midday bounce, validating the system’s filter timing.
💡 Key Takeaways
Wait for alignment – when HTF and LTF agree, you get momentum moves.
Clean entry > early entry – confirmation beat anticipation again.
ORB Pro filter precision – blocked late entries, protecting the green.
🧘♂️ Reflection
“The setup was textbook — patience finally paid off. One trade, one signal, and one profit. The goal now is simple: keep filtering for these perfect alignments and size up responsibly as consistency builds.”
🧩 Next Steps
✅ Focus only on HTF + LTF confirmation signals
✅ Avoid re-entries once target zone is hit
✅ Document each setup screenshot for pattern library

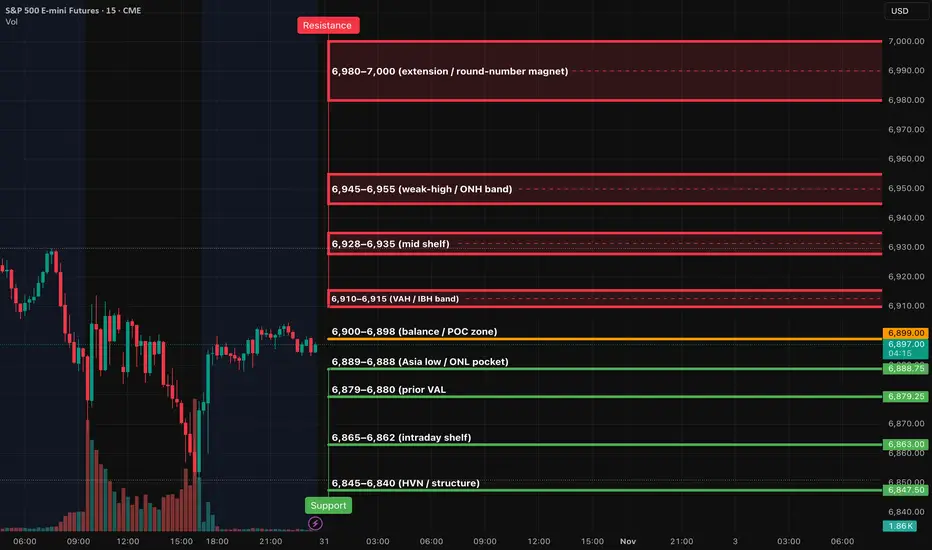
ES (SPX, SPY) Analysis, Key Zones, Setups for Fri (Oct 31st)Kill-zones (ET): NY AM 09:30–11:00; manage 12:00–13:00; NY PM 13:30–16:00.
Event (Fri): 9:45 ET Chicago PMI (unaffected by shutdown).
Upside continuation (LONG):
6,910 flips to support with a 15m close above → 5m pullback holds → 1m HL entry.
SL: 15m trigger-wick ±0.25–0.50.
TP1 6,928; TP2 6,945–6,955; TP3 6,980–7,000.
Quick-reclaim bounce at 6,889–6,888: sweep and instant reclaim → ride to 6,898 → 6,904–6,910.
Pop-and-fail shorts (SHORT):
Reject 6,904–6,910 then 15m closes back under 6,904 → 5m LH entry.
SL: 15m wick.
TP1 6,898; TP2 6,889; TP3 6,879.
Clean breakdown of 6,889 with a 15m close ≤6,887 → 5m LH entry.
TP1 6,879; TP2 6,865; TP3 6,845.
Management & risk
Viability gate: only take a trade if TP1 ≥ 2.0R using the 15m-wick stop.
At TP1: close 70%, set the 30% runner to BE; runner aims TP2→TP3.
Max two attempts per level per session.
GBPJPY's Reversal BaseHi Traders!
When looking at GJ, the chart seemed messy as it was in a range for a long time. After finally breaking out of the 200s, priced reach a Weekly OB area in the 203s.
Over the past weeks or so, GJ created a counter trend dipping back into the high 200s area with what it appears to be a reversal base. If this reversal is true, I would be planning swinging this trade into the next resistance areas around 206-207. That will bring price to a previous Monthly Bearish OB.
Despite of how the chart has looked, the trend remained bullish. Therefore, IMO, GJ seems to want to keep its bullish momentum.
Good luck to everyone!
*DISCLAIMER: I am not a financial advisor. The ideas and trades I take on my page are for educational and entertainment purposes only. I'm just showing you guys how I trade. Remember, trading of any kind involves risk. Your investments are solely your responsibility and not mine.*

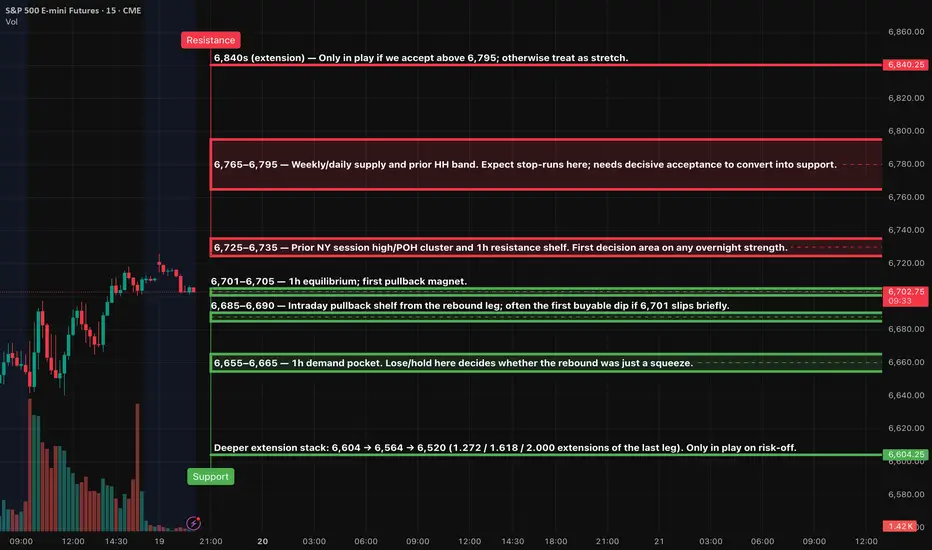
ES (SPX, SPY) Analysis Week-Ahead (Oct 20th - 24th)Market Structure Overview
Price has shown a robust rebound from last week's discount levels, now trading back near the 6,720 area following a swift flush and subsequent V-shaped recovery.
Currently, we remain capped under the supply zone between 6,765 and 6,795, which represents the previous swing-high levels. As long as we trade below this resistance, our primary strategy will be to sell into strength and buy on dips within the established range, rather than pursuing breakouts.
On the hourly chart, key equilibrium is noted around the 6,701 to 6,705 range; this serves as the pivotal point around which price action is currently oscillating.
Setups (Level-KZ style)
Reclaim-and-go long (Tier-1 / Tier-2):
Asia/London: hold above 6,701–6,705 after a shallow dip → in NY AM, take the first 5m re-close + 1m HL toward 6,725–6,735.
Scale/target: TP1 6,725–6,735, runners toward 6,765–6,780 if strength persists. Invalidation: 15m body back below 6,701.
Flush-and-reclaim long (Tier-3 bounce):
• Quick sweep into 6,655–6,665 (or even 6,685–6,690) during London → immediate reclaim → first HL entry.
• Targets: back to 6,701 then 6,725–6,735. Invalidation: 15m close back inside/under the swept zone.
Pop-and-fail short (fade):
• Squeeze into 6,725–6,735 that fails to accept (15m rejection back inside) → take the first 5m LH.
• Targets: 6,701 then 6,685–6,690. Invalidation: 15m body acceptance above 6,735.
Stop-run reversal short:
• Spike into 6,765–6,795 (look for wick/absorption) → 15m rejection → 5m LH entry.
• Targets: 6,735 then 6,701. Invalidation: sustained 15m/30m acceptance above 6,795.
Management:
Anchor hard SL to the relevant 15m wick of the trigger ± a small buffer; require TP1 ≥ 2R to the next major level.
At TP1, trim most and put the runner to BE; max 2 attempts per level per session.
Overnight to Tomorrow NY Forecast
Base Case: Anticipate a range build between 6,685 and 6,735 overnight as the market absorbs the recent rebound. During the NY AM session (09:30–11:00 ET), initial attempts may test the 6,725–6,735 resistance before pulling back towards 6,701, potentially moving within the 6,685–6,690 range. Should buyers maintain support at 6,701 on a 15-minute chart, watch for a late-morning rebound back to the 6,725–6,735 zone, with a potential squeeze toward 6,755–6,780 if we see acceptance above 6,735.
The bias shifts to a bullish trend only with clear acceptance above 6,795, which would indicate multiple strong closes in that area, potentially targeting 6,820 and beyond. On the other hand, a decisive move below 6,655 would trigger a downward extension toward 6,604, 6,564, and 6,520.
Execution windows (ET)
• London: 02:00–05:00 — look for the sweep/reclaim plays.
• NY AM (primary): 09:30–11:00 — best momentum/rotation.
• NY PM: 13:30–16:00 — continuation or mean-revert back into the day’s pivot.
What changes the plan
Acceptance above 6,735 early: favor continuation to 6,765–6,780 rather than fading.
Hard failure at 6,701 with sellers defending on 15m: expect a deeper test into 6,685 → 6,655–6,665.
Elevated macro headlines/data at 08:30/10:00 ET windows can temporarily override levels; let the impulse print, then trade the retest.
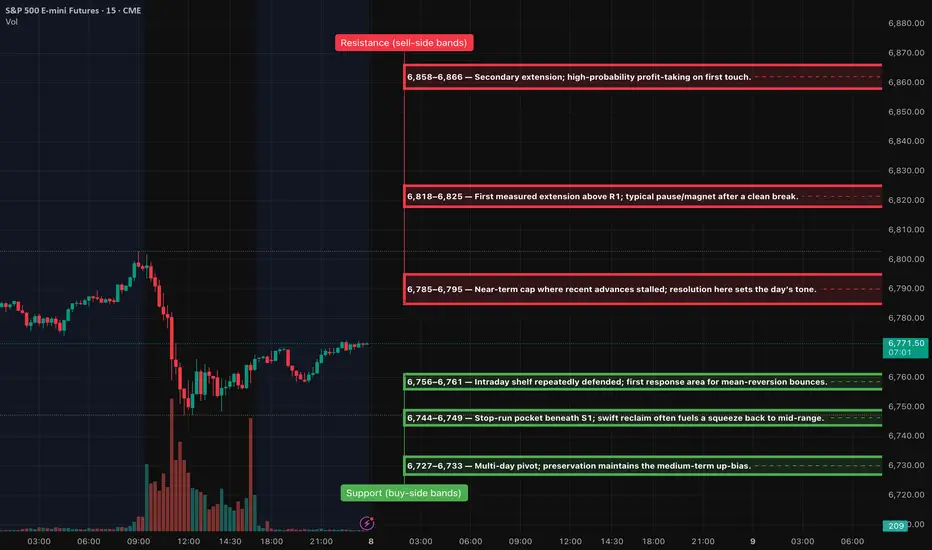
ES (SPX, SPY) Futures Analyses, Key Zones, Setups for Wed, Oct 8The E-mini S&P 500 (ES) is currently exhibiting a primary uptrend on the higher timeframes while consolidating just below a significant resistance level between 6,785 and 6,795. As we approach the New York morning session, the prevailing expectation is for a range-to-trend expansion, dependent on whether the 6,758–6,795 range is broken. The 6,785–6,795 zone should be regarded as the immediate focal point for decision-making.
Event & Risk Calendar (ET)
• 07:00–07:15 — MBA Mortgage Applications (weekly).
• 10:30 — EIA Weekly Petroleum Status Report (standard Wednesday release).
• 14:00 — FOMC Minutes (Sept 16–17 meeting). Expect volatility expansion on release.
A++ Setups (Tier-1, Level-KZ 15/5/1)
1. Trend-Continuation LONG at R1 break
Trigger: 15-minute full-body close above 6,795, 5-minute pullback holds 6,785–6,795, 1-minute higher-low confirms.
Entry: 6,788–6,795 on the retest/hold.
Invalidation: 15-minute body back below ~6,785.
Targets: TP1 6,818–6,825; TP2 6,858–6,866; TP3 6,898–6,905.
Risk: Hard SL = relevant 15-minute wick low −0.25–0.50 pts; take 70% at TP1, runner to BE; max 2 attempts per level.
2. Rejection-Fade SHORT at R1 failure
Trigger: Probe into 6,785–6,795 fails: 15-minute rejection close back below, 5-minute lower-high forms, 1-minute pullback fails.
Entry: 6,785–6,792 on failure.
Invalidation: 15-minute body acceptance above ~6,795.
Targets: TP1 6,756–6,761; TP2 6,744–6,749; TP3 6,727–6,733.
Risk: Same management as Setup 1 (wick-anchored SL; 70/30 at TP1; max 2 attempts).
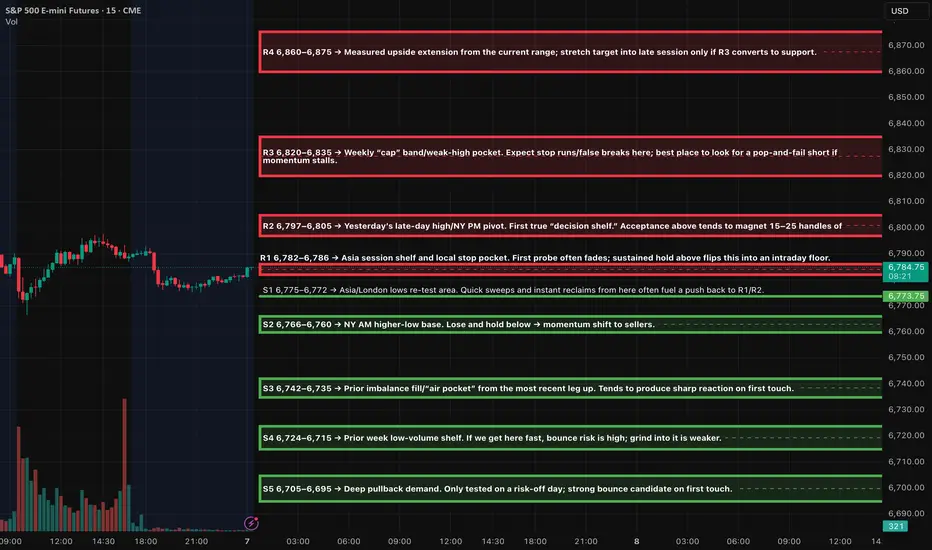
ES (S&P 500) Futures - Analyses, KeyZones, Setups Tue, (Oct 7)Context
We’re sitting just under a shallow ceiling built around 6,785–6,805 after holding a higher-low near 6,766. Trend is still constructive on higher timeframes, but intraday momentum is chopping under that overhead band. Expect two-way trade early with directional follow-through only if one of the edges gives way.
Session timing
• NY AM window: 9:30–11:00 ET (primary)
• Lunch manage-only: 12:00–13:00 ET
• NY PM window: 13:30–16:00 ET (primary continuation/reversal window)
Catalyst windows (be alert for volatility bursts)
• 8:30 ET — morning data drop
• ~10:00–11:00 ET — speaker risk window
• 13:00 ET — rates/auction impact window
Primary setups (Level-KZ style, 15m→5m→1m sequence)
1. Break-and-defend LONG (continuation)
Trigger: 15m full-body close above 6,785–6,786 (R1).
Execute: 5m pullback holds above 6,782 and re-closes up; 1m higher-low entry.
Risk: Hard SL beyond the 15m trigger wick (±0.25–0.50).
Targets: 6,797–6,805 (R2), then 6,820–6,835 (R3). If R3 converts to support, trail for 6,860–6,875 (R4).
Idea: Turn the shelf into a floor and ride the expansion.
2. Quick-reclaim LONG (bounce) at S1/S2
Trigger: Liquidity sweep into 6,775–6,772 or 6,766–6,760, then a 15m close back above the level.
Execute: 5m re-close up + 1m pop-and-go.
Targets: First magnet 6,782–6,786; stretch 6,797–6,805.
Notes: Works best in NY AM; avoid if we grind down into the level slowly.
3. Failure-to-defend SHORT (rotation down)
Trigger: 15m body close below 6,775, then 5m lower-high under 6,775 that can’t reclaim.
Execute: Sell the 1m pop-and-fail under the re-test.
Targets: 6,766–6,760 → 6,742–6,735; leave a runner for 6,724–6,715 if momentum expands.
Invalidation: Any 15m reclaim and hold back above 6,782 kills the idea.
4. Pop-and-fail SHORT at R3 (fade the cap)
Trigger: First push into 6,820–6,835 stalls (upper wicks on 15m), then a 5m lower-high below the spike.
Execute: 1m rejection entry with risk tucked above the wick.
Targets: 6,805 → 6,785; runner for 6,766 if breadth flips risk-off.
Notes: Don’t overstay; if buyers “walk it up” and print strong closes through 6,835, flip bias to continuation (Setup 1 extension).
Price Roadmap for the Day
So, here’s how to roll with today’s market.
Path A — Range to Upside Break: First up, we want to stay above 6,775 early on. If we can turn 6,785 into dependable support, we're looking to push towards 6,797–6,805. If buyers defend that re-test, we might see a move up to 6,820–6,835. Control shifts to buyers when that range becomes support, and that opens up the possibility of hitting 6,860–6,875 later in the PM session.
Path B — Failure from the Ceiling: Now, if we spike into 6,820–6,835 but can’t hold it, then a lower high under 6,805 could take control back to sellers. That sets us up for a drop to 6,785 and maybe even 6,766, with 6,742–6,735 acting like a “magnet pocket” if momentum kicks in.
Path C — Data/Auction Shock: Keep an eye out for any sharp moves around 8:30 or 13:00 that blast through key levels. In these scenarios, wait for a 5-minute re-test to see if it holds (which means the trend continues) or fails (pointing to a potential reversal). Don’t chase that initial spike; let the market prove it can stick at the level first.
Stay sharp!
ES (SPX, SPY) Analyses, Key Zones, Setups for Fri, (Oct 3)08:30 Employment Situation (NFP, unemployment rate, wages) is scheduled, per BLS release calendar. Note: multiple outlets report the federal shutdown may delay key reports, including payrolls—treat 08:30 as tentative.
10:00 ISM Services PMI (third business day @ 10:00).
Setups (Level-KZ Protocol 15/5/1)
Kill-zones (ET): London 02:00–05:00 (optional), NY AM 09:30–11:00 (primary), NY PM 13:30–16:00 (primary).
Stops: Hard SL anchored to the relevant 15m wick ±0.25–0.50 pts.
Targets: TP1 = major opposing level. At TP1: close 70%, set runner 30% to BE; runner aims TP2→TP3. No trail before TP2.
Time-stop: 45–60m if neither TP1 nor SL hits. Max 2 attempts per level per session.
Acceptance Continuation — LONG (Tier-1 A++)
Trigger: 15m body-through acceptance above 6,788 → 5m pullback holds ≥6,782 and re-closes up → 1m HL entry.
Entry: 6,784–6,788 reclaim.
SL: ~6,778 (below trigger wick).
TPs: 6,800 → 6,810 → 6,822–6,830.
Invalidation: 15m close back inside ≤6,782.
3) Quick-Reclaim Bounce at PDL — LONG (Tier-2 A+)
Trigger: Sweep 6,742–6,746, instant reclaim with 5m close back above 6,746 → 1m HL entry.
Entry: 6,744–6,746 after reclaim.
SL: 6,737–6,739 (below sweep low).
TPs: 6,762 → 6,774 → 6,786.
Sizing: Tier-2 (¾ size).
4) Breakdown & Hold — SHORT (Trend/Acceptance)
Trigger: 15m acceptance below 6,742, 5m pullback fails ≤6,742 and re-closes down.
Entry: 6,740–6,742.
SL: 6,748–6,750.
TPs: 6,725 → 6,710 → 6,695.
Invalidation: 15m close back inside ≥6,748.
===
Rejection Fade at PDH — SHORT (Tier-1 A++)
Trigger: First touch 6,786–6,788 fails; 15m rejection close back inside ≤6,782, 5m lower-high + re-close down → 1m LH entry.
Entry: 6,782–6,786.
SL: 6,791–6,794 (above rejection wick).
TPs: 6,762 → 6,746 → 6,725.
Invalidation: 15m body > 6,788.
PA Thoughts:
Overnight (Asia/London):
Looking at the base case rotation between 6,758 and 6,786. I’ll be fading the edges on the first touch of this range (Setups 2/3). A break and acceptance beyond these edges would open up potential targets—6,800 to the upside and 6,725 to the downside. If the Asia session pushes into the R2 and faces rejection, I’ll look for a lower high back toward S1. However, if we see acceptance above, expect a grind toward 6,800–6,810.
NY AM (09:30–11:00):
Depending on the 08:30 data release, be prepared for potential fast, one-sided movement. I plan to stay on the sidelines until we see a 15-minute acceptance at R2/S2, then I’ll execute Setup 1 for an upward move or Setup 4 for a downward trend. If the data comes in delayed or shows benign results, anticipate the first impulse to shift to 10:00, and I’ll apply the same acceptance strategy at the nearest edge.
NY PM (13:30–16:00):
If we hold above 6,788 from the AM session, I’ll target the 6,800–6,810 range and manage runners toward 6,822–6,830 as we approach the close. Conversely, if the AM session fails between 6,786 and 6,788, I expect to see lower highs towards 6,758 and possibly down to 6,746. A clean break below 6,742 would open the door for a slide to 6,725.

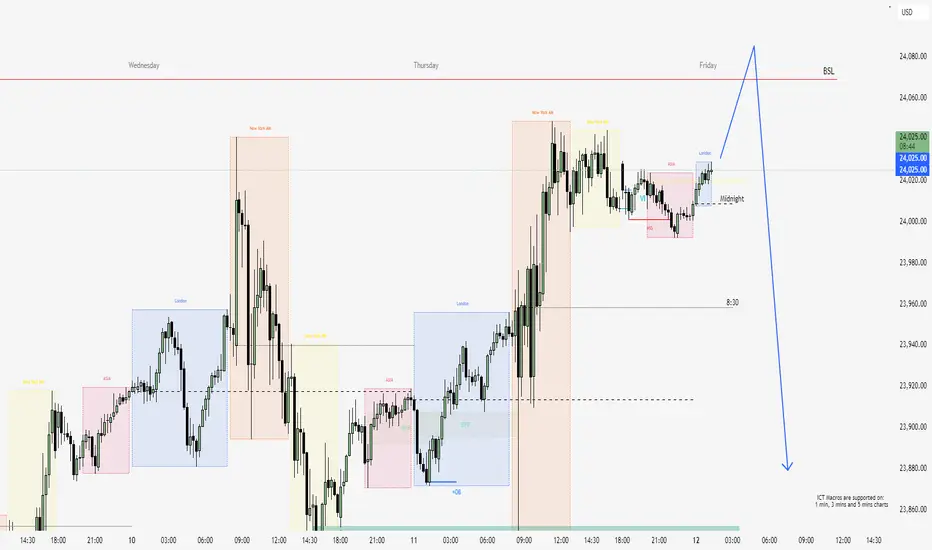
Friday Liquidity Sweep & Reversal Setup – NQNarrative:
Price action on NQ has swept the Buy Side Liquidity (BSL) on the daily timeframe around 24,060 during Thursday’s NY session. After the sweep, price consolidated just below the high, suggesting the potential for a Friday Reversal, in line with ICT’s classic "Reversal Friday" concept.
Today (Friday), I am watching for a potential Judas Swing to the upside during the New York AM session, aiming to lure breakout buyers above yesterday’s highs.
Once that buy-side liquidity is taken, I’ll look for:
A Market Structure Shift (MSS) on the 5M or 3M chart.
Entry on a Fair Value Gap (FVG) or a refined Order Block.
Stop Loss just above the Friday high (above the sweep).
Target 1: Return to the weekly open area or 1H OB.
Target 2: 23,880–23,900 → previous BPR zone and discount level.
Confluences:
✅ Daily BSL swept.
✅ Asian MSS already occurred.
✅ Price is sitting inside premium & consolidating.
🔍 Watching for SMT divergence between NQ and ES (S&P) – if ES breaks high and NQ doesn’t → bearish confirmation.
Execution:
Will wait for price to spike above the current range (Judas), then confirm BOS/MSS and enter short on the retracement.
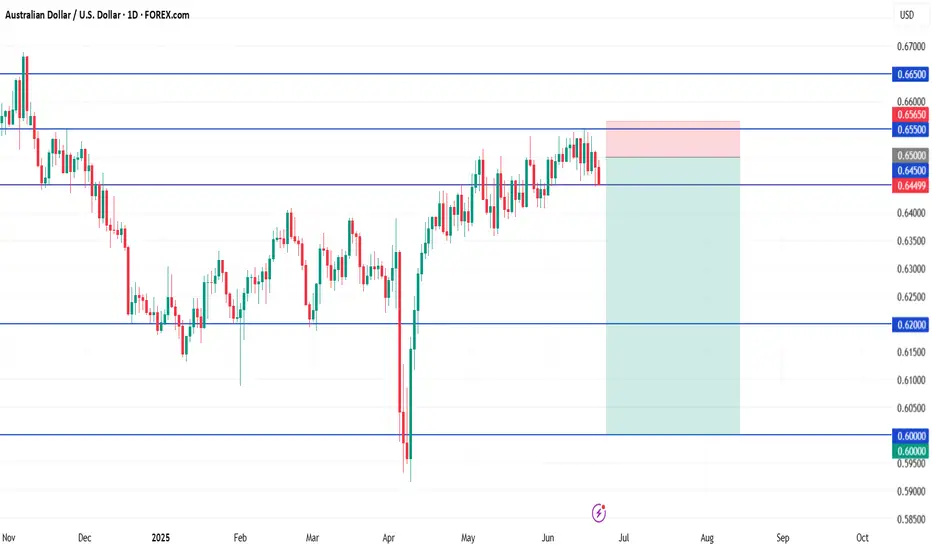
AUD/USD ShortStandard / Aggressive Entry
Sell Limit: 0.6500
Stop Loss: 0.6565
TP1: 0.6200
TP2: 0.6000
Why: Likely to trigger sooner, even on light retracement or spread spike.
🛡️ Conservative Entry
Sell Limit: 0.6520
Stop Loss: 0.6580
TP1: 0.6200
TP2: 0.6000
Why: Waits for a deeper, cleaner pullback toward top of resistance zone. Safer but may not trigger.
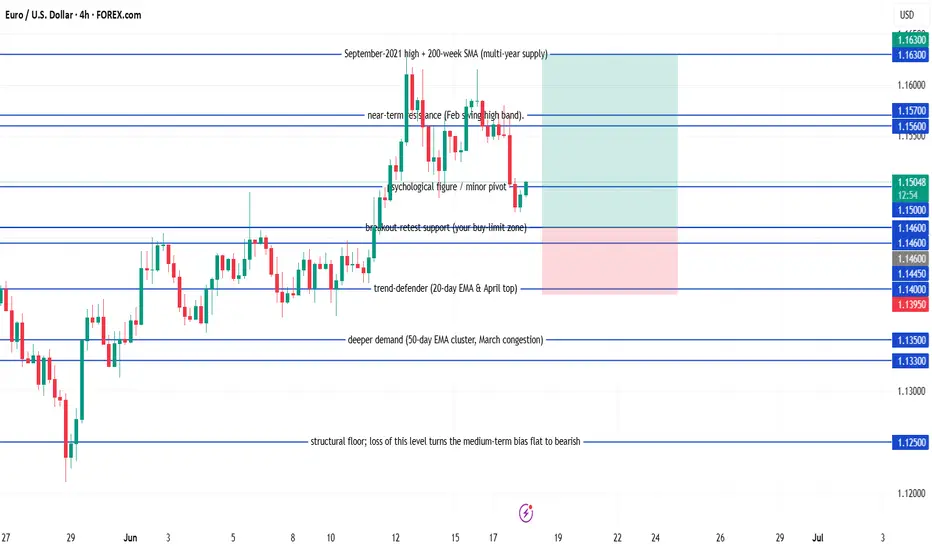
EUR/USD Buy EUR/USD pull-back long
Buy-limit at 1.1460
Stop-loss at 1.1395
Take-profit 1 at 1.1560 – when this first target is reached, move the stop to breakeven
Take-profit 2 at 1.1630
Condition: keep the order active only while the daily candle continues to close at or above 1.1445.
Expiry: if the order hasn’t been filled after five full trading days, cancel it and reassess.
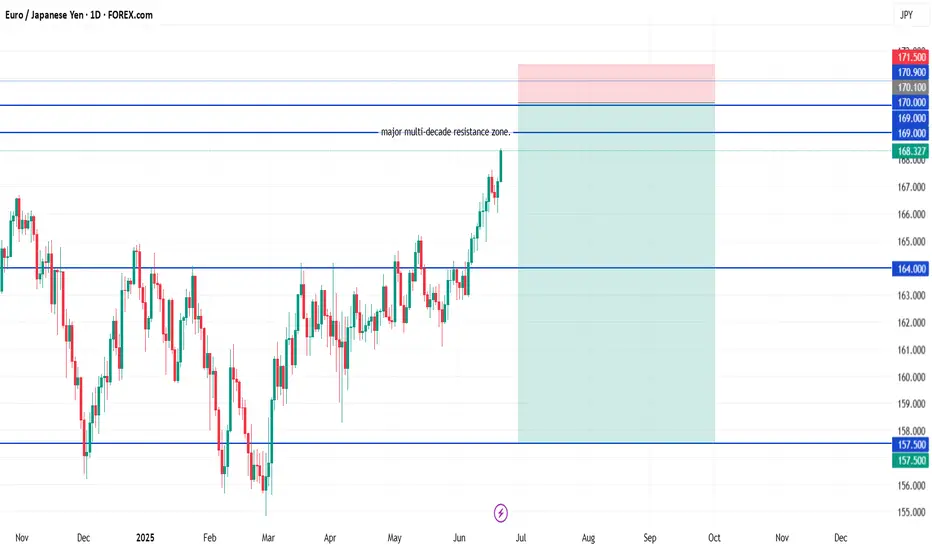
EUR/JPY Short✅ EUR/JPY Swing Short Setup (Multi-Entry)
🎯 Entries:
Entry 1: 169.00 (light position)
Entry 2: 170.10 (core entry)
Entry 3: 170.90 (final top entry)
🛡️ Stop Loss (Unified):
171.50
Placed above the entire resistance zone and previous all-time wick highs, allowing for normal trap behavior without overexposure.
🎯 Take Profits:
TP1: 164.00
TP2: 157.50
You can scale out partially at TP1 or run the full position to TP2 depending on how momentum builds.
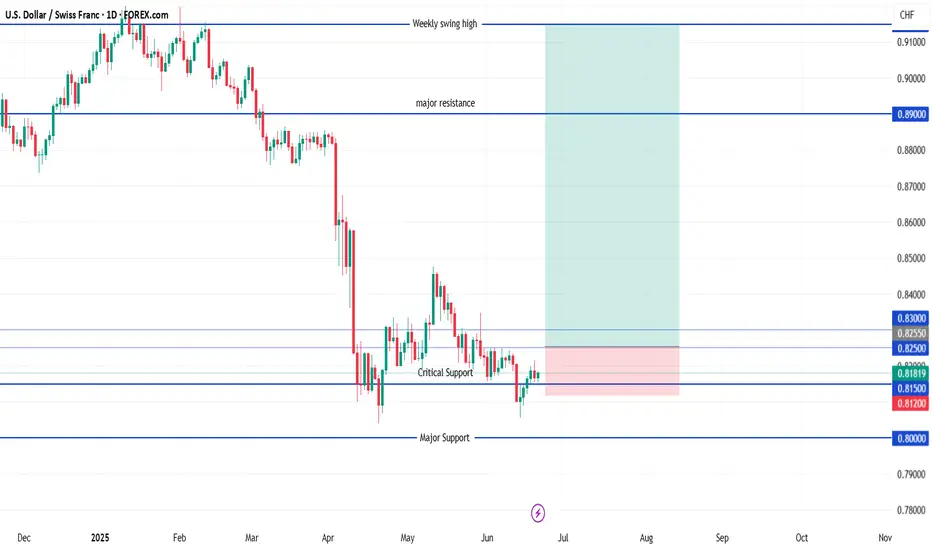
USD/CHF Buy🎯 Long Entry Strategy
🔸 Standard (Conservative) Breakout Entry
Entry: 0.8255 (daily close above key compression + reclaim zone)
Stop Loss: 0.8120 (below 0.8150 structure + most recent wick low)
Target 1: 0.8300 (minor resistance)
Target 2: 0.8900 (major weekly resistance)
Target 3 (Optional Hold): 0.9150 (weekly swing high)
✅ Best if you want confirmation. Higher probability but less RR.
🔸 Aggressive Limit Entry (Inside Range)
Entry: 0.8155 (retest of support zone)
Stop Loss: 0.8040 (below April + June wick lows)
Target 1: 0.8300
Target 2: 0.8900
Target 3: 0.9150
⚠️ Best for RR, but higher chance of drawdown or stop-out.
AUD/JPY Short Trade Plan Options
✅ Standard Entry
Sell Limit: 94.80
Stop Loss: 96.10
Take Profit 1: 90.00
Take Profit 2: 85.00
Why: Clean entry inside rejection zone, just under multi-decade resistance. Gives room for price to wick higher without being stopped prematurely.
🛡️ Conservative Entry
Sell Limit: 95.20
Stop Loss: 96.30
Take Profit 1: 90.00
Take Profit 2: 85.00
Why: Waits for deeper retracement into top of range. Better R:R, but may not trigger if price weakens early in the week.
🔐 Optional Manual Confirmation Strategy
Watch for a bearish daily candle (pin bar, engulfing) inside 94.50–95.50
Enter at close of that candle with stop above candle high
Gives added confirmation but may reduce reward slightly

EUR/CAD BuyEntry – Buy-limit 1.5560 (front-run zone); back-up bid 1.5520 if you ladder.
Stop-loss – Hard stop 1.5410 (below 1.5500 break-fail line).
Targets
TP1 1.5750 – lock ~1.5 R; trail stop to break-even.
TP2 1.5900 – cash majority.
Runner 1.6000 – only if momentum is strong.
Expiry: cancel if not filled after 5 trading days.

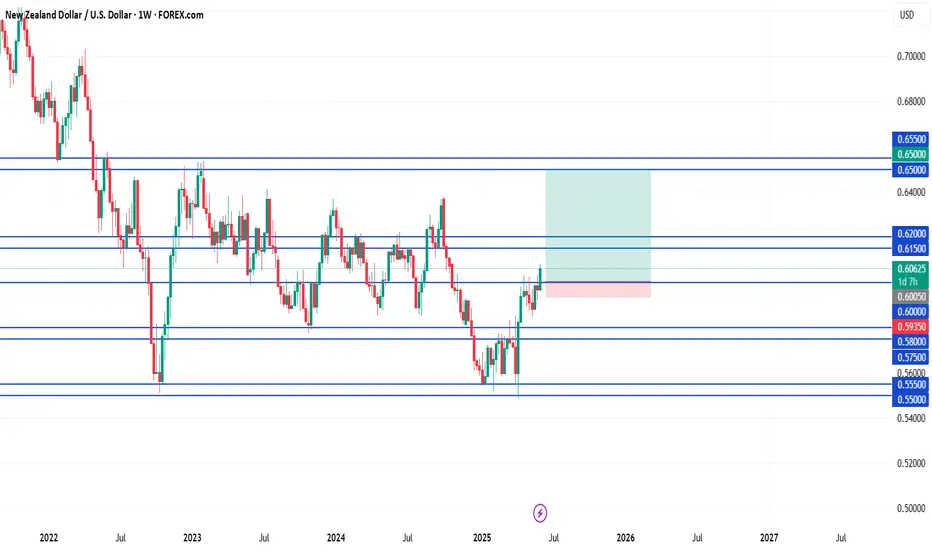
NZD/USD Buy Pullback Buy Setup
Entry Zone: 0.6000 – 0.6020
Retest of breakout + daily demand zone
Stop Loss: Below 0.5950 (ideally 0.5935 to avoid wickouts)
Target 1: 0.6150
Target 2: 0.6200
Target 3: (optional swing) 0.6500 if holding long-term
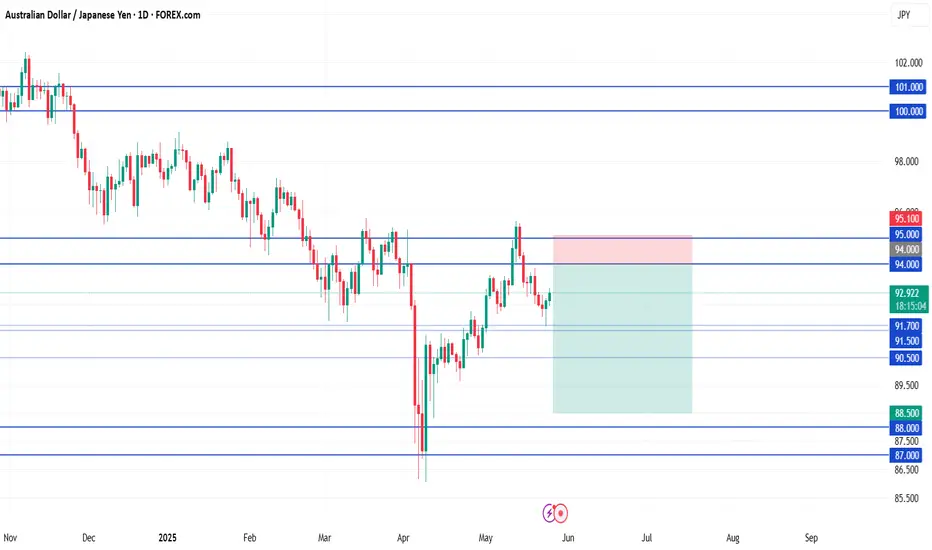
AUD/JPY Short📍 AUD/JPY Short Setup – Sell Limit Order
Entry: 94.00
(clean retest of daily + weekly resistance zone, aligned with previous structure)
Stop Loss: 95.10
Take Profit 1: 91.00
(recent support shelf with high reaction probability)
Take Profit 2: 88.50
(strong weekly support zone; ideal mid-term target if momentum continues)
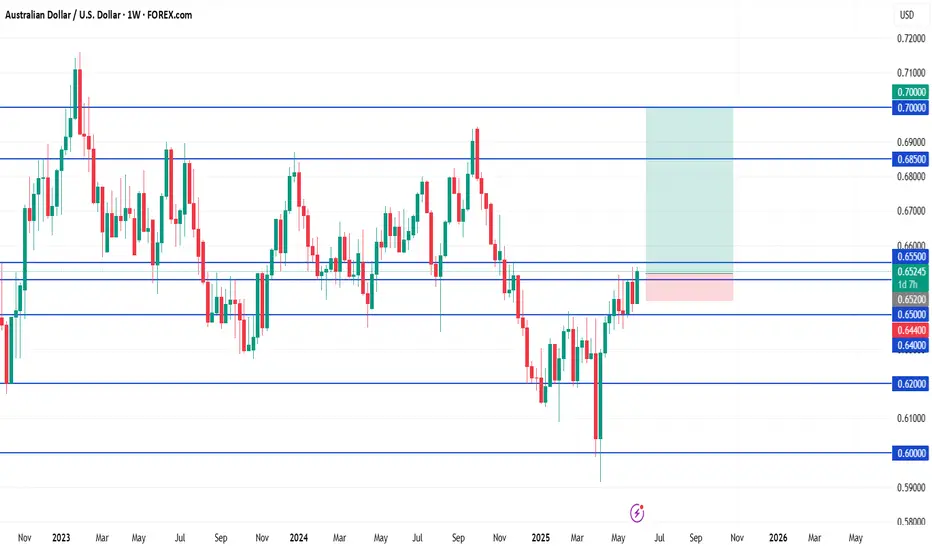
AUD/USD BuyBuy (Bullish breakout continuation)
✅ Entry Conditions (Wait for confirmation first):
Daily candle must close above 0.6550 with strength (not a wick rejection).
After breakout, wait for a retest back into the 0.6500–0.6520 zone.
Only enter if price shows bullish rejection off that zone (e.g., wick rejections, bullish engulfing, or small-bodied doji followed by green candle).
📍 Trade Setup
Buy Limit– 0.6520
Stop Loss (SL): 0.6440 (below the retest structure)
Take Profit 1 (TP1): 0.6700
Take Profit 2 (TP2): 0.6850
(Optional TP3): 0.7000 (stretch target)
AUD/CAD Short🔻 AUD/CAD Short Setup (High-Probability Rejection Play)
🔹 Entry Zone:
0.8990 – 0.9060
Ideal entry: 0.9020 (mid-zone if price stalls or forms a wick)
🔺 Stop Loss:
0.9120 (above all 2023–2024 highs and structure traps)
This SL protects you from a true breakout
🎯 Targets:
TP1: 0.8800 (prior swing lows / first clean zone)
TP2: 0.8650 (mid-range support with confluence)
TP3 (extended): 0.8500 (range bottom — aggressive but clean if momentum kicks in)

GBP/USD Long🟢 Bullish Play (High Probability)
Plan: Break-and-Retest Strategy
Entry: Wait for daily close above 1.3200, then set buy limit at 1.3060
SL: 1.2890
TP1: 1.3300
TP2: 1.3600
TP3: 1.4000 (macro breakout target)

Trade analysis EURAUD 01.04.2025Hi,
very good patten /setup was form in EURAUD , this patten is very identical in forex/crypto/other market, usually built in TOP or bottom ..
comment if you find similar..
Do not ask for Buy or Sell tips.
I/We are not SEBI Registered Advisors. We don't provide any types of Buy/Sell signals. This is purely for educational and learning purposes. i/We shall not be responsible for your profit or loss. Please confirm with your financial advisor.

AUD/CAD Short🔍 Technical Context:
Market Structure:
Price is in a long-term sideways range with lower highs. AUD/CAD is struggling to break above the 0.90–0.91 region, showing signs of exhaustion.
Zone of Interest (Supply):
Purple box: 0.9000 – 0.9100
A clean historical rejection zone that has acted as both support and resistance multiple times since 2022.
Entry Type:
Sell Limit @ 0.9070 placed slightly below the top of the resistance zone to increase likelihood of getting triggered on a spike.
Stop Loss:
0.9175 – above multiple wick rejections and key structure highs. Allows breathing room for volatility without compromising the structure.
Take Profit Targets:
TP1: 0.8650 (conservative target at strong support)
TP2 (optional extension): 0.8500 (major long-term range low)
Risk-Reward Ratio:
~1:3 minimum to TP1, potentially 1:4+ if extended to 0.8500.
🧠 Strategic Notes:
Trigger Conditions:
Wait for a retrace to the 0.9070 zone rather than enter at market open. This is based on the idea that a final upward effort could grab liquidity and fill your limit.
Monthly Candle Watch:
Monday is month-end. Monitor the monthly close to determine if the structure still supports the trade idea. If the close is strongly bullish and you’re triggered early, be open to closing the trade early to avoid deeper drawdown.
Why It’s High Probability:
Multi-year horizontal structure
Repeated failure to hold above 0.90
Candlestick wicks rejecting the same zone
Fundamentals slightly favor CAD over AUD (higher real yields, oil correlation)
Defined invalidation point and asymmetric reward
