EURGBP Trade Recap -1% 15.12.25In this recap I break down my EURGBP short position I took last week using the 1H in combination with the 5M to refine my entry. There was also a valid 4H RE to take as well in line with my short.
Full explanation as to why I executed on this position and this also being a textbook example of the type of bread and butter trades I take as part of my main setups within my trading plan.
Any questions you have just drop them below 👇
Traderecap

AUDNZD Trade Recap 09.12.25In this recap I break down my AUDNZD short position I took last week using the 4H in combination with the 5M to refine my entry.
Full explanation as to why I executed on this position, using the 4H to my advantage but also understanding why I managed the way I did for a breakeven.
Any questions you have just drop them below 👇

AUDUSD & AUDJPY (+4%) Trade Recap 07.11.25Two positions covered in this recap.
AUD / USD +1%
AUD / JPY +3%
Full explanation as to why I executed on this position, using the 4H to my advantage with AUDUSD and AUDJPY being a textbook 15M trade for myself.
Any questions you have just drop them below 👇

EURCAD +3% Trade Recap 10.10.25 In this recap I break down my EURCAD short position I took yesterday morning. I fully forecast this setup in the morning as per my forecast video, and then executed later that day. Manually closing for just under 3% profit at the intended target.
Full explanation as to why I executed on this position, using the 4H to my advantage but also understanding price was due a deeper pullback, but these pullbacks do not always happen.
Any questions you have just drop them below 👇

Two EURCAD Positions Trade Recap 10.09.25Two positions covered in this recap.
EUR / CAD -1%
EUR / CAD Re-Entry BE
Full explanation as to why I executed on these positions and how I maintained my mindset to allow me to get back into the second position after taking the loss. Something I have been working on the past month or so is maintaining the executional mindset after being taken out of a trade, and if it is still intact to actually get back in to the market.
Any questions you have just drop them below 👇

AUDJPY & CADJPY Trade Recaps 08.08.25A long position on AUDJPY taken Monday for a -1%, the trade had great potential but one of those ones that didn't have enough steam to commit. Followed by a CADJPY short taken yesterday for a +2% manual close.
Full explanation as to why I executed on these positions and the management plan with both.
Any questions you have just drop them below 👇

AUDCAD / GBPAUD Trade Recaps 01.08.25A tester trade on AUDCAD with the reasons explained as to why this was a test position, and a short position executed on GBPAUD. Solid setup that this time around just didn't commit.
Full explanation as to why I executed on these positions and the management plan with both.
Any questions you have just drop them below 👇

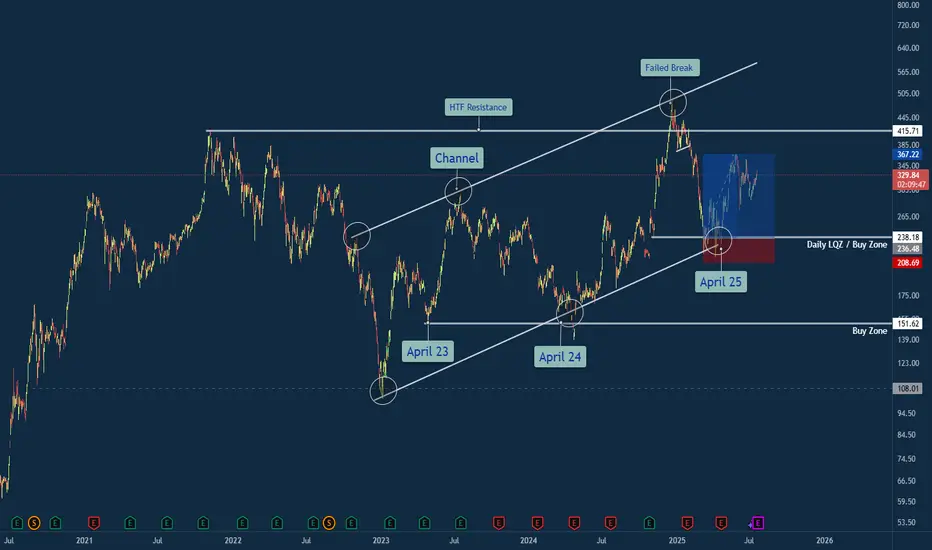
Tesla Trade Breakdown: The Power of Structure, Liquidity & ...🔍 Why This Trade Was Taken
🔹 Channel Structure + Liquidity Trap
Price rejected from a long-standing higher time frame resistance channel, making a false breakout above $500 — a classic sign of exhaustion. What followed was a sharp retracement into the lower bounds of the macro channel, aligning with my Daily LQZ (Liquidity Zone).
🔹 Buy Zone Confidence: April 25
I mapped the April 25th liquidity grab as a high-probability reversal date, especially with price landing in a confluence of:
Demand Zone
Trendline Support (from April 23 & April 24 anchor points)
Volume spike + reclaim of structure
🔹 Risk/Reward Favored Asymmetry
With a clear invalidation below $208 and targets at prior supply around $330+, the R:R on this trade was ideal (over 3:1 potential).
Lessons Reinforced
🎯 Structure Always Tells a Story: The macro channel held strong — even after a failed breakout attempt.
💧 Liquidity Zones Matter: Price gravitated toward where stops live — and then reversed sharply.
🧘♂️ Patience Beats Precision: The best trades don’t chase. They wait. This was one of them.
💬 Your Turn
How did you play TSLA this year? Were you watching the same channel? Drop your insights or charts below — let’s compare notes 👇
#TSLA #Tesla #SwingTrade #PriceAction #LiquidityZone #FailedBreakout #TechnicalAnalysis #TradingView #TradeRecap #ChannelSupport #SmartMoney
EURUSD & US30 Trade Recaps 18.07.25A long position taken on FX:EURUSD for a breakeven, slightly higher in risk due to the reasons explained in the breakdown. Followed by a long on OANDA:US30USD that resulted in a loss due to the volatility spike that came in from Trump.
Full explanation as to why I executed on these positions and the management plan with both.
Any questions you have just drop them below 👇

11.07.25 USDJPY Trade Recap + Re-Entry for +2.5%A long position taken on USDJPY for a breakeven, followed by a premature re-entry that I took a loss on. I also explain the true re-entry I should have taken for a 2.5% win.
Full explanation as to why I executed on these positions and also more details around the third position that I did not take.
Any questions you have just drop them below 👇

EURNZD Trade Recap +3% 2nd July 2025A long position taken on EURNZD for +3%. Full explanation as to why I executed on this position and also my management plan I put in place.
Any questions you have just drop them below 👇

EURAUD -0.7% Short and AUDUSD MistakeA short position taken on EURAUD for a small loss after manually closing before swaps. I have also included a breakdown of a +4% AUDUSD long I was looking at taking but a small error on my behalf that caused me to stay out of the trade. Full explanation as to why I executed on this position and made the decision to manually close at the level I did.
Any questions you have just drop them below 👇

EURUSD +3% Trade Recap 17th June 2025A short position taken on EURUSD for +3%, full explanation as to why I executed on this position and made the decision to manually close at the level I did.
Any questions you have just drop them below 👇

03.06.25 AUDUSD Trade Recap (Breakeven Manual Close)A long position taken on AUDUSD for a breakeven manual close, full explanation as to why I made this decision in the recap and my current thoughts on this pairs next move

-1% GBPAUD & +2.5% GBPCHF Trade RecapsTwo positions I took over the last 10 trading days, both 4H entries, one long and one short.
FX:GBPAUD Short -1%
FX:GBPCHF Long +2.5%
Top down analysis explained in the video and also my thought processes behind playing both entries as limit orders to maximise R:R and protect stops much better.

How I Used COT to Profit in Crude Oil I show you my process from start to finish.
How to identify:
If a market is setup for a move of some significance.
How to confirm a setup using accumulation/distribution measurements & seasonals.
Finally, how to utilize technical methods to enter into a trade.

How I Used COT to Make $2,450 in Crude Oil This WeekI show you my process from start to finish, the same process I use every week to profit from the markets.
-Fundamental Setup
-Confirmation
-Technical Entry
-Exit/Stop

GBPNZD +4.5% Win Trade RecapA FX:GBPNZD short position I took in the last trading week, resulting in a +4.5% win.
Top down analysis explained in the video and also my reasons for the lower timeframe entry in combination with the manual close decision.

Trade recap EUR/USD 06.02.2025Todays trade recap for EUR/USD in the New York session highlighting the break and retest strategy.

-1% NZDJPY & +3.4% USDJPY Trade RecapsTwo short positions I took in the last trading week.
FX:NZDJPY | -1% Loss
FX:USDJPY | +3.4% Win
Top down analysis explained in the video and also my reasons for the weighted timeframe entry in combination with the management decision.

NZDCAD Trade RecapA short position I took the beginning of last week for a breakeven. Top down analysis explained in the video and also my reasons for the weighted timeframe entry in combination with the management decision.
FX:NZDCAD - Breakeven

UK100GBP & NZDJPY Trade RecapApologies for the video cutting off at the end, I was too carried away in flow and forgot TradingView has a 20 minute maximum time limit! 😆
Any questions you have just drop them below 👇
OANDA:UK100GBP - Breakeven
FX:NZDJPY - +3.4%

trade recap. Here’s a recap of today's trading setups: I experienced one loss but had a lovely win the second time around. Patience is essential, and it's crucial to wait for the setup to unfold step by step. Whether you win or lose, always stick to the plan.
