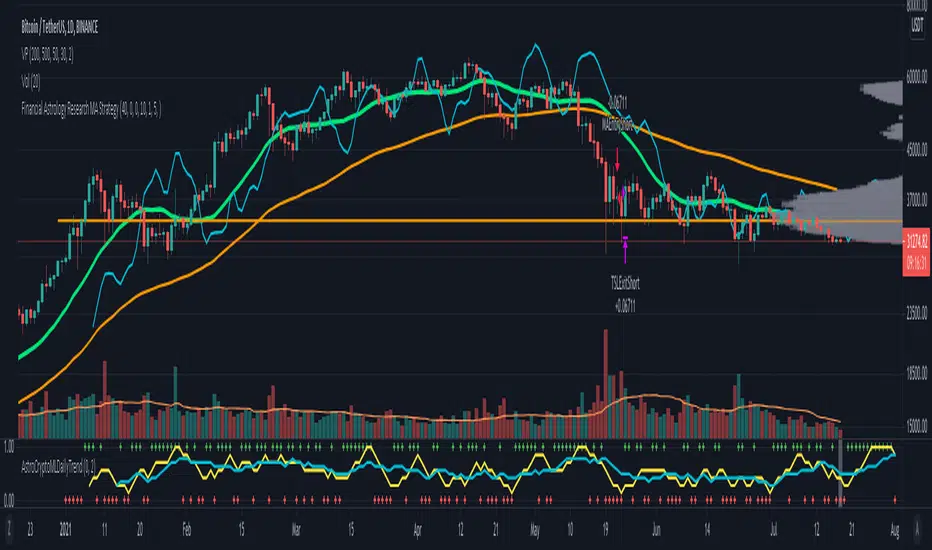
Bias Daily 3.0Bias Daily Indicator with Breakout Alerts
This indicator plots bullish, bearish, and consolidation bias levels based on previous daily candles. It draws horizontal lines at prior candle highs and lows and lets you track momentum shifts visually.
It also includes flexible alerts:
Break previous candle high
Break previous candle low
Break either high or low
Perfect for spotting key breakout levels and identifying market bias across all intraday and higher timeframes. Fully customizable line colors, styles, and number of previous levels displayed.
Search in scripts for "daily"
BTC Spot CVD (Daily Reset) - Multi ExchangeThis indicator plots intraday Cumulative Volume Delta (CVD) for BTC spot markets across multiple major exchanges in a single pane, allowing quick comparison of relative buying/selling pressure throughout the day.
Exchanges / Pairs included
COINBASE:BTCUSD
OKX:BTCUSDT
BINANCE:BTCUSDT
BITFINEX:BTCUSD
KUCOIN:BTCUSDT
KRAKEN:BTCUSD
BYBIT:BTCUSDT
Each exchange is drawn as its own colored CVD line, and the right edge shows a live label with full symbol name + current CVD value.
How CVD is calculated (important)
TradingView spot feeds generally do not provide true aggressor-side trade data (buy vs sell).
This script uses a tick-rule estimate based on bar-to-bar price change:
If close > close → bar volume is treated as buying (+)
If close < close → bar volume is treated as selling (−)
If unchanged → 0
That signed volume is accumulated over time to form CVD.
Intraday reset
CVD resets at the start of each new trading day (based on the symbol’s daily session/day boundary on TradingView). This makes it easy to compare “today’s” flow across venues without long-term drift.
Units toggle: BTC vs USD
In settings you can switch:
BTC mode: CVD in BTC (base units)
USD mode: CVD converted to quote value using the bar’s price (BTC delta × price).
For USDT pairs, USD mode treats USDT as USD-like.
How to use
Add the indicator to any chart/timeframe.
Use the Inputs panel to show/hide specific exchanges.
Compare which venues lead/lag and where delta is strongest/weakest intraday.
Use the zero line as a quick reference for net positive vs net negative delta for the day.
Notes / limitations
This is an approximation of volume delta using OHLCV data, not true order-flow delta from trade prints.
Results can vary by timeframe because the tick-rule sign is derived from the bar close.
HTF Flip Close Levels, Daily Weekly Monthly TASHTF Flip Close Levels (D/W/M) — Support & Resistance Tool
This indicator automatically plots Daily, Weekly, and Monthly support & resistance levels based on higher-timeframe candle close behaviour.
🔹 What this tool does
The script detects HTF momentum flips using closed candles only:
Support is created when:
A red candle is followed by a green candle
The level is drawn at the close of the red candle
Resistance is created when:
A green candle is followed by a red candle
The level is drawn at the close of the green candle
This creates objective, rule-based horizontal levels derived purely from price behavior, not indicators.
🔹 Features
✅ Plots Daily, Weekly, and Monthly levels simultaneously
✅ Works on any timeframe (1m, 5m, 1H, Daily, Weekly, etc.)
✅ Keeps full historical levels, not just the most recent ones
✅ Optional auto-hide tapped levels (when price touches them)
✅ Tap detection:
Wick touch
or Close cross/touch
✅ Levels are always based on HTF candle closes, never wicks
✅ Designed to stay consistent across timeframe changes
🔹 How to use it (IMPORTANT)
This indicator:
❌ Does NOT predict market direction
❌ Does NOT generate buy/sell signals
❌ Does NOT tell you when to enter or exit
It is a context & confluence tool.
You should use these levels together with:
Market structure
Trend analysis
Volume / orderflow / CVD
Your own entry model
Your own risk management
Think of these levels as areas of interest, not automatic trade signals.
🔹 Best use cases
Confluence with:
Local support/resistance
VWAP / Anchored VWAP
Range highs/lows
Liquidity zones
Reversal or continuation patterns
Identifying:
HTF reaction zones
Decision points
Areas where other traders are likely watching
⚠️ Disclaimer
This indicator is a technical analysis tool only.
It is NOT financial advice.
It does NOT guarantee profits.
All trading decisions and risk are your responsibility.
Use it as part of a complete trading system, not as a standalone strategy.
60D Daily Anchored Quadrants + 12M FibJAO 60D Daily Anchored Quadrants + 12M Fib
Use for projecting 5YR 1YR Highs/Lows based on previous range deviations.
Use 60 Day look back to gain insight on narrative whether price is in a premium/discount and or use PDA that line up with levels for true support/resistance areas
Live Daily HA Background (RTH)This indicator paints the backsground with the daily heikin ashi color
FDAX Session Levels (Daily open, 10:00, 14:00)Automated intraday levels for FDAX/DAX traders based on the Europe/Berlin timezone
Monitored Levels:
Daily Open (DO): Midnight open price (00:00 CET).
08:00 CET: Frankfurt session start.
10:00 CET: Morning trend establishment.
14:00 CET: Pre-US session liquidity shift.
Visibility: Clearly labeled levels with adjustable line thickness (Width 3).
Extend Logic: Toggle between infinite lines or session-only historical views.
Precision: Synced with Eurex trading hours.
Ideal for: Identifying intraday Support/Resistance and S/R flips on 1m to 15m timeframes.
M15 Wednesday Daily Open + Vertical LineWednesday Daily Open M15 – Vertical Line
Marks the daily open candle on Wednesdays using M15 logic and draws a vertical line on it.
Includes a timezone selector to avoid day-shift issues.
Designed for M15 charts and works on all symbols.
Color-Coded Merged Daily & Hourly RSIColor-Coded Merged Daily & Hourly RSI
you caN USE THIS TO BUY OR SELL
Strong Daily Reversal Arrows / Labels
🔁 Reversal indicator on the daily time frame
Bullish Reversal
✔ Previous day was bearish
✔ Today is bullish
✔ Today closes above previous day close
Bearish Reversal
✔ Previous day was bullish
✔ Today is bearish
✔ Today closes below previous day close
Monthly Weekly Daily ATR Calculation A weekly options trading script showing optimal levels using daily and weekly ATR ranges and stop loss. (Open ± ATR)
Multi Timeframe 50 EMA (15m | 1H | Daily)50 EMA of Daily 1 hr and 15 minutes visible in 3 minutes timeframe
Multi-Timeframe RSI (Daily + Weekly)View the Daily and Weekly RSI together so you see how the oscillate on any timeframe
Crosses Open Daily (shock points OD)It is an indicator that works to alert you when an asset, during the day, crosses or approaches the daily open again.
Guac's MAs, BBs, and ADX (SMA/EMA/BB + ADX/DI + Daily ATR)As someone who browses through numerous TradingView scripts, I find many ideas/functions that I find useful. However, sometimes I find certain features that I don't find useful or that could be added to make something more useful. Because of this I designed this script to collectively encompass functionality of the items/indicators I find useful when looking at an index/equity chart.
This script was desgined/inspired to keep the chart clean while providing signal context for trend, volatility, price action, and regime conditions.
Summary of what this script does:
Plots a compact, customizable set of SMAs + EMAs for structure and trend layering.
Adds Bollinger Bands with expansion/contraction coloring to visualize volatility state.
Optionally overlays ADX/DI regime context, including:
• an ADX-based “regime fill” (temperature-style colors) on the BB fill
• optional DI+ / DI- cross markers for directional shift awareness
• expanded ADX regime labels (Dead Chop → Very Strong/Extended)
• optional “ADX momentum” (smoothed ADX slope) in the status label to show regime acceleration/decay
Provides a small corner “Regime Status Label” that summarizes ADX regime (with numeric ADX) when enabled.
Optionally appends Daily ATR (value + momentum) to the same label for range/volatility context that is consistent across intraday timeframes.
I always find it frustrating when I am testing or playing with someones indicator and they don't have tooltips implemented so that I can understand the purpose of their parameters and the inputs. I have specifically tried to implement tooltip info bubbles next to every parameter input to give a short explanation of the parameter and it's purpose
Current High-Low - daily weekly and monthlythis isdicator marks your daily weekly and monthly high and low
Max and Min Daily + 4H + 1H + Today Daily + 30mIndicator that shows on the chart the highs and lows of yesterday's daily, today's daily candle, the 4-hour, 1-hour, and 30-minute timeframes.
Indicatore che mostra sul grafico i max e min del daily di ieri, della candela giornaliera di oggi, del tf4h, tf1h e tf30 min.
GK1 Long only Daily Trend Strategy Max 4 Positions Risk-BasedThis strategy buys strong uptrends on the daily chart, risks a fixed % of capital per trade, limits how many trades are open at once, and exits using a trailing volatility stop or when the trend weakens.
What kind of market does this work best in?
1.Strong, persistent trends
2.Index ETFs, sector ETFs, large-cap stocks
3.Bull markets or strong sector rotations
It will underperform in:
Sideways markets
Choppy ranges
High-frequency reversals
The market condition this is looking for " A healthy, established uptrend"
It only goes LONG (no shorts) and only when all of these are true:
Short-term trend is up:
14-day moving average > 50-day moving average
Long-term trend is bullish:
Price is above the 200-day moving average
Primary trend is improving:
200-day MA is rising (today > yesterday)
Volume is normal (not dead, not crazy):
Avoids illiquid days and blow-off spikes
Translation: “I only buy when the market is already strong and behaving normally.”
It can hold up to 4 positions at the same time
Designed for multiple signals across time, not over-trading
You choose a Risk % per trade (default = 1%)
That means: If the stop loss is hit, you lose ~1% of your total account
It uses ATR (Average True Range):
ATR measures how much the market normally moves
Stop loss = 2.5 × ATR
Position size =
(1% of account) ÷ stop distance
So:
Volatile market → smaller position
Calm market → bigger position
Exit #1: Trailing ATR stop (main exit)
Tracks the highest close since entry
Stop moves up only, never down
If price reverses by ~2.5 ATR → exit
📌 Translation:
“Let winners run, cut losers automatically.”
Exit #1: Trailing ATR stop (main exit)
Tracks the highest close since entry
Stop moves up only, never down
If price reverses by ~2.5 ATR → exit
📌 Translation:
“Let winners run, cut losers automatically.”
The Strat - Multi-Timeframe Combo Analyzer## 📊 The Strat - Multi-Timeframe Combo Analyzer
This open-source indicator implements **The Strat** methodology, a universal price action framework developed by Rob Smith (@RobInTheBlack).
---
### 🎯 What is The Strat?
The Strat categorizes every candle into one of three scenarios based on its relationship to the previous bar:
| Type | Name | Definition |
|------|------|------------|
| **1** | Inside Bar | High < Previous High AND Low > Previous Low |
| **2** | Directional | Breaks only one side (2↑ = broke high, 2↓ = broke low) |
| **3** | Outside Bar | Breaks BOTH previous high AND low |
By tracking these bar types across timeframes, traders can identify actionable setups with defined entry triggers and target levels.
---
### ✨ Features
**Daily Timeframe Analysis:**
- Real-time 3-bar combo detection (2-1-2, 3-1-2, 1-2-2, etc.)
- Pattern classification: Bullish/Bearish Continuation or Reversal
- Entry and Target levels based on Strat rules
- Pattern status: ACTIONABLE, IN-FORCE, TRIGGERED, or WATCHING
**ATR Context:**
- Range % used (how much of daily ATR has been consumed)
- Entry quality assessment (Excellent → Exhausted)
- Day type classification (Quiet → Trend Day)
- Remaining range estimation
**15-Minute Analysis:**
- Separate combo tracking for intraday precision
- Pattern detection on lower timeframe
**Visuals:**
- Customizable info tables
- Entry/Target horizontal lines
- Signal labels on chart
- Alert conditions
---
### 🔧 How to Use
1. Look for **ACTIONABLE** patterns - these are setups waiting for a trigger
2. Entry triggers when price breaks the designated level
3. Target is the next logical Strat level (typically prior bar's high/low)
4. Use **Range%** to assess if there's room left in the daily range
5. Combine Daily and 15-Min combos for trade confluence
---
### ⚠️ Disclaimer
This indicator is for **educational purposes only**. It does not constitute financial advice or guarantee profitable trades. Trading involves substantial risk of loss. Past performance is not indicative of future results. Always conduct your own research and trade responsibly.
---
### 🙏 Credits
**The Strat** methodology was created by Rob Smith (@RobInTheBlack).
This implementation is open-source. Feel free to study, modify, and improve the code!
[CT] Daily & Weekly Percentage Price Oscillator Daily & Weekly Percentage Price Oscillator, or D&W PPO, is a dual-speed momentum oscillator that blends a slower “weekly-style” percentage oscillator with a faster “daily-style” percentage oscillator, then turns the relationship between them into a clean histogram that is easy to trade. The script builds four EMAs from the chart’s close. The first pair, L1 and L2, is used to create the W component, which behaves like a slow, higher-timeframe trend pressure line. W is calculated as the percentage distance between EMA(L1) and EMA(L2), normalized by EMA(L2). When W is rising and positive, it tells you the broader momentum is expanding upward, and when W is falling and negative, the broader momentum is expanding downward. The second pair, L3 and L4, creates the D component, which behaves like a faster, lower-timeframe momentum pulse, also expressed as a percentage but normalized by the same EMA(L2), so both components share a consistent “scale.” The script then combines them into R = W + D, which represents the total blended momentum, where W supplies the slow structure and D supplies the fast impulse.
The indicator is plotted as a histogram using “R − W,” and that choice is intentional. Because R = W + D, the histogram value “R − W” is mathematically identical to D. In other words, the columns you see are the fast momentum component, but anchored to a clear baseline that reflects whether the fast component is adding to, or subtracting from, the slower component’s trend context. The zero line is the equilibrium point where R equals W, meaning the fast component is neutral relative to the slow trend context. When the histogram is above zero, the fast component is contributing positive momentum and the script colors the columns with the Bull color, indicating that R is above W and the short-term push is aligned to the upside. When the histogram is below zero, the fast component is contributing negative momentum and the script colors the columns with the Bear color, indicating that R is below W and the short-term push is aligned to the downside. If you enable “Color price bars,” the chart candles are painted with the same logic so you can visually stay in sync with the fast momentum regime without staring at the panel.
How to trade it comes down to treating the histogram as your actionable trigger layer and using its behavior around the zero line as the decision boundary. A basic long framework is to prioritize long trades when the histogram is above zero and either expanding or printing consecutive positive columns, because that tells you the fast momentum pulse is supportive and not fighting the current regime. The cleanest long entries usually occur when the histogram flips from negative to positive and holds above zero for at least a bar or two, because that transition often marks the shift from pullback pressure into renewed upside impulse. You can add selectivity by watching for a “dip and re-strengthen” pattern above zero: after a positive run, the histogram contracts toward the baseline without breaking materially below it, then turns back up, which often corresponds to a controlled pullback followed by continuation. A basic short framework is the mirror image: prioritize shorts when the histogram is below zero and expanding downward, and treat flips from positive to negative that hold below zero as the higher-quality transition into downside impulse. In both directions, the histogram is especially useful for avoiding trades during momentum dead zones, because when columns chop tightly around the zero line with frequent flips, it is signaling indecision and a lack of clean directional impulse, which is where most “false starts” tend to happen.
Risk management with this tool is straightforward because the oscillator gives you a natural invalidation concept. For long trades, a common invalidation is the histogram losing the zero line and staying negative, since that indicates the fast component has turned from supportive to opposing. For short trades, invalidation is the histogram regaining the zero line and holding positive. Another practical way to manage trades is to use histogram contraction as an early warning that the impulse is weakening. If you are long and positive columns begin to shrink toward zero for several bars, you can tighten risk, take partials, or wait for a fresh expansion before adding. If you are short and negative columns begin to shrink toward zero, the same concept applies. The optional W line can be shown if you want a visual anchor of the slow component; while the histogram is already built to reflect the fast component relative to the slow context, viewing W can help you quickly recognize whether the larger momentum backdrop is generally rising or falling, which can be used as an additional bias filter for trade selection.
In practice, the D&W PPO is best used as a momentum alignment and timing tool: the slow component defines the “weather,” the fast component defines the “wind,” and the histogram tells you whether the wind is pushing with the weather or pushing against it. When the histogram is cleanly one-sided and expanding, it supports continuation-style trading and trend-following entries. When the histogram is choppy around zero, it warns you that conditions are rotational and patience usually pays.
UTC Daily High / Low Tracker (UTC Anchored)This indicator will track the Daily high and low AKA daily range of each day using UTC (00:00)


