Updated Price Action Insights:
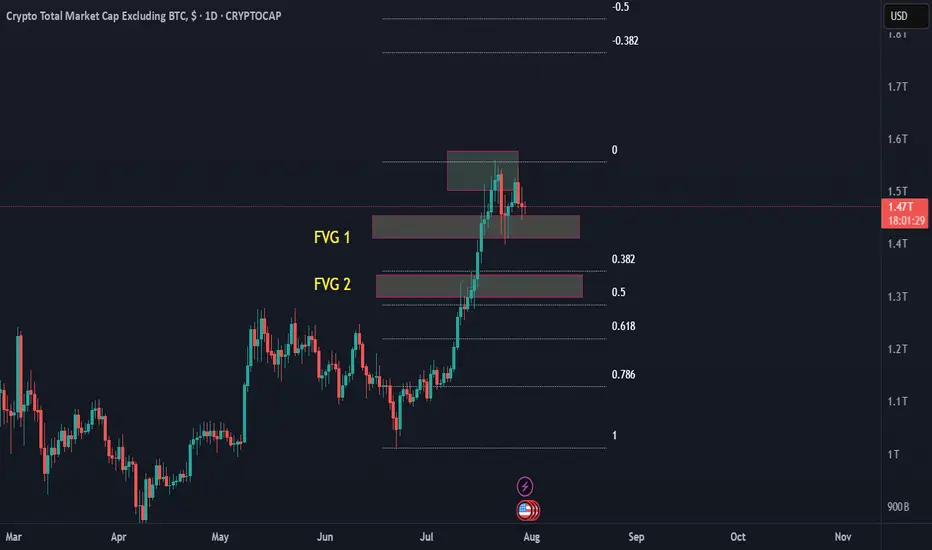
Price rejected cleanly from the upper FVG near 1.55T (still acting as dominant resistance).
Now consolidating / weakening under FVG 1, after briefly testing it.
Lower highs are forming, and price is struggling to reclaim key levels = signs of bearish structure development.
FVG 2 is still untouched = clean liquidity pocket + aligned with the 0.5 Fibonacci retracement (~1.35T).
🧠 Interpretation:
✅ Yes — this looks like a developing short-term downtrend, with the most probable target being FVG 2.
Here’s why:
Factor Observation
Market Structure Forming lower highs and lower closes — early signs of a bearish wave.
Liquidity Targets FVG 2 is clean and unfilled — ideal magnet for smart money correction.
FVG 1 Reaction Weak bounce; no strong bullish continuation = likely to give way.
Fib Confluence 0.5 level is classic corrective support + matches with FVG 2.
🔽 Breakdown Path Projection:
Step 1: Lower highs continue forming
↓
Step 2: Breakdown below FVG 1 (~1.42–1.40T zone)
↓
Step 3: Liquidity sweep / test into FVG 2 (~1.35T)
↓
Step 4: Watch for bullish reversal structure (engulfing, pin bar, volume)
🎯 Trading Bias:
Short-term bias: Bearish
Primary liquidity target: FVG 2
Reversal trigger zone: Around 1.35T, with confirmation
📌 Strategy Tip:
If you're planning a trade:
Avoid buying in FVG 1 unless it flips with conviction and volume.
Ideal long entries would be in FVG 2 with clear confirmation (price action or RSI divergence).
Use the high of the last lower high (above FVG 1) as a stop-loss anchor for any countertrend longs from FVG 2.
Disclaimer
The information and publications are not meant to be, and do not constitute, financial, investment, trading, or other types of advice or recommendations supplied or endorsed by TradingView. Read more in the Terms of Use.
Disclaimer
The information and publications are not meant to be, and do not constitute, financial, investment, trading, or other types of advice or recommendations supplied or endorsed by TradingView. Read more in the Terms of Use.