# The Conviction Crescendo: VRSK's Strengthening Defense at Critical Support
## The Power Shift (Points 1→3)
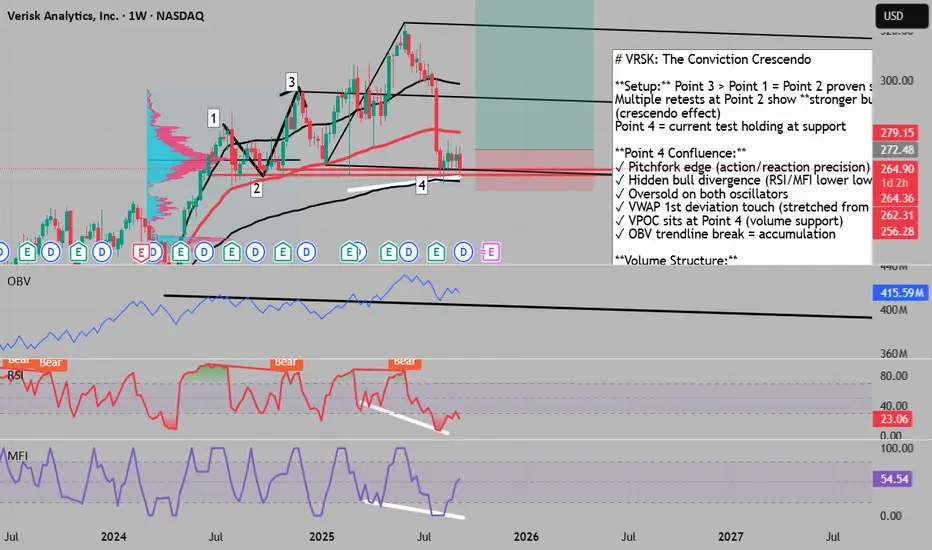
When **Point 3 decisively closed above Point 1**, the market delivered an unambiguous verdict: **Point 2 is now proven support**. The buyers who emerged at Point 2 didn't just challenge the sellers from Point 1 - they **conquered them entirely**, establishing a new high and demonstrating objective strength. This isn't speculation; it's mathematical proof of buyer dominance.
## The Crescendo Effect
What's fascinating here is the **escalating conviction** at Point 2. With multiple retests of this level, each producing a **stronger buyer response** - a crescendo of defensive action. This isn't random; it's the market collectively recognizing Point 2 as increasingly "cheap" territory. **Point 4 represents the current test**, where buyers are once again defending this critical support with conviction.
## Precision Technical Alignment
**The Pitchfork's Mathematical Edge**
Using **action/reaction principles**, the reverse pitchfork precisely identifies Point 4 as the mathematical edge of this move. This isn't arbitrary line-drawing - it's based on Andrews' principle that markets move in measurable, predictable channels.
**Divergence Duality**
• **Price:** Higher low at Point 4
• **RSI/MFI:** Lower lows = **Hidden bullish divergence**
• Both oscillators: **Oversold territory**
This hidden divergence signals continuation of the underlying trend, while oversold conditions suggest immediate bounce potential.
**VWAP Deviation Analysis**
Point 4 touches the **1st standard deviation below VWAP** (anchored from market low). Historically, VRSK has respected VWAP as dynamic support. While this deviation could warn of weakness, within our broader narrative it suggests price has been **stretched too far** from its mean - a rubber band ready to snap back.
## Volume Structure Revelations
**VPOC Magnetic Pull**
The **Volume Point of Control sits precisely at Point 4**. Once our stop order triggers and price moves above the POC, we'll have the market's highest-volume node defending our position - institutional-level support.
**The Exploration Zone Below**
Stretching the volume profile reveals a critical insight: the area below Point 2 is an **exploration zone** - sparse volume indicating these prices were tested but **rejected by the market**. This isn't an acceptance area; it's a void.
The implication? Price won't drift lower aimlessly. Any move below Point 2 would require **strong conviction and purpose** to reach distant value areas. Without that catalyst, the void acts as a natural deterrent.
## The OBV Breakout Signal
The **On-Balance Volume trendline has broken to the upside**, confirming what price action suggests - accumulation is accelerating. Smart money is positioning, even as price tests support.
## Trade Architecture
This setup layers multiple independent confirmations:
• **Structural:** Proven support at Point 2 with escalating defense
• **Mathematical:** Pitchfork edge + VWAP deviation extreme
• **Momentum:** Hidden divergence + oversold conditions
• **Volume:** VPOC support + exploration void below + OBV breakout
• **Behavioral:** Crescendo of buyer conviction with each test
## Risk/Reward Framework
**Entry:** Above Point 4 on confirmation
**Stop:** Below Point 2 (protected by volume void)
**Target 1:** VWAP mean reversion
**Target 2:** Point 3 resistance test
**Invalidation:** Acceptance below Point 2 would negate the "proven support" thesis
---
**Bottom Line:** The repeated tests of Point 2 with increasingly strong reactions, combined with mathematical precision from the pitchfork, divergence signals, and volume structure, create a high-conviction reversal setup where buyers have repeatedly proven their commitment to defending this level.
## The Power Shift (Points 1→3)
When **Point 3 decisively closed above Point 1**, the market delivered an unambiguous verdict: **Point 2 is now proven support**. The buyers who emerged at Point 2 didn't just challenge the sellers from Point 1 - they **conquered them entirely**, establishing a new high and demonstrating objective strength. This isn't speculation; it's mathematical proof of buyer dominance.
## The Crescendo Effect
What's fascinating here is the **escalating conviction** at Point 2. With multiple retests of this level, each producing a **stronger buyer response** - a crescendo of defensive action. This isn't random; it's the market collectively recognizing Point 2 as increasingly "cheap" territory. **Point 4 represents the current test**, where buyers are once again defending this critical support with conviction.
## Precision Technical Alignment
**The Pitchfork's Mathematical Edge**
Using **action/reaction principles**, the reverse pitchfork precisely identifies Point 4 as the mathematical edge of this move. This isn't arbitrary line-drawing - it's based on Andrews' principle that markets move in measurable, predictable channels.
**Divergence Duality**
• **Price:** Higher low at Point 4
• **RSI/MFI:** Lower lows = **Hidden bullish divergence**
• Both oscillators: **Oversold territory**
This hidden divergence signals continuation of the underlying trend, while oversold conditions suggest immediate bounce potential.
**VWAP Deviation Analysis**
Point 4 touches the **1st standard deviation below VWAP** (anchored from market low). Historically, VRSK has respected VWAP as dynamic support. While this deviation could warn of weakness, within our broader narrative it suggests price has been **stretched too far** from its mean - a rubber band ready to snap back.
## Volume Structure Revelations
**VPOC Magnetic Pull**
The **Volume Point of Control sits precisely at Point 4**. Once our stop order triggers and price moves above the POC, we'll have the market's highest-volume node defending our position - institutional-level support.
**The Exploration Zone Below**
Stretching the volume profile reveals a critical insight: the area below Point 2 is an **exploration zone** - sparse volume indicating these prices were tested but **rejected by the market**. This isn't an acceptance area; it's a void.
The implication? Price won't drift lower aimlessly. Any move below Point 2 would require **strong conviction and purpose** to reach distant value areas. Without that catalyst, the void acts as a natural deterrent.
## The OBV Breakout Signal
The **On-Balance Volume trendline has broken to the upside**, confirming what price action suggests - accumulation is accelerating. Smart money is positioning, even as price tests support.
## Trade Architecture
This setup layers multiple independent confirmations:
• **Structural:** Proven support at Point 2 with escalating defense
• **Mathematical:** Pitchfork edge + VWAP deviation extreme
• **Momentum:** Hidden divergence + oversold conditions
• **Volume:** VPOC support + exploration void below + OBV breakout
• **Behavioral:** Crescendo of buyer conviction with each test
## Risk/Reward Framework
**Entry:** Above Point 4 on confirmation
**Stop:** Below Point 2 (protected by volume void)
**Target 1:** VWAP mean reversion
**Target 2:** Point 3 resistance test
**Invalidation:** Acceptance below Point 2 would negate the "proven support" thesis
---
**Bottom Line:** The repeated tests of Point 2 with increasingly strong reactions, combined with mathematical precision from the pitchfork, divergence signals, and volume structure, create a high-conviction reversal setup where buyers have repeatedly proven their commitment to defending this level.
all my paid ( pro ) scripts can be obtained for a low price of 19.99 / month at : whop.com/sabr-pro-tools/access-to-all-pro-tools/
Disclaimer
The information and publications are not meant to be, and do not constitute, financial, investment, trading, or other types of advice or recommendations supplied or endorsed by TradingView. Read more in the Terms of Use.