“Smart traders don’t predict.
They wait for the market to confirm their idea — then act.”
Finding a mitigation zone is only half the job.
Confirmation is what separates professional patience from random guessing.
It’s the step that keeps you from catching a falling knife or buying too soon.
Why Confirmation Matters
Jumping in blindly at the zone can work sometimes — but most of the time, it’s a gamble.
Confirmation gives you:
The Confirmation Playbook
Here’s a simple process you can use.
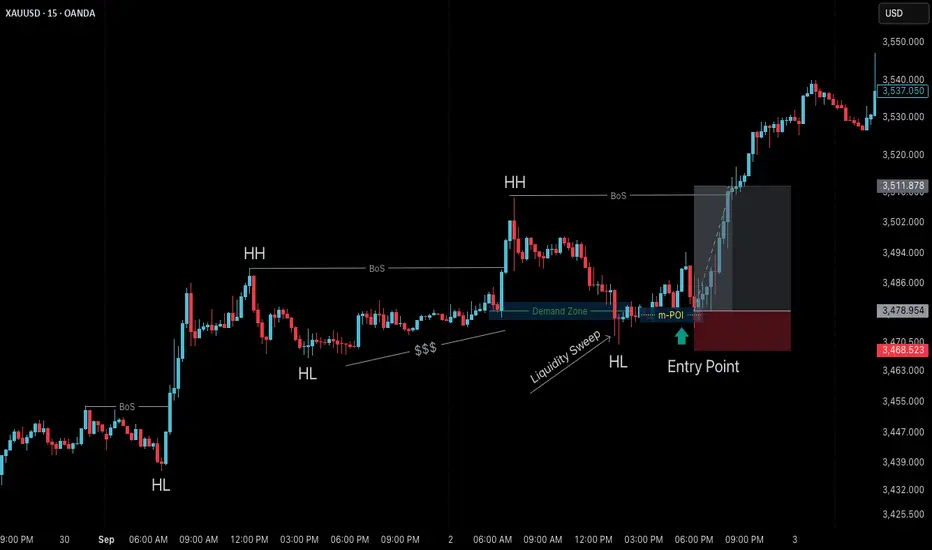
Refer to the Gold M15 Bullish Chart (Sep 2, 2025) above — it shows this process step by step.
Step 1: Mark the Zone
Identify your mitigation block or demand zone after a BoS.
Step 2: Wait for Price to Tap
Be patient — let price react at this zone.
Step 3: Look for a Sweep
Notice how price often sweeps liquidity below the zone first — this fuels the reversal.
Step 4: Drop to Lower Timeframe (M1 or M5)
Watch for micro-structure shift in your favor:
Step 5: Enter with Tight Risk
Take the trade after confirmation and set SL just beyond the sweep.
This gives you a small stop with a high RR potential.
Live Example (Gold)
In the XAUUSD bullish M15 chart above, you can see:
Notice how confirmation turned a risky breakout buy into a sniper entry with a clean risk-reward profile.
📘 Shared by ChartIsMirror
Do you already use confirmation techniques like ChoCH + BoS, or do you prefer instant entries at zones?
Share your experience in the comments — what’s your go-to trigger?
They wait for the market to confirm their idea — then act.”
Finding a mitigation zone is only half the job.
Confirmation is what separates professional patience from random guessing.
It’s the step that keeps you from catching a falling knife or buying too soon.
Why Confirmation Matters
Jumping in blindly at the zone can work sometimes — but most of the time, it’s a gamble.
Confirmation gives you:
- Higher probability setups (not every zone holds)
- Tighter entries (better RR)
- Fewer unnecessary stop-outs
The Confirmation Playbook
Here’s a simple process you can use.
Refer to the Gold M15 Bullish Chart (Sep 2, 2025) above — it shows this process step by step.
Step 1: Mark the Zone
Identify your mitigation block or demand zone after a BoS.
Step 2: Wait for Price to Tap
Be patient — let price react at this zone.
Step 3: Look for a Sweep
Notice how price often sweeps liquidity below the zone first — this fuels the reversal.
Step 4: Drop to Lower Timeframe (M1 or M5)
Watch for micro-structure shift in your favor:
- micro-ChoCH
- micro-BoS
- Strong rejection wicks or engulfing candles
Step 5: Enter with Tight Risk
Take the trade after confirmation and set SL just beyond the sweep.
This gives you a small stop with a high RR potential.
Live Example (Gold)
In the XAUUSD bullish M15 chart above, you can see:
- BoS creates a demand zone
- Price returns and sweeps liquidity below demand zone
- On lower timeframe, we get micro-ChoCH → micro-BoS confirmation
- Entry is taken at micro-POI with tight SL, catching the next impulsive leg
Notice how confirmation turned a risky breakout buy into a sniper entry with a clean risk-reward profile.
📘 Shared by ChartIsMirror
Do you already use confirmation techniques like ChoCH + BoS, or do you prefer instant entries at zones?
Share your experience in the comments — what’s your go-to trigger?
Related publications
Disclaimer
The information and publications are not meant to be, and do not constitute, financial, investment, trading, or other types of advice or recommendations supplied or endorsed by TradingView. Read more in the Terms of Use.
Related publications
Disclaimer
The information and publications are not meant to be, and do not constitute, financial, investment, trading, or other types of advice or recommendations supplied or endorsed by TradingView. Read more in the Terms of Use.