SMART MONEY CONCEPT (SMC)📊 Market Breakdown
1. Structure:
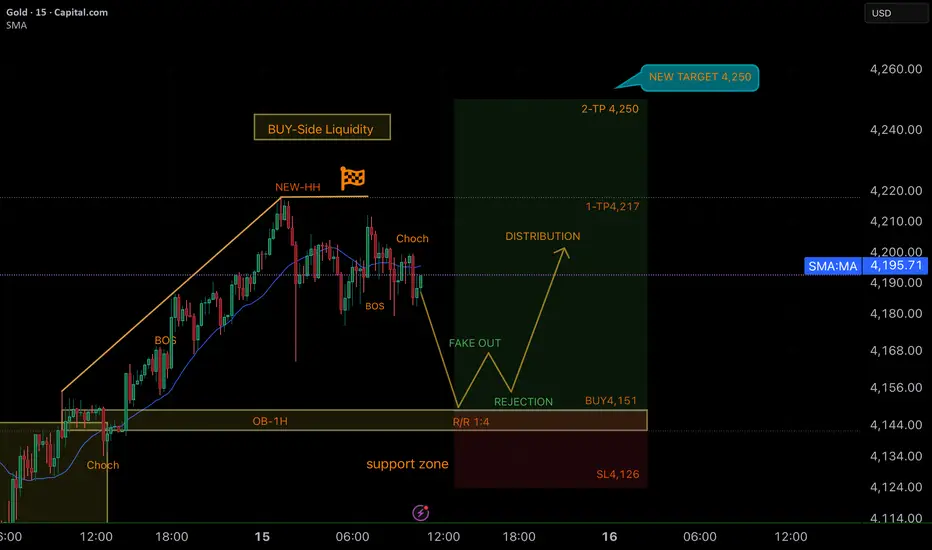
The market created a New HH (Higher High), confirming bullish pressure and liquidity grab on the buy-side.
2. ChoCh + BOS:
A Change of Character and subsequent Break of Structure validate momentum shifts while keeping the bullish narrative intact.
3. OB-1H (Order Block):
The 1H Order Block is the key demand zone where price is expected to mitigate, collect liquidity, and prepare for continuation.
4. Fake Out + Rejection:
Your projection correctly anticipates a liquidity grab (fake out) into the OB, followed by a rejection—perfect institutional behavior for a bullish continuation setup.
5. Distribution & Targets:
After rejection, the market is expected to expand and distribute upward.
• Entry: 4,151
• Stop Loss: 4,126
• TP1: 4,217 (first liquidity target)
• TP2: 4,250 (extended target / higher liquidity pool)
• R/R Ratio: 1:4 → very strong.
🌟 Motivational Note
“Institutions always move in phases: accumulation, manipulation, and distribution. 📊
We’re not chasing—we’re waiting for the fake out, the rejection, and then riding the wave to new highs. 🎯
Patience and precision = consistency. 🚀🔥”
GOOD LUCK TRADERS ;)
Patiencepays
SMART MONEY CONCEPT (SMC)📊 Market Breakdown
1. Accumulation Phase:
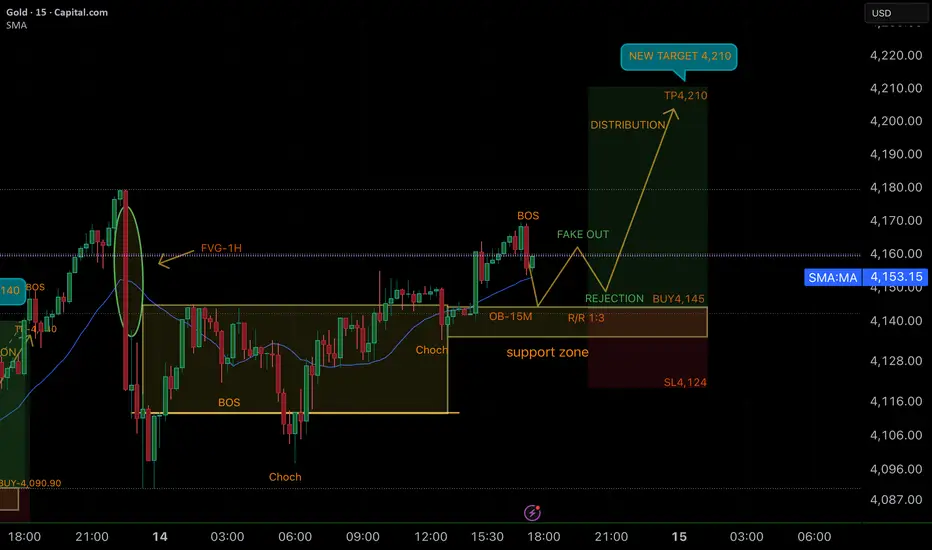
Price consolidated and built liquidity inside a clear range, with multiple ChoCh signals showing the transition of market interest.
2. BOS (Break of Structure) as Confirmation:
You are waiting for the BOS to confirm bullish continuation. This step is crucial—it avoids premature entries and aligns with institutional flow.
3. OB-15M (Order Block):
The 15M Order Block remains the key demand zone. This is where liquidity is absorbed and where the entry setup will form.
4. Fake Out + Rejection:
After the BOS confirmation, you’re planning to enter on the rejection after the fake out. This ensures entry at the point of maximum efficiency.
5. Target & R/R:
• Entry Zone: 4,145 (upon rejection confirmation)
• Stop Loss: 4,124 (below support zone)
• Take Profit: 4,210
• Risk-to-Reward: 1:3 → excellent institutional setup.
🌟 Motivational Note
“Confirmation is the trader’s edge. 📊
We don’t jump in on emotions—we wait for the BOS, let the market reveal its hand, and only then execute with precision. 🎯
Patience + discipline = consistency. 🚀🔥”
GOOD LUCK TRADERS ;)
SMART MONEY CONCEPT (SMC)📊 Market Breakdown
1. BOS + ChoCh (Shift in Structure):
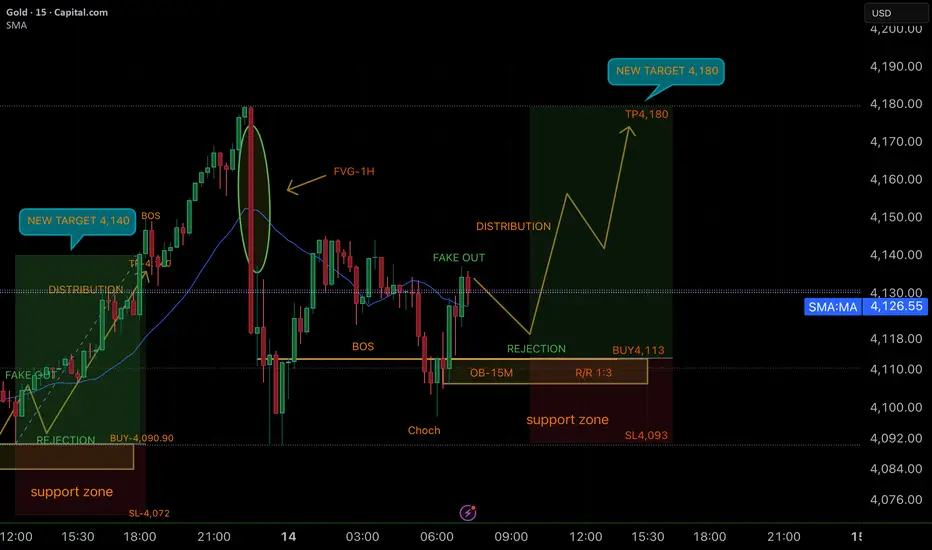
The market confirmed a bullish change of character, followed by multiple Break of Structure signals, showing institutional interest.
2. FVG 1H (Fair Value Gap):
The 1H FVG was highlighted perfectly as an inefficiency left by strong bullish momentum. This is a key area where price often retraces before continuation.
3. OB-15M (Order Block):
Price tapped into the 15M OB, a strong demand zone where liquidity was collected and rebalanced.
4. Fake Out + Rejection:
The setup anticipates a liquidity grab (fake out) below the structure, followed by a sharp rejection, which is typical institutional behavior before expansion.
5. Distribution Phase:
After rejection, projection shows price entering a distribution move toward the target 4,180.
6. Trade Setup:
• Entry: 4,113
• Stop Loss: 4,093
• Target: 4,180
• Risk-to-Reward: 1:3 → strong and professional setup.
🌟 Motivational Note
“Every FVG, BOS, and rejection tells the story of institutional flow. 📊
We don’t rush entries—we wait for the OB mitigation and the liquidity grab. 🎯
That’s where the edge lies: patience and precision. 🚀🔥”
GOOD LUCK TRADERS…. ;)
SMART MONEY CONCEPT (SMC)📊 Market Breakdown
1. ChoCh (Change of Character):
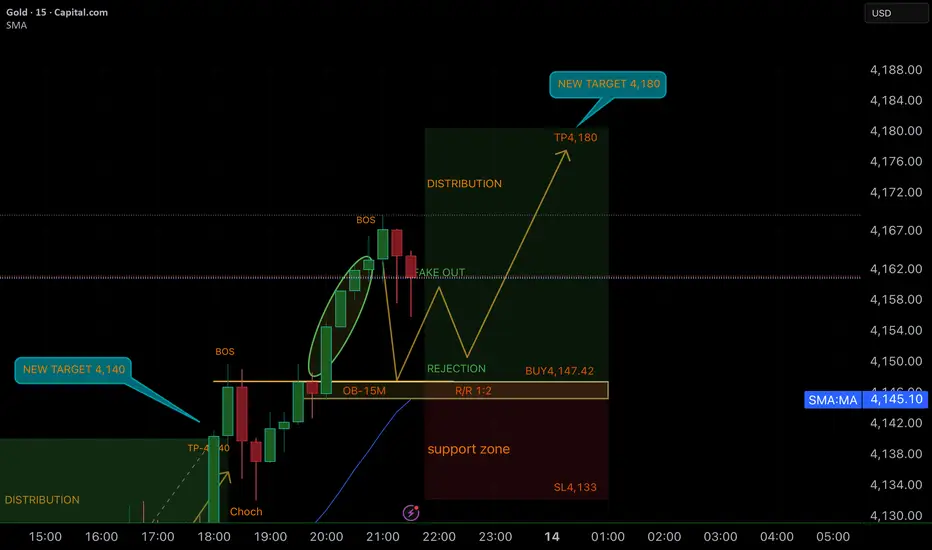
Market shifted from consolidation into bullish control, confirming the presence of institutional buyers.
2. BOS (Break of Structure):
Multiple BOS signals show strength, with price breaking highs and validating bullish momentum.
3. OB-15M (Order Block):
The 15M OB is clearly identified as a liquidity zone where institutions may rebalance before continuing upward.
4. Fake Out + Rejection:
You’re projecting a liquidity grab (fake out) into the OB-15M followed by a rejection. This aligns with typical SMC patterns.
5. Distribution & Target:
After mitigation and rejection, the plan points toward distribution with a new target at 4,180.
• Entry: 4,147.42
• Stop Loss: 4,133
• Target: 4,180
• R/R: Around 1:2 (well-balanced for this setup)
🌟 Motivational Note
“Every BOS and rejection tells the story of institutional flow. 📊
We don’t chase the market—we wait for the liquidity grab and let the setup come to us. 🎯
Patience is the trader’s real edge. 🚀🔥”
GOOD LUCK TRADERS.. ;)
Smart Money concept (SMC)📊 Market Breakdown
The chart shows a clear institutional move step by step:
1. ChoCh (Change of Character):
Market shifted structure, signaling buyers stepping in.
2. BOS (Break of Structure):
A strong bullish candle broke previous highs, confirming momentum.
3. OB-15M (Order Block):
Price retraced into the 15M order block, collecting liquidity and tapping into institutional demand.
4. Fake Out + Rejection:
A false push below structure was created to trap sellers, followed by a sharp rejection—classic liquidity grab.
5. Distribution Phase:
After rejection, price expanded upward, entering the distribution zone with strength.
6. Trade Plan:
• Entry: 4,090.90
• Stop Loss: 4,072 (protected below support)
• Target: 4,140 (next liquidity pool)
• R/R: Positive and favorable, aligning with institutional flow.
🌟 Motivational Note
“Institutions always leave their footprints. Every ChoCh, BOS, and rejection is a clue that guides us to the next liquidity pool. 🎯
Stay patient, stay disciplined—the market rewards those who trust the process. 🚀🔥”
GOOD JOB TRADERS……. ;)

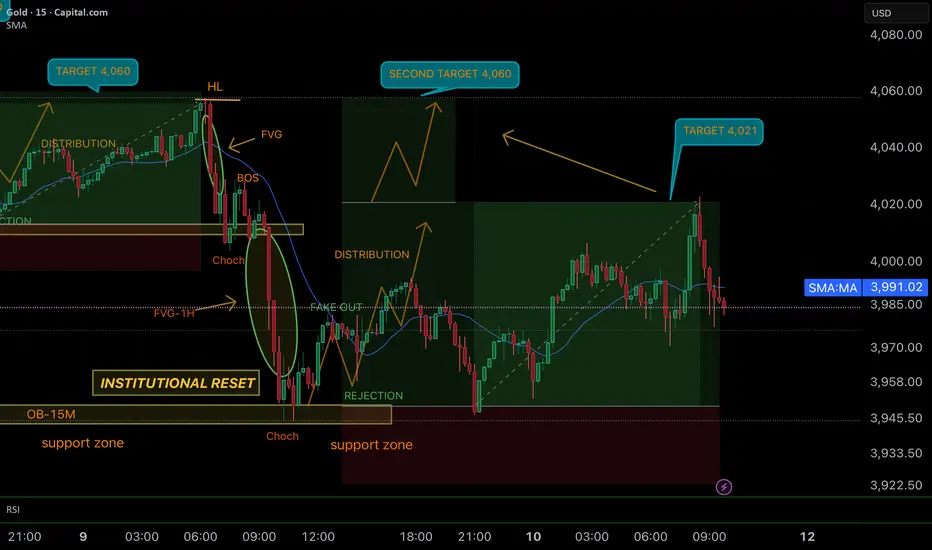
SMART MONEY CONCEPT (SMC)📊 SMC Trade Recap – GOLD 15M
• Both targets achieved: 4,021 ✅ and 4,060 ✅.
• Price respected the support zone after the institutional reset and followed the SMC roadmap step by step.
• The bullish cycle completed with precision: reset → liquidity grab → rejection → distribution → targets hit.
• This is the kind of setup that shows how patience + structure = consistency.
💡 Motivational Caption (English)
“Both targets smashed 🎯🎯 – structure never lies.
Institutional footprints led us step by step into a perfect bullish cycle.
Patience, discipline, and SMC… that’s the formula 🚀📈.”
GOOD JOB TRADERS……. ;)

SMART MONEY CONCEPT ( SMC)📊 SMC Trade Update – GOLD 15M
• First target 4,021 ✅ achieved.
• Trade now secured at Break Even (BE) – no risk on the table.
• Institutions are still pushing price in distribution mode toward the second target at 4,060.
• This is textbook SMC: reset → fake out → rejection → distribution → targets.
💡 Motivational Caption
“First TP hit 🎯 – now we let the institutions do the heavy lifting.
Risk = 0 ✅ Potential = unlimited 🚀
This is the power of trading with structure.”
GOOD JOB TRADERS……. ;)
SMART MONEY CONCEPT (SMC)📊 SMC Trade Review – GOLD 15M
• The setup respected the support zone, showing a fake out and then a strong distribution leg to the upside.
• Target zones at 4,050 – 4,060 were projected, and price reached more than 75% of the planned move before reversing.
• Even without the full TP, the trade followed the plan with precision: liquidity grab → rejection → bullish continuation.
• This is a clear example of consistency and risk management paying off.
💡 Motivational Caption (English)
“Not every trade will hit full TP… and that’s okay. ✅
Taking 75% of the move with discipline is still a win.
Trading is not about perfection, it’s about consistency. 🚀📈”
GOOD JOB TRADERS ;)

SMART MONEY CONCEPT (SMC)📊 SMC Analysis – GOLD 15M
• After the reset with a strong reaction from the support zone, price confirmed bullish intent.
• We saw a fake out followed by a clean rejection, signaling institutional absorption of liquidity.
• The FVG and OB-15M have been respected, reinforcing the bullish bias.
• Current projection: distribution phase pushing price higher toward the new target at 4,060.
• Market structure remains bullish with potential to create new Higher Highs (HH).
🚀 This setup shows how patience pays off: reset → absorption → continuation. Institutions are still leading price to new highs.
Be very careful and good luck TRADERS… ;)

SMART MONEY CONCEPT (SMC)📊 Bullish Analysis – GOLD 15M
🔑 Technical Context
1. Support Zone Exhausted
Price respected the support base and then broke upwards with strength, showing institutional buyers defended the area.
2. BOS (Break of Structure)
The break of the previous bearish structure confirmed the start of bullish momentum.
3. ChoCh (Change of Character)
A clear ChoCh confirmed the shift in direction, validating the intention to reach new highs.
4. Fake Out & Rejection
After distribution, a fake out cleaned liquidity before projecting higher. The rejection zone is the key confirmation for the entry.
🎯 Projection
• Entry: At the rejection after the fake out.
• Target (TP): 3,830 – aiming for new highs (HH).
• Stop Loss (SL): Below support zone to protect invalidation.
📌 Conclusion
Market has consolidated, grabbed liquidity, and is ready to continue bullish momentum towards 3,830. Waiting for confirmation at rejection is key for high-probability setups.
GOOD LUCK TRADERS…. ;)

SMART MONEY CONCEPT (SMC)📊 SMC Breakdown – Perfect Bullish Execution on GOLD
🔎 Trade Recap
1. Distribution & Fake Out:
Price distributed at the 15M OB and created a fake out to trap sellers and sweep liquidity.
2. BOS + ChoCh:
After the liquidity grab, the Break of Structure (BOS) confirmed bullish intent, supported by the Change of Character (ChoCh) at the support zone.
3. Rejection & Entry:
Price reacted exactly at the support/rejection zone, providing a clean entry opportunity with minimal risk.
4. Bullish Continuation:
Following the reaction, price pushed upward aggressively, respecting structure and heading straight into the target zone.
🎯 Result
• Entry: At rejection (support + BOS confirmation).
• TP: Target 3,664 ✅
• R:R: About 2:1, clean and efficient trade.
📌 Key Lesson
Patience pays off — by waiting for the fake out, BOS confirmation, and rejection, we secured a high-probability entry and captured liquidity right into the target zone.

USDJPY | NFP helped pushed Price down since USD is weakIt looks like the price has moved into our area of interest. All that remains is to secure our position and anticipate further downward movement.
Right now, the price is at a previous high-volume area. We'll have to observe closely to see if this changes the bias, providing us with bullish intent or continuing on a bearish trend.
For now, we wait and watch the market closely.

Pepe IdeaSeems to be coiling and consolidating.
Patience with good risk management will provide decent returns.
Probably could take a couple swings with proper risk management. 🤔

NIFTY ON SALE SALE SALENifty is in the making of inverse head n shoulder pattern on daily charts.
Risk:Reward = 1:20
Could bought here with closing basis stoploss below 21775 & target is almost 2000 points from here.
Not to b missed level.

EURUSD - Analysis and Potential Setups (Intraday- 22.04.25)Overall Trend & Context:
This pair is in an overall uptrend and has broken above last weeks highs.
Technical Findings:
Price is trading above 25, 50,100 and 200 EMA's on the daily and 4H charts.
Overall Bullish price action is evident.
Price has been consolidating through London session thus far, we can expect a tap into the demand below the liquidity (relative equal lows) before continuation of bullish cycles.
Notes:
Price is currently at a weekly supply level, we may bounce in and out of it a few times, so manage your risk and take this setup based on your own analysis as well.

AAPL, NVDA, MSFT & XPS: High-Probability Trade Setups This WeekWeekly Trade Radar & Market Outlook
This week, my focus is on AAPL, NVDA, MSFT, and XPS. There could be a potential retest of the 200 SMA with AAPL and MSFT, offering opportunities for well-structured trades. NVDA looks weak and has already tested the 200 SMA, making it a candidate for further downside potential or a short-term bounce. Additionally, Chinese developments in AI chip production remain a factor that could influence price action, particularly with NVDA. Staying aware of these key levels and macro developments is crucial for trade execution.
📚 Trading Plan: Ichimoku & 200 SMA Monthly Options Strategy**
📌 Strategy Objective
This strategy aims to capitalize on **high-probability trend-following setups** by using the **Ichimoku Cloud and 200 SMA** for confirmation while trading **monthly options contracts** to minimize time decay risks.
📀 Trading Rules
✅ 1. Entry Timing Rules (Your 3 Golden Rules)**
🚫 **No trading on Mondays** (Avoid weekend gaps & false breakouts).
🚫 **No trading on Fridays** (Avoid weekend time decay & volatility).
⏳ **No trades before the first 15-minute candle closes** (Avoid market noise).
📊 Setup & Trade Criteria
🔹 2. Trend Confirmation Using Ichimoku & 200 SMA
Bullish (Call Trade) Criteria:
✅ **Price is above the 200 SMA** (bullish bias).
✅ **Price is above the Ichimoku Cloud** (strong uptrend).
✅ **Tenkan-sen is above Kijun-sen** (momentum confirmation).
✅ **Chikou Span is above price from 26 candles ago** (historical trend alignment).
✅ **Future Cloud is green** (trend continuation signal).
Bearish (Put Trade) Criteria:
✅ **Price is below the 200 SMA** (bearish bias).
✅ **Price is below the Ichimoku Cloud** (strong downtrend).
✅ **Tenkan-sen is below Kijun-sen** (momentum confirmation).
✅ **Chikou Span is below price from 26 candles ago** (historical trend alignment).
✅ **Future Cloud is red** (trend continuation signal).
🔹 3. Entry Triggers (After First 15-Min Candle Closes)**
**Bullish (Call Trade) Entry:**
- Price pulls back to **Kijun-sen** and holds support, then starts to bounce.
- OR price **breaks above the Ichimoku Cloud** and holds.
- ✅ Enter **Call contract (monthly expiration)**.
**Bearish (Put Trade) Entry:**
- Price pulls back to **Kijun-sen**, rejects resistance, and starts falling.
- OR price **breaks below the Ichimoku Cloud** and holds.
- ✅ Enter **Put contract (monthly expiration)**.
🔹 4. Selecting the Right Option Contract
✅ Monthly expiration contract (third Friday of the month).
✅ 30-60 days to expiry (avoid rapid theta decay).
✅ Strike Price:
- **ATM (At-The-Money) or slightly ITM (In-The-Money)**.
- Delta between **0.55 – 0.70** for balance between premium & movement.
✅ Liquidity Criteria:
- **Open Interest > 1,000** for easy fills.
- **Tight bid-ask spread** (<$0.10 on liquid stocks).
🎯 Risk Management & Trade Management**
🔹 5. Stop Loss & Take Profit Rules**
Stop Loss (SL):
🔴 For Calls: Below the Kijun-sen or most recent swing low.
🔴 For Puts: Above the Kijun-sen or most recent swing high.
Take Profit (TP):
✅ First Target: At the opposite edge of the Ichimoku Cloud.
✅ Second Target: Key support/resistance level based on price action.
✅ If profit reaches 70-80% max potential, close early** to avoid theta decay.
---
🔹 6. Trade Adjustments**
🔄 Rolling:If trade is profitable near expiry but hasn’t hit full target, roll to next monthly contract.
🔄 Cutting Losses: Exit early if price **closes inside the Ichimoku Cloud** (loss of trend strength).
📊 Trade Example: Bullish Call Play**
- Stock:** AAPL
- Current Price:** $190
- Bias: Price is above 200 SMA and Ichimoku Cloud
- Entry Trigger:** Price pulls back to Kijun-sen and bounces
- Option Contract:
- Expiry: **Next monthly contract (e.g., July 19 expiration)**
- Strike: **$190 ATM Call**
- Delta: **0.60**
- Bid/Ask Spread: **$2.00 / $2.05**
- Entry Price: $2.05
- Stop Loss: Below Kijun-sen (~$187)
- Take Profit:
- First TP at $195 (Cloud resistance)
- Final TP at $200 key resistance
🔹 7. Why This Strategy Works?**
✅ **Avoids weak setups by following strict entry rules**.
✅ **Uses monthly contracts to avoid rapid time decay**.
✅ **Combines trend-following confirmation from Ichimoku & 200 SMA**.
✅ **Ensures liquidity & better risk management with ATM/ITM options**.
📀 Final Notes
🔹 Only trade **Tuesday to Thursday** to avoid low-probability days.
🔹 Wait for **first 15-minute candle to close** before entering.
🔹 Stick to **monthly contracts** for better theta control.
🔹 **Follow trend confirmation rules strictly**—no guessing.
Turning a Small Trading Account into a Side Hustle for Financial Freedom
Imagine having a skill that allows you to generate income from anywhere, with nothing more than your phone, iPad, or laptop. No need for an expensive setup, no need for hours glued to a screen, and no need to risk everything on a single trade. This is the power of trading options with a small account—starting with as little as $500 and scaling up over time to create financial security, eliminate debt, and build leverage for larger investments.
Weekly Trade Radar & Market Outlook
This week, my focus is on AAPL, NVDA, MSFT, and XPS. There could be a potential retest of the 200 SMA with AAPL and MSFT, offering opportunities for well-structured trades. NVDA looks weak and has already tested the 200 SMA, making it a candidate for further downside potential or a short-term bounce. Additionally, Chinese developments in AI chip production remain a factor that could influence price action, particularly with NVDA. Staying aware of these key levels and macro developments is crucial for trade execution.
Trading Method: Ichimoku Cloud & 200 SMA Strategy
For trade setups, I rely on a combination of the Ichimoku Cloud and the 200 SMA to confirm entries and exits. This system provides a structured approach to trading by identifying trend direction, support and resistance levels, and potential breakouts.
Identify the Trend – The 200 SMA serves as the key trend indicator. If price is above, we look for long opportunities; if below, short setups take priority.
Ichimoku Confirmation – Price action should align with the cloud structure:
Bullish trades: Price above the cloud with strong momentum.
Bearish trades: Price below the cloud with confirmation of weakness.
Entry Timing – Trades are entered after the first 15-minute candle closes to avoid early market volatility. No trades on Mondays or Fridays to maintain consistency and avoid false breakouts.
Monthly Options Contracts – Focusing on monthly expirations allows for strategic entries with enough time for price movements to develop.
Risk Management – Stop losses are set just below key Ichimoku or 200 SMA levels, ensuring a disciplined risk-reward ratio.
How This Can Work as a Side Hustle
Many people look for side hustles to supplement their income, but most involve long hours, additional expenses, or require significant effort to scale. Trading options, however, offers:
✅ Minimal time commitment – With the right plan, you spend less than an hour per day analyzing and placing trades.
✅ Low startup cost – Start with as little as $500 and build from there.
✅ No physical inventory or overhead – You don’t need to buy and store products.
✅ Scalability – As your account grows, you can increase contract size and compound gains.
✅ Financial freedom potential – The profits from consistent, disciplined trading can be used to pay off debt, invest, or build long-term wealth.
The Power of Leverage: Using Trading to Build Wealth
The ultimate goal of trading isn’t just to make a little extra cash—it’s to create financial leverage. Here’s how smart traders use small account growth to create lasting financial success:
1️⃣ Get Out of Debt – Use profits to pay off credit cards, student loans, or other financial burdens. Imagine the freedom of being debt-free.
2️⃣ Reinvest in Larger Opportunities – Once your small account grows, you can scale up your trades, fund larger investments, or even start a business.
3️⃣ Build a Safety Net – Having extra cash flow from trading can serve as an emergency fund, helping you navigate life’s unexpected challenges.
4️⃣ Create a Path to Full-Time Trading – For those who love the process, this side hustle can evolve into a primary source of income over time.
It’s About Discipline, Not Just Trading
The key to successful trading isn’t the market—it’s you.
Many traders fail because they lack the discipline to follow a system. This approach isn’t just about making money; it’s about becoming the kind of person who can execute a plan without emotion, without impulsiveness, and without shortcuts.
Success in trading mirrors success in life: patience, discipline, and consistency always win.
Getting Started – No Excuses
You don’t need a fancy setup. You don’t need to be a finance expert. You just need a phone, iPad, or laptop, a brokerage account (I use Robinhood for its simplicity), and a commitment to mastering a system that works.
If you’re looking for a low-stress, high-reward way to build financial security, trading options with a small account might be the perfect opportunity. It’s time to take control of your future—one trade at a time.

NQ - Bullish positionBased on confluences, correction is possibly completed and the price will continue with an overall bullish trend. This is not financial advice. trade at your own risk.

USDT Dominance Raises Caution: Time to Stay Patient in Crypto?USDT dominance is looking quite concerning right now!
It might be wiser to stay patient and wait for clearer signals before moving.
#Crypto

Classic ConsolidationLT Fut first break out of rounding pattern then consolidated & took support at multiple resistance turned support zone & made flag pattern on an hourly charts with decent OI addition.
Could b bought with mentioned stoploss & target

Multiple Patterns Breakout.Jindal Steel Fut broke above ascending triangle pattern as well as double bottom pattern on an hourly charts with decent OI build up.
Risk:-Rewar = 1:2
Could b bought with mentioned stoploss & target

BTSTTVSMot Fut is on the verge of breaking triangle pattern on an hourly charts with good OI addition.
Risk:Reward = 1:2.6
Could be bought with mentioned stoploss & target.

RECREC fut broke out of triangle pattern on hourly charts with decent OI build up.
Could be bought with mentioned stoploss & target.

paypal stock long term bullishpaypal breakdown for long term bullish , as you can see paypal and economy doing good, will be a bullish market this 4 years will reach a higher high
