GBPUSD| Deep Mitigation Complete - Now Awaiting Bullish DeliveryPrice continues to respect higher timeframe structure, maintaining the bullish narrative from previous weeks.
Our blue zone represents the core higher timeframe order block, and price has consistently responded with precision — showing smart money’s hand clearly in play.
From that foundation, we dropped into lower timeframes to confirm alignment and validate bullish continuation. Price delivered a clear CHoCH, followed by a mitigation into our lighter orange zone, which produced multiple refined setups and ultimately led to a new high.
As the new week began, price dipped deeper into the darker orange zone — the next layer of premium mitigation. From there, we’ve observed a fresh structural switch confirming buyers are regaining control.
We are now long and patiently awaiting delivery toward higher objectives. Until the market completes delivery, we remain disciplined — no forcing, no anticipation beyond confirmation.
We follow price, let structure speak, and move in sync with smart money.
Market open is near. Let’s execute with patience and precision.
Let’s go. ⚡️
Structure

EURUSD| Maintaing Structure & Awaiting Final DeliveryHigher-timeframe structure continues to hold firm, keeping our bullish narrative intact.
Last week, price mitigated key 4H levels and confirmed continuation through mid-timeframe order flow — giving the precision entry we were anticipating.
From entry, price has respected every structural checkpoint and is now approaching the final 5-minute high that must be breached for full delivery. This zone represents the last liquidity pocket before completion of our projected target range.
At this stage, it’s not about forcing new positions — it’s about letting structure deliver.
All confirmations remain aligned: higher-timeframe momentum supports continuation, and lower-timeframe reactions are maintaining bullish flow without displacement violations.
We’ll continue to monitor the 5-minute range for any final mitigation before the push through that high. Once breached, we’ll evaluate potential exhaustion or continuation into premium territory.
Patience and precision — execution is already done, now it’s about trusting the system and waiting for delivery.
Let’s finish strong. ⚡️

GBPJPY| Deep Mitigation Before Bullish ContinuationHigher timeframe structure remains bullish, still respecting last week’s flow.
We’ve seen mid-timeframe mitigation, and from that zone, price continues showing bullish intent in alignment with higher timeframe order flow.
Currently, we’re monitoring price for deeper mitigation into discounted areas — watching how it interacts with those two key green levels.
Once price reaches mitigation within our lower timeframe range, we’ll drop down for confirmation entries to target 5M and 30M highs, depending on market delivery.
Until then, patience and precision. Let the deeper mitigation come to us.
Let’s go.

24.10.25 Morning ForecastPairs on Watch -
FX:AUDJPY
FX:EURUSD
FX:NZDJPY
A short overview of the instruments I am looking at for today, multi-timeframe analysis down to what I will be looking at for an entry. Enjoy!

23.10.25 Morning ForecastPairs on Watch -
FX:NZDJPY
FX:AUDUSD
A short overview of the instruments I am looking at for today, multi-timeframe analysis down to what I will be looking at for an entry. Enjoy!

Main Watch - CADJPY 22.10.25Good morning guys!!
As you know I am in Italy until Thursday, so my morning forecast videos will be paused until I return back home. I thought I would try and keep some consistency and post up my main pair I am watching for that day with a description of what I am looking for.
Main Watch -
FX:CADJPY

Main Watch - GBPUSD 21.10.25Good morning guys!!
As you know I am in Italy until Thursday, so my morning forecast videos will be paused until I return back home. I thought I would try and keep some consistency and post up my main pair I am watching for that day with a description of what I am looking for.
Main Watch -
FX:GBPUSD

Main Watch - GBPCAD 20.10.25Good morning guys!!
As you know I am in Italy until Thursday, so my morning forecast videos will be paused until I return back home. I thought I would try and keep some consistency and post up my main pair I am watching for that day with a description of what I am looking for.
Main Watch - FX:GBPCAD

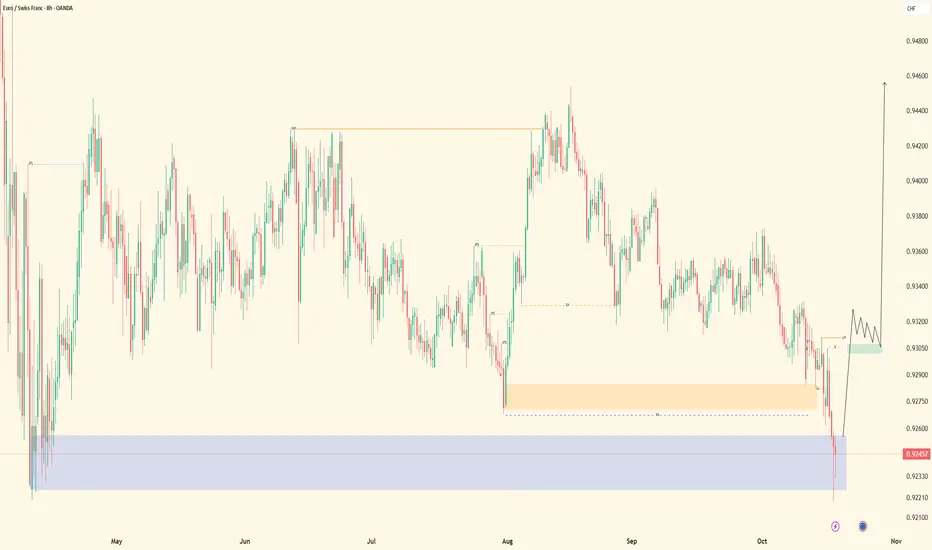
EUR/CHF | Bullish Structure & Order Block ReactionBias: Bullish
4H Overview:
• High timeframe structure bullish — price respecting major highs and maintaining upward momentum.
30M–5M Refinement:
• Midterm structure mapped and refined.
• Discounted and extreme OBs identified; price currently reacting within these zones.
• Waiting for lower timeframe confirmation for clean entries.
Lower Timeframe Focus:
• Observe for CHoCH and reaction off order blocks before entering.
• Let smart money dictate movement.
Mindset Note:
Patience + alignment with structure is key — entries only when lower timeframe confirms reaction.
NZD/USD| Bearish Structure & Premium OB
Bias: Bearish
4H Overview:
• High timeframe structure is bearish — price broke significant highs and major lows, confirming downward momentum.
30M–5M Refinement:
• Midterm structure mapped.
• Buy-side liquidity spotted above in premium OB zones.
• Waiting for buy-side liquidity to be taken before potential entry.
Lower Timeframe Focus:
• Let smart money dictate direction — monitor for reaction before entries.
Mindset Note:
Patience is key — allow structure and liquidity to confirm before acting.

AUD/JPY| Bullish Struture & Refined OBBias: Bullish
4H Overview:
• High timeframe structure is bullish.
• Price has taken out higher timeframe liquidity, giving extra confirmation for the observed OB.
30M–5M Refinement:
• Midterm structure mapped and refined after sell-side liquidity was swept.
• Price may hold this zone — waiting for lower timeframe confirmation before taking entries.
Lower Timeframe Focus:
• Let smart money lead — only take trades when structure aligns and confirmation occurs.
Mindset Note:
Patience is key — the market dictates the timing, not the trader.

EURJPY| Bullish Structure & Continuation SetupBias: Bullish
4H Overview:
• High timeframe structure bullish — strong upward movement and clear bullish momentum.
• Price breaking and respecting key structure with continuation potential.
30M–5M Refinement:
• Midterm structure mapped and refined.
• Waiting for price to fully take out previous levels and sweep liquidity into the OB zone beneath.
• Targeting continuation long to the upside.
Lower Timeframe Focus:
• Confirmation needed from lower timeframes before entries.
• Let smart money lead and watch for clean reaction zones.
Mindset Note:
Patience + alignment with higher timeframe structure ensures precision entries.

GBP/JPY| Bullish Structure & AMD SetupBias: Bullish
4H Overview:
• High timeframe bullish structure with an AMD setup — clear playmaking structure and directional clarity.
30M–5M Refinement:
• Midterm structure mapped and refined.
• Internal framework structures placed for lower timeframe precision.
• Discounted and extreme OB zones identified.
• Price currently sitting at 50% equilibrium.
Lower Timeframe Focus:
• Waiting for lower timeframe to hold the zone for entries.
• If it fails, deeper mitigation levels will be used before establishing position.
• Let smart money dictate the move.
Mindset Note:
Patience and structure alignment first — entries only when lower timeframe confirms reaction.

USD/CAD| Bullish Structure & Extreme OB ZonesBias: Bullish
4H Overview:
• High timeframe structure is bullish — price breaking significant highs.
• Move is very obvious — even “kindergarten” can see the trend direction.
30M–5M Refinement:
• Midterm structure mapped and refined.
• All possible order blocks marked.
• Deeper, darker orange OB: extreme OB for key entries.
• Looking for price to tap 50% equilibrium within these zones.
Lower Timeframe Focus:
• Lower timeframe confirmation will validate entries and any additional structure.
• Until then, stay patient — let smart money guide price.
Mindset Note:
Patience + structure alignment is everything — no forcing trades, wait for clean confirmation.

AUD/USD| Bullish Structure & Extreme OB ZoneBias: Bullish
4H Overview:
• High timeframe structure is bullish, price breaking significant highs.
• Move may look “funny/fishy” to those unfamiliar with reading price — strong trend behavior still intact.
30M–5M Refinement:
• Midterm structure mapped and refined.
• Order blocks refined and aligned within discounted areas.
• Orange OB sits right in the 50% equilibrium zone.
• Price currently mitigated into an extreme OB zone.
Lower Timeframe Focus:
• Waiting for lower timeframe confirmation: CHoCH → break of lower highs.
• Pullback into discounted OBs will define optimal entries.
Mindset Note:
Let smart money lead — watch price direction carefully, no forcing trades.

USD/JPY| Bullish Structure With Liquidity SweepBias: Bullish
4H Overview:
• High timeframe structure is bullish with clean mapping and refinement.
• Price continues to follow liquidity footsteps, creating clear highs and broken structure.
• HTF discounted and extreme order blocks are properly aligned.
30M–5M Refinement:
• Midterm structure mapped and refined with discounted and extreme OBs marked.
• Price could react in three scenarios:
1. Continuation: Holds at discounted OB → lower timeframe confirmation → long entries → breaking highs.
2. Mitigation Failure: Sweeps buy-side liquidity above → discounted OB violated → retraces deeper → entry from extreme OB once lower timeframe confirms.
3. Retrace to Highs: Price violates discounted OB → sits in extreme OB → entry only when lower timeframe confirms reaction.
Mindset Note:
Patience is key — wait for lower timeframe confirmation before taking trades. Let structure and liquidity dictate the move.

GBP/USD| Bullish Correction Within TrendBias: Bullish
4H Overview:
• Price continues to break highs with strong bullish structure and heavy volume.
• Multiple large bullish candles confirm momentum and strength in direction.
• Current correction is reacting from a major high timeframe order block zone, giving us a controlled pullback inside structure.
30M–5M Refinement:
• Midterm structure refined — price mitigated discounted levels (highlighted in darker orange).
• Bullish reaction confirmed with internal CHoCH (break of lower highs).
• Expecting a sell-side liquidity sweep into deeper discounted areas before continuation.
• Watch for mitigation at internal OBs before executing new buy entries.
Mindset Note:
Stay patient through the correction — structure is intact, order flow is clear, and deeper liquidity will fuel the next leg up.

EURUSD| Bullish Flow Within structureBias: Bullish
4H Overview: Price continues to respect bullish structure, breaking significant highs while remaining within the broader weekly flow. The midterm discounted order block aligned perfectly with a higher timeframe OB — giving strong confluence for continuation.
30M–5M Confirmation: After mitigation, price broke internal lower highs, signaling a clear CHoCH and shift in direction.
Expectations: Looking for sell-side liquidity to be swept before another leg up. Closest internal OB may fail — I’m anticipating a deeper discount tap before continuation.
Mindset Note: Patience pays when structure and liquidity are aligned. Let price come to your zone — not the other way around.

17.10.25 Morning ForecastJust a heads up! I will be in Italy the beginning of next week, so most likely will not be able to upload any video forecasts. I will do my best to post what I am looking at for the day to keep you guys in the loop. From Thursday next week I will be back to normal schedule 🫡
Pairs on Watch -
FX:USDJPY
A short overview of the instruments I am looking at for today, multi-timeframe analysis down to what I will be looking at for an entry. Enjoy!

16.10.25 Morning ForecastPairs on Watch -
FX:EURUSD
FX:GBPUSD
FX:GBPCAD
A short overview of the instruments I am looking at for today, multi-timeframe analysis down to what I will be looking at for an entry. Enjoy!

The Bull’s Call: HFCL Joins the Uptrend League!HFCL Technical Update (1-Hour Timeframe)
HFCL is currently moving within a well-defined parallel channel. The stock has established a strong support zone around the ₹72–74 range on the shorter timeframe, while the key resistance is observed near ₹90.
At present, the stock is trading close to the Line of Polarity (LOP). A breakout above the mid-channel level could lead the price toward its upper resistance zone.
If the support zone holds, we may witness further upside momentum in HFCL in the coming sessions.
Thank you !!!!

AUDUSD – Confluence Buy Zone!AUDUSD is currently testing a major support confluence zone, where the rising blue trendline, the green demand area, and the lower boundary of the short-term red falling channel intersect.
As long as price continues to hold above the 0.6450–0.6485 zone, the bullish outlook remains valid, and I’ll be looking for long opportunities from this area.
A rebound from this level could trigger a move toward 0.6560, followed by 0.6620–0.6670, aligning with the upper boundary of the broader channel.
However, a 4H close below 0.6425 would invalidate this bullish scenario and shift the focus toward the next support zone near 0.6380.
⚠️ Disclaimer: This is not financial advice. Always do your own research and manage risk properly.
📚 Stick to your trading plan regarding entries, risk, and management.
Good luck! 🍀
All Strategies Are Good; If Managed Properly!
~Richard Nasr

15.10.25 Morning ForecastPairs on Watch -
FX:EURUSD
FX:GBPUSD
FX:AUDUSD
A short overview of the instruments I am looking at for today, multi-timeframe analysis down to what I will be looking at for an entry. Enjoy!
