UJ - Bullish Bias🔹 Pair: USDJPY
🔹 HTF Overview: Bullish structure well respected, with clean momentum driving price higher.
🔹 MTF Confirmation: Price mitigated our midterm OB, held firmly, and validated the continuation longs we’ve been anticipating.
🔹 LTF Setup: Bullish setups already played out—now waiting for fresh alignments and new mitigations to position for the next leg.
🔹 Targets: Eyes on mid- to long-term highs as liquidity magnets in line with bullish intent.
🔹 Mindset Note: Patience sharpens precision—let the market confirm before engaging.
Structure

GU - Bullish Bias🔹 Pair: GBPUSD
🔹 HTF Overview: Price swept liquidity, then respected a higher-timeframe order block. Momentum shifted bullish with a steady rhythm.
🔹 MTF Confirmation: Initial OB mitigation failed cleanly, but price tapped deeper into hidden anchor OBs. From here, expecting smart money to defend and guide the move higher.
🔹 LTF Setup: Waiting for a CHoCH and a fresh OB print. Once midterm structure aligns, I’ll refine entries from the LTF.
🔹 Targets: Higher liquidity pools above recent highs in line with bullish HTF intent.
🔹 Mindset Note: Patience is the real entry—let smart money confirm before committing.

EU - Bullish Bias🔹 Pair: EURUSD
🔹 HTF Overview: Major higher-high order block respected cleanly. Strong bullish intent and volume confirmed; market structure favors upside continuation.
🔹 MTF Confirmation: Original OB failed, but price tapped deeper into the hidden anchor block. Expecting this zone to act as the true smart money foundation.
🔹 LTF Setup: Waiting for a CHoCH and lower-high break. After that, I’ll target a pullback below 50% equilibrium into discounted areas for long entries.
🔹 Targets: Continuation toward higher-timeframe liquidity above recent highs.
🔹 Mindset Note: Patience is the edge. Smart money confirms before committing.

26.09.25 Morning ForecastPairs on Watch -
FX:EURAUD
A short overview of the instruments I am looking at for today, multi-timeframe analysis down to what I will be looking at for an entry. Enjoy!

AUDJPY Trade Recap + Coffee Sell Position Explanation 25.09.25Two positions covered in this recap.
AUD / JPY - 1%
COFFEE Short Structure Explanation
Full explanation as to why I executed on this position, using the 4H to my advantage but also understanding price was due a deeper pullback, but these pullbacks do not always happen.
Any questions you have just drop them below 👇

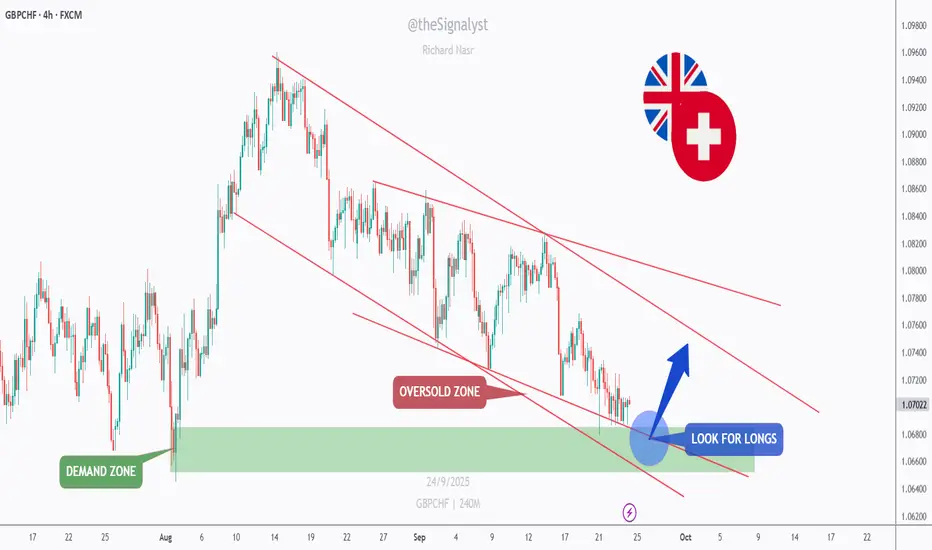
GBPCHF - Oversold at Demand: Longs on Confirmation?GBPCHF has been drifting lower on the 4H inside a falling channel. Price is now tapping a multi-touch demand zone around 1.066–1.070, right at the channel’s lower bound—classic confluence for a bounce.
As long as this base holds, I’ll look for reversal confirmation (wick rejections/HH-HL) to ride a rotation toward 1.075 first, then 1.082–1.085 near the channel midline 📈. A clean 4H close below 1.064 would invalidate the idea and expose 1.060–1.058 next.
What’s your move => buy the dip at demand, or wait for a break of the red channel before joining? 🤔
⚠️ Disclaimer: This is not financial advice. Always do your own research and manage risk properly.
📚 Stick to your trading plan regarding entries, risk, and management.
Good luck! 🍀
All Strategies Are Good; If Managed Properly!
~Richard Nasr
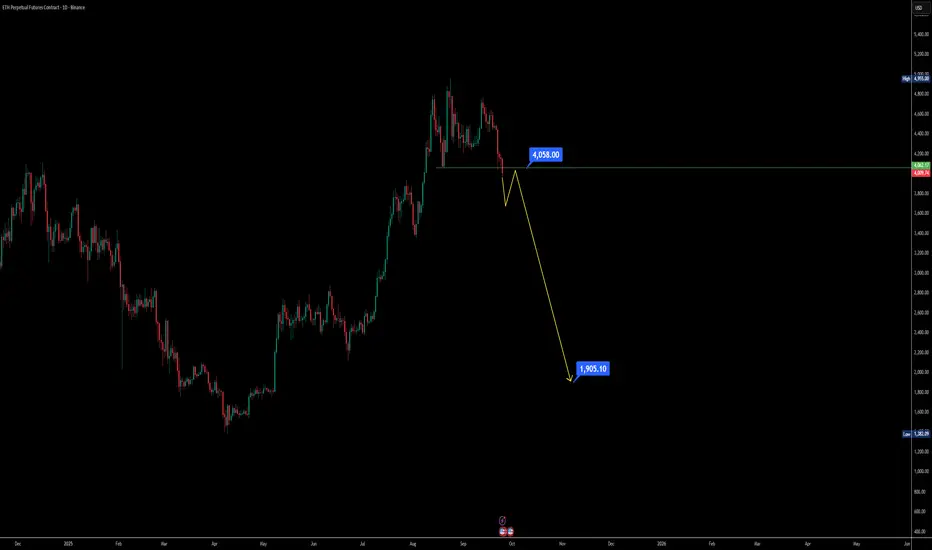
Ethereum Daily Chart Distribution Phase Signals huge dumpIf you’ve been tracking Ethereum on the daily chart, the structure is starting to look heavy — and not in a bullish way. Let’s break this down step by step so it’s easy to follow 👇
Support lost: ETH has already broken its key support zone around $4060, which previously acted as a higher low. Now, the recent dip is printing a new lower low, shifting market sentiment.
Daily close levels matter: If the daily candle closes below $4000, it confirms weakness and opens doors for a further sell-off.
Possible head and shoulders: A pullback toward the $4100 region could simply build the right shoulder of a bearish head and shoulder pattern. The structure matches what we saw earlier on the left shoulder.
Bearish momentum risk: If ETH fails to hold above $4000 after that pullback, we could be looking at extended downside — even a sharp fall toward the $2000 zone based on historical dump patterns.
Market behavior reminder: Over the past two years, whenever ETH started a distribution breakdown, the drop was often fast and violent. That’s why caution is key here.
📌 Key Takeaway: Ethereum is at a make-or-break daily level. Watch $4000 closely — losing this level could accelerate a bearish breakdown. Short-term traders may look for opportunities on the pullback, while long-term holders need to stay cautious of the possible head and shoulders pattern forming.
USDJPY - Red Low or Orange Resistance: Your Trigger Map!USDJPY squeezed off 146.0 and is testing the 148.8–149.2 orange resistance on the 4H while momentum cools.
Here’s the plan 🔑
If the last low in red is broken downward, the bears take over, and I’ll look for 147.2 first, then the 146.0 support zone.
If the orange resistance is broken upward and holds, I’ll expect continuation toward the upper supply at 150.7–151.0 (with 150.0 as a waypoint).
What’s your move => fade a failure at the orange band, or buy a clean break and hold into 150s? 🤔
⚠️ Disclaimer: This is not financial advice. Always do your own research and manage risk properly.
📚 Stick to your trading plan regarding entries, risk, and management.
Good luck! 🍀
All Strategies Are Good; If Managed Properly!
~Richard Nasr

25.09.25 Morning ForecastPairs on Watch -
FX:USDJPY
FX:AUDJPY
A short overview of the instruments I am looking at for today, multi-timeframe analysis down to what I will be looking at for an entry. Enjoy!

24.09.25 Morning ForecastPairs on Watch -
FX:AUDJPY
FX:EURAUD
FX:NZDUSD
A short overview of the instruments I am looking at for today, multi-timeframe analysis down to what I will be looking at for an entry. Enjoy!

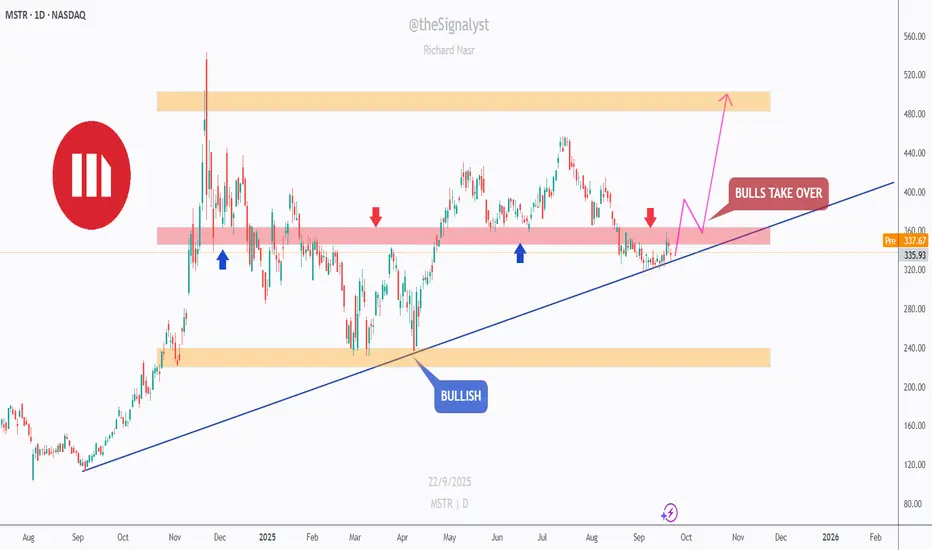
MSTR - Trendline Support vs. Supply Cap!MSTR has been overall bullish on the daily, respecting a rising trendline since last year. Price is coiling right beneath the 330–350 supply band after multiple rejections.
This area is key 🔑. It overlaps prior supply and the rising trendline—clean confluence. If bulls defend the trendline and we see a clean daily close above 350, momentum could extend toward 400 first, then 470–520 inside the broader range 🚀.
If the trendline gives way, I’ll look for a deeper dip toward 260–240 demand before bulls try again. Until then, structure favors the upside while the line holds.
What’s your plan => buy strength above 350 or wait for a retest on the trendline first? 🤔
⚠️ Disclaimer: This is not financial advice. Always do your own research and manage risk properly.
📚 Stick to your trading plan regarding entries, risk, and management.
Good luck! 🍀
All Strategies Are Good; If Managed Properly!
~Richard Nasr
23.09.25 Morning ForecastPairs on Watch -
FX:EURUSD
FX:AUDJPY
FX:GBPCAD
A short overview of the instruments I am looking at for today, multi-timeframe analysis down to what I will be looking at for an entry. Enjoy!

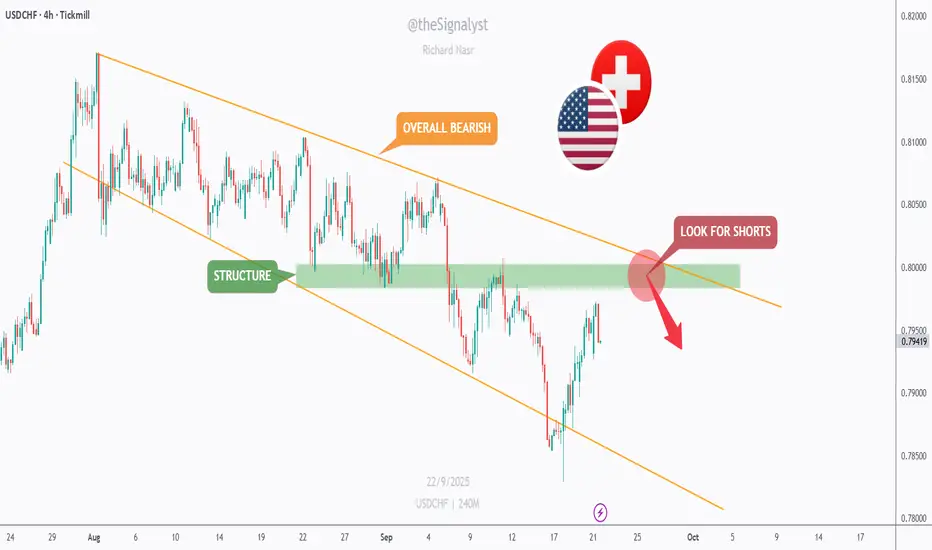
USDCHF — Rally Into Structure, Short the Retest?USDCHF has been overall bearish on the 4H, sliding inside a falling channel. After a bounce, price is rotating back into the 0.798–0.802 structure zone, right at the channel’s upper bound.
This confluence is key 🔑. If sellers react here, I’ll look for rejection shorts toward 0.790 first, then 0.785–0.780 near the channel floor. A clean 4H close and hold above 0.802 would invalidate the idea and expose 0.806–0.810 next ⏳.
What’s your plan => fade the rally at supply, or wait for confirmation before jumping in? 🤔
⚠️ Disclaimer: This is not financial advice. Always do your own research and manage risk properly.
📚 Stick to your trading plan regarding entries, risk, and management.
Good luck! 🍀
All Strategies Are Good; If Managed Properly!
~Richard Nasr
22.09.25 Morning ForecastPairs on Watch -
FX:EURNZD
FX:GBPJPY
A short overview of the instruments I am looking at for today, multi-timeframe analysis down to what I will be looking at for an entry. Enjoy!

GBPCHF - Weekly Outlook
Pair: GBPCHF
Bias: Bullish
HTF Overview (4H):
Major LH has been broken, signaling clear buy intent. A deep pullback is currently in play, setting up potential continuation.
MTF (2H/1H/30M):
Price has mitigated the OB zone and pushed deeper into the secret anchor OB area. Structure shows high-probability continuation potential.
LTF (30M/5M):
Waiting for a CHoCH to form. Once the LH breaks, we’ll wait for the pullback to occur and attend the bullish leg.
Targets:
• TP1: 5M highs
• TP2: 30M highs (depending on market delivery)
Mindset Note:
GBPCHF can run sharp — patience for the CHoCH and pullback ensures a clean entry aligned with HTF bullish intent.

EURNZD - Weekly OutlookPair: EURNZD
Bias: Bullish
HTF Overview (4H):
Strong momentum visible toward the upside, structure clearly bullish.
MTF (2H/1H/30M):
Anticipating continuation to the highs. Waiting for the courtyard liquidity to be taken and slashed before confirming the next leg.
LTF (30M/5M):
Once price mitigates the OB from the MTF, we wait for a full CHoCH. After that prints, we’ll look for a pullback on the bullish leg to catch the move.
Targets:
• TP1: 5M highs
• TP2: 30M highs (depending on market delivery)
Mindset Note:
Let the CHoCH and mitigation complete — patience ensures the cleanest entry and avoids premature entries against structure.

BTCUSD - Weekly OutlookPair: BTCUSD
Bias: Bullish
HTF Overview (4H):
Bullish structure remains intact. Dropping to lower scales to anticipate continuation within the broader trend.
MTF (2H/1H/30M):
Structure is mapped and refined. A CHoCH has printed from a deep anchor zone. Now waiting for the sell-side liquidity (SSL) sweep 🧹 before dropping to lower confirmations.
LTF (30M/5M):
Once mitigation from the higher zone is complete, we’ll wait for a breach of the LH. Once applied, we’ll attend the bullish leg.
Targets:
• TP1: 5M highs
• TP2: 30M highs (depending on market delivery)
Mindset Note:
Crypto loves liquidity sweeps — let BTC clear the SSL and confirm with structure before committing to the long side.

XAUUSD (Gold) - Weekly OutlookPair: XAUUSD
Bias: Bullish
HTF Overview (4H):
Structure is mapped and refined, with momentum clearly showing toward the upside.
MTF (2H/1H/30M):
Watching for sell-side liquidity (SSL) to be taken. Once slashed and the OB is fully mitigated, confirmations for continuation higher will be in play.
LTF (30M/5M):
Waiting for HTF sync and full mitigation. Once a CHoCH is confirmed with a LH break, we’ll attend to the bullish leg.
Targets:
• TP1: 5M highs
• TP2: 30M highs (depending on delivery)
Mindset Note:
Gold moves aggressively — let the SSL clear and mitigation align before entering. The CHoCH keeps you disciplined inside the volatility.

NZDUSD - Weekly Outlook
Pair: NZDUSD
Bias: Bearish
HTF Overview (4H):
Structure is mapped and refined at the highest tier, showing bearish intent.
MTF (2H/1H/30M):
Anticipating continuation lower. Waiting for buy-side liquidity (BSL) to be taken. Once slashed and OB mitigated, price aligned with the bearish narrative.
LTF (30M/5M):
A CHoCH has already been confirmed with a break of the HL. Now waiting for a pullback into the bearish leg to attend further sells.
Targets:
• TP1: 5M lows
• TP2: 30M lows (depending on delivery)
Mindset Note:
NU often fakes bullish before continuing lower — let the pullback deliver before committing to the short side.

AUDUSD - Weekly OutlookPair: AUDUSD
Bias: Bullish
HTF Overview (4H):
Bullish structure is intact, with momentum visually clear and intent showing strong upside direction.
MTF (2H/1H/30M):
Price has been mapped and refined to precision. The OB zone has already been mitigated, so now we wait for confirmation of continuation.
LTF (30M/5M):
Looking for a CHoCH confirmation with a breach of the LH. Once that occurs, we’ll attend the bullish leg for long setups.
Targets:
• TP1: 5M highs
• TP2: 30M highs (depending on delivery)
Mindset Note:
AU rewards patience — let the CHoCH print before entering. A confirmed breach of structure keeps you aligned with the higher-timeframe bullish momentum.

EURJPY - Weekly OutlookPair: EURJPY
Bias: Bullish
HTF Overview (4H):
Bullish structure is mapped and refined, showing strong momentum toward the upside.
MTF (2H/1H/30M):
Refined structure suggests continuation in line with the dominant bullish trend. Waiting for courtyard liquidity (SSL) to be taken and slashed before further confirmation.
LTF (30M/5M):
Once price mitigates the refined zone, we’ll wait for a CHoCH to anticipate the buy leg. Until then, we remain patient.
Entry Zone:
Pending mitigation of refined OB and CHoCH confirmation.
Targets:
• TP1: 5M highs
• TP2: 30M highs (depending on market delivery)
Mindset Note:
EURJPY can fake early — let the SSL get slashed before looking for your CHoCH confirmation. Patience secures the cleaner entry.

GBPJPY - Weekly OutlookPair: GBPJPY
Bias: Bullish
HTF Overview (4H):
Bullish structure is mapped and refined, showing strong upward momentum. Price is moving cleanly in line with the trend.
MTF (2H/1H/30M):
Structure is refined and awaiting a deeper courtyard slash. Looking for mitigation of the OB sitting below before continuation higher.
LTF (30M/5M):
Confirmation will come once the lower high (LH) is breached. Expecting a pullback setup from there, which we’ll attend to. Until then, patience is key.
Entry Zone:
Refined OB once mitigation aligns with LTF confirmations.
Targets:
• TP1: 5M highs
• TP2: 30M highs (depending on market delivery)
Mindset Note:
GJ delivers volatility — let price pull back into your courtyard slash before committing. Structure will tell the story.

GBPUSD - Weekly OutlookPair: GBPUSD
Bias: Bullish
HTF Overview (4H):
Structure is refined and mapped, with mitigation of the OB zone below. Since then, price has respected bullish movement across lower scales. ⚖️
MTF (2H/1H/30M):
Structure has been mapped and previous sell-side liquidity was taken. Following the OB mitigation, price continued bullish. Now watching to see if that mitigation level holds.
LTF (30M/5M):
Looking for a CHoCH confirmation inside refined zones. Once confirmed, we’ll aim toward the highs.
Targets:
• TP1: 5M highs
• TP2: 30M highs (depending on market delivery)
Mindset Note:
Let the confirmation come to you — GU loves to sweep and shake weak hands before committing to trend continuation.
