EURUSD – Execution Update | Target Reached EURUSD – Execution Update | Target Reached ✅
Previously outlined continuation scenario has played out as anticipated.
Price respected the defined demand / mitigation zone on lower timeframes, formed bullish structure, and delivered a clean impulsive expansion toward the projected liquidity.
📌 Execution Details:
Entry: Demand reaction within the marked grey zone
Structure: Higher low formation on intraday timeframe
Momentum confirmation: Strong displacement move
Result: Take Profit achieved
The move unfolded in alignment with the 4H continuation bias shared earlier.
Liquidity above was efficiently delivered without violating the invalidation level.
This trade was not prediction-based — it was structure-based.
Clear zone.
Defined risk.
Logical target.
Discipline + patience = asymmetric outcome.
Risk management remains the core edge.
Takeprofit

PFE 1M Long Trend TradeNo set up
- neglected one bar rule for the 1Y context
+ long impulse
+ 1/2 correction
Calculated affordable stop limit
1 to 2 R/R take profit
1Y Trend
"+ long impulse
+ 1/2 correction
+ SOS level
+ support zone
- exhaustion volume too big"
1D Situation
"+ long impulse
- neutral zone 1
+ above consolidation volume"

TROW Long Investment 1D Conservative CounterTrend TradeConservative Trade
+ long balance
+ volumed T2
+ support zone
+ 1/2 correction
+ weak approach
+ biggest volume 2Sp-
Calculated affordable stop limit
1 to 2 R/R take profit
1M CT
"'- short balance
+ volumed expanding ICE
+ support zone
+ weak approach
+ biggest volume 2Sp+
+ weak test
+ 1/2 correction"
1Y T
"+ long impulse
+ 1/2 correction
- strong approach
+ T2 level
+ supporting zone
+ volumed interaction bar"

TROW Long Investment 1M Aggressive TradeAggressive Trade
- short balance
+ volumed expanding ICE
+ support zone
+ weak approach
+ biggest volume 2Sp+
+ weak test
- first bullish bar close above entry
+ 1/2 correction
Calculated affordable stop limit
1 to 2 R/R take profit
1T Trend
"+ long impulse
+ 1/2 correction
- strong approach
+ T2 level
+ supporting zone
+ volumed interaction bar"

XOM 5M Short Aggressive DayTradeAggressive Trade
- long impulse
+ volumed T1
+ resistance level
+ biggest volume irregular 2Ut+
+ weak test
- below first bearish bar close entry
Calculated affordable stop loss
Less than 1/2 R/R take profit
1H CT
"- long impulse
- unvolumed TE / T1
+ resistance zone
+ weak approach
+ biggest volume Ut
+ test"
1D CT
"- long impulse
+ volumed T1
+ weal approach
+ resistance zone"
1M CT
"- long balance
+ expanding CREEK
+ resistance level"
1Y CT
"- long impulse
+ neutral zone 2"

Exit Strategies: Entries Get Attention, Exits Make the MoneyEveryone Obsesses Over Entries. Professionals Obsess Over Exits.
Here's a trading truth that took me years to learn:
You can have a mediocre entry and still make money with a great exit.
You can have a perfect entry and lose money with a poor exit.
Exits determine your actual profit or loss. Entries just get you in the game.
Why Exits Matter More
The Entry Illusion:
Traders spend 90% of their time on entries:
Finding the perfect setup
Waiting for confirmation
Timing the exact moment
The Exit Reality:
But exits determine:
Whether a winning trade stays winning
How much you actually capture
Whether a losing trade stays small
Your overall expectancy
The Math:
A 60% win rate with poor exits can lose money.
A 40% win rate with excellent exits can make money.
It's not about being right. It's about how much you make when right and how little you lose when wrong.
Types of Exits
1. Stop Loss Exit
Predetermined price where you exit to limit loss.
Purpose: Capital preservation
Placement: Where your trade thesis is invalidated
2. Take Profit Exit
Predetermined price where you exit to capture profit.
Purpose: Lock in gains
Placement: At logical targets (resistance, measured moves)
3. Trailing Stop Exit
Stop that moves with price to lock in profits.
Purpose: Let winners run while protecting gains
Types: Fixed distance, ATR-based, percentage-based
4. Time-Based Exit
Exit after a certain time regardless of price.
Purpose: Avoid dead money, force decisions
Example: Exit if trade hasn't moved in 5 days
5. Indicator-Based Exit
Exit when indicator gives signal.
Purpose: Systematic exit based on market conditions
Example: Exit when RSI crosses below 70
6. Discretionary Exit
Exit based on judgment and market conditions.
Purpose: Adapt to changing conditions
Risk: Emotional interference
Stop Loss Strategies
Strategy 1: Technical Stop
Place stop where the trade idea is invalidated.
Examples:
Below support level
Below swing low
Below trendline
Advantage: Logical placement based on market structure
Disadvantage: Can be obvious to other traders
Strategy 2: ATR-Based Stop
Place stop at multiple of Average True Range.
Formula:
Stop = Entry - (ATR × Multiplier)
Example:
Entry: $100
ATR: $2
Multiplier: 2
Stop: $100 - ($2 × 2) = $96
Advantage: Adapts to volatility
Disadvantage: May not align with structure
Strategy 3: Percentage Stop
Place stop at fixed percentage from entry.
Example:
Entry: $100
Stop: 5% below = $95
Advantage: Simple, consistent
Disadvantage: Ignores market structure and volatility
Strategy 4: Time Stop
Exit if trade doesn't move within timeframe.
Example:
"If not profitable within 3 days, exit at market."
Advantage: Avoids dead money
Disadvantage: May exit before move happens
Take Profit Strategies
Strategy 1: Fixed Target
Predetermined price target.
Methods:
Risk multiple (2R, 3R)
Resistance level
Round number
Advantage: Clear, removes emotion
Disadvantage: May leave money on table
Strategy 2: Scaled Exit
Exit in portions at different levels.
Example:
1/3 at 1R
1/3 at 2R
1/3 trailing
Advantage: Locks in some profit, lets rest run
Disadvantage: More complex management
Strategy 3: Trailing Stop
Let profits run with moving stop.
Types:
Fixed distance trailing
ATR trailing
Moving average trailing
Swing point trailing
Advantage: Captures extended moves
Disadvantage: Gives back some profit on reversals
Strategy 4: Indicator Exit
Exit when indicator signals.
Examples:
RSI overbought
MACD crossover
Moving average cross
Advantage: Systematic, removes emotion
Disadvantage: May lag price action
AI-Enhanced Exit Strategies
1. Dynamic Stop Optimization
AI adjusts stops based on:
Current volatility
Time in trade
Profit accumulated
Market regime
2. Optimal Target Calculation
AI analyzes:
Historical move distributions
Current momentum
Resistance levels
Probability of reaching targets
3. Exit Signal Ensemble
AI combines multiple exit signals:
Technical indicators
Price action
Volume patterns
Time factors
4. Regime-Adaptive Exits
AI adjusts exit strategy based on market regime:
Trending: Wider trailing stops
Ranging: Tighter fixed targets
Volatile: Faster exits
Exit Mistakes
Moving Stop Loss Away — "I'll give it more room" = hoping, not trading. Set stop before entry, never move it further away.
Taking Profits Too Early — Fear of giving back gains leads to cutting winners short. Use trailing stops to let winners run.
No Exit Plan — Entering without knowing where you'll exit. Define all exits BEFORE entering.
Emotional Exits — Exiting based on fear or greed, not plan. Automate exits or use strict rules.
Same Exit for All Trades — Using identical exit regardless of setup or conditions. Match exit strategy to trade type and market conditions.
Exit Planning Framework
Before Every Trade, Define:
1. Initial Stop Loss
Where is the trade idea wrong?
What's the maximum acceptable loss?
2. Primary Target
Where is the logical profit target?
What's the risk:reward ratio?
3. Trailing Strategy
How will you protect profits?
When does trailing begin?
4. Time Limit
How long will you hold?
When do you exit regardless of price?
5. Invalidation Conditions
What would change your thesis?
When do you exit early?
Exit Scenarios
Scenario 1: Trade Goes Your Way
Move stop to breakeven after 1R
Trail stop as price advances
Take partial profits at targets
Let remainder run with trail
Scenario 2: Trade Goes Against You
Stop loss hits = exit immediately
No hoping, no averaging down
Accept the loss, move on
Scenario 3: Trade Goes Nowhere
Time stop triggers
Exit to free up capital
Reassess if setup is still valid
Scenario 4: Conditions Change
Original thesis no longer valid
Exit regardless of profit/loss
Don't hold for wrong reasons
Key Takeaways
Exits determine actual profit/loss — entries just get you in the game
Define all exits BEFORE entering any trade
Never move stop loss further away — only closer
Use trailing stops to let winners run while protecting gains
Match exit strategy to trade type and market conditions
Your Turn
What's your biggest challenge with exits?
Do you tend to exit too early or hold too long?
Share your exit strategies below 👇

KHC Short 5M Aggressive Trend DayTradeAggressive Trend Trade
- long impulse
- unvolumed T1
+ resistance zone
+ biggest volume 2Ut+
+ weak test
+ first bearish bar closed entry
Calculated affordable virtual stop loss
Bought puts
1 to 2 R/R take profit
1H Trend
"+ short impulse
+ BUI level
+ resistance zone
+ 1/2 correction
- strong approach"
1D Trend
"+ short impulse
+ BUI test / T2 level
+ resistance zone
+ volumed 2Ut+"
1M Trend
"+ short impulse
= neutral zone 2"
1Y
Trend
no context

MDLZ Swing Long 1H Aggressive TradeAggressive Trade
- short impulse
+ exhaustion volume T1
+ support level
+ exhaustion volume 2Sp+
+ weak test
+ first bullish bar close entry
Calculated affordable stop limit
1 to 2 R/R take profit
1D CounterTrend
"- short impulse
+ volumed TE/T1
+ support level
- below volume buildup
+ reverse volume weak approach
+ exhaustion volume Sp"
1M CounterTrend
"- short impulse
+ exhaustion volume TE/T1
+ support level
+ weak approach
+ exhaustion volume manipulation bar without result"
1Y Trend
"+ long impulse
+ 1/2 correction
- SOS above JOC level
+ support level
- ultravolumed manipulation bar"

AAPL Long 1D Investment Conservative TradeConservative Trade
+ long impulse
+ 1/2 correction
+ SOS level
+ support level
+ volumed 2Sp+
? technical volume
Calculated affordable stop market
1 to 2 R/R take profit within 1D range
Monthly Trend
"+ long impulse
+ neutral zone 2
+ long volume distribution"
Yearly Trend
+ long impulse
+ neutral zone 2
- beyond rotation point
+ long volume distribution

Long 1H Swing Conservative TradeConservative Trade
+ long balance
+ 1/2 correction
+ ICE level
+ supporting zone
+ biggest volume old spread Sp
Calculated affordable stop limit
1 to 2 R/R take profit
- outside 1H range
+ within 1D main and perforated ranges
Daily Trend
"+ long impulse
+ 1/2 correction
+ SOS level
+ supporting zone
? ultravolume 2Sp+
= perforated T2
+ 1/2 correction
+ volumed 2Sp+
? weak test"
Monthly CounterTrend
"- short balance
+ expanding ICE
+ support zone
+ biggest volume 2Sp+
+ weak test
+ 1/2 correction"
Yearly Trend
"+ long impulse
+ 1/2 correction
? strong approach
+ T2 level
+ supporting zone
+ volumed interaction bar"

Long 1H Swing TROW Conservative TradeConservative Trade
+ long balance
+ 1/2 correction
+ ICE level
+ supporting zone
+ biggest volume old spread Sp
? weak test
+ first bullish bar closed entry
Calculated affordable stop limit
1 to 2 R/R take profit
- outside 1H range
+ within 1D main range
Daily Trend
"+ long impulse
+ 1/2 correction
+ SOS level
+ supporting zone
? ultravolume 2Sp+
= perforated T2
+ 1/2 correction
+ volumed 2Sp+
? weak test"
Monthly CounterTrend
"- short balance
+ expanding ICE
+ support zone
+ biggest volume 2Sp+
+ weak test
+ 1/2 correction"
Yearly Trend
"+ long impulse
+ 1/2 correction
? strong approach
+ T2 level
+ supporting zone
+ volumed interaction bar"

Long 1D Investment TROW Conservative TradeConservative Trade
+ long impulse
+ 1/2 correction
+ SOS level
+ supporting zone
? ultravolume 2Sp+
= perforated T2
+ 1/2 correction
+ volumed 2Sp+
+ weak test
+ first bullish bar close entry
Calculated affordable stop limit
1 to 2 R/R take profit
- outside 1D range
+ inside 1M range
Monthly CounterTrend
"- short balance
+ expanding ICE
+ support zone
+ biggest volume 2Sp+
+ weak test
+ 1/2 correction"
Yearly Trend
"+ long impulse
+ 1/2 correction
? strong approach
+ T2 level
+ supporting zone
+ volumed interaction bar"

AAPL 1H Long Swing Conservative TradeConservative Trade
+ long balance
+weak approach
+ 1/2 correction
+ SOS test / ICE level
+ support zone
+ biggest volume 2Sp=
Calculated affordable stop market
1 to 2 R/R take profit
1D Trend
"+ long impulse
+ 1/2 correction
+ SOS level
+ support level
+ volumed 2Sp+
? technical volume
+ weak test"
1M Trend
"+ long impulse
+ neutral zone 2
+ long volume distribution
+ before rotation point"
1Y Trend
"+ long impulse
+ neutral zone 2
- beyond rotation point
+ long volume distribution"

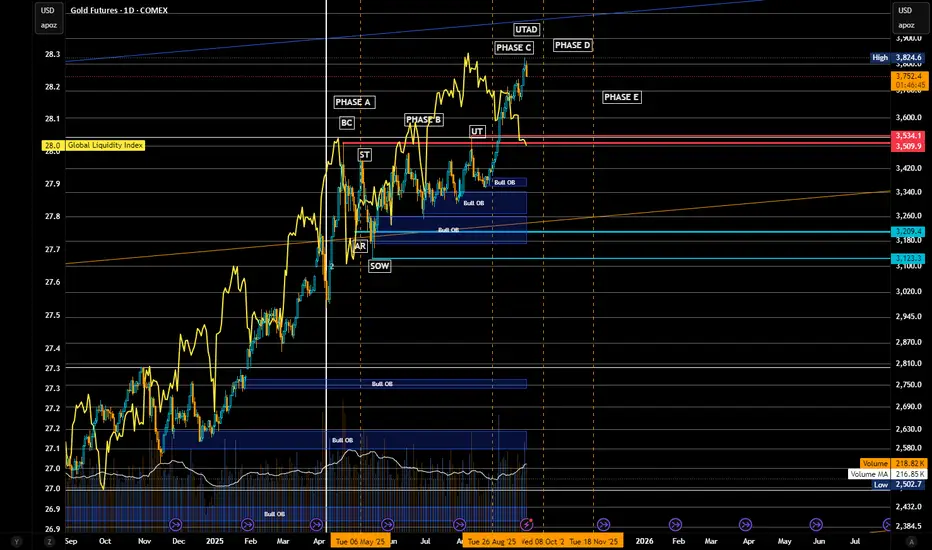
Gold Futures (GC) – “Top Is In” Schematic ReviewExecutive Snapshot 🧭
Primary stance: Bearish swing/top-in thesis (Wyckoff Distribution complete via UTAD).
Bias strength: High, while price remains below 3,825–3,860 and fails to accept above.
Game plan: Fade strength into supply; look for Phase D → E breakdown confirmation → target 3,534/3,509 → 3,209 → 3,123 then extended 2,970–2,795 if momentum accelerates.
Multi-Framework Confluence:
A) Wyckoff (your schematic) ♟️
Phases:
A/B: BC/ST established range highs; AR/SOW tagged mid/low of range.
C: UT → UTAD (new high on diminishing relative spread & mixed volume).
D (now): Throwback rallies holding beneath UTAD; look for LPSY near 3,760–3,825; failure → Phase E markdown.
Validation: Lower highs after the UTAD and repeated rejections of the supply shelf 3,760–3,825.
Confirmation trigger: Break and accept below ICE/Creek = 3,534–3,509 (your pink band) → distribution confirmed.
Macro Frame 🌐
Gold’s cyclical up-leg is extended; near-term macro supports a pause/reversion:
Real yields/beta & USD shocks can catalyze a value-seeking dip.
COMEX time-and-price run suggests heat above without equivalent build in value → mean-revert first, trend later.
Invalidation & Risk:
Hard invalidation (swing): Weekly close > 3,860 and acceptance above for 2–3 sessions (no swift rejection).
Soft invalidation (tactical): Daily close back inside 3,760–3,825 after a breakdown → step aside, wait for next LPSY.
Position/Risk Template:
Initial risk: above 3,825 (or 3,860 for wider swing).
Size: start ½–⅔ unit at first tag/reject; complete size on breakdown retest of 3,534–3,509.
Trailing: swing stop > last LPSY high once 3,534 is lost.
Momentum & Internals (Quick Read) ⚙️
RSI/ultimate RSI (your panels): persistent bearish divergence into UTAD zone.
MACD: high, curling; ripe for signal cross on daily if price slips under 3,600s → 3,534.
Squeeze/Momentum: elevated; release down would align with the distribution thesis.
Execution Checklist ✅
Pre-break:
Fade 3,760–3,825 on rejection candles/footprint absorption.
Track delta & volume—no expansion = stronger distribution read.
Break event:
Daily close < 3,534 → reduce discretion, execute plan; seek retest → LPSY to add.
Manage:
Cover +30–50 handles into 3,209–3,180; roll runner.
Data to watch: USD DXY spikes, GLD OI/put skew, dealer GEX flips around GLD 300.
One-Page Risk Map 🗺️
Bearish while: < 3,825–3,860.
Confirmation: < 3,534–3,509 (close/accept).
Targets: 3,209 → 3,123 → 2,970 → 2,795 → 2,541.
Stop/Invalid: > 3,860 w/ acceptance.
Marked UTAD and supply stack 3,760–3,825 present a clean risk-defined top. Until the market accepts above 3,860, the probabilistic path favors Phase E markdown back toward 3,2xx value and possibly the 2,9xx–2,795 extension if momentum breaks loose.
PROFIT ON EURJPY Eurjpy smashed take profit correctly , and now we shall wait for more opportunities

MRK 1H Conservative Short SwingTradeConservative Trade
+ short impulse
+ 1/2 correction
+ BUI test level (exhaustion volume?)
+ weak approach
+ biggest volume Ut?
+ weak test
+ first bearish bar close entry
Calculated affordable virtual stop
(bought puts)
1 to 2 R/R take profit
1D Trend
"+ short impulse
+ short volume distribution
+ neutral zone 2"
1M Trend
"+ short impulse
+ 1/2 correction
+ resisting bar level
+ resistance level
- strong approach from far
+ volumed manipulation bar"
1Y CounterTrend
"+ long impulse
+ 1/2 correction"

EURGBP FRGNT FULL TRADE BREAKDOWN - TAKE PROFIT + 2% 📅 Q4 | W50 | D8 | Y25 |
📊 EURGBP FRGNT FULL TRADE BREAKDOWN - TAKE PROFIT + 2%
🔍 Analysis Approach:
I’m applying Smart Money Concepts, focusing on:
Identifying Points of Interest on the Higher Time Frames (HTFs) 🕰️
Using those POIs to define a clear trading range 📐
Refining those zones on Lower Time Frames (LTFs) 🔎
Waiting for a Break of Structure (BoS) for confirmation ✅
This method allows me to stay precise, disciplined, and aligned with the market narrative, rather than chasing price.
💡 My Motto:
"Capital management, discipline, and consistency in your trading edge."
A positive risk-to-reward ratio, paired with a high win rate, is the backbone of any solid trading plan 📈🔐
⚠️ Losses?
They’re part of the mathematical game of trading 🎲
They don’t define you — they’re necessary, they happen, and we move forward 📊➡️
🙏 I appreciate you taking the time to review my Daily Forecast.
Stay sharp, stay consistent, and protect your capital
— FRNGT 🚀


MGNT Short 5M Conservative CounterTrend DaytradeConservative CounterTrend trade
+ short impulse
+ resisting bar test level
+ 1/2 correction
+ weak approach
+ biggest volume 2Ut-
- manipulation signal configuration needs a test
Calculated affordable virtual stop
1 to 2 R/R take profit
1H Countertrend
"- long impulse
+ volumed TE / T1
+ weak approach
+ biggest volume 2Ut-"
1D Trend
"+ short impulse
+ BUI level
+ 1/2 correction
+ resistance level
- volumed retest"
1M
Trend
"+ short impulse
= neutral zone type 2
+ continuation of the trend"
1Y CounterTrend
"- long impulse
- T2 level
- support zone
- 1/2 correction
- biggest volume Sp?
+ model doesn't work"

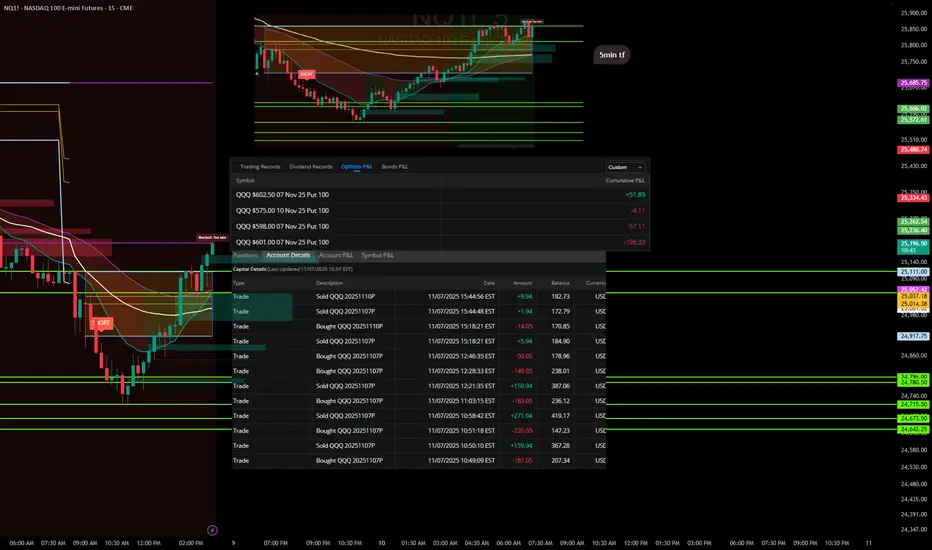
Trades with B – Daily Recap (Nov 7, 2025) "Lesson Learned"Ticker: QQQ / NQ1!
Strategy: ORB Pro + Fib Confluence + EMA Trend Filters
Result: Small red day – self-inflicted
🧭 Market Context
Today’s price action gave a clear short opportunity during the mid-morning fade, but momentum stalled mid-session. The first entries lined up beautifully with the ORB breakdown and EMA confluence, offering solid profits early on.
Where it fell apart was after the first wins — I overstayed, chasing secondary flushes that never came. The market started to base, and I kept expecting continuation instead of taking what the chart gave me.
📉 Trade Summary
Multiple put entries between $601–$602 levels
Early trades locked quick gains (+$271.94, +$159.94)
Gave back a chunk re-entering late into chop
Final P/L across contracts: -$205.66 total
Cumulative Options P/L breakdown:
QQQ $602.50 07 Nov 25 Put – +$51.89
QQQ $575 10 Nov 25 Put – -$4.11
QQQ $598 07 Nov 25 Put – -$57.11
QQQ $601 07 Nov 25 Put – -$196.33
💡 Lessons & Takeaways
The first clean move is often the best move. Don’t overcomplicate a confirmed win.
Late-day trades = low probability. Volume dries up, conviction fades.
Protect the capital, not the ego. There’s no “making up” missed points — only protecting what’s already earned.
🧘♂️ Reflection
“The setup worked, but I didn’t. I tried to extract more from a move that was already complete. Next time, once my target hits, I’m walking away.”
DTM Investment 1D Conservative CounterTrend TradeConservative CounterTrend Trade
+ short impulse
- unvolumed T2 level
+ resistance level
+ 1/2 correction
+ weak approach?
+ biggest volume 2Ut-
- interaction bar bigger volume
Calculated affordable virtual stop loss
1 to 2 R/R take profit
Bough put
Monthly CounterTrend
"- long impulse
- unvolumed T1
+ resistance level
+ biggest volume 2Ut-
+ more volume on reaction bar"
Yearly CounterTrend
"- long impulse
- neutral zone 2
- continuation if the trend
+ exhaustion volume?"

IREN 5M Short Conservative Trend DayTradeConservative Trend Trade
+ short impulse
+ unvolumed T2
+ resistance zone
- before 1/2 correction
+ strong approach
+ volumed 2Ut+
+ weak test
+ first bullish bar close entry
Calculated affordable virtual stop loss
1 to 2 R/R take profit within 5M range
Bought put
1D Trend
"- short balance
+ volumed T2
+ resistance zone
+ 1/2 correction
- strong approach
+ biggest volume 2Ut-"
1M CounterTrend
"- long impulse
+ volumed T1
+ resistance zone
+ weak approach
+ biggest volume Ut
+ test"
1Y CounterTrend
"- long impulse
= neutral zone
+ exhaustion volume?"

DIA 1H Swing Short Conservative CounterTrend TradeConservative CounterTrend Trade
+ short impulse
- resisting bar level below BUI
+ resistance zone
+ 1/2 correction
+ volumed 2Ut-
Bought a put
1 to 2 R/R take profit
1D CounterTrend
"- short balance
+ biggest volume expanding CREEK
+ volumed 2Ut+
+ weak test"
1M CounterTrend
"- long impulse
- neutral zone
+ exhaustion volume?"
1Y CounterTrend
"- long impulse
+ beyond rotation point
- neutral zone"
