OPEN-SOURCE SCRIPT
Updated Multi-Timeframe Trend Table
📊 Multi-Timeframe Trend Table
Overview
This powerful trend-tracking tool gives you a real-time snapshot of market trends across multiple timeframes — all in one compact and color-coded table. Designed for traders who want fast, clean, and multi-timeframe awareness at a glance.
⸻
✅ Features
• 7 Key Timeframes Monitored:
2min · 5min · 15min · 1h · 4h · 1d · 1w
• Trend Detection Based on EMAs
Uses a fast (default 20) and slow (default 200) EMA to determine if a timeframe is trending:
• 🟢 Uptrend: Fast EMA is above slow EMA
• 🔴 Downtrend: Slow EMA is above fast EMA
• 🟠 Sideways: EMAs are close (configurable threshold)
• Raw EMA Distance
See the actual difference between fast and slow EMAs for each timeframe — great for gauging trend strength.
• EMA Slope Analysis
A unique “Slope” column tells you the current behavior of EMAs:
• 📈 Pointing Up
• 📉 Pointing Down
• 🔄 Crossing Up/Down
• ➡️ Lateral
• Instant Alerts
Alerts fire the moment a trend flips on any timeframe, keeping you ahead of market shifts.
• Optional Chart EMAs
Toggle on/off the fast and slow EMAs on your active chart for extra clarity.
⸻
🧠 Use Case Examples
• Confirm trades with alignment across multiple timeframes
• Spot early trend reversals with crossing behavior
• Add a higher-timeframe filter to your scalping system
• Monitor key EMAs without changing your chart timeframe
⸻
⚙️ Configuration
• EMA lengths and sideways threshold are fully adjustable
• Enable/disable chart overlays for EMAs
• Table dynamically updates in real time
⸻
💡 Pro Tip: Use this indicator alongside your entry strategy to only trade in the direction of the dominant trends.
⸻
Release Notes
📊 Multi-Timeframe Trend Table (MTFTT)Overview:
This indicator gives you a complete multi-timeframe trend overview using Fast and Slow EMAs, Stochastic Oscillator, and EMA slope analysis. It helps identify trend direction, strength, and alignment conditions across multiple timeframes in a clean and compact table format.
⸻
🧠 How it Works:
• Trend is determined by whether Fast EMA is above/below Slow EMA and both are sloping in the same direction.
• Diff reflects how far apart the EMAs are:
• Crossed: very close (less than 0.1%)
• Close: small gap (0.1% to 1%)
• Far: strong separation (over 1%)
• Stochastic confirms momentum—helps filter out bad entries.
• Alignment checks if price, trend, and momentum are all moving in the same direction.
• Bias gives a quick snapshot of where the price sits in relation to both EMAs.
⸻
🛠️ Settings:
• EMA Lengths (Fast & Slow)
• Stochastic settings
• Sideways threshold for detecting flat trends
• Toggle EMA visibility
• Fullscreen table mode
⸻
🧪 Use Cases:
• Confirm multi-timeframe trend alignment before entries
• Identify trend strength (using EMA slope and distance)
• Detect reversals or sideways markets early
• Pair with other entry signals or breakout strategies
Release Notes
📊 Multi-Timeframe Trend Table — Pro EditionOverview:
A powerful multi-timeframe trend dashboard that combines EMA alignment, stochastic signals, MA proximity, and momentum strength into a compact, customizable table. Ideal for traders looking to identify high-confluence entry zones across intraday and higher timeframes.
⸻
🧩 Table Columns:
• TF – Timeframe
• Trend – EMA-based trend (↑ Bullish, ↓ Bearish, → Sideways)
• MA Distance – Price distance from Fast EMA (in ATR) with t-shirt size label (XS to XL)
• Stoch – Stochastic oscillator value (%)
• MA Slope – Slope direction of the Fast EMA
• Align – ✔ if trend, price, stoch (and optionally MA Distance) all align
• Price Bias – Whether price is above or below both EMAs (Bullish/Bearish/Neutral)
• Strength – Trend momentum based on slope steepness (↟ Strong, ↑ Up, → Sideways, etc.)
⸻
⚙️ Customizable Parameters:
• Fast/Slow EMA lengths
• Stochastic thresholds
• MA Distance thresholds for XS/S/M/L/XL
• Toggle to require MA Distance proximity for Align
• Full-screen table mode
• Momentum strength visualization
⸻
🧠 Use Cases:
• Identify timeframes where price is near EMAs and trend is aligned
• Avoid chasing extended trends by filtering out distant MA entries
• Spot momentum shifts across multiple timeframes
• Build confident entries where ✔ Align + Strong trend agree
Release Notes
🧠 Multi-Timeframe Trend TableThis script gives you a full dashboard of market conditions across key timeframes — from 2 minutes to 1 week — using visual cues and calculated insights. It’s designed for traders who want confirmation from multiple timeframes before making a move.
⸻
📊 📋 Table Columns Explained:
1. TF (Timeframe)
Displays the timeframe being analyzed (e.g., 2m, 5m, 1H, etc.).
⸻
2. Trend
🔼 Uptrend if Fast EMA > Slow EMA
🔽 Downtrend if Fast EMA < Slow EMA
➡️ Sideways if Fast and Slow EMAs are close together (within your set % threshold)
⸻
3. MA Distance (T-Shirt Size)
Measures how far the price is from the Fast EMA, using the ATR (Average True Range) as a volatility gauge:
• ⚪ XS = Very close to EMA
• 🟢 S = Slightly off
• 🟡 M = Moderate distance
• 🟠 L = Far
• 🔴 XL = Very far
Only shown if price is trending and in the same direction (above EMA for uptrend, below for downtrend).
⸻
4. Stoch
Stochastic oscillator value (0–100) to show momentum.
• 🔴 Red if overbought
• 🟢 Green if oversold
• ⚪ White if neutral
⸻
5. MA Slope
Direction the Fast EMA is moving:
• ↑ = Slope rising
• ↓ = Slope falling
• → = Flat slope
⸻
6. Align
✅ Shows a ✔ if everything is aligned for a clean entry:
• Trend direction is clear
• Price is above/below both EMAs in the trend direction
• Stoch is favorable (not overbought for longs / not oversold for shorts)
• MA Distance is close (XS/S/M), if enabled in settings
⸻
7. Price Bias
Estimates price positioning:
• Bullish = Price is above both EMAs
• Bearish = Price is below both EMAs
• Neutral = Mixed
⸻
8. Strength
Based on Fast EMA’s slope strength:
• ↟ Strong = Strong up slope
• ↑ Up = Gentle up slope
• ↡ Strong = Strong down slope
• ↓ Down = Gentle down slope
• → Sideways = No clear slope
⸻
🛠️ Customizable Settings (with Default Values and Suggestions)
• Fast EMA Length
Default: 20
Defines the short-term trend line. A lower value makes the EMA more sensitive.
• ✅ Day Trading Suggestion: 8 to 21
• ✅ Swing Trading Suggestion: 20 to 50
• Slow EMA Length
Default: 200
Defines the long-term trend line. Used to determine trend direction by comparing it to the fast EMA.
• ✅ Day Trading Suggestion: 50 to 100
• ✅ Swing Trading Suggestion: 100 to 200
• Sideways EMA % Difference
Default: 0.1
If the fast and slow EMAs are within this percentage difference, the trend is considered sideways.
• ✅ Day Trading Suggestion: 0.1 to 0.2
• ✅ Swing Trading Suggestion: 0.05 to 0.15
• Show EMAs on Chart
Default: false
When enabled, it visually plots the fast and slow EMAs directly on the price chart.
• ✅ Day Trading: true (to see fast reactions)
• ✅ Swing Trading: optional
• Full Screen Table Mode
Default: false
When true, centers the trend table on screen in a larger format.
• ✅ Day Trading: false (compact view is cleaner)
• ✅ Swing Trading: true (dashboard layout)
• Only Align if MA Distance is XS/S/M
Default: true
Filters out signals where price is too far from the EMA. Helps avoid overextended entries.
• ✅ Day Trading: true
• ✅ Swing Trading: true
• Stochastic Length
Default: 8
Defines how many candles to calculate the stochastic. Lower values make it more sensitive.
• ✅ Day Trading: 5 to 14
• ✅ Swing Trading: 8 to 14
• Stoch Overbought
Default: 70.0
Marks the overbought zone for the stochastic oscillator.
• ✅ Day Trading: 70 to 80
• ✅ Swing Trading: 70
• Stoch Oversold
Default: 30.0
Marks the oversold zone for the stochastic oscillator.
• ✅ Day Trading: 20 to 30
• ✅ Swing Trading: 30
• MA Distance Thresholds (ATR Multiples)
These values define how far price is from the fast EMA, scaled by the ATR. They’re used to label distance with XS/S/M/L/XL:
• XS Threshold
Default: 0.25
✅ Day Trading: 0.2 to 0.4
✅ Swing Trading: 0.1 to 0.3
• S Threshold
Default: 0.75
✅ Day Trading: 0.5 to 1.0
✅ Swing Trading: 0.4 to 0.8
• M Threshold
Default: 1.5
✅ Day Trading: 1.0 to 2.0
✅ Swing Trading: 1.0 to 1.5
• L Threshold
Default: 2.5
✅ Day Trading: 2.0 to 3.0
✅ Swing Trading: 2.0 to 2.5
⸻
✅ Ideal For:
Trend-following, scalping, swing trading — especially when you want multi-timeframe confirmation before entering a trade.
Release Notes
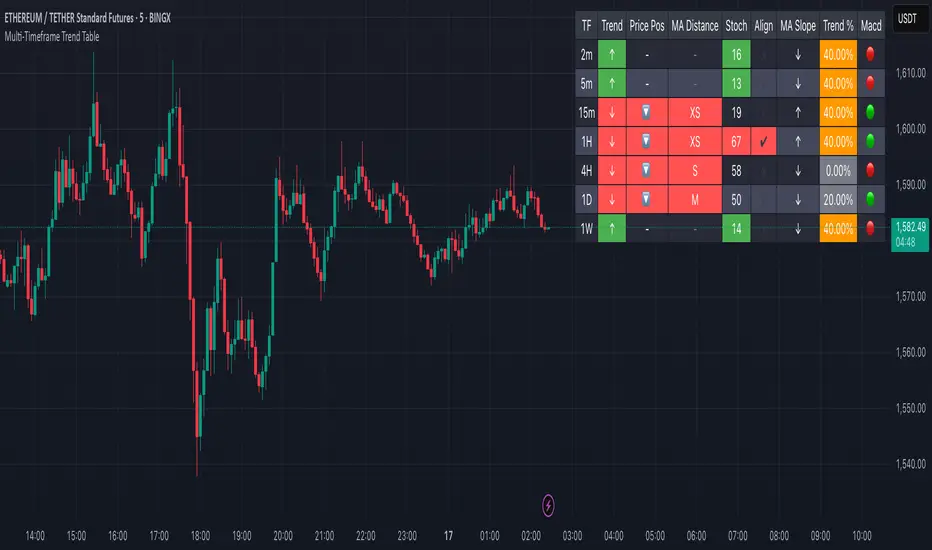
📊 Multi-Timeframe Trend TableA compact yet powerful tool for analyzing trend conditions across multiple timeframes. This table helps traders quickly assess alignment across EMAs, price structure, momentum, and volatility.
🧠 Columns Explained:
1. TF – Timeframe label for each row (e.g., 2m, 15m, 1D).
2. Trend – Determined by EMA crossover:
• ↑ if Fast EMA (20) > Slow EMA (200) → bullish (green)
• ↓ if Fast EMA < Slow EMA → bearish (red)
• → if nearly equal → sideways (orange)
3. Price Pos – Where price sits relative to both EMAs:
• 🔼 above both
• 🔽 below both
• – between
Background color reflects agreement with the trend.
4. MA Distance – Distance from price to the Fast EMA using ATR multiples:
• XS, S, M, L, XL
Green/red background if aligned with trend and distance is close enough. Text turns white when highlighted.
5. Stoch – Rounded Stochastic %K value:
• Green background if oversold during a bullish trend
• Red background if overbought during a bearish trend
6. Align – ✅ when all alignment conditions are met:
• Trend direction matches price position
• Stochastic not overextended
• MA distance is XS/S/M
Shows ❌ with a custom tooltip when not aligned, explaining which conditions are missing.
7. MA Slope – Direction of the Fast EMA over the last 5 bars:
• ↑ Rising
• ↓ Falling
• → Flat
8. Trend % – Composite trend strength score (0–100%), based on:
• EMA crossover
• Slope direction
• MACD signal
• Price position
• Higher timeframe trend
9. Macd – MACD condition:
• 🟢 MACD line above Signal
• 🔴 MACD line below Signal
Open-source script
In true TradingView spirit, the creator of this script has made it open-source, so that traders can review and verify its functionality. Kudos to the author! While you can use it for free, remember that republishing the code is subject to our House Rules.
Disclaimer
The information and publications are not meant to be, and do not constitute, financial, investment, trading, or other types of advice or recommendations supplied or endorsed by TradingView. Read more in the Terms of Use.