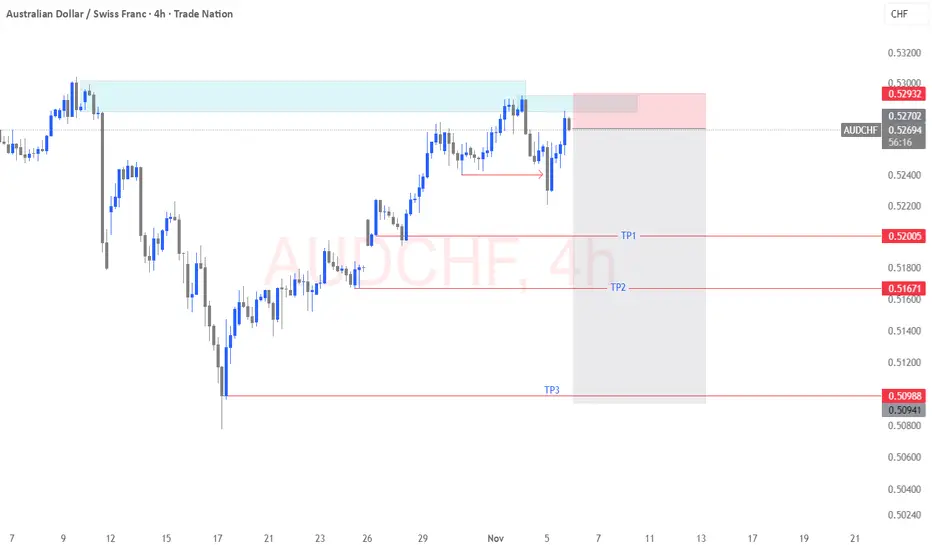
Price has rotated back into the higher-timeframe supply zone highlighted in the previous idea. Instead of executing a blind touch trade, this short was taken as a confirmation entry, waiting for price to show signs of rejection before committing risk.
After tapping the supply block, price failed to push higher and printed a clear loss of bullish momentum. The small shift in orderflow (shown by the arrow) acted as the trigger, signalling that the zone was being respected and that sellers were stepping back in. This provided the validation needed to engage the setup with tighter precision.
The stop is placed above the supply zone, keeping the risk container clean and consistent with the structural thesis.
Targets are layered at logical liquidity points:
TP1 – 0.52005: first reaction zone and a safe management level.
TP2 – 0.51671: mid-range inefficiency fill.
TP3 – 0.50988: full continuation target aligned with the previous swing low.
This update is simply a continuation of the earlier idea. same narrative, but refined execution.
Waiting for confirmation allowed the entry to be data-driven rather than reactive, improving probability and keeping the trade aligned with the broader bearish structure.
More updates coming as price develops.
Related publications
Disclaimer
The information and publications are not meant to be, and do not constitute, financial, investment, trading, or other types of advice or recommendations supplied or endorsed by TradingView. Read more in the Terms of Use.
Related publications
Disclaimer
The information and publications are not meant to be, and do not constitute, financial, investment, trading, or other types of advice or recommendations supplied or endorsed by TradingView. Read more in the Terms of Use.