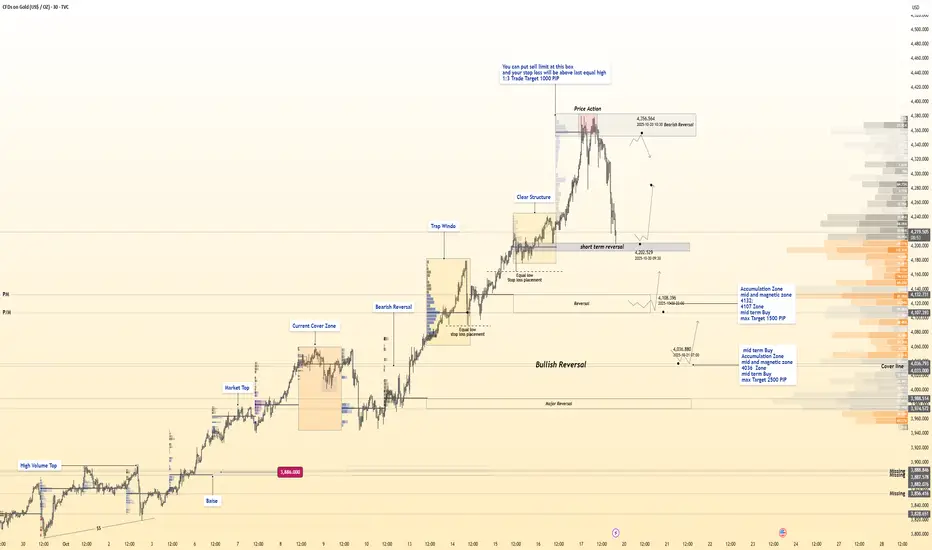
📊 Hanzo Protocol Note
Every marked level reflects precision between liquidity, delta reaction, and volume logic —
Only structure and flow decide — not bias.
Mid-Term SELL Zone — 4360
Setup: Limit Sell Recommended
Stop Loss: Above recent equal highs
Target: +1000 Pips (1:3 RR)
Reasons:
Short-Term BUY Zone — 4202
Setup: Reactive Buy Opportunity
Target: 500–1000 Pips
Mid-Term BUY Zone — 4132 – 4107
Setup: Accumulation & Magnetic Demand Area
Target: Up to 1500 Pips
Reasons:
Multi-session HVN alignment
Strong accumulation footprint on delta flow
Reactive rejection at discounted price zone
Liquidity engineered below equilibrium
Large volume imbalance correction
Compression channel breakout origin
Major liquidity gap filled
High-probability reversal range from fixed profile
Delta divergence showing quiet buyer absorption
Institutional order flow detected at low volume shelf
Long-Term BUY Zone — 4036
Setup: Deep Accumulation Zone
Target: Up to 2500 Pips
Every marked level reflects precision between liquidity, delta reaction, and volume logic —
Only structure and flow decide — not bias.
Mid-Term SELL Zone — 4360
Setup: Limit Sell Recommended
Stop Loss: Above recent equal highs
Target: +1000 Pips (1:3 RR)
Reasons:
- Liquidity pool above previous equal highs
- Institutional distribution volume at upper range
- HVN (High Volume Node) cluster acting as resistance wall
- Delta shift showing heavy sell absorption
- Imbalance re-test aligned with order block
- 4H premium pricing zone within range top
- Price deviation above value area high
- Stop hunt confirmation wick
- Momentum divergence vs delta
- Hidden distribution footprint visible on volume profile
Short-Term BUY Zone — 4202
Setup: Reactive Buy Opportunity
Target: 500–1000 Pips
- Reasons:
- Ultra-volume spike with no price continuation
- Delta flip confirming buyer absorption
- Trap formation below session low
- Volume exhaustion beneath POC
- Smart Money re-entry point after sell-side clear
- Strong 30M reversal wick with liquidity gap
- Reaction from prior fixed HVN
- Internal structure shift with micro CHoCH
- Buyer cluster confirmed under equilibrium
- Perfect liquidity grab setup before new leg
Mid-Term BUY Zone — 4132 – 4107
Setup: Accumulation & Magnetic Demand Area
Target: Up to 1500 Pips
Reasons:
Multi-session HVN alignment
Strong accumulation footprint on delta flow
Reactive rejection at discounted price zone
Liquidity engineered below equilibrium
Large volume imbalance correction
Compression channel breakout origin
Major liquidity gap filled
High-probability reversal range from fixed profile
Delta divergence showing quiet buyer absorption
Institutional order flow detected at low volume shelf
Long-Term BUY Zone — 4036
Setup: Deep Accumulation Zone
Target: Up to 2500 Pips
- Reasons:
- Major 4H structural base confirmed
- Deep liquidity flush below quarterly low
- Volume absorption + delta compression zone
- Institutional reloading pattern visible
- Smart Money demand block within discount 0.79 level
- Magnet zone aligning with historical POC
- Strong rejection from fixed range low
- Major delta shift to positive
- Buyer footprint expansion in lower volume node
- Final liquidity grab before long-term accumulation move
Hanzo , The Shadow Behind Every Move
Telegram : t.me/Hanzo_Trading
website : Path-Of-Hanzo.com
Hanzo Course : path-of-hanzo.com/scalping-course
Hanzo VIP : path-of-hanzo.com/vip-packages
Telegram : t.me/Hanzo_Trading
website : Path-Of-Hanzo.com
Hanzo Course : path-of-hanzo.com/scalping-course
Hanzo VIP : path-of-hanzo.com/vip-packages
Disclaimer
The information and publications are not meant to be, and do not constitute, financial, investment, trading, or other types of advice or recommendations supplied or endorsed by TradingView. Read more in the Terms of Use.