NIFTY 📊 15-min Breakout/Breakdown Plan (Intraday)
🕒 Timeframe: 15-minute candles
🧭 Method: Trade only after a 15-min candle closes beyond the level, then use the trigger candle’s high/low for precise entries & stops.
📈 Long (Breakout)
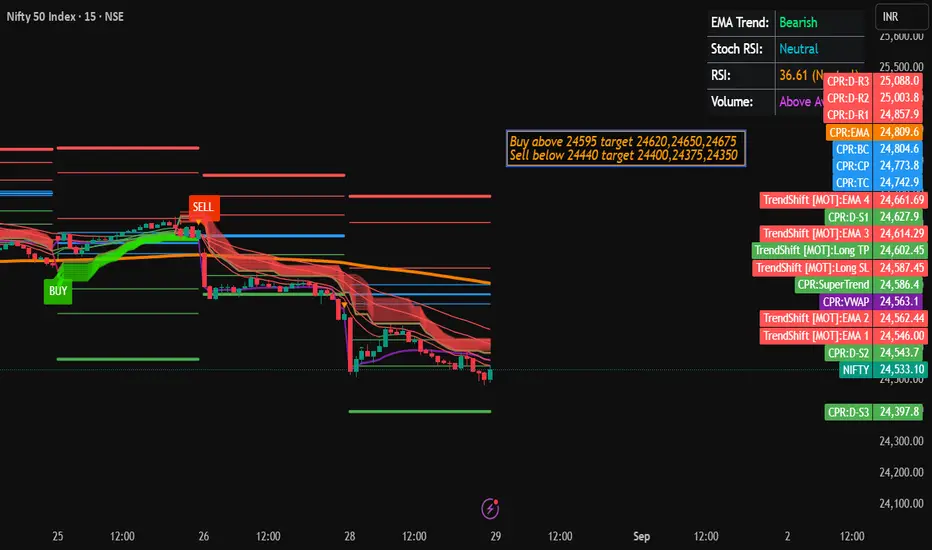
Condition: A 15-min candle closes above 24,595.
Entry: Buy above the high of that closing candle (next tick/price).
Stops (pick one):
⛔ Conservative: SL = low of the trigger candle
⛔ Aggressive: SL = 24,565–24,575 buffer (≈20–30 pts), only if the trigger candle is small.
Targets (scale out):
🎯 T1: 24,620
🎯 T2: 24,650
🎯 T3: 24,675
Trade management:
After price hits T1, move SL to cost.
Trail SL by last 5-min swing low or ATR(5, 5-min) if you use indicators.
If a 15-min candle closes back below 24,595, consider exiting remainder (failed breakout).
📉 Short (Breakdown)
Condition: A 15-min candle closes below 24,440.
Entry: Sell below the low of that closing candle.
Stops (pick one):
⛔ Conservative: SL = high of the trigger candle
⛔ Aggressive: SL = 24,470–24,480 buffer (≈20–40 pts), only if the trigger candle is small.
Targets (scale out):
🎯 T1: 24,400
🎯 T2: 24,375
🎯 T3: 24,350
Trade management:
After price hits T1, move SL to cost.
Trail SL by last 5-min swing high or ATR(5, 5-min).
If a 15-min candle closes back above 24,440, consider exiting remainder (failed breakdown).
🧪 Position Sizing (example)
🎯 Aim R:R ≥ 1:1.5 to T1 and ≥ 1:2 to T2 whenever possible.
🛡️ Risk per trade: e.g., 0.5% of account.
📐 Qty = (Risk ₹) ÷ (Entry − SL).
Example (long): If entry 24,605, SL 24,575 → risk 30 pts. With ₹3,000 risk, qty ≈ 100 units (futures/lot sizing as per instrument).
🧭 Optional: Options Execution
On long trigger, prefer near-ATM CE (same-day/weekly).
On short trigger, prefer near-ATM PE.
Exit or roll when underlying hits T1/T2 or when time decay accelerates after lunch.
🚧 Avoid/Filter
🕘 First 15–30 minutes: consider avoiding initial whipsaws unless candle structure is clean.
📰 Major news events (RBI/US CPI/Fed/GDP): pause 10–15 min around release.
📏 Very large trigger candle (>60–80 pts body): consider skipping or reduce size (SL too wide).
✅ Quick Checklist
15-min close beyond level (24,595/24,440)
Structure: clean body, not a long-wick fakeout
Entry at trigger candle high/low only
Pre-defined SL & position size
Scale-out at T1 → SL to cost
Trail sensibly; stop trading after 2 losing trades or if R:R deteriorates
📌 Notes
No-trade zone until a valid 15-min close occurs beyond the levels.
If both setups trigger on the same day, trade only the first clean signal unless the opposite side invalidates and a fresh trigger appears later with structure.
⚠️ Disclaimer
🧾 Educational purpose only.
🧑⚖️ I am not SEBI-registered.
💼 This is not investment advice. Markets are risky; do your own research and consult a SEBI-registered advisor if needed.
🕒 Timeframe: 15-minute candles
🧭 Method: Trade only after a 15-min candle closes beyond the level, then use the trigger candle’s high/low for precise entries & stops.
📈 Long (Breakout)
Condition: A 15-min candle closes above 24,595.
Entry: Buy above the high of that closing candle (next tick/price).
Stops (pick one):
⛔ Conservative: SL = low of the trigger candle
⛔ Aggressive: SL = 24,565–24,575 buffer (≈20–30 pts), only if the trigger candle is small.
Targets (scale out):
🎯 T1: 24,620
🎯 T2: 24,650
🎯 T3: 24,675
Trade management:
After price hits T1, move SL to cost.
Trail SL by last 5-min swing low or ATR(5, 5-min) if you use indicators.
If a 15-min candle closes back below 24,595, consider exiting remainder (failed breakout).
📉 Short (Breakdown)
Condition: A 15-min candle closes below 24,440.
Entry: Sell below the low of that closing candle.
Stops (pick one):
⛔ Conservative: SL = high of the trigger candle
⛔ Aggressive: SL = 24,470–24,480 buffer (≈20–40 pts), only if the trigger candle is small.
Targets (scale out):
🎯 T1: 24,400
🎯 T2: 24,375
🎯 T3: 24,350
Trade management:
After price hits T1, move SL to cost.
Trail SL by last 5-min swing high or ATR(5, 5-min).
If a 15-min candle closes back above 24,440, consider exiting remainder (failed breakdown).
🧪 Position Sizing (example)
🎯 Aim R:R ≥ 1:1.5 to T1 and ≥ 1:2 to T2 whenever possible.
🛡️ Risk per trade: e.g., 0.5% of account.
📐 Qty = (Risk ₹) ÷ (Entry − SL).
Example (long): If entry 24,605, SL 24,575 → risk 30 pts. With ₹3,000 risk, qty ≈ 100 units (futures/lot sizing as per instrument).
🧭 Optional: Options Execution
On long trigger, prefer near-ATM CE (same-day/weekly).
On short trigger, prefer near-ATM PE.
Exit or roll when underlying hits T1/T2 or when time decay accelerates after lunch.
🚧 Avoid/Filter
🕘 First 15–30 minutes: consider avoiding initial whipsaws unless candle structure is clean.
📰 Major news events (RBI/US CPI/Fed/GDP): pause 10–15 min around release.
📏 Very large trigger candle (>60–80 pts body): consider skipping or reduce size (SL too wide).
✅ Quick Checklist
15-min close beyond level (24,595/24,440)
Structure: clean body, not a long-wick fakeout
Entry at trigger candle high/low only
Pre-defined SL & position size
Scale-out at T1 → SL to cost
Trail sensibly; stop trading after 2 losing trades or if R:R deteriorates
📌 Notes
No-trade zone until a valid 15-min close occurs beyond the levels.
If both setups trigger on the same day, trade only the first clean signal unless the opposite side invalidates and a fresh trigger appears later with structure.
⚠️ Disclaimer
🧾 Educational purpose only.
🧑⚖️ I am not SEBI-registered.
💼 This is not investment advice. Markets are risky; do your own research and consult a SEBI-registered advisor if needed.
Disclaimer
The information and publications are not meant to be, and do not constitute, financial, investment, trading, or other types of advice or recommendations supplied or endorsed by TradingView. Read more in the Terms of Use.
Disclaimer
The information and publications are not meant to be, and do not constitute, financial, investment, trading, or other types of advice or recommendations supplied or endorsed by TradingView. Read more in the Terms of Use.