Bearish drop off 50% Fibonacci resistance?AUD/JPY has rejected off the pivot and could drop to the 1st support.
Pivot: 96.14
1st Support: 95.04
1st Resistance: 96.67
Risk Warning:
Trading Forex and CFDs carries a high level of risk to your capital and you should only trade with money you can afford to lose. Trading Forex and CFDs may not be suitable for all investors, so please ensure that you fully understand the risks involved and seek independent advice if necessary.
Disclaimer:
The above opinions given constitute general market commentary, and do not constitute the opinion or advice of IC Markets or any form of personal or investment advice.
Any opinions, news, research, analyses, prices, other information, or links to third-party sites contained on this website are provided on an "as-is" basis, are intended only to be informative, is not an advice nor a recommendation, nor research, or a record of our trading prices, or an offer of, or solicitation for a transaction in any financial instrument and thus should not be treated as such. The information provided does not involve any specific investment objectives, financial situation and needs of any specific person who may receive it. Please be aware, that past performance is not a reliable indicator of future performance and/or results. Past Performance or Forward-looking scenarios based upon the reasonable beliefs of the third-party provider are not a guarantee of future performance. Actual results may differ materially from those anticipated in forward-looking or past performance statements. IC Markets makes no representation or warranty and assumes no liability as to the accuracy or completeness of the information provided, nor any loss arising from any investment based on a recommendation, forecast or any information supplied by any third-party.
JPYAUD trade ideas

AUDJPY Intraday BuyAUDJPY – Buy Limit
Entry: 95.50
Target: 96.25
Stop Loss: 95.15
Type: Intraday
Trade Idea:
Indecisive price action has resulted in sideways congestion on the intraday chart.
Pivot support is at 95.50.
Risk/reward would be poor to call a buy from current levels, but a move through 96.00 will confirm the bullish momentum.
The measured move target is 96.50.
Preferred trade is to buy on dips.
Resistance Levels: 96.00 / 96.25 / 96.50
Support Levels: 95.50 / 95.25 / 95.15
Next Volatile Events:
No events in the next 24 hours
Disclosure: I am part of Trade Nation's Influencer program and receive a monthly fee for using their TradingView charts in my analysis.

Sell idea on AudJpyPrice continues in the direction of order flow. Expecting a bullish move up to clear out buy side liquidity and then sell down towards the equal lows and potentially towards the weekly candle wick

AUDJPY – DAILY FORECAST Q3 | W34 | D19 | Y25📊 AUDJPY – DAILY FORECAST
Q3 | W34 | D19 | Y25
Daily Forecast 🔍📅
Here’s a short diagnosis of the current chart setup 🧠📈
Higher time frame order blocks have been identified — these are our patient points of interest 🎯🧭.
It’s crucial to wait for a confirmed break of structure 🧱✅ before forming a directional bias.
This keeps us disciplined and aligned with what price action is truly telling us.
📈 Risk Management Protocols
🔑 Core principles:
Max 1% risk per trade
Only execute at pre-identified levels
Use alerts, not emotion
Stick to your RR plan — minimum 1:2
🧠 You’re not paid for how many trades you take, you’re paid for how well you manage risk.
🧠 Weekly FRGNT Insight
"Trade what the market gives, not what your ego wants."
Stay mechanical. Stay focused. Let the probabilities work.
FX:AUDJPY


AUD/JPY Rebounds Ahead of Monthly LowAUD/JPY rebounds ahead of the monthly low (94.91) to snap the series of lower highs and lows from last week.
In turn, AUD/JPY may attempt to test the monthly high (97.07), with a breach of the July high (97.43) opening up bringing the 97.90 (23.6% Fibonacci extension) to 98.30 (38.2% Fibonacci retracement) zone on the radar.
Next area of interest comes around the January high (99.17), but failure to hold above the 95.10 (38.2% Fibonacci extension) to 95.20 (23.6% Fibonacci extension) region may push AUD/JPY toward the July low (93.97).
--- Written by David Song, Senior Strategist at FOREX.com

AUDJPY Bullish FlagAUDJPY long idea. A bullish flag pattern can be seen emerging on the 3hr chart. Allow price to fall lower to create weekly lows and long.

AUDJPY - One More Bearish Impulse Soon!Hello TradingView Family / Fellow Traders. This is Richard, also known as theSignalyst.
📈AUDJPY has been overall bearish trading within the falling broadening wedge pattern marked in red and it is currently retesting the upper bound of the channel acting as a non-horizontal resistance.
Moreover, the green zone is a strong supply.
📚 As per my trading style:
As #AUDJPY retests the red circle zone, I will be looking for bearish reversal setups (like a double top pattern, trendline break , and so on...)
📚 Always follow your trading plan regarding entry, risk management, and trade management.
Good luck!
All Strategies Are Good; If Managed Properly!
~Rich
Disclosure: I am part of Trade Nation's Influencer program and receive a monthly fee for using their TradingView charts in my analysis.

AUD/JPY Pre-SetupMarket has formed a Head & Shoulders pattern and is now pulling back to retest the neckline.
📌 What I’m Watching:
Structure: H&S complete with neckline pullback.
Price has reached the AOI (Area of Interest).
Waiting for Volume and Momentum to align before confirming entry.
⚡ No rush — patience pays.
Aligned execution means preparing for the trade, not chasing it.
“VMS Strategy | Volume • Momentum • Structure | Aligned Execution”

AUDJPY – DAILY FORECAST Q3 | W34 | D18 | Y25📊 AUDJPY – DAILY FORECAST
Q3 | W34 | D18 | Y25
Daily Forecast 🔍📅
Here’s a short diagnosis of the current chart setup 🧠📈
Higher time frame order blocks have been identified — these are our patient points of interest 🎯🧭.
It’s crucial to wait for a confirmed break of structure 🧱✅ before forming a directional bias.
This keeps us disciplined and aligned with what price action is truly telling us.
📈 Risk Management Protocols
🔑 Core principles:
Max 1% risk per trade
Only execute at pre-identified levels
Use alerts, not emotion
Stick to your RR plan — minimum 1:2
🧠 You’re not paid for how many trades you take, you’re paid for how well you manage risk.
🧠 Weekly FRGNT Insight
"Trade what the market gives, not what your ego wants."
Stay mechanical. Stay focused. Let the probabilities work.
FX:AUDJPY


AUDJPY-Bullish🔗 Macro Confluence (as of Aug 18, 2025):
AUD Fundamentals:
Aussie supported by risk-on tone and commodity stability (iron ore prices firm)
RBA likely to hold or slow hikes – neutral to mild bullish
JPY Fundamentals:
BoJ remains dovish with intervention fears fading
Japanese economy showing soft inflation and stagnant wage growth
Seasonals & COT:
AUD positioning rising gradually
Yen remains short-heavy → bullish cross-pair bias
After creating a double bottom, price broke the minor structure high (HL) near 95.80
Price now pulling back for a possible retest of previous structure + fib zone
Entry at 0.618 aligns with:
Fib support
Former resistance turned support
Bullish momentum on RSI

Catch the AUD/JPY Wave: Double Bottom Sets Stage for Gains
The AUD/JPY has formed a double bottom around 95.50 on weak yen. It reached an intraday high of 95.92 and is currently trading at around 95.92. The intraday trend remains bullish as long as the resistance level at 95.50 holds.
‘The AUD/JPY pair is trading above 55 and above 200 EMA and below 365 EMA (long-term) on the 15-min chart, confirming a mixed trend. Any violation below 95.50 indicates the intraday trend is weak. A dip to 94.90/93.95/93 is possible. Immediate resistance is at 96, a breach above this level targets of 96.32/96.85/97.20/97.64/98.
Market Indicators ( 15-min chart)
CCI (50)- Bullish
Directional movement index - Bullish
Trading Strategy: Buy
It Is good to buy above 96 with SL around 95.45 for a TP of 97.05.

AUDJPY BUYBuying as this is a simple 1:2 RR
Getting is as market spread has lower getting in real quick and doing a risky but small profitable trade before we start to consolidate until Monday have fun buy or sell at your own risk

AUD_JPY WILL GROW|LONG|
✅AUD_JPY is trading in an uptrend
Along the rising support line
Which makes me bullish biased
And the pair is already making
A bullish rebound from the support
So a further move up is expected
With the target of retesting the level above at 98.068
LONG🚀
✅Like and subscribe to never miss a new idea!✅

AUDJPY H2 | Market OutlookPotential for a bearish pullback on the AUDJPY H1 which could lead to a price movement towards the support level at 94.000. SELL levels from 96.200

AUD/JPY – Double Top Signals Potential Bearish MoveAUD/JPY (4H) is showing a strong double top pattern at the resistance zone (96.9 – 97.1), followed by a break of structure (BOS) and rejection from the supply area.
Price has also filled the fair value gap and is showing signs of weakness with a potential downside target near 94.80.
If the bearish momentum continues, we could see further decline toward support at 94.00 – 94.20.
Key confluences:
Double top formation
BOS confirmation
Supply zone rejection
MACD bearish momentum
📌 Trade Idea: Watch for a pullback to the 96.4 – 96.6 zone for possible short entries. Targets: 94.80, then 94.00.
💡 Always manage risk properly and follow your trading plan.

AUD-JPY Long From Rising Support! Buy!
Hello,Traders!
AUD-JPY is trading in an
Uptrend along the rising
Support and the pair made
A retest of the support and
We are already seeing a
Bullish reaction so we will
Be expecting a bullish rebound
On Monday!
Buy!
Comment and subscribe to help us grow!
Check out other forecasts below too!
Disclosure: I am part of Trade Nation's Influencer program and receive a monthly fee for using their TradingView charts in my analysis.

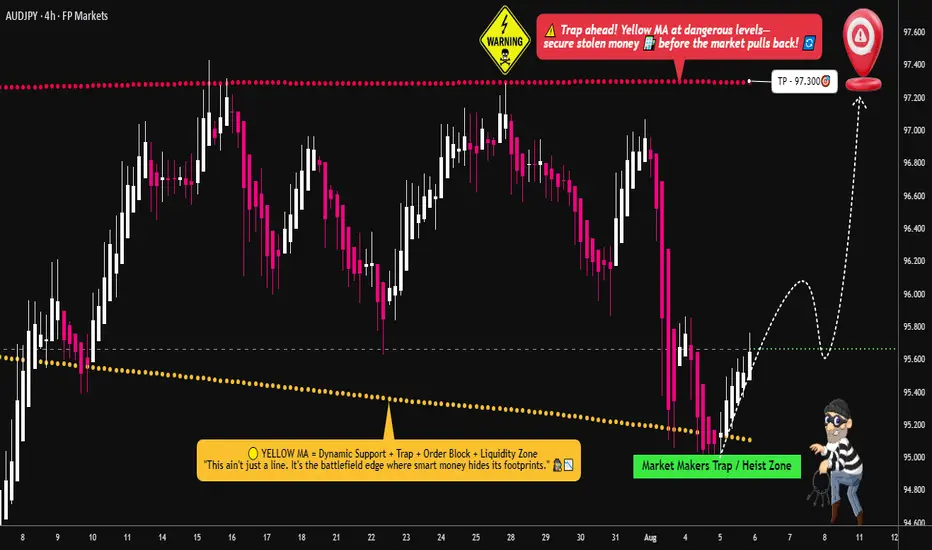
Cracking the Aussie-Yen Vault: Bullish Heist Setup in Progress🔓💸 AUD/JPY "Aussie vs Yen" Forex Bank Heist 💸🔓
🎯 Plan: Bullish Robbery | Targeting 97.300 | Stop Loss: 95.000
💰 Layered Entries | Precision Robbery | No Mercy
🚨🧠 Attention Robbers, Looters & Forex Mercenaries! 🧠🚨
The AUD/JPY vault is open, and Thief Trader is back with a multi-layer LIMIT ENTRY STRATEGY – stacking orders like cash in a briefcase. 💼💷💣
👀 We ain’t sniping one entry – we’re building an army of LIMITS. Every dip? A robbery opportunity.
💥 ENTRY: Any Price is a Good Price 💥
"Aussie Bull" on steroids – grab the loot on any pullback!
Set buy limits across key dips in liquidity pockets, swing zones, or even psychological levels.
Thief-style: Entries aren’t missed, they’re planned.
🛑 STOP LOSS: 95.000 🔐
Locked tight at the institutional panic zone – let them get triggered, we reload with confidence.
Built for multiple orders – size wisely, survive the fakeouts.
🎯 TARGET: 97.300 💸
Targeting the upper vault room, stacked with JPY weakness.
Ride the bullish getaway car all the way to the Tokyo vault rooftop.
🧠 Scalpers? Ride the trend. Swingers? Load your clip. Investors? Sit back and sip that profit. ☕💵
Use trailing SL to protect the bag as price moves in your favor.
🕵️♂️ THIEF TRADER SECRETS:
📊 Backed by technicals, macro juice, and liquidity-sniffing analysis.
🗞️ Don’t forget: News releases = volatility = sniper mode ON.
⚠️ MONEY HEIST PROTOCOL:
✅ Avoid entries during high-impact news 📉
✅ Use risk-adjusted sizing on your orders
✅ Be patient – layering needs discipline, not desperation
❤️🔥 Hit that 💥 BOOST BUTTON 💥 if you're with the Thief Squad!
Support the robbery. Respect the style. Make money like a true Market Outlaw.
🔔 Follow for the next HEIST PLAN. Big bags only. 💼💰🚀
“Markets don’t move randomly – they move for the ones who rob it correctly.” – Thief Trader
🤑📈🐂 #AUDJPY #ForexHeist #ThiefTrader #BankTheMarket #LayeredEntries #ForexTrading #RobTheMarket
AUDJPY--SHORT--Short term SELL possibility
--daily ,weekly bearish
--entry and TP are as shown on chart

AUDJPY--SHORT--Short term SELL possibility
--daily ,weekly bearish
--entry and TP are as shown on chart

AUDJPY – DAILY FORECAST Q3 | W33 | D15 | Y25📊 AUDJPY – DAILY FORECAST
Q3 | W33 | D15 | Y25
Daily Forecast 🔍📅
Here’s a short diagnosis of the current chart setup 🧠📈
Higher time frame order blocks have been identified — these are our patient points of interest 🎯🧭.
It’s crucial to wait for a confirmed break of structure 🧱✅ before forming a directional bias.
This keeps us disciplined and aligned with what price action is truly telling us.
📈 Risk Management Protocols
🔑 Core principles:
Max 1% risk per trade
Only execute at pre-identified levels
Use alerts, not emotion
Stick to your RR plan — minimum 1:2
🧠 You’re not paid for how many trades you take, you’re paid for how well you manage risk.
🧠 Weekly FRGNT Insight
"Trade what the market gives, not what your ego wants."
Stay mechanical. Stay focused. Let the probabilities work.
FX:AUDJPY
