Higher resolutionHigher resolutions aka lower timeframes have several uses:
HIgh res levels
1) For more precise entries past the positioned levels. You have a level on your current resolution, a level you want to use, let's call it "X". You turn in higher resolutions, and scale in around the levels there, past the X;
2) For precise entries during positioning. You have a level that you expect to be positioned 'that way', let's call it "Y". You turn in higher resolutions, and scale in around the levels there, past the Y. An example on the chart is exactly about that. Suppose we expected a 1M level (red line) to be positioned as support. We've opened 1W chart and scaled in at 1W levels below the level;
3) Overridden levels. Forgot to mention, just as overridden waves, overridden levels do exist. It really concerns an imaginary level called value aka fair price. Usually, when you have an overridden wave -> value level in the middle of this wave, the real levels around value exist only deep in higher resolutions, and are already cleared, long time ago. So, they kinda "reactivate" again inside an overridden wave, near the value;
4) For scaling out. When offloading risk, you don't want to do it at the levels that You, yourself, expect to be cleared xD. And that includes the levels from the high ress.
HIgh res waves
1) To fine tune the location of back levels. Positioning of a level on a given resolution is a so called pattern seen on higher resolutions. I can't say much about the predictive power of dem patterns, but can say for sure that fine tuning the back levels by finding boundaries of these patterns is a good idea;
2) Simply monitoring the action on higher resolutions gives information about what's happening around your levels of interest. Everything explained in "Current resolution" can be applied there.
You may come up with more uses. The main part is to understand what higher resolutions are: less data in greater detail. Now how would you leverage this info?
Support

Lower resolutionMore data on lower resolutions, smth that others call higher timeframes.
Low res waves
While being on a given resolution, the lower resolutions are mostly used to understand the trends within the overall fractal. In general, you want to trade along with the strong low res wave, and don't trade against an exhausted low res wave. While being on given resolution, you're interested in all the lower resolutions, not only in the first adjacent one. So if you operate on 1H charts, you also need to consider 6H, 1D, 1W etc, not only 6H.
For example, imagine being in a strong up trend on 1W chart. It won't go 4 ever. There's no exhaustion in 1M wave. But here we go, and exhaustion on 1Q chart. And "suddenly", the levels on 1W chart start to position as resistances! Before that, the overall trend on 1Q surely showed some weaknesses, but there was no evident evidence. This kind of info could've been only gained from more data.
Low res levels
Now that's really interesting. As I mentioned somewhere before, while being on any resolution, ALL the levels from ALL the lower resolutions should be monitored. That's why people say that it's harder to trade on lower timeframes (higher resolutions), simply because they don't know that simple fact I just mentioned. They see a reversal "in the air", but, as you already know, there's always a level. So, a level from 1Y chart does matter on 1 minute chart. Yes, it does. How?
The action around low res levels are somewhat common with the action around option strikes. In a sense, it's a microstructural phenomena as well. Without further analysis, what you know 4 sure is that low res levels might produce reactions, even if a level is from 1Y chart and you are on 1 sec chart. In general, they allow rapid price moves to come through, and produce reactions when prices approach these levels in normal way.
Why? As you know, it becomes cheap/expensive PAST the level, never before. Now imagine price comes to a level in a usual manner, or even slower. Chances for a deep dive past the levels are low. What you do? You scale in closer to the level. And now imagine price flying fast. It'll make sense to scale in deeper with a bigger size, to get better prices, to reduce risks. Why not if the market activity allows it?
It's a 1H chart on the screen there, and the yellow level is a support from 1W chart. Take a look how the 1H action unfolds around that level.

Microstructural phenomenons: option strikesThere's no such thing as round levels , instead:
1) You open the option chain of given vehicle;
2) You notice the step between the strikes that have significantly higher volume/OI than the other ones;
3) for example on ES dem would be xx50.00 and xx00.00;
Without further analytics of the option chain, the very general rule is that these levels usually stop & repel the sharp jumps in prices, and allow the average activity to pass through em with a little stuck around em.
Again the reason is microstructural, some of are hedging current & anticipated option positions on good prices. Usually market allows to do it right after economic releases.
About the example, if you have any platform that offers a liquidity heatmap, try to find that reversal on ES & correlated assets, that moment in time that I market with a circle, you might be surprised.

Microstructural phenomenons: re-positioning 4 real, levels can't be re-positioned, but there's a lil detail.
As explained in "Real levels: positioning and clearing", positioned levels can't switch direction, ie once a level was positioned as support it can't become a resistance, once a level was positioned as resistance it can't become a support. A positioned level can only be cleared with time, price or volume.
However, there are things that do exist and not based on the ways of the system behavior, but rather on some lil details how the sub-systems and the super-system work.
Aye aye, easy, a level can switch directing for a very specific and short period of time, but not due to the principles of how things work, rather by a microstructural reasons. The reason is all of us & common sense. When we scale in near a positioned level, but shortly after it becomes obvious with evidence that a level was consumed/cleared (ie there's no more level anymore), in most occasions there's no reason to take a loss right away, it makes sense to try scaling out at around break-even.
1879 was positioned as support in the end of march 2022, the same time 1788 was discovered as a back level of 1879.
Point 1: we enter @ ~ the level;
Point 2: the level gets definitely proved as a cleared one;
Point 3: we leave at break-even, concentrating the liquidity around 1879 (~ when we've entered);
Point 4: we see the result, a pop.
If we would've dropped much deeper than 1788 (technically said, if we would've contacted another deeper level), that phenomenon would've never occurred (there would've been no1 to scale out at breakeven).

Imaginary levels: partitionsImaginary levels are used when there’s no alternative, but a decision has to be made. We need something to "snap" to.
No, these are not the binary levels like 512, 8912 or 65536 that I'm sure a lot of funny people are hiding or present as super secret, lol no.
When there's truly nothing else and just the empty medium, we take partition function, give her all the integers, and get the levels around which the long-term order flow might change direction. Dem are already calculated, called Sequence A000041 , more info there .
That's the natural way how to find level in the emptiness.
After having the real trading activity at these levels we can forget dem partition levels, ain't no reason to use em anymore.
Since the start of 20th century, mainstream text book science seem to forget about the concept of aether (tldr the emptiness is an object itself, and it's not uniform, 'everything' exists in a medium including waves & light, totally obvious if you use your own head for thinking). As usually, the lovely market, as a sub-universe in our universe, is the same, teaching the real stuff & proving fakies wrong.

NQ - a textbook short setup: breakdown-failed-test-plungeThis is a textbook short setup, break under Monthly Support followed by a bounce back to the broken-support-turned-resistance.
As soon as bulls failed to reclaim the broken support that became a trigger that attracted new shorts.
The Rule of thumb is:
⚠️ when bears manage to break a support and then bulls attempted to reclaim it but fail, bears get reasons to believe that bulls got exhausted and as a result new bears open fresh short positions turning the price down and starting another leg down.
You can get that free Month Opening Range indicator here:

Drawing Volume Based Trendlines Support and ResistanceFor this to work you're going to need your bull bear power void oscillator.
I have mine set on its default settings but you can also set it up with the following.
Click the image below for that indicator for free
The Setup
the length is 50
the moving average is 20
the macd settings are 12 / 26 / 9
With this I have a 50 period EMA on my chart.
Drawing Support and Resistance Levels Based on Volume
When drawing support and resistance levels you should always do them on a 1 hour time frame or higher. You can do them on a 30 minute time frame but some of them will be less relevant.
Since most people and most institutions do them a 1 hour time frame and hire you might as well be doing the same.
Support and resistance levels are found in the non-tradable areas of the oscillator. in other words it's the area of the oscillator where it has a black background.
As an example if you have a pink volume bar coming down first followed by a red volume bar afterwards this would mean resistance. But both of these bars must clear the void
If you have a light green bar first outside with the tradable area followed by a dark green bar this means support and both bars must be outside the void.
As an example if you have more than one light colored bar in the tradable area followed by a darker colored bar volume then you draw your support or resistance level at the 1st alternating color bars.
Find out where your current price level is and then draw about 2 or 3 support and resistance levels above current price and two or three below current price. You don't really want more than that.
Drawing Trendlines Based on Volume
To draw trend lines you need to have a background that goes from one color to Black and then to the alternate color for example green to Black to red or red to Black to Green. if you get the same color twice then what you have is a continuation of your trend.
In a trend that goes from green to Black to Red you're looking for the highest volume in the non-tradable area and then drawing of line from there to the very first tradable volume in the red area.
Once you do this you can't move to a smaller time frame and use that trend line as a Target when moving to it or an exit point.

🟢PRICE ACTION SECRETS
🔴Multi-candle patterns are more reliable
The more candles a specific pattern contains, the more reliable it usually is. 3 candle patterns are better than single candle patterns. 30 candle patterns are usually better than 3 candle patterns. Patterns like head and shoulders, double and triple tops are among my favorites, exactly because of this reason. They consistently result in higher probability trades, which is what we’re all after. It doesn’t mean that a good pin bar setup won’t work, it just means there’s a higher probability of having these multi-candle setups resulting in a winning trade.
🟠Know where to place your stop loss
Knowing where to place an order is just the beginning. Where do you place your stop loss? Fixed pips stop loss levels are hardly a good approach since the market volatility can change and every trade should be looked at within the context of the recent market history.
🟢Always look for confluence
This is absolutely one of the most important secrets you have to know about. Confluence is everything.
So you’ve found a sweet price action setup. Great! Now make sure it has confluence, meaning that it coincides with other valid signals that support your trading idea.
🔵Tell a story of what happened
Every chart tells a story. It might be a story of clear direction or a story of messy back-and-forth battling between buyers and sellers. In a similar way, we can talk about clean price action vs messy price action. It is up to the trader to find the story and better understand what the market might do.
🟣Context is everything
Depending on where a price action setup occurs, you should interpret it differently. The same pin bar could be bullish or bearish, depending on if they show up at the bottom of a downtrend or top of an uptrend, respectively. Not all patterns are also worth taking if they are not preceded by the right price action and happen at the levels that are in one way or the other of significance.
🟤Identify key support & resistance zones
Support and resistance (or S&R for short) are terms used to denote areas where price reverses at its lowest point (support) and the highest point (resistance) on a chart. Often, these zones are “tested” multiple times as traders look for an increased buyer and seller activity around these levels. It’s important to note that support and resistance are usually not thin lines, but rather zones.
🔴The Bottom Line
The price action strategy is one of the most powerful tools for extracting money from the markets with predictability and manageable risks, but only if used correctly.
Thank you!
Please give a Thumbs UP and Leave Comment👍🏻

TRADING FOR BEGINEERS! USING SUPPORT AND RESISTANCE IN 2022!!!This tutorial video discusses how to find KEY support and resistance within trading on any timeframe or market including FOREX, STOCKS or CRYPTO. DROP A LIKE AND SHARE WITH OTHER PEOPLE.
P.S NOT A FINANCIAL ADVISOR... JUST FOR EDUCATIONAL AND LEARNING PURPOSES ONLY...

types of pullbacksIn this lesson, I shared with you the types of pullbacks
Be careful, pullbacks are breaks in the middle of the trend
Poolbacks do not have the strength of main steps
In my opinion, the best type of trading with pullbacks is to recognize the completion of these corrections patterns so that we can move in the direction of the trend at the right point.
Of course, it depends on your trading time frame.

Educational Series: Trading with Boxes (Part 1)Boxes are drawn on the chart of any timeframe, depending on the trader's preference.
Typically, drawn on the
- H1 timeframe identifies short-term, weekly trend and interim support & resistance levels
- H4 timeframe identifies medium-term, monthly trend and key support & resistance levels
- Daily timeframe identifies longer-term trend and major support & resistance levels.
These boxes help traders identify momentum and is used as a trend-following indicator. However, these boxes do not predict or anticipate a move. Instead, it reacts to the price movement.
Drawing the Boxes
1) Identify the Highs & Lows of the period (Day/Week/Month)
2) Draw a box encompassing the Highs & Lows with a box
Basically, on the H1 chart, you would have drawn a daily candle (without tails or shadows).
Support & Resistance levels with Boxes
When the lows of 2 boxes align, this can form a support level.
In another example, if a series of boxes form a high within the same area, this could form a resistance area.

Master this basic skill before anything else to find success. 📚One of the first and most critical skill you must master - How to PROPERLY identify Support/Resistance Levels.
Once you learn how to properly identify these levels you can quickly understand what the trend is doing or where price could go next.
Follow these basic guidelines:
💎 You need 2 touch points, but 3+ are better. The more touch points, the more powerful the level
💎 Look for price rejection at the same level (resistance)
💎 Look for price being respected and held up at the same level (support)
💎 You can use wicks or bodies but bodies are more powerful
💎 Indicators, Oscillators and Trendlines can all act or be used as S/R
💎 Practice on a Higher Time frame before moving to lower time frames
Advanced Techniques:
💎 When S/R lines up with FIBS, becomes much more powerful
💎 Look at Swing Highs (SH) and Swing Lows (SL)
💎 Use Moving Averages to find Support/Resistance
💎 S/R is not always an exact point or number. It can be a zone.
📚 Test your self
1. Open a 3D Chart and find 3 levels of support
2. Find 3 levels of resistance
3. Study what price action did after breaking through or holding either support or resistance
4. Practice on 5 other coins from your watch list.
5. Add the 50MA to your chart. Study how price reacts when it holds support or resistance.
Bonus! Can you identify Support/Resistance on an indicator like the RSI?
Comment below if you would love to see more skills broken down.

CSC-HARSI UPdate: Bull Rejection / Bear RejectionWhat's new in this indicator
Support and resistance levels have been re-coded to give you a cleaner visualization.
as always when you see a support indication you set the support level at the close of the candle. if they cancel this red you place it at the bottom.
If the candle is green you place it at the top.
You always place the S/R level at the close of the candle.
Two other indications added to the script are called, Bull Rejection and Bear Rejection.
--Bull rejection shows up when there's a bullish rally and then there's enough resistance to stop that upward move.
--Bear rejection is when there's a bearish move and there is enough resistance to stop that downward move.
If you get a resistance indication followed by a bullish rejection indication you should exit your trade. Because it's showing you resistance at that level and enough pushing back down.
If you get a support indication followed by a bearish rejection you should exit that short trade because it's showing you there is support at that level and enough force pushing to the upside.

The Heiken Ashi Algo Oscillator (Range Trading technique)You're watching this video because you keep getting stop-hunted. You feel like every time you enter a trade to the market it immediately goes the other way and you get this little spike out the top or the bottom of a candle that knocks you out of your position and takes out your stop loss. This is most likely due to Market manipulation on your charts which is making you think that price is moving up or down and instead you have just entered a trade at the beginning of the consolidation or distribution phase. Don't worry you're not alone this happens to a lot of novice and intermediate Traders. I really wish there was an indicator that would tell you as soon as you have entered into a ranging Market but usually you can't tell that until you've looked at your charts for a couple of hours and realize that price hasn't moved above or below a certain number.
Well you're in luck because I just finished coating an indicator that will tell you that you have entered into a consolidation or distribution phase at the beginning.
In today's video I'm going to show you how to do range trading using the Heiken Ashi Algo Oscillator available for free on Tradingview.
Usually after price makes a big rally to the upside or to the downside you can expect that price is going to go into either consolidation or a distribution phase.
On your charts this will look like where price runs flat for what could be an extended period of time. The rule of thumb is that after a very strong move to the upside or downside the consolidation period can be lengthy. If there is a short rally to the upside or downside then the consolidation or distribution phase would be a short period of time.
So lets get into adding the indicator, and setting up your chart to trade in ranges using alerts from the Heiken Ashi Algo Oscillator.
Open up TradingView
Go to your indicators tab and search for Heiken Ashi Algo Oscillator and add it to your chart.
In the settings make sure you've turned on the following:
Range
Range Break Long
Range Break Short
Support Levels
Resistance Level
There are a number of other alerts available in the Oscillator but we don't need them for this purpose. And as always, use the default settings.
When you get a RANGE signal (Which looks like a line between two left and right arrows.) You want to grab your Parallel Channel Tool.
You should have already set your support and resistance levels when you opened your chart for the day so look left of your candle. There should be a support or resistance alert right there. On my chart I have a Resistance level.
So I'm going to use this line at the top of my parallel Channel
Take your parallel channel tool And place it on that support resistance level just left of the candle .
I'll drive it far to the right and make sure it's straight and click again.
now drag it down to the closest support level and click again.
You have just drawn your range.
Also on my chart you can see here that I have 1 range indication and then just after it I have a second range indication. When you get a second one you disregard the first one because price has now entered into a new range.
What you are looking at is the Centerline of your range. In this particular instance the first Range Line is lower than the second one so to correct this I have to take the top of my parallel Channel and drag it up until the dotted line is at the close of the candle with the new Range signal. do this by driving the top of the box and not changing the bottom of a box. In this case you can see how the bottom of the parallel channel is still sitting on my support and resistance level to the bottom but the top of the parallel Channel is above my support and resistance level And this is fine.
The way you use this is by imagining your parallel channel has three levels.
Level 1 = The top line
Level 2 = The midline
Level 3 = The bottom.
Also you must respect any Support and Resistance levels traveling THROUGH the Parallel Channel
What you are looking for is any candle that closes its majority size across one of these lines here are some examples:
Please watch the video for a perfect visualization of how to do this.
Directions of Trades in Range Trading. Follow the arrows.
You ONLY trade to the INSIDE from the top or bottom of the channel.
You also trade either up or down FROM the midline, depending on the majority close of the candle.
Again also respect your support or resistance levels when a candle is crossing them.

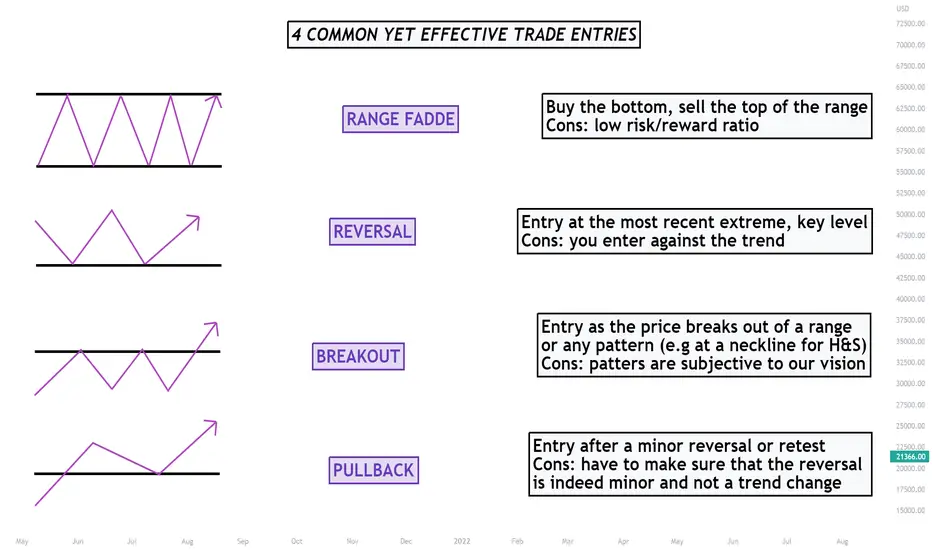
4 COMMON YET EFFECTIVE TRADE ENTRIESHappy Chewsday, traders! Some of you reached out and asked for more educational articles and we’re here to deliver. Relatively simple but important topic of entries is going to be lightly covered today. The image above should be pretty self-explanatory, but to cover it in more details: There are 4 main entry types.
- Range fadde is when we buy the bottoms and sell the tops of the range. Usually the box/rectangle isn’t large, so the risk-reward ratio is just not there for many traders. However, you can definitely put the stop loss a few pips out of the range and maximize the ratio.
- Reversal is an entry at the most recent extreme, key level. Quite popular approach, but personally, it usually goes against our fight club rule #1: “never fight the trend, he’s your friend”. We do; however, look out for multi-day/week key levels in our ideas as well.
- Breakout is an entry as the price breaks out of a range or any pattern. Very reliable option for beginners that are obsessed with finding repetitive reoccurrences in the market. For example, you can sell at the neckline of head and shoulders pattern and successfully profit from that. It is important to keep in mind that, the more complicated patterns you “notice”, the less people use them, thus, devaluing the importance of it.
- Pullback is an entry after a minor reversal or retest. Statistically speaking, this is one of the most frequent entries utilized by us. It’s simple and you still follow the trend. Draw your key points, look for proper Fibonacci levels and make sure it’s not a complete trend reversal. Of course, you’ll miss out on a few pips this way, but this might change your long-term profit statement.
What’s your favorite entry type?
Rule Of 30The rule of 30 is a concept that allows you to find the timeframe you should use for confirmations on your trades. Keep in mind that this gives you an idea of the timeframe range you should be looking in and not an end all be all timeframe for that trade.

Simple Technical Analysis for BeginnersIdentifying the Support (lowest price), Resistance (highest price), and Key Levels (areas price gravitates to between Support and Resistance) one two or more timeframes. Today, I have them marked on the 4H and 1H Timeframes.
Identifying Support
Support is the lowest level a price will go before reversing. A support is created in two ways. The first way is when Sellers in the market close their existing positions and take their profit. The second way is when new Buyers enter the market by opening new positions.
Identify all historical Lows in a chart.
Circle these zones.
Connect as many as possible using straight horizontal lines. These are known as areas of Support.
Identifying Resistance
Resistance is the highest level a price will go before reversing. A Resistance is created in two ways. The first way is when Buyers in the market close their existing positions and take their profit. The second way is when new Sellers are entering the market by opening new positions.
Identify all historical Highs in a chart.
Circle these zones.
Connect as many as possible using straight horizontal lines. These are known as areas of Resistance.
Chart Made Using AlphaMind AM All-In-One Indicator


Trading with Support and resistance - Organize your chartIn this video I attempt to show how using price based support and resistance and help forecast market moves and organize your chart in a way that can help improve a traders ability to react to price movement with purpose

The '5th rule' in support/resistance trades !!!There is a false and very deceptive saying in technical analysis when it comes to identifying strong and valid S/R levels, which says that the more tests apply to S/R levels the stronger they become.
excuse me WHAT?!!!!!
Many tests won't make support nor resistance levels any stronger, in fact, we have a rule here which mentions: ' the 5th touch of S/R level will most probably become a breakout '
most probably ladies and gentlemen, not 100%
the psychology behind this is simple:
every time we bounce from a support or resistance level, more retail traders will be attracted to open a position in the direction of the bounce, therefore a lot of liquidity will create for market makers, aka smart money, to join the party and grab their liquidity in their favor and move the market with ease afterward.
as lots of retail traders are not familiar with basic risk management methods, they put their stop losses just above or below the S/R levels, sooooo... liquidity will be provided. easy stop hunt opportunity !!!
this is in fact a common way for market makers to manipulate the market and deviate the price, trap as many traders as they can, and hunt every stop losses out there.
*one more key point: after the breakout, it's not 100% guaranteed that the S/R level is flipped. it could be a deviation!!
that it for today's article, please consider liking and following me if you find any of my ideas useful xoxo

The power of the daily highs, lows and the VWAP!Hey Traders and Happy Monday!
In todays post on our Tradingview channel talk about the importance of the 3 main levels we focus on, which are,
VWAP
Daily high
Daily low
Based on what happens at these levels we usually take big action! The video explains more.
Enjoy and see you tomorrow!
#support #resistance #keylevel

Healthy TrendA healthy trend happens when during a bullish/bearish trend is possible to enter after the breakout and the retest of the resistance/support level.

US30 16th of JunePrice made a fakeout on the first support zone. It took liquidity, on the support below, it retested the zone and it flew up.
