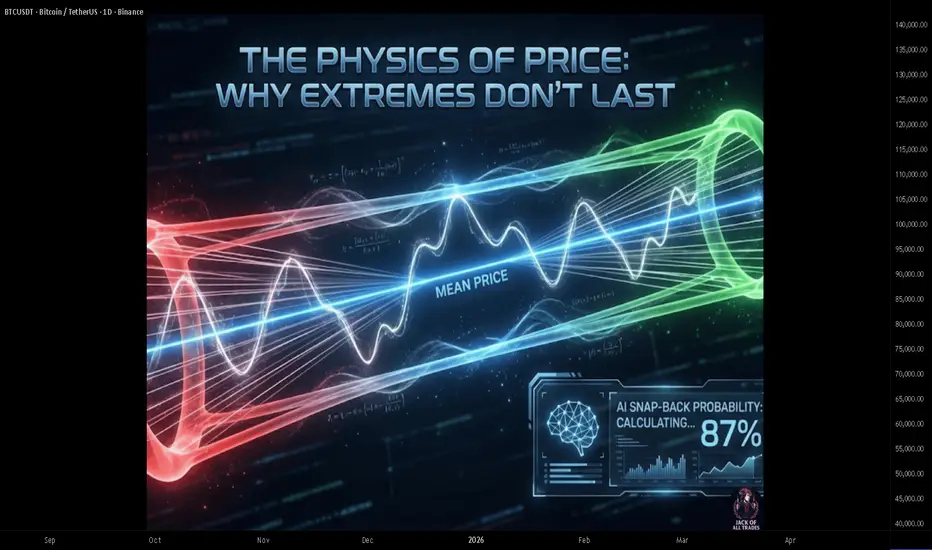
"The Physics of Price: Why Extremes Don't Last
Everything That Stretches Too Far Eventually Snaps Back
While trend followers chase momentum, mean reversion traders wait for the rubber band to stretch — then bet on the snap back.
This isn't about fighting trends. It's about understanding that extremes are temporary, and AI can identify exactly when the snap is most likely.
---
What Is Mean Reversion?
Definition:
Mean reversion is the theory that prices tend to return to their average over time.
The Core Idea:
Prices oscillate around a "fair value" or mean
Extreme deviations from the mean are temporary
The further price stretches, the stronger the pull back
The Physics Analogy:
Think of price as attached to a rubber band anchored at the mean. The further it stretches, the more tension builds, and the more likely it snaps back.
---
Why Mean Reversion Works
1. Market Overreaction
Humans overreact to news and events
Fear and greed push prices to extremes
Rational pricing eventually returns
2. Liquidity Dynamics
At extremes, one side is exhausted
Buyers depleted at tops, sellers at bottoms
Counter-pressure builds naturally
3. Arbitrage Forces
Extreme prices attract contrarian capital
Value buyers step in at lows
Profit-takers emerge at highs
4. Statistical Reality
Extreme readings are by definition rare
Probability favors return to normal
Standard deviation math supports this
---
Mean Reversion vs Trend Following
Trend Following:
"The trend is your friend"
Buy strength, sell weakness
Works in trending markets
Suffers in choppy markets
Mean Reversion:
"Extremes don't last"
Buy weakness, sell strength
Works in ranging markets
Suffers in strong trends
The Key Insight:
Neither is always right. The market alternates between trending and mean-reverting regimes. AI can help identify which regime you're in.
---
Measuring "The Mean"
Method 1: Simple Moving Average (SMA)
Average price over N periods.
Use: General trend center
Limitation: Lags price, equal weight to all periods
Method 2: Exponential Moving Average (EMA)
Weighted average favoring recent prices.
Use: More responsive mean
Limitation: Can be noisy
Method 3: VWAP (Volume-Weighted Average Price)
Average price weighted by volume.
Use: Institutional fair value reference
Limitation: Resets daily, intraday focus
Method 4: Regression Line
Statistical best-fit line through price.
Use: Trend-adjusted mean
Limitation: Requires more calculation
Method 5: Bollinger Band Middle
20-period SMA (typically).
Use: Standard mean reversion reference
Limitation: Fixed lookback period
---
Measuring "The Stretch"
Indicator 1: Bollinger Bands
Price distance from mean in standard deviations.
Signal:
Price at upper band = stretched high
Price at lower band = stretched low
2+ standard deviations = extreme
Indicator 2: RSI (Relative Strength Index)
Momentum oscillator measuring overbought/oversold.
Signal:
RSI > 70 = overbought (stretched high)
RSI < 30 = oversold (stretched low)
Extreme readings suggest reversion
Indicator 3: Z-Score
Statistical measure of deviation from mean.
Formula:
Z-Score = (Price - Mean) / Standard Deviation
Signal:
Z > 2 = significantly above mean
Z < -2 = significantly below mean
Indicator 4: Percent from Moving Average
Simple percentage distance from MA.
Signal:
Price 10%+ above MA = stretched
Price 10%+ below MA = stretched
Threshold varies by asset volatility
---
Mean Reversion Trading Strategies
Strategy 1: Bollinger Band Bounce
Setup:
Price touches or exceeds outer Bollinger Band
RSI confirms overbought/oversold
Volume shows exhaustion
Entry:
Enter counter-trend when price reverses from band
Confirmation candle required
Target:
Middle band (20 SMA)
Or opposite band for aggressive targets
Stop:
Beyond the extreme
ATR-based for volatility adjustment
---
Strategy 2: RSI Extreme Reversal
Setup:
RSI reaches extreme (below 20 or above 80)
Price at support/resistance
Divergence present (price makes new extreme, RSI doesn't)
Entry:
RSI crosses back above 30 (for longs)
RSI crosses back below 70 (for shorts)
Target:
RSI returns to 50 (neutral)
Or previous swing high/low
---
Strategy 3: VWAP Reversion (Intraday)
Setup:
Price significantly deviates from VWAP
Extended move without pullback
Volume declining on extension
Entry:
Fade the move back toward VWAP
Use lower timeframe for entry timing
Target:
VWAP touch
Or VWAP + small overshoot
---
Strategy 4: Z-Score Mean Reversion
Setup:
Calculate rolling Z-score (20-50 periods)
Z-score exceeds +2 or -2
Historical analysis shows reversion at this level
Entry:
Z-score begins declining from extreme
Confirmation of reversal
Target:
Z-score returns to 0 (mean)
Or Z-score reaches opposite threshold
---
How AI Enhances Mean Reversion
1. Regime Detection
AI identifies whether market is trending or mean-reverting:
Trending regime: Avoid mean reversion trades
Ranging regime: Mean reversion strategies activated
Transition detection: Adjust exposure
2. Dynamic Threshold Optimization
AI calculates optimal entry thresholds:
What Z-score level has best risk/reward?
How does this vary by asset and timeframe?
Adaptive thresholds based on recent volatility
3. Multi-Factor Confirmation
AI combines multiple mean reversion signals:
Bollinger Band + RSI + Volume
Weighted scoring system
Higher confidence when multiple factors align
4. Exit Optimization
AI determines optimal exit points:
Full reversion to mean vs partial
Time-based exits for failed reversions
Trailing stops for extended moves
5. Risk-Adjusted Sizing
AI adjusts position size based on:
Confidence level of signal
Current volatility
Correlation with existing positions
---
Mean Reversion Risks
Catching Falling Knives — "It's oversold" doesn't mean it can't go lower. Extreme can become more extreme. Wait for reversal confirmation, don't anticipate.
Fighting Strong Trends — Mean reversion fails in trending markets. What looks "stretched" in a trend is just the new normal. Identify regime before applying strategy.
The Mean Moves — The mean itself isn't static. In a downtrend, the mean is falling. Reverting to a falling mean still means lower prices.
Timing Difficulty — Being right about direction but wrong about timing. Position sizing and stop placement are critical.
Correlation Spikes — During market stress, everything becomes correlated. Multiple mean reversion positions can all fail together.
---
Mean Reversion Checklist
Before any mean reversion trade:
Is the market in a ranging/mean-reverting regime?
How extreme is the current deviation? (Z-score, BB, RSI)
Is there confirmation of reversal starting?
Where is the mean I'm targeting?
What's my stop if the extreme continues?
Is position size appropriate for the risk?
---
Combining Mean Reversion with Trend
The Hybrid Approach:
Identify the higher timeframe trend
Only take mean reversion trades in the trend direction
Use mean reversion for entry timing within the trend
Example:
Daily chart: Uptrend
4H chart: Price pulls back to oversold
Entry: Buy the oversold pullback in the uptrend
This combines trend following with mean reversion timing
---
Key Takeaways
Mean reversion exploits the tendency of prices to return to average
Works best in ranging markets, fails in strong trends
Measure deviation using Bollinger Bands, RSI, Z-score, or distance from MA
AI can identify regimes and optimize entry/exit thresholds
Always wait for reversal confirmation — don't catch falling knives
---
Your Turn
Do you use mean reversion strategies in your trading?
How do you determine when the market is ranging vs trending?
Share your approach below 👇
Bollingerbandstrategy
BTC/USD – Band Rejection + Gap Squeeze Play (Textbook Execution)Caught a clean 30m bullish band rejection on BTC/USD, aligned with a textbook gap-up squeeze setup. Price gapped above the lower Bollinger Band after a clear downtrend, forming a strong engulfing candle. Entry triggered on break of the rejection candle high at 89,276.
Trade Highlights:
- Entry: 89,276 (2 lots)
- Target 1: Midline (9 EMA) hit at 89,372 (+0.11%)
- Target 2: Upper Band hit at 89,672 (+0.44%)
- Stop: 89,044 (below rejection low)
- Result: Full 1:1 RR achieved on both lots
Setup Confluence:
- Lower band rejection with hammer
- Gap-up ≥ 1% with strong close
- X/Y band stretch> 1.6 confirms squeeze
- No opposite rejection before midline
Takeaway: A+ setup with high-probability structure and mechanical execution. Kill fast, ride smart.

How to Trade with Bollinger Bands in TradingViewBollinger Bands are a volatility indicator that helps traders identify market extremes, trend strength, and potential breakout setups by measuring how far price moves away from its average.
What You’ll Learn:
• Understanding Bollinger Bands as a volatility-based trading tool built around a moving average
• How the middle band represents the 20-period simple moving average (SMA)
• How the upper and lower bands are calculated as two standard deviations above and below that SMA
• Why expanding bands signal rising volatility — and tightening bands signal market compression
• Recognizing overbought and oversold conditions when price touches or moves beyond the upper or lower bands
• Why these signals aren’t automatic buy or sell triggers, and how to confirm them with other tools like RSI or MACD
• Identifying the “Bollinger Band squeeze,” a setup that often precedes major breakouts
• Spotting potential mean-reversion trades when price closes back inside the bands after moving outside
• How to add Bollinger Bands on TradingView via the Indicators menu
• Understanding the default settings (20, 2) and how adjusting the period or deviation affects sensitivity
• Practical examples using the E-mini S&P 500 futures chart
• Applying Bollinger Bands across daily, weekly, and intraday timeframes for volatility analysis and signal confirmation
This tutorial is designed for futures traders, swing traders, and technical analysts who want to integrate volatility dynamics into their trading approach.
The methods discussed may help you identify breakout conditions, trend continuation signals, and potential reversal zones across multiple markets and timeframes.
Learn more about futures trading with TradingView:
optimusfutures.com
Disclaimer
There is a substantial risk of loss in futures trading. Past performance is not indicative of future results. Please trade only with risk capital. We are not responsible for any third-party links, comments, or content shared on TradingView. Any opinions, links, or messages posted by users on TradingView do not represent our views or recommendations. Please exercise your own judgment and due diligence when engaging with any external content or user commentary.
This video represents the opinion of Optimus Futures and is intended for educational purposes only.
Chart interpretations are presented solely to illustrate objective technical concepts and should not be viewed as predictive of future market behavior. In our opinion, charts are analytical tools — not forecasting instruments.

RXRX monthly close.www.tradingview.com
RXRX MC. Touched the lower BB, but got bought heavily. IMHO price is going to reclaim the 20ma MA in the upcoming month(s). Sell volume is dropping while buy volume is increasing. Institutions keep on buying as well. Shake out before breakout!
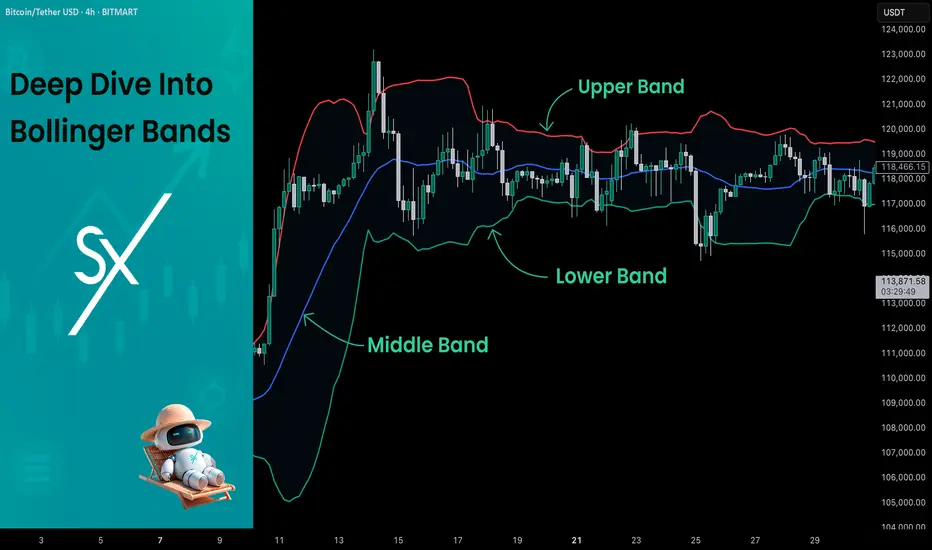
Deep Dive Into Bollinger Bands 🗓This article explores the Bollinger Bands indicator—a powerful volatility tool used by traders worldwide. You'll learn how it works, how to calculate it, and how to use it to detect potential breakouts, trend reversals, and overbought or oversold conditions in the market.
📚 Introduction to Bollinger Bands
In the fast-paced world of trading, understanding market volatility is key to making informed decisions. Bollinger Bands, developed by John Bollinger in the 1980s, offer a visual and statistical method to measure this volatility. Unlike simple moving averages, which only tell you the trend, Bollinger Bands expand and contract based on recent price action, helping traders spot overbought, oversold, or consolidation phases.
These bands dynamically adjust to market conditions, making them one of the most popular indicators for trend-following, mean-reversion, and breakout strategies. Whether you’re trading crypto, stocks, or forex, Bollinger Bands can help you identify high-probability setups by combining trend direction with volatility.
📚 How Bollinger Bands Are Calculated
Bollinger Bands consist of three lines:
Middle Band – This is a simple moving average (SMA) of the price, typically over 20 periods.
Upper Band – The middle band plus two standard deviations.
Lower Band – The middle band minus two standard deviations.
Middle Band = SMA(n)
Upper Band = SMA(n) + (k × σₙ)
Lower Band = SMA(n) - (k × σₙ)
Where σₙ is the standard deviation of the price for n periods and k is the multiplier, typically set to 2, which captures ~95% of price action under normal distribution. The middle band shows the average price over the last 20 candles. The upper and lower bands adjust based on how volatile the price has been — expanding in high volatility and contracting in low volatility.
🤖 For those traders who want to implement Bollinger Bands into algorithmic strategy we provide formula it's calculation in Pine Script:
basis = ta.sma(src, length) // Middle Band (SMA)
dev = mult * ta.stdev(src, length) // Standard Deviation × Multiplier
upper = basis + dev // Upper Band
lower = basis - dev // Lower Band
📚 How to Use MACD in Trading Strategies
⚡️Bollinger Band Squeeze (Volatility Contraction and Expansion)
The idea is pretty simple, а squeeze indicates low volatility and often precedes a breakout. The squeeze is the situation when the Upper Band and Lower Band contract, and BB width is at a local minimum. In this case you shall be prepared for the high volatility after the period of low volatility. This strategy doesn’t predict direction — it prepares you for volatility.
Long setup:
Price is in long-term uptrend, you can use 200 EMA as a major trend approximation - price shall be above it.
Bollinger Bands is narrow in comparison to the previous period. Price usually is in sideways.
Open long trade when candle shows a breakout and closes above the Upper Band.
Set a trailing stop-loss at the Middle Band.
Short setup:
Price is in long-term downtrend, you can use 200 EMA as a major trend approximation - price shall be below it.
Bollinger Bands is narrow in comparison to the previous period. Price usually is in sideways.
Open short trade when candle shows a breakdown and closes below the Lower Band.
Set a trailing stop-loss at the Middle Band
📈Long Trading Strategy Example
1. Price candle shall be closed above 200-period EMA. In our example we have BITMART:BTCUSDT.P 4h time frame.
2. Bollinger Bands shall be narrow in comparison with the previous periods.
3. Open long trade when candle closes above the Upper Band.
4. Close trade when price touched the Middle Band.
📉Short trading strategy example
1. Price candle shall be closed below 200-period EMA. In our example we have BITMART:BTCUSDT.P 4h time frame.
2. Bollinger Bands shall be narrow in comparison with the previous periods.
3. Open short trade when candle closes below the Lower Band.
4. Close trade when price touched the Middle Band.
⚡️Mean Reversion (Rebound from the Bands)
This is the most common approach to use Bollinger Bands. The idea is also very simple, we just want to open long if price touches Lower Band and short if price reaches Upper Band. Price tends to revert to the mean (Middle Band), especially in range-bound markets. It's very important to trade in the direction of the major trend to reduce the probability of the large move against you.
Long setup:
Price is in long-term uptrend, you can use 200 EMA as a major trend approximation - price shall be above it.
Open long trade when price touches the Lower Band.
Set the initial stop-loss at the fixed percentage below entry price. Choose this percentage number with your personal risk/money management, you shall be comfortable to lose this amount of money in case of stop-loss hit.
If price reached Middle Band set stop-loss at breakeven.
Close trade when price reached the Upper Band.
Short setup:
Price is in long-term downtrend, you can use 200 EMA as a major trend approximation - price shall be below it.
Open short trade when price touches the Upper Band.
Set the initial stop-loss at the fixed percentage above entry price. Choose this percentage number with your personal risk/money management, you shall be comfortable to lose this amount of money in case of stop-loss hit.
If price reached Middle Band set stop-loss at breakeven.
Close trade when price reached the Lower Band.
🧪 Important: the most common approach to close trades is the Middle Band touch, this is classic mean reversion. We experimented multiple times with different approached and revealed that usually it's better to take profit at the Upper/Lower band for long/short trades and use Middle Band only for setting stop-loss at breakeven. This approach provides better risk to reward ratio.
📈Long Trading Strategy Example
1. Price candle shall be closed above 200-period EMA. In our example we have BITMART:BTCUSDT.P 4h time frame.
2. Open long trade the Lower Band.
3. Put Initial stop-loss 2% below the entry price.
4. When price reached Middle band place stop-loss at the breakeven.
5. Close long trade at the Upper Band.
📉Short trading strategy example
1. Price candle shall be closed below 200-period EMA. In our example we have BITMART:BTCUSDT.P 4h time frame.
2. Open short trade the Upper Band.
3. Put Initial stop-loss 2% above the entry price.
4. When price reached Middle band place stop-loss at the breakeven.
5. Close short trade at the Lower Band.
🧪 Important tip: notice that initial stop-loss is needed only to avoid disaster in case of price moves strongly against you. This percentage shall give enough space to avoid its reaching too often. Mean reversion strategy provides fast trades with the small average gain, so you shall maintain the high win rate (perfectly above 70%). You have to choose stop-loss based on particular asset volatility.
⚡️Combined Approach: Mean Reversion + Trend Following
Skyrexio made multiple researches about Bollinger Bands strategies and we found that we can receive better gains in combination of different approaches. Mean reversion gives you great entry with discount but you don't need to exit that early. Use the trading stop and allow to gain profit while market is moving in your direction.
This approach you can find in our advanced strategy Bollinger Bands Enhanced Strategy which we shared in 2024. Click on the link to read about it and understand how you can combine best features of this popular indicator.
📚 Conclusion
Bollinger Bands are more than just a volatility indicator — they provide a flexible framework for understanding price dynamics and market conditions. By visualizing the relationship between price and standard deviation around a moving average, traders can gain valuable insights into whether an asset is consolidating, trending, or preparing for a breakout.
The real strength of Bollinger Bands lies in their versatility. They can adapt to different trading styles — whether you’re a short-term scalper, a swing trader, or a long-term position holder. From identifying squeeze setups to riding strong trends or capturing mean reversion moves, BBs offer a strategic edge when used correctly.
However, Bollinger Bands should never be used in isolation. Like any technical tool, they work best when combined with momentum indicators like RSI or MACD, volume analysis, and price action signals. Context is key: a signal that works well in a ranging market may fail during high momentum trends.
Ultimately, Bollinger Bands help traders make more informed, disciplined decisions by clarifying where price stands relative to recent history. When paired with sound risk management and broader market awareness, they become a powerful ally in navigating market uncertainty.
BTC Just Hit the Brakes – Is the Pump Over?Bitcoin just tagged the upper Bollinger Band on the 1H chart while Stoch RSI maxed out and crossed down — a classic signal of volatility exhaustion combined with a momentum slowdown.
Technical Breakdown:
Bollinger Band Top: Price tapped the upper band, often a sign of near-term overextension
Overbought Stoch RSI (July 9th): RSI hit 97+ and flipped — momentum may be shifting
Cooling Phase? Price is stalling inside a tight range with low follow-through
arget Zone: $109K or BB midline as a possible mean reversion area
This is a high-probability zone for a pullback setup or a more attractive long opportunity if momentum resets.

Silver to Continue UpWhen a price goes to oversold/overbought levels as indicated by the Bollinger Band, one must them look at the Band Width. When this indicator is rising, it shows that price is stronger than the average. My rule of thumb is to stay positioned in the direction of the trend until this number reverses.

ZRX Linear Regression Trend pierces Bollinger Band Buy ZoneI use 3 Primary indicators to determine trade entries and exits
1) Pivot points - 1yr (Thinnest), 2yr (Medium), and 3yr (Thick Lines) are plotted with pivot in yellow, Resistance bands in Red / Pink hues, Support in Blue.
2) Fibonnaci Bollinger Bands - Midline in purple, 25% and 75% in yellow are buy and sell zones
3) Linear Regression - Linear regression dictates price action outside of major fundamental events.
For trades, I nearly always enter buys below the Bollinger midline and more typically like to buy in the bottom 25% of the Bollinger Band. I look for the linear regression channel to be intersecting price action, and usually target a pivot point for exits.
For ZRX Daily chart, we see the Red/Yellow LR channel has pierced the bottom 25% of the Bollinger Band, indicated by the thin yellow Bollinger Band. This is typically a reliable, low-risk entry. Once this occurs, I look for price action to travel through the linear-regression trend line as this indicates to me that sellers are exhausted and there is a solidly established price floor strong enough to push through the linear-regression line.
For ZRX, you can see that this has occurred several times in previous years, with a subsequent rise in price of 2-3 times the original buy zone.
For this trade, I am going long at .26 with a target just below the 3-year pivot of .65, which is solidly in the middle of that 2-3x range. I typically trigger out just below major pivots to get the best chance of trade execution while locking in solid gains.
Stop loss set at .20, which is the recent low.

DOGE/USDT Potential UpsidesHey Traders, in today's trading session we are monitoring DOGE/USDT for a buying opportunity around 0.22000 zone, DOGE/USDT is trading in an ascending channel and currently is in a correction phase in which it is approaching the ascending channel support.
Trade safe, Joe.

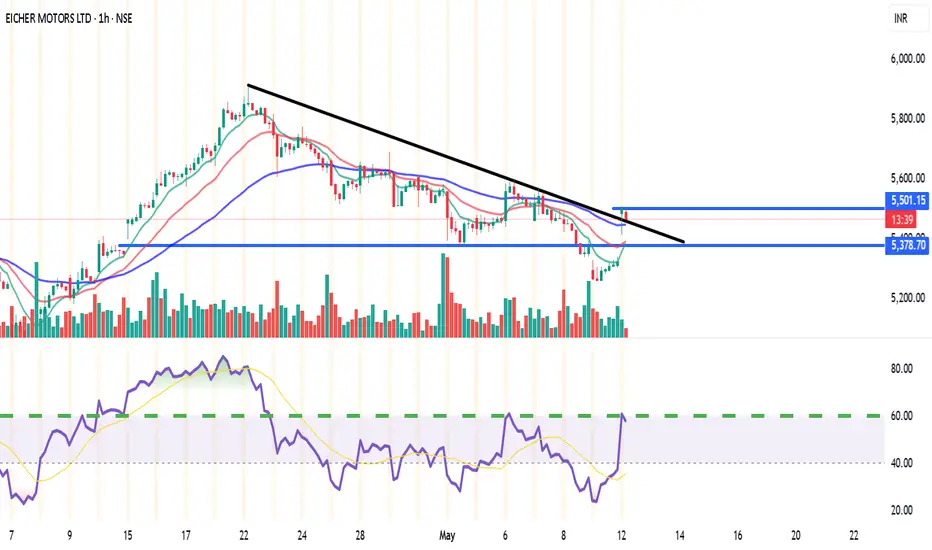
EICHERMOT (NSE) – Bullish Setup on 15min & 1H🔑 Trade Plan:
📥 Buy Above: ₹5485 (above current resistance & candle body highs)
🎯 Targets:
T1: ₹5527 (Pivot R1)
T2: ₹5555
🛡️ Stop Loss: ₹5380 (below 13 EMA & Supertrend support)
📊 Technical Signals:
RSI: 58.08 – Bullish momentum, still room to run
%B (BB): 0.77 – Close to breakout from upper band
EMA Crossover: 9 EMA > 13 EMA – Short-term bullish crossover confirmed
Supertrend: Support at ₹5322, aligning with bullish reversal
Volume: Spike during recent green candles signals strong buying interest
⚙️ Strategy Notes:
Use 15min chart for entry timing post breakout
Tighten SL to cost after T1 hits
Ideal for short-term intraday/swing traders
For Education Purposes Only
Ethereum (ETH): Our Attentions Are At Bollinger Bands Now, as many of you remember, we are aiming to see the bullish CME (on upper zones) to be filled on ETH, but there is no proper volume from any side currently.
So with this kind of sideways movement, our attention is at Bollinger Bands upper and lower zones, which are going to be our micro target zones while we see a proper BOS from either buyers or sellers.
Also keeping eyes on the middle line of Bollinger Bands, as this can be our trend ladder to either lower zones or upper zones. So let's keep on monitoring until we get more clarity.
Swallow Academy
EShort

Bollinger Bands: Basics and Breakout Strategy🔵 What are Bollinger Bands?
Bollinger Bands are a popular technical analysis tool developed by John Bollinger in the early 1980s. They help traders analyze price volatility and potential price levels for buying or selling. The indicator consists of three lines plotted over a price chart:
Middle Band: A simple moving average (SMA), typically set to a 20-period average.
Upper Band: The middle band plus two standard deviations.
Lower Band: The middle band minus two standard deviations.
🔵 How Are Bollinger Bands Calculated?
Middle Band (MB): MB = 20-period SMA of the closing price.
Upper Band (UB): UB = MB + (2 × standard deviation of the last 20 periods).
Lower Band (LB): LB = MB - (2 × standard deviation of the last 20 periods).
The bands expand when volatility increases and contract when volatility decreases.
length = 20
basis = ta.sma(src, length)
dev = mult * ta.stdev(src, length)
upper = basis + dev
lower = basis - dev
🔵 How to Use Bollinger Bands in Trading
Bollinger Bands provide insights into market volatility and potential price reversals. Traders often use them to:
Identify overbought (price near the upper band) and oversold (price near the lower band) conditions.
Spot volatility contractions, which often precede significant price moves.
Confirm trend strength and potential reversals.
🔵 Bollinger Bands Breakout Strategy
One effective strategy involves preparing for breakouts when the upper and lower bands contract, indicating low price momentum.
Strategy Steps:
Identify Low Volatility Zones: Look for periods when the bands are close together, signaling a potential breakout.
Prepare for a Breakout: Monitor price action as it approaches either the upper or lower band.
Entry Signal: Enter a trade when the price closes above the upper band (for a long position) or below the lower band (for a short position).
Stop Loss Placement:
For long entries (break above upper band): Set stop loss at the lower band.
For short entries (break below lower band): Set stop loss at the upper band.
Profit Target: Use a risk-reward ratio of at least 1:2 or close the position when price shows signs of reversal.
Example Charts:
🔵 Final Thoughts
This Bollinger Bands breakout strategy is simple yet effective. By recognizing periods of low volatility and preparing for breakouts, traders can capitalize on significant price movements. Always complement this strategy with proper risk management and confirmation indicators for optimal results.
This article is for informational purposes only and should not be considered financial advice. Trading involves risk, and traders are solely responsible for their own decisions and actions.

Big Move Coming - Bitcoin’s Bollinger Bands Are Tight AFBitcoin's daily Bollinger Bands are at one of their tightest levels in history, a pattern that has almost always preceded bullish price action.
Historically, when volatility has compressed to this degree, Bitcoin has followed with strong upward movement.
There have only been TWO times in Bitcoins history that the price dropped at these compression levels:
November 2018: A sharp drop that took ~6 months to recover.
August 2023: A decline with a ~2-month recovery.
Every other time, a this level of tightness is followed by bullish price action. Given it's history, the odds favour a move higher.
What’s your take — up or down? Will history repeat? Or will this be another rare exception?

How do Bollinger Bands work?Bollinger Bands are a technical indicator used to measure market volatility and identify overbought or oversold conditions. They consist of three bands:
- Middle Band – A 20-period Simple Moving Average (SMA).
- Upper Band – SMA + 2 standard deviations (indicates overbought).
- Lower Band – SMA - 2 standard deviations (indicates oversold).
Key Strategies:
- Overbought/Oversold: Price near the upper band may indicate a reversal down, while price near the lower band suggests a potential bounce.
- Bollinger Squeeze: When bands tighten, low volatility signals a possible breakout.
- Trend Confirmation: In strong uptrends, price tends to "walk the band" near the upper side.
Trade Example:
- Buy when price bounces off the lower band with confirmation
- Sell when price touches the upper band with bearish signals.
- Stop loss: Just below the lower band in a long trade.
Always combine Bollinger Bands with volume, RSI, or MACD for better accuracy!

Nifty's Next Move? 24,000 on the Cards!The hourly candle formed on Friday, 7th Feb looks promising! A bullish engulfing pattern, confirming RD while taking support at AVWAP, sets up an interesting long opportunity. With the low of this candle on a closing basis as SL, going long makes sense.
📈 Upside Target? 24,000 in the coming weeks!
📉 What about ATH? A new all-time high (ATH) looks unlikely unless we see a clear breakout above the heavy supply zone of 24,200 - 24,300.
🔍 Trading Idea
For now, shorting PUTs seems like a good play, aiming for 23,800 - 24,000 levels with a clear SL of closing below 23,400.
👀 What's your view? Drop your thoughts below! 🔥📊
⚠ Disclaimer: This is my personal view and not a recommendation or tip. Please do your own due diligence and study before making any trading decisions.
NSE:NIFTY

BTC to reach new all-time highs in Q1 2025I am not yet convinced BTC has fallen far enough to be written off as the end of this push.
My idea here is based on perceived symmetry between Nov-Dec 2023, and Nov-Dec 2024.
fig. 1a
As you can see here, in both 2023 and 2024 following pushes started around September that took the price above the levels I consider to indicate a long term uptrend. the uppermost peach coloured line is an upper bollinger band based on a 90-week SMA... I have found it provides an accurate idea of multi-year trends, allowing better judgement of the end of a trend as seen when viewing data from the 2020-2021 bullish push.
fig. 1b
The other set of peach bollinger bands are 2-week length with a positive offset. They act similar to a normal moving average but can give earlier buy-in points, and earlier sell signals.
Other than those, there are shorter timeframe versions of both in use, that give indications of oversold/overbought, and of buy and sell points for shorter-term trades.
Back to fig 1a, we that following the identified pushes, from November to December, we see a consolidation phase in almost the exact same shape. There's a sharp drop at first, then a short push to attempt a continuation of the bullish trend, and then a sudden sharp drop, forming the largest leg of the pattern. Now, looking at this closely we see that in 2023 BTC hits the upper of the 90-week BB and then bounces back up from it starting the Q1 push of 2024. As we remain above this level, I do not believe the final nail has been driven into BTC's coffin.
These next two images, taken from a 6hr chart, demonstrate that this pattern previously mentioned is not just perceived, but reflected in technical indicators. In both cases, the CCI reaches overbought, and pulls back below the MA until it's under 100, where we see a false signal caused by a very short bullish push, after which we see a real push back into overbought, and then a drop to below -100.
At this point, I will add that I am neither bullish nor bearish right now. I am not saying the market WILL go up, but that it still has the potential to. Fibonnaci retrace projections are giving me a bit of trouble as using them for the long-term trend is showing that we're at the limit of this push, whereas just viewing this push separately, shows we've hit a key support level which may be why we aren't seeing a real push below 93,000.
To conclude, I don't think it's best to write off the possibility of another push just yet, but be ready because that point will be reached within the next month or so.
Thanks for reading, if you made it this far - lmk your opinions in the comments. I'll try to update with any interesting developments :)

GBPUSD BEARISH IDEAGBPUSD price attempting to break the weekly bearish flag possibly attempting to test previous weekly structure lows
Daily chart shows a possible divergence creating a thesis that a possible pullback is imminent that could test previous support turned resistance for possible bearish continuation set up
note:
The indicator you are seeing in the chart are bollinger bands with 200 sma that would show if price is over extended long term. this indicator is set to daily so that if you scroll down to lower time frame what you will see is the same indicator but set to daily. The RSI is the regular rsi with 100sma bollinger band for long term trend shifts in momentum.
4h or 1h chart would be the execution chart if I will see pull backs to fib levels using RSI midline and sma as confluence

GBPUSD Bollinger Divergence with %B ApplicationIn a downtrend, if the price keeps dropping while %B forms higher lows, it could indicate that sellers are losing strength, potentially signalling a reversal or pause in the trend.

BTC fibonacci reload zone, back to ath ?Analyzing the Fibonacci reload zone, BTC shows potential for a strong recovery. If we break above the upper Bollinger Band, it could signal bullish momentum and pave the way back to all-time highs. 📈 Stay sharp!

USOIL otw 2746m15 pinbar was unable to penetrate the mid-bollingerbands area, the trend continues until the nearest pullback area.

Understanding the Renko Bricks (Educational Article)Today we are going to study a chart which is called a Renko chart. Renko chart is a chart which is typically used to study price movement. I use Renko chart many times to determine supports and resistnace. I find it easy and accurate way of determining supports and resistances. The word Renko is derived from Japanese word renga.
Renga means brick. As you can see in the chart below it shows a kind of Brick formation. The brick size is determined wither by the user and mostly it depends of typical average movement on the stock historically.
A new brick is formed once the price moves upwards on downwards in the same proportion or ratio of the typical brick. New brick is only added post the price moves in that particular proportion. A new brick might not be added in months if the price movement is not as per the ratio. At the same time a new brick might be added in a day or few bricks in a week is price moves accordingly.
We will try to understand this concept further by looking at the chart in the post. We have used the chart of Reliance industries to understand this concept and concept only. Please do not consider this buy or sell call for the stock. As you can see in the above chart I have used a combination of RSI, EMA (50 and 200 days) and Bollinger band strategy. RSI support for Reliance is at 35.89 with current RSI at 40.13. Bollinger band suggests that support might be round the corner for the stock. The peaks from previous tops are used to find out further supports and resistances. Mid Bollinger band level and Bollinger band top level coincide with other pervious tops making them tough resistance when the price moves upwards. Mother line EMA is a resistance now and Father line EMA support is far away. All these factors indicate the support zones for the stock to be around 2736, 2657, 2601 and 2561 in the near term. Resistance for Reliance seem to be at 2814, 2972, 3006, 3048 and 3202 levels. Let me give a disclaimer again. The above data is for analysis purpose and to understand Bollinger band, RSI, effect of EMA and Renko Bricks only. Please do not trade based on the information provided here as it is just for understanding Renko charts.
Disclaimer: There is a chance of biases including confirmation bias, information bias, halo effect and anchoring bias in this write-up. Investment in stocks, derivatives and mutual funds is subject to market risk please consult your investment advisor before taking financial decisions. The data, chart or any other information provided above is for the purpose of analysis and is purely educational in nature. They are not recommendations of any kind. We will not be responsible for Profit or loss due to descision taken based on this article. The names of the stocks or index levels mentioned if any in the article are for the purpose of education and analysis only. Purpose of this article is educational. Please do not consider this as a recommendation of any sorts.

Bitcoin (BTC): Will Crash Soon!The new week is here and bitcoin has successfully re-tested the 100EMA line, which was broken on June 23rd.
As we see a new daily candle (which is also an opening day for the week + month), we are seeing a nice rejection from 100EMA so far, which is working rather well.
We are waiting to see a re-test of local lows at the $60K zone and a movement to lower zones touching that 200EMA and breaking it as well!
Swallow Team

WATCH OUT: Ship SINKS for KUJI (-80%)KUJIUSDT has lost 80% in two weeks, losing exponentially more than the rest of the altcoin market. It continues to make lower lows and the price is now in price-discovery mode... but to the low side.
However, if you are interested in buying KUJI (for your own personal reasons) at this low price- I'm going to show you a strategy on how to find price levels to set your buying orders on.
If you're getting negative values on your Bbands, try switching up the timeframe. It is NOT because the Bollinger bands are broken, but because the price is trading lower than it's opening price and is already in the decimals. Strong selling volume will push the Bbands to expand wide. This indicated the price will likely fall even lower.
Take extreme caution!
___________________________
MEXC:KUJIUSDT
KShort
