AUDJPY shortPrice is currently going for a retest into the resistance zone, also to fill the imbalance caused by the impulsive move, after which we should see a sell to the next support zone which is over 100 pips
AUDJPY trade ideas

AUDJPY Need a break from the rising trendline channelAUD/JPY breaks its three-day winning streak, declining to near 99.30 during the Asian session on Friday. The Japanese Yen (JPY), considered a safe-haven currency, strengthened as geopolitical tensions escalated in the Middle East. This dynamic contributed to the weakening of the AUD/JPY cross.
The escalation of tensions follows Iran's vow to retaliate against Israel's attack on Iran's embassy in Syria, which led to the loss of Iranian military personnel. Additionally, reports indicating heightened threats against Israeli embassies in the United States (US) by Iran have further heightened market concerns.
We will watch to SELL LONG-TERM when the AUDJPY price approaches the indicated barrier

Long buddy!!!My confluences of continuation for the longs has triggered.
The pullback is over imo.
Trade safely my friends

AUDJPY: Short Trade with Entry/SL/TP
AUDJPY
- Classic bearish formation
- Our team expects pullback
SUGGESTED TRADE:
Swing Trade
Short AUDJPY
Entry - 99.700
Sl - 100.20
Tp - 98.793
Our Risk - 1%
Start protection of your profits from lower levels
❤️ Please, support our work with like & comment! ❤️

AudJpy is bearish.I will be expecting a Sell move according to my analysis . i will see how it goes.
Happy trading.

AUD/JPY Is Ready to Take OffAUD/JPY is on the verge of completing a head and shoulders pattern, suggesting a potential move towards the 100.300 level.


Audjpy bearishAudjpy rejection from key level 100,
Making double top pattern,
In price action audjpy is down in short term.

Bullish Momentum: AUDJPY's Upside PotentialHello Everyone,
Currently, AUDJPY presents a compelling buying opportunity, supported by a confirmed bullish market trend. Our trajectory suggests further upside potential. It's important to monitor resistance levels at 100.434 and 102.944.
TradeWithTheTrend3344

AUDJPY Long Buy Idea (Daily)Price was respecting Daily FVGs.
Now look for buys around 97.850 (Daily OB)
All depends if price will make CHoCH next week.

AUDJPY LONGElite Strategy
Rules Based
Transitional Switch confirmed in 1 minute time frame.
Transitional Switch confirmed in 3 minute time frame.
Transitional Switch confirmed in 5 minute time frame.
Targeting upper liquidity pools
RR 1:2

🔥 AUDJPY: Curve Analysis (1W) 🔥(Long Term Position Trade)
SLO @ 97.00 ⏳
SSO @ 96.66 ⏳
TP1 @ 90.00 (shaving 25%)
TP2 @ 85.75 (shaving 25%)
TP3 @ 79.50 (shaving 25%)
TP4 @ 67.85 (closing ALL Sell Orders)
BLO @ 66.15 ⏳
-SL 60.00
ADDITIONAL INFO:
✍️ If this 1W Curve Analysis holds, we are in for ONE BIG TREAT!!!
🔑
BLO = BUY LIMIT ORDER
HTF = HIGH TIME FRAME
SLO = SELL LIMIT ORDER
SSO = SELL STOP ORDER
TP = TAKE PROFIT
Long-term time frames (1 week to 1 year):
— Shows the big picture, revealing major trends and economic factors.
— Less volatile, price movements are slower and smoother.
— Suitable for long-term trend trading and position trading.
— Requires less frequent monitoring but may offer fewer trading opportunities.

🔥 AUDJPY: Curve Analysis (1W) 🔥🗣 CALLING ALL POSITION TRADERS
(Long Term Position Trade)
SLO2 @ 102.50 ⏳
SLO1 @ 101.20 ⏳
TP1 @ 89.95 (shaving 25%)
TP2 @ 82.66 (shaving 25%)
TP3 @ 77.30 (shaving 25%)
TP4 @ 69.00 (closing ALL Sell Orders)
BLO1 @ 66.99 ⏳
BLO2 @ 62.15 ⏳
-SL @ 59.88
ADDITIONAL INFO:
💰 If this analysis holds, we have an opportunity to capture +3200 pips
Long-term time frames (1 week to 1 year):
— Shows the big picture, revealing major trends and economic factors.
— Less volatile, price movements are slower and smoother.
— Suitable for long-term trend trading and position trading.
— Requires less frequent monitoring but may offer fewer trading opportunities.

AUD/JPY with Inverse H&S and Bullish M Pattern on 4H Chart Title: "Analyzing AUD/JPY: Inverse Head and Shoulders Formation with Bullish M Pattern on 4-Hour Chart"
In the recent analysis of the AUD/JPY currency pair, a notable technical pattern has emerged on the 4-hour chart, presenting potential trading opportunities:
1. **Inverse Head and Shoulders Pattern (H&S):**
- The chart displays an inverse head and shoulders pattern, a bullish reversal formation.
- This pattern typically consists of three lows, with the middle low (the head) being lower than the two surrounding lows (the shoulders).
- The neckline, drawn across the highs between the shoulders, acts as a key resistance level. A breakout above this neckline often signals a bullish trend reversal.
2. **Bullish M Pattern:**
- Additionally, an M pattern has formed within the inverse head and shoulders pattern.
- This bullish M pattern is characterized by a sharp decline (the left side of the 'M'), followed by a higher low (the middle of the 'M'), and another decline with a subsequent higher low (the right side of the 'M').
- The completion of the M pattern suggests potential bullish momentum building, especially if accompanied by a breakout above the neckline of the inverse head and shoulders pattern.
3. **Inverse Cup and Handle Formation (IC):**
- Though not explicitly mentioned, an inverse cup and handle formation might also be inferred from the analysis.
- The 'cup' forms as the price reaches a high and retraces, followed by a 'handle' pattern where the price consolidates before attempting to break out.
- Similar to the inverse head and shoulders pattern, a breakout above the handle's resistance level confirms bullish sentiment.
Traders may consider the following actions based on this analysis:
- **Entry:** Consider entering long positions on a confirmed breakout above the neckline of the inverse head and shoulders pattern or the handle of the inverse cup and handle pattern.
- **Stop-loss:** Place stop-loss orders below the pattern's neckline or handle to manage risk.
- **Target:** Set profit targets based on the height of the pattern, projected upwards from the breakout point, or by identifying key resistance levels ahead.
As always, it's essential to incorporate risk management strategies and consider additional technical indicators or fundamental factors before executing trades.

AUDJPY - 4hrs ( Sell Trade Target Range 100 PIP ) 💵Pair Name : AUD/JPY
Time Frame : 4hrs Chart / Close
Scale Type : Large Scale
------
🌐 spreading knowledge among us and to clarify the most important points of entry, exit and entry with more than 5 reasons
We seek to spread understanding rather than make money
🔗 Key Technical / Direction ( Short Reversal )
Type : Mid Term Swing
——————————
Bearish Reversal
99.600 Area
Reasons
- Low Volume Area
- Fibo Golden Area
- 0.618 % : 0.786 %
- Choch Zone
- Fixed Low
Bullish Reversal
98.600 Area
Reasons
- Major Turn level
- Choch Area
- Fixed Low Volume
- Fibo 0.618 % Golde
- Fixed Low

AUDJPY - SellI wait this pair for days, this blue zone is liquidity zone and all SL are there, the price target this zone and will down.
It's just a idea.

AUDJPY 01/04/2024Good Afternoon traders.
Today I am going short AUDJPY at market.
SL 98.89
TP: 96.91
Just sharing my trades. Not a recommendation to enter the market.

AUDJPY Long IdeaIf price breaks March high, we might re-test 98.350 area.
I will be waiting for CHoCH confirmation.
If we don't break March Asia high, price could go to daily OB 97.850 area.


AUDJPY SHORTThis is just simple trading idea draw into chart using labels and lines. Please use it as educational purpose and you are free to modify any

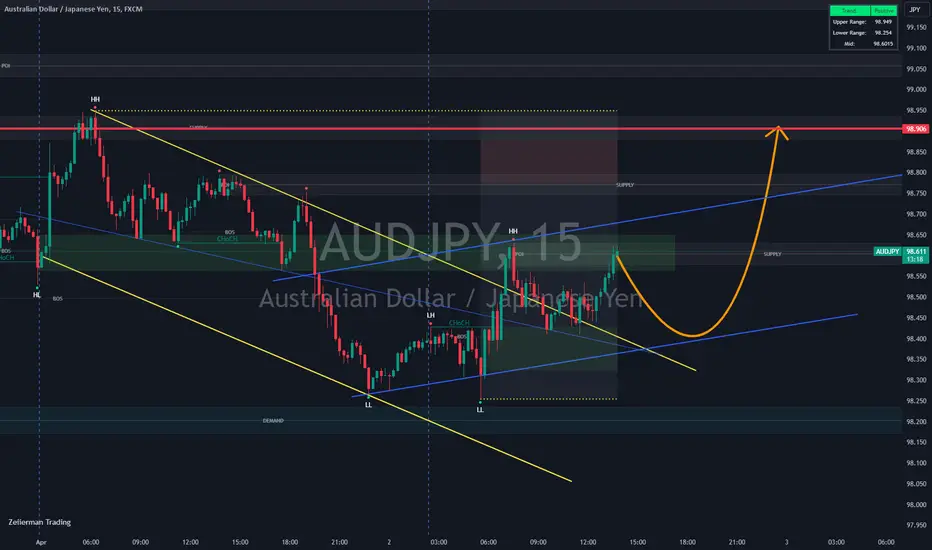
AUD JPY PRICE WILL BE BACK TO YESTERDAYS HIGH ZONE AUD JPY PRICE WILL BE BACK TO YESTERDAYS HIGH ZONE 98.906 price marked in the picture,take a long entry, follow for more live updates @FOREX_TRADER_007
AUDJPYWEEKLY TIMEFRAME BULLISH STORYLINE, looking for buys off a lower timeframe level following break of higher highs

More Yen weaknessBOJ under pressure after US ISM data stronger than expected causing Yen Weakness has markets on watch for an intervention, not to happen during Asian session (their own). Market survey expects intervention at the 152 level. BOFA see a print north of 160 if FED further delays cuts, if at all...YUAN pressure mounting, too. Markets surveys report expected 200k jobs print this Friday, north of that expect a bounce above 152 and BOJ jawboning and/or intervention possibly the catalysts, all else equal, rangebound holding pattern until Fri.
