Simulateur Carnet d'Ordres & Liquidité [Sese] - Custom🔹 Indicator Name
Order Book & Liquidity Simulator - Custom
🔹 Concept and Functionality
This indicator is a technical analysis tool designed to visually simulate market depth (Order Book) and potential liquidity zones.
It is important to adhere to TradingView's transparency rules: This script does not access real Level 2 data (the actual exchange order book). Instead, it uses a deductive algorithm based on historical Price Action to estimate where Buy Limit (Bid) and Sell Limit (Ask) orders might be resting.
Methodology used by the script:
Pivot Detection: The indicator scans for significant Swing Highs and Swing Lows over a user-defined lookback period (Length).
Level Projection: These pivots are projected to the right as horizontal lines.
Red Lines (Ask): Represent potential resistance zones (sellers).
Blue Lines (Bid): Represent potential support zones (buyers).
Liquidity Management (Absorption): The script is dynamic. If the current price crosses a line, the indicator assumes the liquidity at that level has been consumed (orders filled). The line is then automatically deleted from the chart.
Density Profile (Right Side): Horizontal bars appear to the right of the current price. These approximate a "Time Price Opportunity" or Volume Profile, showing where the market has spent the most time recently.
🔹 User Manual (Settings)
Here is how to configure the inputs to match your trading style:
1. Detection Algorithm
Lookback Length (Candles): Determines the sensitivity of the pivots.
Low value (e.g., 10): Shows many lines (scalping/short term).
High value (e.g., 50): Shows only major structural levels (swing trading).
Volume Factor: (Technical note: In this specific code version, this variable is calculated but the lines are primarily drawn based on geometric pivots).
2. Visual Settings
Show Price Lines (Bid/Ask): Toggles the horizontal Support/Resistance lines on or off.
Show Volume Profile: Toggles the heatmap-style bars on the right side of the chart.
Extend Lines: If checked, untouched lines will extend to the right towards the current price bar.
3. Colors and Transparency Management
Customize the aesthetics to keep your chart clean:
Bid / Ask Colors: Choose your base colors (Default is Blue and Red).
Line Transparency (%): Crucial for chart visibility.
0% = Solid, bright colors.
80-90% = Very subtle, faint lines (recommended if you overlay this on other tools).
Text Size: Adjusts the size of the price labels ("BUY LIMIT" / "SELL LIMIT").
🔹 How to Read the Indicator
Rejections: Unbroken lines act as potential walls. Watch for price reaction when approaching a blue line (support) or red line (resistance).
Breakouts/Absorption: When a line disappears, it means the level has been breached. The market may then seek the next liquidity level (the next line).
Density (Right-side boxes): More opaque/visible boxes indicate a price zone "accepted" by the market (consolidation). Empty gaps suggest an imbalance where price might move through quickly.
⚠️ Disclaimer
This script is for educational and technical analysis purposes only. It is a simulation based on price history, not real-time order book data. Past performance is not indicative of future results. Trading involves risk.
Sentiment

MTF Trading Helper & Multi AlertsHi dear fellows, I´m using this indicator for my trading, so every then and when I will publish updates on this one.
This indicator should help to identify the right trading setup. I´m using it to trade index futures and stocks.
MTF Trading Helper & Multi Alerts
Overview
This indicator provides a clear visual representation of trend direction across three timeframes. It helps traders identify trend alignment, potential reversals, and optimal entry/exit points by analyzing the relationship between different smoothed timeframes.
You can set up multiple alerts (as one alert in Tradingview)
How It Works
The indicator displays three colored circles representing the smoothed candle direction on three different timeframes:
Bottom plot represents the overall trend direction, the plot in the middle shows intermediate momentum, and the one on top captures short-term price action.
When a color change occurs, the circle appears in a darker shade to highlight the transition.
🟢 Green = Bullish - 🔴 Red = Bearish
This change can also trigger multiple alerts.
Timeframe Settings - important
Choose between two trading setups, either for:
Intraday 1-minute candles or 1h for swing trading. Set up your chart accordingly to that timeframe.
Intraday | 1Min chart candles
Swing | 1 hour chart candles
Plots
TF3 represents the overall trend direction (bottom), TF2 shows intermediate momentum (middle), and TF1 captures short-term price action (top).
Interpretation & Strategy Alerts
1. Trend Bullish (TF3 turns Green)
The higher timeframe has shifted bullish - a potential new uptrend is forming.
Example: You're watching ES-mini on the Intraday setting. TF3 turns green after being red for several days. This signals the broader trend may be shifting bullish - consider looking for long opportunities.
2. Trend Bearish (TF3 turns Red)
The higher timeframe has shifted bearish - consider protecting profits or exiting long positions.
Example: You hold a long position in Es-mini. TF3 turns red, indicating the macro trend is weakening. This is your signal to take profits or tighten stop-losses.
3. Possible Accumulation (TF3 Red + TF2 turns Green)
While the overall trend is still bearish, the medium timeframe shows buying pressure. Smart money may be accumulating - watch closely for a potential trend reversal.
Example: Es-mini has been in a downtrend (TF3 red). Suddenly TF2 turns green while TF3 remains red. This could indicate institutional buying before a reversal. Don't buy yet, but add it to your watchlist and wait for confirmation.
4. Trend Continuation (TF3 Green + TF2 turns Green)
The medium timeframe realigns with the bullish macro trend - a potential buying opportunity as momentum returns to the uptrend.
Example: Es-mini is in an uptrend (TF3 green). After a pullback, TF2 was red but now turns green again. The pullback appears to be over - this is a trend continuation signal and a potential entry point.
5. Buy the Dip (TF3 + TF2 Green + TF1 turns Green)
All timeframes are now aligned bullish. The short-term pullback is complete and price is resuming the uptrend - optimal entry for short-term trades.
Example: Es-mini is trending up (TF3 + TF2 green). A small dip caused TF1 to turn red briefly. When TF1 turns green again, all three timeframes are aligned - this is your "Buy the Dip" signal with strong confirmation.
6. Sell the Dip (TF3 + TF2 Green + TF1 turns Red)
Short-term weakness within an uptrend. This can be used to take partial profits, wait for a better entry, or trail stops tighter.
Example: You're long on ES-mini with TF3 and TF2 green. TF1 turns red, indicating short-term selling pressure. Consider taking partial profits here and wait for TF1 to turn green again (Buy the Dip) to add back to your position.
How to Use
Choose your scenario: Select "Intraday" 1min-chart for day trading or "Swing" 1h-chart for swingtrading
Enable alerts: Turn on the strategy alerts you want to receive in the settings
Wait for signals: Let the indicator notify you when conditions align
Confirm with price action: Always use additional confirmation before entering trades
Best Practices
✅ Use TF3 as your trend filter - only take longs when TF3 turns green and hold them :)
✅ Use TF2 for timing - wait for TF2 to align with TF3 for swings.
✅ Use TF2 for early entries (accumulation phase) when TF3 is still red. Watch out!
✅ Use TF1 for entries when TF3 and TF2 are green. Only buy if TF1 is red. Keep it short and sweet.
✅ Combine with support/resistance levels for better entries
✅ Use proper risk management - no indicator is 100% accurate
Disclaimer
This indicator is for educational purposes only. Past performance does not guarantee future results. Always do your own research and use proper risk management. Never risk more than you can afford to lose.

Santhosh Time Block HighlighterI have created an indicator to differentiate market trend/momentum in different time zone during trading day. This will help us to understand the market pattern to avoid entering trade during consolidation/distribution. Its helps to measure the volatility and market sentiment

Ben D"s IndicatorIt Auto Draws and Detects, Channels draws buy and sell signals based on over bought, oversold and a few other indicators. It works on all time frames! Enjoy! Leave a comment if you like it.

Index Top 5 Heavyweight Analyzer## 🎯 Overview
This advanced Pine Script indicator applies the **Pareto Principle** to Nifty 50 trading: the top 5 heavyweights control 40%+ of the index's movement. Instead of watching all 50 stocks, this tool monitors the "Kings" that actually drive the index direction.
Professional traders don't trade the index in isolation - they look "under the hood" at heavyweight constituents. This indicator does exactly that, providing real-time analysis of HDFC Bank, Reliance, ICICI Bank, Bharti Airtel, and TCS to predict Nifty movements before they happen.
## 🔥 Key Features
### 1️⃣ Four-Quadrant OI Cycle Analysis
Identifies which cycle each heavyweight is in using Open Interest from continuous futures contracts:
- **Long Buildup** (Price ↑ + OI ↑): Institutions buying aggressively → Bullish driver
- **Short Covering** (Price ↑ + OI ↓): Bears trapped and exiting → Fast bullish spike
- **Short Buildup** (Price ↓ + OI ↑): Big money shorting → Bearish drag
- **Long Unwinding** (Price ↓ + OI ↓): Buyers giving up → Index weakness
### 2️⃣ Alignment Score System
Counts how many of the top 5 stocks are bullish/bearish/neutral. When 3+ heavyweights align in the same direction with sufficient weightage (15%+), the indicator generates high-conviction trade signals for the Nifty index.
### 3️⃣ Cost of Carry (Basis) Analysis
Compares Future vs Spot prices to gauge institutional sentiment:
- **Rising Premium**: Aggressive institutional buying
- **Discount (Backwardation)**: Extreme bearishness
### 4️⃣ Divergence Detection
Warns when the index move contradicts heavyweight signals - identifying "fake moves" that professional traders fade.
### 5️⃣ Actionable Trade Signals
- **Strong Bullish**: Buy Index Calls / Long Nifty Future
- **Strong Bearish**: Buy Index Puts / Short Nifty Future
- **Neutral/Choppy**: Iron Condor / Avoid Directional trades
## 📈 What Makes This Different?
Unlike basic index indicators, this tool:
- Fetches real Open Interest data from continuous futures (RELIANCE1!, HDFCBANK1!, etc.)
- Applies weighted analysis - top 3 stocks matter most
- Provides professional trade recommendations based on constituent alignment
- Uses dark theme optimized colors for extended screen time
- Displays comprehensive dashboard with price, OI, OI change %, cycle status, and basis
## 💡 How to Use
1. **Add to any Nifty 50 or Bank Nifty chart**
2. **Watch the dashboard** in the top-right corner showing all 5 heavyweights
3. **Check the ALIGNMENT row**:
- 🔼 Bull Count | 🔽 Bear Count | ➖ Neutral Count
- Weighted Bull/Bear scores
4. **Read the INDEX SIGNAL row** for trade recommendations
5. **Look for divergence warnings** (⚠️) indicating fake moves
6. **Use the histogram plot** to visualize signal strength over time
## ⚙️ Customizable Settings
- **Constituents**: Modify ticker symbols and weightages
- **Signal Thresholds**: Adjust minimum alignment required (default: 3 out of 5)
- **Display Options**: Toggle table, signals, and basis calculations
- **Timeframe**: Works on all timeframes (intraday and daily)
## 🎨 Dark Theme Optimized
Designed specifically for TradingView's dark mode with:
- High-contrast colors that reduce eye strain
- Bright lime green (#00E676) for bullish signals
- Bright red (#FF5252) for bearish signals
- Electric colors for easy pattern recognition
## 📊 Best Used For
- **Nifty 50 Options Trading**: Know whether to buy calls or puts
- **Index Futures Trading**: Identify high-probability directional moves
- **Risk Management**: Avoid trading when heavyweights show divergence
- **Market Timing**: Enter when top stocks align (3+ in same direction)
## 🚀 Pro Tips
- **"Double Engine" Signal**: When Reliance shows Long Buildup AND HDFC Bank shows Short Covering → Extremely bullish for Nifty
- **Sector Rotation**: If Banks are strong but Tech is weak (or vice versa) → Expect choppy, range-bound index
- **Rollover Analysis**: Near expiry, watch for high OI with rising basis → Bulls/Bears carrying positions forward with confidence
## ⚠️ Important Notes
- Requires TradingView Premium for multiple `request.security()` calls
- OI data available only for stocks with active futures
- Best used on NSE exchange during market hours
- Combine with your own risk management strategy
## 📝 Credits
Based on professional institutional trading methodologies that analyze index constituents rather than the index itself. Implements the Pareto Principle: focus on the 20% (top 5 stocks) that drives 80% of the index movement.
***
## 🔔 Alerts Available
- Strong Bullish Signal (3+ stocks aligned bullish)
- Strong Bearish Signal (3+ stocks aligned bearish)
- Divergence Warning (fake index moves)
**Made for serious traders who want to trade like institutions - by watching what the "smart money" is doing in the heavyweights.**
***
*Optimize your Nifty trading by monitoring the stocks that actually matter. Stop watching all 50 - focus on the 5 Kings!* 👑
***
**Tags**: Nifty, Open Interest, OI Analysis, Heavyweight Analysis, Index Trading, Options Trading, Futures Trading, Institutional Analysis, Smart Money, Pareto Principle

[CT] Donchian Histogram w/Candle ColorsDonchian Histogram, originally created by RafaelZioni and enhanced with optional price bar coloring, is a momentum-style oscillator that shows where the current close sits inside a dynamic Donchian channel and how that position is evolving over time. The script calculates a rolling high and low over a multi-session lookback period based on your chosen Donchian timeframe, then normalizes the close within that range to create a percentage position between the recent high and low. This normalized value is smoothed with a signal length and plotted as a histogram around a zero line, making it easy to see whether price is pressing toward the upper side of its recent range, the lower side, or oscillating near the middle. Positive values indicate that price is trading closer to the Donchian high, negative values indicate price is closer to the Donchian low, and the magnitude of the histogram reflects how strongly price is favoring one side of the range. The color logic highlights this state visually: stronger positive conditions can be shown in teal, moderate positive conditions in lime, stronger negative conditions in red, and neutral or transitional states in orange. The script also includes an option to color the actual chart candles with the same colors as the histogram, so traders can see Donchian-based pressure directly on the main price chart without constantly looking down at the lower pane. The indicator works on completed bars using standard highest/lowest and moving average functions, so it behaves like a normal oscillator and does not use any lookahead tricks. It is best used as a contextual tool to gauge whether price is pushing to the edges of its recent range or reverting toward balance, and to visually synchronize that information with candle colors when desired.

Superior-Range Bound Renko - Alerts - 11-29-25 - Signal LynxSuperior-Range Bound Renko – Alerts Edition with Advanced Risk Management Template
Signal Lynx | Free Scripts supporting Automation for the Night-Shift Nation 🌙
1. Overview
This is the Alerts & Indicator Edition of Superior-Range Bound Renko (RBR).
The Strategy version is built for backtesting inside TradingView.
This Alerts version is built for automation: it emits clean, discrete alert events that you can route into webhooks, bots, or relay engines (including your own Signal Lynx-style infrastructure).
Under the hood, this script contains the same core engine as the strategy:
Adaptive Range Bounding based on volatility
Renko Brick Emulation on standard candles
A stack of Laguerre Filters for impulse detection
K-Means-style Adaptive SuperTrend for trend confirmation
The full Signal Lynx Risk Management Engine (state machine, layered exits, AATS, RSIS, etc.)
The difference is in what we output:
Instead of placing historical trades, this version:
Plots the entry and RM signals in a separate pane (overlay = false)
Exposes alertconditions for:
Long Entry
Short Entry
Close Long
Close Short
TP1, TP2, TP3 hits (Staged Take Profit)
This makes it ideal as the signal source for automated execution via TradingView Alerts + Webhooks.
2. Quick Action Guide (TL;DR)
Best Timeframe:
4H and above. This is a swing-trading / position-trading style engine, not a micro-scalper.
Best Assets:
Volatile but structured markets, e.g.:
BTC, ETH, XAUUSD (Gold), GBPJPY, and similar high-volatility majors or indices.
Script Type:
indicator() – Alerts & Visualization Only
No built-in order placement
All “orders” are emitted as alerts for your external bot or manual handling
Strategy Type:
Volatility-Adaptive Trend Following + Impulse Detection
using Renko-like structure and multi-layer Laguerre filters.
Repainting:
Designed to be non-repainting on closed candles.
The underlying Risk Management engine is built around previous-bar data (close , high , low ) for execution-critical logic.
Intrabar values can move while the bar is forming (normal for any advanced signal), but once a bar closes, the alert logic is stable.
Recommended Alert Settings:
Condition: one of the built-in signals (see section 3.B)
Options: “Once Per Bar Close” is strongly recommended for automation
Message: JSON, CSV, or simple tokens – whatever your webhook / relay expects
3. Detailed Report: How the Alerts Edition Works
A. Relationship to the Strategy Version
The Alerts Edition shares the same internal logic as the strategy version:
Same Adaptive Lookback and volatility normalization
Same Range and Close Range construction
Same Renko Brick Emulator and directional memory (renkoDir)
Same Fib structures, Laguerre stack, K-Means SuperTrend, and Baseline signals (B1, B2)
Same Risk Management Engine and layered exits
In the strategy script, these signals are wired into strategy.entry, strategy.exit, and strategy.close.
In the alerts script:
We still compute the final entry/exit signals (Fin, CloseEmAll, TakeProfit1Plot, etc.)
Instead of placing trades, we:
Plot them for visual inspection
Expose them via alertcondition(...) so that TradingView can fire alerts.
This ensures that:
If you use the same settings on the same symbol/timeframe, the Alerts Edition and Strategy Edition agree on where entries and exits occur.
(Subject only to normal intrabar vs. bar-close differences.)
B. Signals & Alert Conditions
The alerts script focuses on discrete, automation-friendly events.
Internally, the main signals are:
Fin – Final entry decision from the RM engine
CloseEmAll – RM-driven “hard close” signal (for full-position exits)
TakeProfit1Plot / 2Plot / 3Plot – One-time event markers when each TP stage is hit
On the chart (in the separate indicator pane), you get:
plot(Fin) – where:
+2 = Long Entry event
-2 = Short Entry event
plot(CloseEmAll) – where:
+1 = “Close Long” event
-1 = “Close Short” event
plot(TP1/TP2/TP3) (if Staged TP is enabled) – integer tags for TP hits:
+1 / +2 / +3 = TP1 / TP2 / TP3 for Longs
-1 / -2 / -3 = TP1 / TP2 / TP3 for Shorts
The corresponding alertconditions are:
Long Entry
alertcondition(Fin == 2, title="Long Entry", message="Long Entry Triggered")
Fire this to open/scale a long position in your bot.
Short Entry
alertcondition(Fin == -2, title="Short Entry", message="Short Entry Triggered")
Fire this to open/scale a short position.
Close Long
alertcondition(CloseEmAll == 1, title="Close Long", message="Close Long Triggered")
Fire this to fully exit a long position.
Close Short
alertcondition(CloseEmAll == -1, title="Close Short", message="Close Short Triggered")
Fire this to fully exit a short position.
TP 1 Hit
alertcondition(TakeProfit1Plot != 0, title="TP 1 Hit", message="TP 1 Level Reached")
First staged take profit hit (either long or short). Your bot can interpret the direction based on position state or message tags.
TP 2 Hit
alertcondition(TakeProfit2Plot != 0, title="TP 2 Hit", message="TP 2 Level Reached")
TP 3 Hit
alertcondition(TakeProfit3Plot != 0, title="TP 3 Hit", message="TP 3 Level Reached")
Together, these give you a complete trade lifecycle:
Open Long / Short
Optionally scale out via TP1/TP2/TP3
Close remaining via Close Long / Close Short
All while the Risk Management Engine enforces the same logic as the strategy version.
C. Using This Script for Automation
This Alerts Edition is designed for:
Webhook-based bots
Execution relays (e.g., your own Lynx-Relay-style engine)
Dedicated external trade managers
Typical setup flow:
Add the script to your chart
Same symbol, timeframe, and settings you use in the Strategy Edition backtests.
Configure Inputs:
Longs / Shorts enabled
Risk Management toggles (SL, TS, Staged TP, AATS, RSIS)
Weekend filter (if you do not want weekend trades)
RBR-specific knobs (Adaptive Lookback, Brick type, ATR vs Standard Brick, etc.)
Create Alerts for Each Event Type You Need:
Long Entry
Short Entry
Close Long
Close Short
TP1 / TP2 / TP3 (optional, if your bot handles partial closes)
For each:
Condition: the corresponding alertcondition
Option: “Once Per Bar Close” is strongly recommended
Message:
You can use structured JSON or a simple token set like:
{"side":"long","event":"entry","symbol":"{{ticker}}","time":"{{timenow}}"}
or a simpler text for manual trading like:
LONG ENTRY | {{ticker}} | {{interval}}
Wire Up Your Bot / Relay:
Point TradingView’s webhook URL to your execution engine
Parse the messages and map them into:
Exchange
Symbol
Side (long/short)
Action (open/close/partial)
Size and risk model (this script does not position-size for you; it only signals when, not how much.)
Because the alerts come from a non-repainting, RM-backed engine that you’ve already validated via the Strategy Edition, you get a much cleaner automation pipeline.
D. Repainting Protection (Alerts Edition)
The same protections as the Strategy Edition apply here:
Execution-critical logic (trailing stop, TP triggers, SL, RM state changes) uses previous bar OHLC:
open , high , low , close
No security() with lookahead or future-bar dependencies.
This means:
Alerts are designed to fire on states that would have been visible at bar close, not on hypothetical “future history.”
Important practical note:
Intrabar: While a bar is forming, internal conditions can oscillate.
Bar Close: With “Once Per Bar Close” alerts, the fired signal corresponds to the final state of the engine for that candle, matching your Strategy Edition expectations.
4. For Developers & Modders
You can treat this Alerts script as an ”RM + Alert Framework” and inject any signal logic you want.
Where to plug in:
Find the section:
// BASELINE & SIGNAL GENERATION
You’ll see how B1 and B2 are built from the RBR stack and then combined:
baseSig = B2
altSig = B1
finalSig = sigSwap ? baseSig : altSig
To use your own logic:
Replace or wrap the code that sets baseSig / altSig with your own conditions:
e.g., RSI, MACD, Heikin Ashi filters, candle patterns, volume filters, etc.
Make sure your final decision is still:
2 → Long / Buy signal
-2 → Short / Sell signal
0 → No trade
finalSig is then passed into the RM engine and eventually becomes Fin, which:
Drives the Long/Short Entry alerts
Interacts with the RM state machine to integrate properly with AATS, SL, TS, TP, etc.
Because this script already exposes alertconditions for key lifecycle events, you don’t need to re-wire alerts each time — just ensure your logic feeds into finalSig correctly.
This lets you use the Signal Lynx Risk Management Engine + Alerts wrapper as a drop-in chassis for your own strategies.
5. About Signal Lynx
Automation for the Night-Shift Nation 🌙
Signal Lynx builds tools and templates that help traders move from:
“I have an indicator” → “I have a structured, automatable strategy with real risk management.”
This Superior-Range Bound Renko – Alerts Edition is the automation-focused companion to the Strategy Edition. It’s designed for:
Traders who backtest with the Strategy version
Then deploy live signals with this Alerts version via webhooks or bots
While relying on the same non-repainting, RM-driven logic
We release this code under the Mozilla Public License 2.0 (MPL-2.0) to support the Pine community with:
Transparent, inspectable logic
A reusable Risk Management template
A reference implementation of advanced adaptive logic + alerts
If you are exploring full-stack automation (TradingView → Webhooks → Exchange / VPS), keep Signal Lynx in your search.
License: Mozilla Public License 2.0 (Open Source).
If you build improvements or helpful variants, please consider sharing them back with the community.

Superior-Range Bound Renko - Strategy - 11-29-25 - SignalLynxSuperior-Range Bound Renko Strategy with Advanced Risk Management Template
Signal Lynx | Free Scripts supporting Automation for the Night-Shift Nation 🌙
1. Overview
Welcome to Superior-Range Bound Renko (RBR) — a volatility-aware, structure-respecting swing-trading system built on top of a full Risk Management (RM) Template from Signal Lynx.
Instead of relying on static lookbacks (like “14-period RSI”) or plain MA crosses, Superior RBR:
Adapts its range definition to market volatility in real time
Emulates Renko Bricks on a standard, time-based chart (no Renko chart type required)
Uses a stack of Laguerre Filters to detect genuine impulse vs. noise
Adds an Adaptive SuperTrend powered by a small k-means-style clustering routine on volatility
Under the hood, this script also includes the full Signal Lynx Risk Management Engine:
A state machine that separates “Signal” from “Execution”
Layered exit tools: Stop Loss, Trailing Stop, Staged Take Profit, Advanced Adaptive Trailing Stop (AATS), and an RSI-style stop (RSIS)
Designed for non-repainting behavior on closed candles by basing execution-critical logic on previous-bar data
We are publishing this as an open-source template so traders and developers can leverage a professional-grade RM engine while integrating their own signal logic if they wish.
2. Quick Action Guide (TL;DR)
Best Timeframe:
4 Hours (H4) and above. This is a high-conviction swing-trading system, not a scalper.
Best Assets:
Volatile instruments that still respect market structure:
Bitcoin, Ethereum, Gold (XAUUSD), high-volatility Forex pairs (e.g., GBPJPY), indices with clean ranges.
Strategy Type:
Volatility-Adaptive Trend Following + Impulse Detection.
It hunts for genuine expansion out of ranges, not tiny mean-reversion nibbles.
Key Feature:
Renko Emulation on time-based candles.
We mathematically model Renko Bricks and overlay them on your standard chart to define:
“Equilibrium” zones (inside the brick structure)
“Breakout / impulse” zones (when price AND the impulse line depart from the bricks)
Repainting:
Designed to be non-repainting on closed candles.
All RM execution logic uses confirmed historical data (no future bars, no security() lookahead). Intrabar flicker during formation is allowed, but once a bar closes the engine’s decisions are stable.
Core Toggles & Filters:
Enable Longs and Shorts independently
Optional Weekend filter (block trades on Saturday/Sunday)
Per-module toggles: Stop Loss, Trailing Stop, Staged Take Profits, AATS, RSIS
3. Detailed Report: How It Works
A. The Strategy Logic: Superior RBR
Superior RBR builds its entry signal from multiple mathematical layers working together.
1) Adaptive Lookback (Volatility Normalization)
Instead of a fixed 100-bar or 200-bar range, the script:
Computes ATR-based volatility over a user-defined period.
Normalizes that volatility relative to its recent min/max.
Maps the normalized value into a dynamic lookback window between a minimum and maximum (e.g., 4 to 100 bars).
High Volatility:
The lookback shrinks, so the system reacts faster to explosive moves.
Low Volatility:
The lookback expands, so the system sees a “bigger picture” and filters out chop.
All the core “Range High/Low” and “Range Close High/Low” boundaries are built on top of this adaptive window.
2) Range Construction & Quick Ranges
The engine constructs several nested ranges:
Outer Range:
rangeHighFinal – dynamic highest high
rangeLowFinal – dynamic lowest low
Inner Close Range:
rangeCloseHighFinal – highest close
rangeCloseLowFinal – lowest close
Quick Ranges:
“Half-length” variants of those, used to detect more responsive changes in structure and volatility.
These ranges define:
The macro box price is trading inside
Shorter-term “pressure zones” where price is coiling before expansion
3) Renko Emulation (The Bricks)
Rather than using the Renko chart type (which discards time), this script emulates Renko behavior on your normal candles:
A “brick size” is defined either:
As a standard percentage move, or
As a volatility-driven (ATR) brick, optionally inhibited by a minimum standard size
The engine tracks a base value and derives:
brickUpper – top of the emulated brick
brickLower – bottom of the emulated brick
When price moves sufficiently beyond those levels, the brick “shifts”, and the directional memory (renkoDir) updates:
renkoDir = +2 when bricks are advancing upward
renkoDir = -2 when bricks are stepping downward
You can think of this as a synthetic Renko tape overlaid on time-based candles:
Inside the brick: equilibrium / consolidation
Breaking away from the brick: momentum / expansion
4) Impulse Tracking with Laguerre Filters
The script uses multiple Laguerre Filters to smooth price and brick-derived data without traditional lag.
Key filters include:
LagF_1 / LagF_W: Based on brick upper/lower baselines
LagF_Q: Based on HLCC4 (high + low + 2×close)/4
LagF_Y / LagF_P: Complex averages combining brick structures and range averages
LagF_V (Primary Impulse Line):
A smooth, high-level impulse line derived from a blend of the above plus the outer ranges
Conceptually:
When the impulse line pushes away from the brick structure and continues in one direction, an impulse move is underway.
When its direction flips and begins to roll over, the impulse is fading, hinting at mean reversion back into the range.
5) Fib-Based Structure & Swaps
The system also layers in Fib levels derived from the adaptive ranges:
Standard levels (12%, 23.6%, 38.2%, 50%, 61%, 76.8%, 88%) from the main range
A secondary “swap” set derived from close-range dynamics (fib12Swap, fib23Swap, etc.)
These Fibs are used to:
Bucket price into structural zones (below 12, between 23–38, etc.)
Detect breakouts when price and Laguerre move beyond key Fib thresholds
Drive zSwap logic (where a secondary Fib set becomes the active structure once certain conditions are met)
6) Adaptive SuperTrend with K-Means-Style Volatility Clustering
Under the hood, the script uses a small k-means-style clustering routine on ATR:
ATR is measured over a fixed period
The range of ATR values is split into Low, Medium, High volatility centroids
Current ATR is assigned to the nearest centroid (cluster)
From that, a SuperTrend variant (STK) is computed with dynamic sensitivity:
In quiet markets, SuperTrend can afford to be tighter
In wild markets, it widens appropriately to avoid constant whipsaw
This SuperTrend-based oscillator (LagF_K and its signals) is then combined with the brick and Laguerre stack to confirm valid trend regimes.
7) Final Baseline Signals (+2 / -2)
The “brain” of Superior RBR lives in the Baseline & Signal Generation block:
Two composite signals are built: B1 and B2:
They combine:
Fib breakouts
Renko direction (renkoDir)
Expansion direction (expansionQuickDir)
Multiple Laguerre alignments (LagF_Q, LagF_W, LagF_Y, LagF_Z, LagF_P, LagF_V)
They also factor in whether Fib structures are expanding or contracting.
A user toggle selects the “Baseline” signal:
finalSig = B2 (default) or B1 (alternate baseline)
finalSig is then filtered through the RM state machine and only when everything aligns, we emit:
+2 = Long / Buy signal
-2 = Short / Sell signal
0 = No new trade
Those +2 / -2 values are what feed the Risk Management Engine.
B. The Risk Management (RM) Engine
This script features the Signal Lynx Risk Management Engine, a proprietary state machine built to separate Signal from Execution.
Instead of firing orders directly on indicator conditions, we:
Convert the raw signal into a clean integer (Fin = +2 / -2 / 0)
Feed it into a Trade State Machine that understands:
Are we flat?
Are we in a long or short?
Are we in a closing sequence?
Should we permit re-entry now or wait?
Logic Injection / Template Concept:
The RM engine expects a simple integer:
+2 → Buy
-2 → Sell
Everything else (0) is “no new trade”
This makes the script a template:
You can remove the Superior RBR block
Drop in your own logic (RSI, MACD, price action, etc.)
As long as you output +2 or -2 into the same signal channel, the RM engine can drive all exits and state transitions.
Aggressive vs Conservative Modes:
The input AgressiveRM (Aggressive RM) governs how we interpret signals:
Conservative Mode (Aggressive RM = false):
Uses a more filtered internal signal (AF) to open trades
Effectively waits for a clean trend flip / confirmation before new entries
Minimizes whipsaw at the cost of fewer trades
Aggressive Mode (Aggressive RM = true):
Reacts directly to the fresh alert (AO) pulses
Allows faster re-entries in the same direction after RM-based exits
Still respects your pyramiding setting; this script ships with pyramiding = 0 by default, so it will not stack multiple positions unless you change that parameter in the strategy() call.
The state machine enforces discipline on top of your signal logic, reducing double-fires and signal spam.
C. Advanced Exit Protocols (Layered Defense)
The exit side is where this template really shines. Instead of a single “take profit or stop loss,” it uses multiple, cooperating layers.
1) Hard Stop Loss
A classic percentage-based Stop Loss (SL) relative to the entry price.
Acts as a final “catastrophic protection” layer for unexpected moves.
2) Standard Trailing Stop
A percentage-based Trailing Stop (TS) that:
Activates only after price has moved a certain percentage in your favor (tsActivation)
Then trails price by a configurable percentage (ts)
This is a straightforward, battle-tested trailing mechanism.
3) Staged Take Profits (Three Levels)
The script supports three staged Take Profit levels (TP1, TP2, TP3):
Each stage has:
Activation percentage (how far price must move in your favor)
Trailing amount for that stage
Position percentage to close
Example setup:
TP1:
Activate at +10%
Trailing 5%
Close 10% of the position
TP2:
Activate at +20%
Trailing 10%
Close another 10%
TP3:
Activate at +30%
Trailing 5%
Close the remaining 80% (“runner”)
You can tailor these quantities for partial scaling out vs. letting a core position ride.
4) Advanced Adaptive Trailing Stop (AATS)
AATS is a sophisticated volatility- and structure-aware stop:
Uses Hirashima Sugita style levels (HSRS) to model “floors” and “ceilings” of price:
Dungeon → Lower floors → Mid → Upper floors → Penthouse
These levels classify where current price sits within a long-term distribution.
Combines HSRS with Bollinger-style envelopes and EMAs to determine:
Is price extended far into the upper structure?
Is it compressed near the lower ranges?
From this, it computes an adaptive factor that controls how tight or loose the trailing level (aATS / bATS) should be:
High Volatility / Penthouse areas:
Stop loosens to avoid getting wicked out by inevitable spikes.
Low Volatility / compressed structure:
Stop tightens to lock in and protect profit.
AATS is designed to be the “smart last line” that responds to context instead of a single fixed percentage.
5) RSI-Style Stop (RSIS)
On top of AATS, the script includes a RSI-like regime filter:
A McGinley Dynamic mean of price plus ATR bands creates a dynamic channel.
Crosses above the top band and below the lower band change a directional state.
When enabled (UseRSIS):
RSIS can confirm or veto AATS closes:
For longs: A shift to bearish RSIS can force exits sooner.
For shorts: A shift to bullish RSIS can do the same.
This extra layer helps avoid over-reactive stops in strong trends while still respecting a regime change when it happens.
D. Repainting Protection
Many strategies look incredible in the Strategy Tester but fail in live trading because they rely on intrabar values or future-knowledge functions.
This template is built with closed-candle realism in mind:
The Risk Management logic explicitly uses previous bar data (open , high , low , close ) for the key decisions on:
Trailing stop updates
TP triggers
SL hits
RM state transitions
No security() lookahead or future-bar access is used.
This means:
Backtest behavior is designed to match what you can actually get with TradingView alerts and live automation.
Signals may “flicker” intrabar while the candle is forming (as with any strategy), but on closed candles, the RM decisions are stable and non-repainting.
4. For Developers & Modders
We strongly encourage you to mod this script.
To plug your own strategy into the RM engine:
Look for the section titled:
// BASELINE & SIGNAL GENERATION
You will see composite logic building B1 and B2, and then selecting:
baseSig = B2
altSig = B1
finalSig = sigSwap ? baseSig : altSig
You can replace the content used to generate baseSig / altSig with your own logic, for example:
RSI crosses
MACD histogram flips
Candle pattern detectors
External condition flags
Requirements are simple:
Your final logic must output:
2 → Buy signal
-2 → Sell signal
0 → No new trade
That output flows into the RM engine via finalSig → AlertOpen → state machine → Fin.
Once you wire your signals into finalSig, the entire Risk Management system (Stops, TPs, AATS, RSIS, re-entry logic, weekend filters, long/short toggles) becomes available for your custom strategy without re-inventing the wheel.
This makes Superior RBR not just a strategy, but a reference architecture for serious Pine dev work.
5. About Signal Lynx
Automation for the Night-Shift Nation 🌙
Signal Lynx focuses on helping traders and developers bridge the gap between indicator logic and real-world automation. The same RM engine you see here powers multiple internal systems and templates, including other public scripts like the Super-AO Strategy with Advanced Risk Management.
We provide this code open source under the Mozilla Public License 2.0 (MPL-2.0) to:
Demonstrate how Adaptive Logic and structured Risk Management can outperform static, one-layer indicators
Give Pine Script users a battle-tested RM backbone they can reuse, remix, and extend
If you are looking to automate your TradingView strategies, route signals to exchanges, or simply want safer, smarter strategy structures, please keep Signal Lynx in your search.
License: Mozilla Public License 2.0 (Open Source).
If you make beneficial modifications, please consider releasing them back to the community so everyone can benefit.

Super-AO Engine - Sentiment Ribbon - 11-29-25Super-AO Sentiment Ribbon by Signal Lynx
Overview:
The Super-AO Sentiment Ribbon is the visual companion to the Super-AO Strategy Suite.
While the main strategy handles the complex mathematics of entries and risk management, this tool provides a simple "Traffic Light" visual at the top of your chart to gauge the overall health of the market.
How It Works:
This indicator takes the core components of the Super-AO strategy (The SuperTrend and the Awesome Oscillator), calculates the spread between them and the current price, and generates a normalized "Sentiment Score."
Reading the Colors:
🟢 Lime / Green: Strong Upward Momentum. Ideally, you only want to take Longs here.
🟤 Olive / Yellow: Trend is weakening. Be careful with new entries, or consider taking profit.
⚪ Gray: The "Kill Zone." The market is chopping sideways. Automated strategies usually suffer here.
🟠 Orange / Red: Strong Downward Momentum. Ideally, you only want to take Shorts here.
Integration:
This script uses the same default inputs as our Super-AO Strategy Template and Alerts Template. Use them together to confirm your automated entries visually.
About Signal Lynx:
Free Scripts supporting Automation for the Night-Shift Nation 🌙
(www.signallynx.com)

Super-AO with Risk Management Alerts Template - 11-29-25Super-AO with Risk Management: ALERTS & AUTOMATION Edition
Signal Lynx | Free Scripts supporting Automation for the Night-Shift Nation 🌙
1. Overview
This is the Indicator / Alerts companion to the Super-AO Strategy.
While the Strategy version is built for backtesting (verifying profitability and checking historical performance), this Indicator version is built for Live Execution.
We understand the frustration of finding a great strategy, only to realize you can't easily hook it up to your trading bot. This script solves that. It contains the exact same "Super-AO" logic and "Risk Management Engine" as the strategy version, but it is optimized to send signals to automation platforms like Signal Lynx, 3Commas, or any Webhook listener.
2. Quick Action Guide (TL;DR)
Purpose: Live Signal Generation & Automation.
Workflow:
Use the Strategy Version to find profitable settings.
Copy those settings into this Indicator Version.
Set a TradingView Alert using the "Any Alert() function call" condition.
Best Timeframe: 4 Hours (H4) and above.
Compatibility: Works with any webhook-based automation service.
3. Why Two Scripts?
Pine Script operates in two distinct modes:
Strategy Mode: Calculates equity, drawdowns, and simulates orders. Great for research, but sometimes complex to automate.
Indicator Mode: Plots visual data on the chart. This is the preferred method for setting up robust alerts because it is lighter weight and plots specific values that automation services can read easily.
The Golden Rule: Always backtest on the Strategy, but trade on the Indicator. This ensures that what you see in your history matches what you execute in real-time.
4. How to Automate This Script
This script uses a "Visual Spike" method to trigger alerts. Instead of drawing equity curves, it plots numerical values at the bottom of your chart when a trade event occurs.
The Signal Map:
Blue Spike (2 / -2): Entry Signal (Long / Short).
Yellow Spike (1 / -1): Risk Management Close (Stop Loss / Trend Reversal).
Green Spikes (1, 2, 3): Take Profit Levels 1, 2, and 3.
Setup Instructions:
Add this indicator to your chart.
Open your TradingView "Alerts" tab.
Create a new Alert.
Condition: Select SAO - RM Alerts Template.
Trigger: Select Any Alert() function call.
Message: Paste your JSON webhook message (provided by your bot service).
5. The Logic Under the Hood
Just like the Strategy version, this indicator utilizes:
SuperTrend + Awesome Oscillator: High-probability swing trading logic.
Non-Repainting Engine: Calculates signals based on confirmed candle closes to ensure the alert you get matches the chart reality.
Advanced Adaptive Trailing Stop (AATS): Internally calculates volatility to determine when to send a "Close" signal.
6. About Signal Lynx
Automation for the Night-Shift Nation 🌙
We are providing this code open source to help traders bridge the gap between manual backtesting and live automation. This code has been in action since 2022.
If you are looking to automate your strategies, please take a look at Signal Lynx in your search.
License: Mozilla Public License 2.0 (Open Source). If you make beneficial modifications, please release them back to the community!

Super-AO with Risk Management Strategy Template - 11-29-25Super-AO Strategy with Advanced Risk Management Template
Signal Lynx | Free Scripts supporting Automation for the Night-Shift Nation 🌙
1. Overview
Welcome to the Super-AO Strategy. This is more than just a buy/sell indicator; it is a complete, open-source Risk Management (RM) Template designed for the Pine Script community.
At its core, this script implements a robust swing-trading strategy combining the SuperTrend (for macro direction) and the Awesome Oscillator (for momentum). However, the real power lies under the hood: a custom-built Risk Management Engine that handles trade states, prevents repainting, and manages complex exit conditions like Staged Take Profits and Advanced Adaptive Trailing Stops (AATS).
We are releasing this code to help traders transition from simple indicators to professional-grade strategy structures.
2. Quick Action Guide (TL;DR)
Best Timeframe: 4 Hours (H4) and above. Designed for Swing Trading.
Best Assets: "Well-behaved" assets with clear liquidity (Major Forex pairs, BTC, ETH, Indices).
Strategy Type: Trend Following + Momentum Confirmation.
Key Feature: The Risk Management Engine is modular. You can strip out the "Super-AO" logic and insert your own strategy logic into the template easily.
Repainting: Strictly Non-Repainting. The engine calculates logic based on confirmed candle closes.
3. Detailed Report: How It Works
A. The Strategy Logic: Super-AO
The entry logic is based on the convergence of two classic indicators:
SuperTrend: Determines the overall trend bias (Green/Red).
Awesome Oscillator (AO): Measures market momentum.
The Signal:
LONG (+2): SuperTrend is Green AND AO is above the Zero Line AND AO is Rising.
SHORT (-2): SuperTrend is Red AND AO is below the Zero Line AND AO is Falling.
By requiring momentum to agree with the trend, this system filters out many false signals found in ranging markets.
B. The Risk Management (RM) Engine
This script features a proprietary State Machine designed by Signal Lynx. Unlike standard strategies that simply fire orders, this engine separates the Signal from the Execution.
Logic Injection: The engine listens for a specific integer signal: +2 (Buy) or -2 (Sell). This makes the code a Template. You can delete the Super-AO section, write your own logic, and simply pass a +2 or -2 to the RM_EngineInput variable. The engine handles the rest.
Trade States: The engine tracks the state of the trade (Entry, In-Trade, Exiting) to prevent signal spamming.
Aggressive vs. Conservative:
Conservative Mode: Waits for a full trend reversal before taking a new trade.
Aggressive Mode: Allows for re-entries if the trend is strong and valid conditions present themselves again (Pyramiding Type 1).
C. Advanced Exit Protocols
The strategy does not rely on a single exit point. It employs a "Layered Defense" approach:
Hard Stop Loss: A fixed percentage safety net.
Staged Take Profits (Scaling Out): The script allows you to set 3 distinct Take Profit levels. For example, you can close 10% of your position at TP1, 10% at TP2, and let the remaining 80% ride the trend.
Trailing Stop: A standard percentage-based trailer.
Advanced Adaptive Trailing Stop (AATS): This is a highly sophisticated volatility stop. It calculates market structure using Hirashima Sugita (HSRS) levels and Bollinger Bands to determine the "floor" and "ceiling" of price action.
If volatility is high: The stop loosens to prevent wicking out.
If volatility is low: The stop tightens to protect profit.
D. Repainting Protection
Many Pine Script strategies look great in backtesting but fail in live trading because they rely on "real-time" price data that disappears when the candle closes.
This Risk Management engine explicitly pulls data from the previous candle close (close , high , low ) for its calculations. This ensures that the backtest results you see match the reality of live execution.
4. For Developers & Modders
We encourage you to tear this code apart!
Look for the section titled // Super-AO Strategy Logic.
Replace that block with your own RSI, MACD, or Price Action logic.
Ensure your logic outputs a 2 for Buy and -2 for Sell.
Connect it to RM_EngineInput.
You now have a fully functioning Risk Management system for your custom strategy.
5. About Signal Lynx
Automation for the Night-Shift Nation 🌙
This code has been in action since 2022 and is a known performer in PineScript v5. We provide this open source to help the community build better, safer automated systems.
If you are looking to automate your strategies, please take a look at Signal Lynx in your search.
License: Mozilla Public License 2.0 (Open Source). If you make beneficial modifications, please release them back to the community!

VWAP & EMA9 Cross AlertAlerts when EMA9 and VWAP Cross. This provides an indicator of general market direction based on these 2 indicators.

Institutional Orderflow - CT Institutional Orderflow - CT
Overview
This indicator translates VIX futures dynamics into equity price implications, revealing institutional hedging flows and vol pricing's gravitational pull on price, where overpriced volatility signals compression and upside support, while underpriced levels flag expansion risks and downside pressure.
It maps VX deviations to equity levels via historical correlations, anchored by the Bull Bear Bias (BBB), a contango midpoint concept from Matt Cowart at Rocketscooter that sets VX1! fair value as the midpoint between front-month (VX1!) and second-month (VX2!) contracts at monthly rolls.
VX itself quantifies the distribution of options strikes around the underlying price over time, essentially the market's priced-in dispersion of potential outcomes, tied to expiration distance, with volatility inversely proportional to liquidity (fewer transactions in high-vol environments reduce flow and amplify moves).
Interpretation
- VX1! (Front-Month VIX Futures) : Gauges 30-day (±7 days, or 23-37 days to expiration) SPX implied volatility via forward options pricing, capturing medium-term hedging landscapes. Dealers, managing gamma exposure from longer-dated options, hedge by delta-adjusting underlying positions; rising VX1! reflects widening strike distributions (higher fear), prompting protective equity sales that pressure prices; falls toward BBB indicate narrowing distributions (calm), easing hedges and fostering liquidity-driven rallies as transaction frequency rises.
- VIX1D (1-Day Expected Volatility) : Focuses on ultra-short-dated (e.g., 0DTE) P.M.-settled options, measuring immediate strike clustering and gamma intensity near expiration. Closer-dated options heighten dealer sensitivity; spikes signal concentrated hedging bursts, eroding liquidity and fueling intraday volatility with sharp price reversals; declines promote hedging unwind, boosting transaction flow and short-term stability.
- VVIX (Volatility of VIX) : Assesses the implied volatility of VIX options (the "vol of vol"), revealing uncertainty in the vol forecast itself. Elevated VVIX denotes aggressive dealer repositioning across VIX strikes, forecasting erratic VX swings and reduced equity liquidity; subdued levels imply stable distributions, enhancing flow and trend persistence. BBB projections adjust dynamically: low VVIX (<80) constrains overshoots for reversion trades, while high (>110) expands them amid panic hedging.
- BBB Relationship : VX1! above BBB highlights over-distributed (expensive) vol, where dealers unwind hedges as time decays, inverting low liquidity into upside momentum; below BBB warns of under-distributed (cheap) vol, with sparse transactions amplifying expansion risks. Shorter tenors (VIX1D) drive tactical, gamma-fueled price action, contrasting VX1!'s strategic horizon, with VVIX scaling the intensity.
Key Features
- Target Line (Anchored) : Locks at swing violations as enduring support (green, below price) or resistance (red, above), fusing BBB's vol equilibrium with technical anchors to spotlight dealer hedge confluences in strike distributions.
- Magnet Line (Dynamic) : Mirrors live VX1!/BBB shifts, plotting "implied fair" price (blue above for unwind pull; orange below for hedge drag), linking term structure evolution to liquidity-driven gravity.
- Fear Scenario Line : Forecasts price erosion from a 10%+ VX1! surge above BBB, calibrated by VVIX for vol-of-vol amplification, defining dealer panic thresholds where low-liquidity spikes cascade.
- Overshoot Projection : Predicts interim extensions past targets, modulated by VIX1D (near-term gamma flares) and VVIX (distribution uncertainty), relating expiration proximity to heightened swings before time-decay reversion.
- Candle Coloring and SMA Trends : Tracks near-term VX1!/VVIX/VIX1D flows via gradient-colored candles (strong/medium/weak bullish/bearish based on SMA deviations), visualizing realtime options dynamics; green shades signal hedging unwind (rising liquidity, upside bias), red indicates expansion (dealer sales, downside drag). Recommended: VX1! Trend for long-term confluences (Tue-Thu swings); VIX1D Trend or VX1! + VIX1D for short-term (Mon/Fri scalps); add VVIX for regime shifts.
- Swing Boxes : Denote aggressive VX spikes (fear hedging bets) or de-escalations (position realizations), highlighting gamma-driven reversals where dealers rebalance, often preceding liquidity surges or drains in price action.
- Table Metrics : Condenses VX1!/BBB skew, VVIX regimes, VIX1D pulses, and contango cues, correlating options tenor gradients to price flow and hedging mechanics.

Nexural OrderFlow MatrixNexural OrderFlow Matrix
### Professional Order Flow Analysis for Index Futures on TradingView
**Specifically Engineered for:** ES, NQ, YM, RTY, and other high-liquidity index futures
---
## Before You Read Any Further
I need to be upfront with you about something important.
**True order flow analysis—the kind used by institutional traders and prop firms—is not possible on TradingView.**
When professionals talk about order flow, they're referring to the raw tape: every single trade, the exact price, the exact size, and whether it was a buyer lifting the offer or a seller hitting the bid. That level of data simply doesn't exist in TradingView's infrastructure.
So why did I build this indicator? Because TradingView *does* provide meaningful volume delta data through their official functions, and when presented correctly, it can still give you a genuine edge in understanding buying and selling pressure—especially on **index futures** where liquidity is deep and the uptick/downtick methodology works best.
This indicator was specifically engineered with index futures traders in mind. The data sources, the color thresholds, the activity calculations—all of it is optimized for the characteristics of ES, NQ, YM, and RTY. It can work on other instruments, but index futures are where it shines.
I'm not here to oversell you. I'm here to give you the best tool possible within the platform's limitations—and to be completely transparent about what those limitations are.
---
## What This Indicator Actually Does
Nexural OrderFlow Matrix uses TradingView's most advanced volume analysis functions under the hood:
- `ta.requestUpAndDownVolume()` — Samples lower timeframe data to estimate volume on upticks vs downticks
- `ta.requestVolumeDelta()` — TradingView's official cumulative volume delta calculation
The indicator presents this data in two ways:
**1. The Matrix Table**
A heatmap grid aligned beneath each candle showing:
- **Volume** — Total bar volume with yellow/gold intensity gradient
- **Bar VWAP** — Volume-weighted average price within the bar
- **Delta** — Net difference between buying and selling volume
- **Delta %** — Delta as a percentage of total volume (the most important metric)
- **Bar Δ CVD** — How much cumulative volume delta changed this bar
- **Buy Volume** — Estimated volume on upticks
- **Sell Volume** — Estimated volume on downticks
**2. The Imbalance Bars**
A visual stacked bar chart showing the proportional split between buyers and sellers. Green on top represents buying volume, red on bottom represents selling volume. The split is proportional—so a 70/30 bar instantly shows you the imbalance without reading numbers.
**3. The Nexural Flow Meter**
A real-time panel showing:
- Current bias (BUYERS/SELLERS/NEUTRAL)
- Intensity classification (EXTREME/STRONG/MODERATE/WEAK)
- Imbalance ratio (e.g., "BUY 2.3:1")
- Live delta, volume, and VWAP readings
---
## The Color System
I spent considerable time on this because it matters.
Most indicators treat all bars equally. That's noise. In reality, a bar with 8% delta imbalance tells you almost nothing, while a bar with 65% imbalance is screaming information at you.
**The Activity Threshold System:**
- Bars below your threshold (default 25% delta) fade to muted gray tones
- As imbalance increases, colors transition from gray → muted color → vibrant color
- High-activity bars pop with bright greens and reds
- Low-activity bars fade into the background where they belong
**Volume uses a separate yellow/gold gradient:**
- Low volume: Faint, dark yellow-brown
- High volume: Rich, vibrant amber/gold
- This lets you instantly spot volume spikes without reading numbers
The result: your eye is naturally drawn to the bars that matter.
---
## Honest Accuracy Assessment
Based on extensive comparison testing against TradingView's own Volume Footprint and CVD indicators, this indicator achieves approximately **85-90% correlation** with official TradingView tools.
Let me put that in perspective:
| Platform | Data Source | Typical Accuracy |
|----------|-------------|------------------|
| Sierra Chart (Denali feed) | Actual bid/ask tape | 99%+ |
| Bookmap | Actual bid/ask tape | 99%+ |
| NinjaTrader + Kinetick | Tick-level data | 95-99% |
| Jigsaw Daytradr | Reconstructed tape | 95-99% |
| **TradingView (this indicator)** | **Aggregated LTF sampling** | **85-90%** |
| Generic volume indicators | Basic volume only | 50-60% |
We're at the ceiling of what TradingView can provide. The dual data source approach, official library functions, and lower timeframe sampling squeeze out every drop of accuracy the platform allows.
But if you're a dedicated tape reader who needs to see every lot hitting the book, this isn't the tool for that. No TradingView indicator is. That's not a criticism—it's just the reality of the platform's architecture.
---
## Where This Indicator Works Best
### Primary Use Case: Index Futures
This indicator was built specifically for index futures traders. These instruments have the characteristics that make order flow analysis most reliable:
**The Big Four:**
| Symbol | Name | Why It Works |
|--------|------|--------------|
| **ES** | E-mini S&P 500 | Deepest liquidity in the world, tight spreads, clean delta readings |
| **NQ** | E-mini NASDAQ-100 | Massive volume, excellent uptick/downtick correlation |
| **YM** | E-mini Dow | Strong institutional participation, reliable volume data |
| **RTY** | E-mini Russell 2000 | Good liquidity, solid delta accuracy |
Index futures are ideal because:
- **Deep liquidity** — Thousands of contracts per minute means meaningful sample sizes
- **Tight spreads** — Usually 1 tick, so bid/ask attribution is more accurate
- **Continuous trading** — No gaps during RTH, consistent data flow
- **Institutional participation** — Real order flow, not retail noise
- **Official CME volume** — Accurate, exchange-reported data
If you're trading ES, NQ, YM, or RTY on TradingView, this indicator will give you the most accurate order flow approximation the platform can provide.
---
### Secondary Use Cases
**Other Liquid Futures:**
- CL, GC, SI (commodities) — Work well but slightly less optimized
- 6E, 6B, 6J (currency futures) — Decent accuracy with good liquidity
**Large-Cap Stocks & ETFs:**
- SPY, QQQ, IWM
- AAPL, MSFT, NVDA, TSLA, AMD
- Any stock trading millions of shares daily
**Crypto (with caveats):**
- BTC, ETH on major exchanges
- Works best during active hours
- Quality varies by exchange data feed
**Best Timeframes:**
- 1-minute to 15-minute for active intraday trading
- The indicator automatically selects appropriate lower timeframe sampling
- Can work on higher timeframes but edge diminishes
---
## Where This Indicator Struggles
I could hide this section and let you figure it out the hard way. I'd rather just tell you.
**Low-Volume Stocks:**
If a stock trades 50,000 shares a day, the delta readings will be noisy and inconsistent. The uptick/downtick estimation needs sufficient trade activity to be meaningful.
**Wide-Spread Instruments:**
When spreads are 10+ cents wide, a trade at the ask doesn't necessarily indicate aggressive buying. The bid/ask classification becomes less reliable.
**Forex:**
TradingView shows broker-specific volume for forex, not actual market volume. Readings will vary wildly depending on your data provider. Use with extreme caution, or not at all.
**Pre-Market & After-Hours:**
Liquidity thins dramatically. Estimations become less reliable. I'd trust regular session data far more.
**Daily/Weekly/Monthly Charts:**
The aggregation becomes so smoothed that the edge largely disappears. This is designed for intraday analysis.
---
## How to Actually Use This
### Focus on Delta %, Not Raw Delta
Raw delta is influenced by overall volume. A 500-lot delta sounds significant until you realize the bar traded 50,000 lots—that's just 1% imbalance, which is noise.
Delta % normalizes this. Look for readings above ±30% to identify meaningful pressure. Above ±50% is strong. Above ±70% is extreme.
### Let the Colors Guide You
If a bar is gray, the market isn't showing its hand. Don't overanalyze it. When you see bright green or red cells, that's when something is happening.
### Confirm With Price Action
Order flow data is context, not a signal generator. A strong bullish delta at a key support level means something different than the same reading in the middle of nowhere.
Use this alongside your existing analysis—levels, structure, momentum—not as a replacement.
### Watch for Divergences
Price making new highs while delta turns negative? That's absorption—sellers stepping in but price hasn't reacted yet.
Price dropping but delta stays positive? Buyers are defending.
These divergences often precede reversals. They're where order flow analysis provides genuine edge.
### Adjust the Activity Threshold
The default is 25%. For volatile instruments like NQ futures, you might lower it to 20%. For calmer instruments, raise it to 30-35%. The goal is filtering noise while keeping meaningful signals visible.
---
## Understanding the Metrics
| Metric | What It Tells You |
|--------|-------------------|
| **Volume** | Total contracts/shares traded |
| **Delta** | Net buying minus selling volume |
| **Delta %** | How imbalanced the bar is (key metric) |
| **Bar Δ CVD** | Cumulative delta change for this bar |
| **Imbalance Ratio** | Buy:Sell ratio (e.g., 2.1:1 or 1:1.8) |
| **Bar VWAP** | Where most volume transacted within the bar |
| Delta % Range | Interpretation |
|---------------|----------------|
| 0-15% | Neutral, no clear pressure |
| 15-30% | Weak directional bias |
| 30-50% | Moderate pressure |
| 50-70% | Strong imbalance |
| 70%+ | Extreme one-sided flow |
| Color | Meaning |
|-------|---------|
| Gray | Low activity, likely noise |
| Muted Green | Mild buying pressure |
| Bright Green | Strong buying pressure |
| Muted Red | Mild selling pressure |
| Bright Red | Strong selling pressure |
| Yellow/Gold | Volume intensity (separate scale) |
---
## Settings Breakdown
**Display Settings:**
- *Show Matrix Table* — Toggle the data heatmap on/off
- *Show Imbalance Bars* — Toggle the stacked visual bars on/off
- *Row Height* — Adjust the matrix row sizing
- *Activity Threshold* — Delta % below which bars fade to gray
**Imbalance Bars:**
- *Bar Height* — Vertical size of the stacked bars
- *Show Volume Labels* — Display buy/sell volume numbers
- *Show Percentage* — Display buy/sell percentages
**Timeframe Mode:**
- *Auto* — Sensible defaults based on your chart timeframe
- *Aggressive* — Samples from lowest possible timeframe (more granular)
- *Conservative* — Samples from slightly higher timeframe (smoother)
- *Custom* — You choose the exact lower timeframe
**CVD Reset:**
- *Daily* — Standard for intraday trading
- *Weekly/Monthly* — Useful for swing analysis
- *None* — Running cumulative total
---
## A Note on Expectations
I built this to be the best possible order flow tool within TradingView's constraints. It uses every optimization available, presents data in a clean and functional way, and doesn't pretend to be something it's not.
But I want to be clear: if order flow is central to your strategy and you're making decisions based on tape reading, you should seriously consider platforms designed for that purpose. Sierra Chart, Bookmap, Jigsaw—these tools show you the actual order book and time & sales. The difference is substantial.
Think of Nexural OrderFlow Matrix as a bridge. It gives TradingView users access to order flow concepts with reasonable accuracy. For many traders, especially those combining multiple analysis methods, that's enough. For dedicated tape readers, it's a starting point that might inspire you to explore deeper tools.
---
## What You're Getting
- **Dual visualization modes** — Matrix table and/or Imbalance bars
- **Activity-based color system** — Noise fades, signals pop
- **Real-time Nexural Flow Meter** — Live imbalance readings
- **Flexible configuration** — Show what you need, hide what you don't
- **Honest accuracy** — 85-90% correlation with official TradingView data
- **Clean, professional presentation** — Designed for actual trading, not screenshots
---
## What You're Not Getting
- Raw tick data (TradingView limitation)
- Bid/ask tape attribution (TradingView limitation)
- Order book depth (TradingView limitation)
- 99% accuracy (impossible on this platform)
- Magic signals (this is a tool, not a strategy)
---
## Final Thoughts
Trading is hard enough without tools that overpromise and underdeliver. I'd rather give you something that works within its limitations and be honest about those limitations than sell you a fantasy.
Nexural OrderFlow Matrix does what it says. It presents TradingView's best volume delta data in a clear, heatmap format with intelligent color coding. It's accurate within the platform's constraints. It's clean, it's fast, and it doesn't clutter your chart with noise.
Use it wisely. Combine it with price action, levels, and your own market understanding. And if you ever feel limited by what TradingView offers, know that there are deeper tools waiting for you when you're ready.
Trade well.
*— Nexural Trading*
---
## Quick Reference Card
**Built For:** Index Futures (ES, NQ, YM, RTY)
**Also Works On:** CL, GC, SPY, QQQ, large-cap stocks
**Avoid On:** Low-volume stocks, forex, illiquid instruments
**Best Timeframes:** 1-min to 15-min intraday
**Key Metric:** Delta % (not raw delta)
**Accuracy:** ~85-90% vs TradingView official tools
**Edge:** Divergences between price and delta
---
*Nexural OrderFlow Matrix — Engineered for index futures. Maximum accuracy within TradingView's limits.*

$TGM | Topological Geometry Mapper (Custom)TGM | Topological Geometry Mapper (Custom) – 2025 Edition
The first indicator that reads market structure the way institutions actually see it: through persistent topological features (Betti-1 collapse) instead of lagging price patterns.
Inspired by algebraic topology and persistent homology, TGM distills regime complexity into a single, real-time proxy using the only two macro instruments that truly matter:
• CBOE:VIX – market fear & convexity
• TVC:DXY – dollar strength & global risk appetite
When the weighted composite β₁ persistence drops below the adaptive threshold → market structure radically simplifies. Noise dies. Order flow aligns. A directional explosion becomes inevitable.
Features
• Structural Barcode Visualization – instantly see complexity collapsing in real time
• Dynamic color system:
→ Neon green = long breakout confirmed
→ red = short breakout confirmed
→ yellow = simplification in progress (awaiting momentum)
→ deep purple = complex/noisy regime
• Clean HUD table with live β₁ value, threshold, regime status and timestamp
• Built-in high-precision alerts (Long / Short / Collapse)
• Zero repaint – uses only confirmed data
• Works on every timeframe and every market
Best used on:
BTC, ETH, ES/NQ, EURUSD, GBPUSD, NAS100, SPX500, Gold – anywhere liquidity is institutional.
This is not another repainted RSI or MACD mashup.
This is structural regime detection at the topological level.
Welcome to the future of market geometry.
Made with love for the real traders.
Open-source. No paywalls. No BS.
#topology #betti #smartmoney #ict #smc #orderflow #regime #institutional

Auction Theory Support & Resistance Flipper @MaxMaserati 3.0The Auction Theory Support & Resistance Flipper @MaxMaserati 3.0 indicator identifies and tracks volume-based support and resistance levels using an auction market theory approach. It automatically detects price swing points and creates dynamic "defense zones" where significant volume activity occurred, then monitors these zones to determine if they're being defended or overwhelmed by market participants.
Key Features:
1. Automatic Level Detection
Uses fractal swing detection to identify key reversal points
Creates support zones at swing lows where buyers defended price
Creates resistance zones at swing highs where sellers defended price
2. Volume-Based Validation
Only displays levels with significant volume (above threshold)
Volume strength shown as percentage relative to average volume
Visual volume boxes scale with strength (optional)
3. Auction Status Tracking
The indicator monitors each level and displays real-time auction status through labels:
IMPORTANT - Box Without Label:
When a level is first created, it shows ONLY the box/line with NO label
This means price has NOT yet visited/tested this defense level
The auction has not started yet - it's a pending defense zone
Labels ONLY appear after price touches the zone for the first time
Label Formats (3 modes available once price visits):
Compact Mode: 150% ↑
First number = Original volume strength percentage
Symbol shows auction status (↑↑ Strong Defense, ↑ Defending, ↓ Under Pressure, ↓↓ Overwhelmed, ⇌ Balanced, ✓ Finished, ⚡ Flipped)
Full Mode: 150% | ↑ Defending Auction 45%
Volume strength | Status description | Excess volume percentage
Touch Only: Labels appear only after price touches the level (same as default behavior)
Auction States (after first touch):
Unfinished Auction (⏳): Recently touched, minimal volume absorbed (< 30%)
Balanced Auction (⇌): Volume matching original defense, equilibrium
Defending Auction (↑/↓): Successfully defending with excess volume (20-100%)
Strong Defense Auction (↑↑/↓↓): Overwhelming defense volume (>100%)
Under Pressure (↑/↓): Defense weakening, opposite volume building
Overwhelmed (↑↑/↓↓): Defense broken, significant opposite volume (>50%)
Finished Auction (✓): Volume threshold met (100%+), level depleted
Flipped Level (⚡): Support became resistance or vice versa
4. Support/Resistance Flip Detection
Automatically detects when a support level fails and becomes resistance
Or when resistance breaks and becomes support
Visual indication with orange background and ⚡ symbol
Continues tracking until new auction finishes
5. Summary Table
Active Levels count
Breakdown by Support/Resistance
Number of flipped levels
Maximum volume strength currently active
Settings:
Volume Analysis: Lookback period and threshold multiplier
Auction Management: Depletion threshold, bars away to finish, merge distance
Visual Options: Show/hide boxes, labels, depleted levels
Label Customization: Compact/Full/Touch Only modes, size options
Colors: Buyers (green), Sellers (red), Flipped (orange), Depleted (gray)


DTR Trend EntryDTR Trend Entry is a trend-based entry tool designed to highlight market conditions and generate clear long and short signals based on price behavior around a moving average. It helps traders quickly identify bullish trends, bearish trends, consolidation zones, and potential breakout entries.
The indicator uses a simple moving average (SMA) of user-defined length to determine trend direction. A bullish trend is confirmed when the price stays above the moving average for consecutive bars, while a bearish trend is confirmed when the price stays below it. ATR (Average True Range) is also calculated, and price proximity to the moving average is used to detect consolidation, marking periods where the market is likely ranging and preparing for a move.
The chart background is shaded green during bullish trends, red during bearish trends, and yellow during consolidation to make market conditions easy to see at a glance. Entry signals appear when price crosses the moving average in the direction of the established trend: a crossover above the moving average triggers a long entry signal in a bullish zone, and a crossunder triggers a short entry signal in a bearish zone. These signals are marked on the chart with labels and can also be sent as alerts.
DTR Trend Entry is useful for traders who prefer trend-following approaches, breakout strategies, or structure-based entries. It works well on most timeframes and helps avoid late or low-quality trades by filtering entries through trend confirmation and volatility conditions.

Santhosh Zero lag Trend change AlertThis indicator alert whenever these is a change in trend direction. Change input to match with your Asset/Index. This works well in all time frame, I recommend this for Scalping and Position trading

@Aladdin's Trading Web – Command CenterThe indicator uses standard Pine Script functionality including z-score normalization, standard deviation calculations, percentage change measurements, and request.security calls for multiple predefined symbols. There are no proprietary algorithms, external data feeds, or restricted calculation methods that would require protecting the source code.
Description:
The @Aladdin's Trading Web – Command Center indicator provides a composite market regime assessment through a weighted combination of multiple intermarket relationships. The indicator calculates normalized z-scores across several key market components including banks, volatility, the US dollar, credit spreads, interest rates, and alternative assets.
Each component is standardized using z-score methodology over a user-defined lookback period and combined according to configurable weighting parameters. The resulting composite measure provides a normalized assessment of the prevailing market environment, with the option to invert rate relationships for specific market regime conditions.
The indicator focuses on capturing the synchronized behavior across these interconnected market segments to provide a unified view of systemic market conditions.
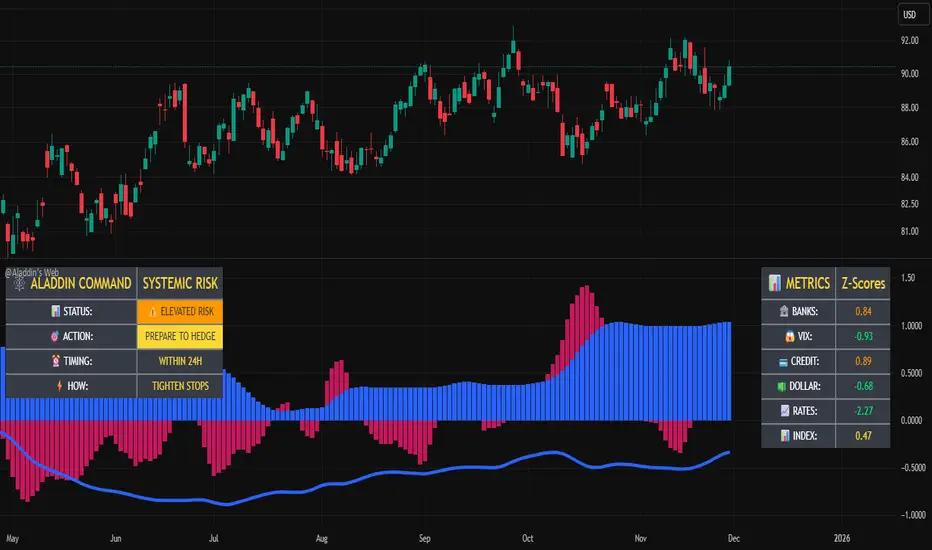
Elite Energy Alpha MatrixThe Elite Energy Alpha Matrix indicator provides comprehensive analysis of the energy sector, focusing on the complex relationships between crude oil benchmarks, natural gas, energy-related ETFs, and the performance dynamics across various energy sub-sectors.
The indicator tracks multiple energy price data sources including WTI crude oil, Brent crude, natural gas, and oil ETFs, enabling detailed monitoring of price relationships and divergences within the energy complex.
Key analytical components include:
• Correlation analysis between major energy benchmarks
• Multi-timeframe examination of energy price relationships
• Sector rotation detection within energy sub-sectors including integrated oil majors, exploration and production companies, oilfield services, refiners, pipelines, and renewable energy
• Performance monitoring across different energy market segments
The indicator provides a structured framework for analyzing the internal dynamics of the energy sector, identifying periods of alignment or divergence between different energy price instruments, and monitoring relative performance across energy sub-sectors.
This approach enables users to assess the consistency of price movements across the energy complex and identify situations where different components of the energy market are exhibiting divergent behavior, which can provide insight into the underlying drivers affecting the sector.2.6s

Myfxschool Trade Pick v25Introducing the MyFXSchool Leading Indicator™, a next-generation market prediction tool designed exclusively for traders who want accuracy, clarity, and early trend identification. Built using advanced price-action logic, institutional order-flow concepts, and dynamic volatility algorithms, this indicator gives you a true leading advantage—not just lagging signals.

BT Aggressionv0.3.1 Beta Release
The BT Aggression Indicator is a high-resolution market sentiment and aggression tool for futures trading. It combines volume delta, volatility normalization, and dynamic smoothing to give traders real-time insight into market pressure.
Detailed description in future release.
