Introduction to Currency Adventures: Players in Currency MarketsUnderstanding Currency Markets
Currency markets are unique in the global financial ecosystem. Unlike stock markets that operate within specific exchanges, Forex is a decentralized market, operating 24 hours a day, five days a week, across multiple time zones. Major financial centers include London, New York, Tokyo, and Sydney, creating a continuous flow of trading activity.
Key Features of Currency Markets:
Liquidity: The FX market is highly liquid. Currencies like the US Dollar (USD), Euro (EUR), and Japanese Yen (JPY) are traded in enormous volumes, allowing traders to enter and exit positions efficiently.
Volatility: Currency prices fluctuate based on multiple factors including interest rates, political developments, trade balances, and market sentiment. High volatility creates opportunities for profit but also increases risk.
Leverage: Forex trading allows traders to control large positions with relatively small amounts of capital. While leverage magnifies profits, it also increases potential losses.
Global Influences: Unlike equities, currency markets are influenced not just by individual companies but by macroeconomic indicators, central bank policies, and global geopolitical events.
The combination of liquidity, volatility, and global influences makes currency trading an adventurous field where knowledge and strategy often dictate success.
The Concept of Currency Adventures
A currency adventure is not merely about trading for profit; it’s about understanding the dynamics that drive currency movements and making informed decisions. Every currency pair represents a relationship between two economies. For example, trading EUR/USD involves monitoring the Eurozone and US economies simultaneously.
Types of Currency Adventures:
Speculative Trading: Traders attempt to profit from short-term price movements. This could involve day trading, swing trading, or scalping.
Hedging: Businesses and investors use currency markets to protect themselves against adverse movements. For instance, an importer in India might hedge against USD appreciation to manage costs.
Arbitrage Opportunities: Some sophisticated traders exploit small discrepancies in currency pricing across different markets to earn risk-free profits.
Long-Term Investments: Currency investors may take positions based on long-term macroeconomic trends, interest rate differentials, or expected geopolitical shifts.
A currency adventure involves a continuous learning process — observing market patterns, analyzing news, and adapting strategies in real-time. It requires discipline, analytical skills, and emotional control, as the market’s rapid pace can lead to impulsive decisions.
Major Currency Pairs and Their Significance
Currency markets revolve around pairs, representing one currency relative to another. Understanding these pairs is critical for anyone embarking on a currency adventure.
Major Pairs:
EUR/USD: Represents the Euro against the US Dollar. It is the most traded pair, reflecting the health of the Eurozone and US economies.
USD/JPY: Indicates the strength of the US Dollar against the Japanese Yen. Often influenced by interest rate differentials and geopolitical stability in Asia.
GBP/USD: Known as “Cable,” it shows the performance of the British Pound versus the US Dollar, influenced by Brexit developments and UK economic indicators.
USD/CHF: Often considered a safe haven pair, influenced by global risk sentiment.
AUD/USD and NZD/USD: Represent commodity currencies, sensitive to global commodity prices, particularly metals and agricultural products.
Exotic Pairs:
These involve currencies from emerging markets, like USD/TRY (US Dollar/Turkish Lira) or USD/ZAR (US Dollar/South African Rand). While offering high profit potential, these pairs are highly volatile and carry significant risk.
Understanding the dynamics of these pairs — from macroeconomic trends to central bank interventions — forms the foundation of any currency adventure.
Key Players in Currency Markets
The Forex market is not a playground for the faint-hearted. Its complexity is amplified by the diverse participants, each with unique objectives and strategies.
1. Central Banks
Central banks are perhaps the most influential players in currency markets. They manage national monetary policies, control interest rates, and intervene directly in currency markets to stabilize their economy.
Example: The US Federal Reserve (Fed) adjusts interest rates to control inflation, which directly impacts the USD’s strength.
Central banks can also engage in quantitative easing, affecting currency supply and valuation.
2. Commercial Banks
Commercial banks act as intermediaries for currency transactions, offering services to businesses and institutional clients. They also trade for proprietary profits.
Banks often hold large inventories of currencies, allowing them to influence short-term market movements.
3. Hedge Funds and Speculators
These players actively seek profit from currency fluctuations. Hedge funds often employ sophisticated strategies, including algorithmic trading, arbitrage, and leveraged positions.
Speculators increase market liquidity but can also amplify volatility.
4. Corporations
Businesses engaged in international trade are critical participants. They buy or sell currencies to pay for imports and exports or to hedge against adverse movements.
Example: An American company importing electronics from Japan will need to buy JPY, impacting the USD/JPY pair.
5. Retail Traders
Individual investors, or retail traders, have grown significantly in influence due to online trading platforms. Though smaller in size compared to institutional players, retail traders contribute to market liquidity and reflect public sentiment.
6. Brokers and Market Makers
Brokers facilitate access for retail and institutional clients. Market makers quote buy and sell prices, profiting from the spread. They play a crucial role in maintaining market liquidity.
Factors Influencing Currency Markets
Currency movements are driven by a mix of economic, political, and psychological factors. Understanding these forces is essential for navigating currency adventures.
1. Economic Indicators
Gross Domestic Product (GDP): A strong GDP indicates economic growth, attracting foreign investment and strengthening the currency.
Inflation Rates: Higher inflation may weaken a currency unless matched by higher interest rates.
Employment Data: Job creation and unemployment rates signal economic health, influencing currency demand.
2. Interest Rates
Interest rate differentials between countries create opportunities for carry trades, where investors borrow in a low-interest currency to invest in a high-interest currency.
3. Political Stability
Geopolitical events — elections, conflicts, or policy changes — can create sharp movements in currency markets. Safe-haven currencies like USD, CHF, and JPY often benefit during times of uncertainty.
4. Market Sentiment
Currencies are also influenced by perception. Positive news about a country’s economy can strengthen its currency, while rumors or fears can trigger sell-offs.
5. Global Events
Natural disasters, pandemics, or technological disruptions can also have far-reaching impacts on currency valuation.
The Adventure of Currency Trading
Engaging in currency markets requires more than knowledge; it demands strategy and discipline. Traders often use a combination of technical analysis, fundamental analysis, and risk management to navigate the market.
Technical Analysis
Chart patterns, trend lines, and indicators like Moving Averages or RSI help identify entry and exit points.
Technical analysis assumes historical price patterns may repeat due to human psychology and market dynamics.
Fundamental Analysis
Focuses on economic indicators, interest rate decisions, and geopolitical events.
Helps traders anticipate long-term trends beyond short-term price movements.
Risk Management
Tools like stop-loss orders, position sizing, and diversification are essential.
Emotional control is critical; impulsive decisions can lead to significant losses.
Technology in Currency Adventures
Modern currency trading is powered by advanced technologies. Automated trading systems, AI-driven algorithms, and real-time news feeds have transformed the landscape, allowing traders to react faster and more efficiently than ever before.
Conclusion
Currency adventures are a journey into the complex, fast-paced world of global finance. They involve understanding the dynamics of currency pairs, the motivations of key players, and the multiple factors that influence markets. From central banks orchestrating monetary policy to retail traders executing speculative trades, every participant contributes to the global flow of currencies.
Success in currency markets requires knowledge, strategy, and discipline. It is a continuous learning process where traders must analyze, adapt, and execute with precision. While the risks are real and sometimes significant, the opportunities are equally vast for those willing to navigate the intricacies of global markets.
Ultimately, a currency adventure is not just about trading; it is an exploration of global economics, international relations, and human psychology, all converging in the vibrant, ever-changing world of currency markets. Those who master this adventure gain not just potential financial rewards but a deeper understanding of how interconnected the modern world truly is.
Chart Patterns

Traders, Investors, and PolicymakersTheir Role in Global Trading.
Introduction
Global trading forms the backbone of the world economy. It connects nations through the exchange of goods, services, capital, and ideas, driving economic growth and innovation. Behind the seamless flow of trade, three critical groups shape its structure and direction — traders, investors, and policymakers. Each group plays a distinct but interconnected role in ensuring that global markets function efficiently, fairly, and sustainably.
Traders facilitate transactions and price discovery; investors allocate capital and influence long-term market trends; policymakers design the legal and institutional framework that governs trade and investment. Together, they create a dynamic balance between market forces and regulations, driving global economic progress.
1. The Role of Traders in Global Trading
1.1 Market Intermediaries and Price Discovery
Traders are the front-line participants in global markets. Their primary function is to buy and sell goods, commodities, currencies, and financial instruments across borders. Through their actions, traders facilitate price discovery — the process by which the value of an asset is determined based on supply and demand.
In global markets, traders operate in multiple forms:
Commodity traders, dealing in oil, metals, agricultural products, etc.
Currency traders (forex traders), influencing exchange rates and liquidity.
Equity and derivatives traders, focusing on stocks, bonds, and financial contracts.
By responding quickly to changing market conditions — such as geopolitical tensions, inflation data, or production shifts — traders ensure that prices reflect real-time global realities. This continuous activity keeps markets liquid and efficient.
1.2 Risk Management and Hedging
Global trade is inherently risky. Prices of commodities and currencies fluctuate constantly due to factors like weather, politics, and global demand. Traders play a critical role in risk management by using derivatives instruments such as futures, options, and swaps.
For example:
An oil producer may hedge future prices by selling crude oil futures contracts.
An importer may buy currency futures to protect against exchange rate volatility.
Such hedging activities stabilize revenues and costs, making international trade more predictable. Traders thus act not merely as profit seekers but also as risk absorbers, helping firms and economies manage uncertainty.
1.3 Liquidity Creation and Market Efficiency
One of the most important functions traders perform is liquidity creation. By continuously buying and selling, they ensure that there is always a counterparty for market participants wanting to enter or exit a trade. Liquidity enhances market efficiency, reducing transaction costs and narrowing bid-ask spreads.
In global markets, high-frequency trading firms, market makers, and institutional traders provide the bulk of this liquidity. Their algorithms process information in microseconds, reacting to changes across global exchanges — from New York to London to Tokyo — creating an interconnected trading ecosystem.
1.4 Speculation and Price Stabilization
While speculation is often criticized, it plays a vital role in price stability. Speculators take positions based on their forecasts of market movements, which often correct price distortions caused by temporary imbalances in supply and demand.
For instance, if a drought threatens wheat production, speculators may buy wheat futures, pushing prices up early. This incentivizes farmers to produce more and consumers to conserve, helping balance the market over time. Thus, traders indirectly contribute to long-term equilibrium through their speculative actions.
2. The Role of Investors in Global Trading
2.1 Capital Allocation and Global Growth
Investors — including individuals, institutions, and sovereign wealth funds — play a foundational role by providing the capital that fuels global trade and development. Their investment decisions determine which countries, industries, and companies receive funding to expand production, improve infrastructure, and innovate.
Foreign Direct Investment (FDI), portfolio investment, and venture capital flows are all forms of global investment that bridge financial gaps between nations. For developing economies, such inflows bring not just capital but also technology, expertise, and access to international markets.
For example, investors in emerging markets like India or Vietnam help create factories, logistics hubs, and export-oriented industries that become integral parts of the global supply chain.
2.2 Long-Term Stability and Confidence
While traders focus on short-term movements, investors typically adopt a long-term outlook. Their steady commitment provides stability and confidence to global markets. Institutional investors like pension funds, mutual funds, and insurance companies deploy capital over years or decades, allowing businesses to plan for sustainable growth.
Moreover, investors’ willingness to hold assets across economic cycles smooths out market volatility and helps economies recover from downturns. For instance, during global recessions, sovereign and institutional investors often continue to fund key projects, preventing total collapse in economic activity.
2.3 Portfolio Diversification and Global Integration
Global investors diversify across countries and asset classes to spread risk and enhance returns. This diversification links markets together — a movement in one region can now affect investment sentiment worldwide.
For example:
A slowdown in China can influence global commodity prices and stock markets.
A rise in U.S. interest rates can trigger capital outflows from emerging markets.
Thus, global investors not only connect financial systems but also transmit economic signals, influencing policymaking and business strategies worldwide.
2.4 Corporate Governance and Ethical Standards
Investors today increasingly focus on Environmental, Social, and Governance (ESG) principles. By choosing where to allocate capital, they exert influence over corporate behavior, encouraging transparency, sustainability, and ethical conduct.
Large institutional investors such as BlackRock or Norway’s sovereign wealth fund use their ownership stakes to push companies toward sustainable practices. In this way, investors act as guardians of global corporate responsibility, ensuring that profits are balanced with long-term social and environmental well-being.
3. The Role of Policymakers in Global Trading
3.1 Creating a Legal and Regulatory Framework
Policymakers — including governments, central banks, and international organizations — set the rules of the global trading system. Their policies determine tariffs, taxes, capital controls, interest rates, and trade agreements.
Without effective policymaking, global markets could descend into chaos. Laws governing intellectual property, labor rights, dispute resolution, and customs procedures ensure fairness and predictability. Institutions such as the World Trade Organization (WTO), International Monetary Fund (IMF), and World Bank coordinate policies among nations to maintain a level playing field.
3.2 Trade Agreements and Economic Diplomacy
One of the key policymaking roles is negotiating trade agreements that define how countries exchange goods and services. Bilateral and multilateral pacts such as the European Union (EU), North American Free Trade Agreement (NAFTA), or Regional Comprehensive Economic Partnership (RCEP) facilitate cross-border commerce.
Through diplomacy, policymakers open new markets, remove barriers, and harmonize standards. These agreements also provide dispute-resolution mechanisms that reduce uncertainty for traders and investors, making global trade smoother and more predictable.
3.3 Monetary and Fiscal Policies
Global trading is deeply influenced by monetary and fiscal policies. Central banks manage interest rates, currency supply, and inflation — all of which affect exchange rates and investment flows. For example:
When the U.S. Federal Reserve raises interest rates, the U.S. dollar strengthens, making imports cheaper and exports less competitive.
Fiscal policies like tax incentives or export subsidies can promote certain industries, shaping trade patterns.
Policymakers must balance domestic goals (such as employment and inflation control) with global competitiveness, ensuring their economies remain resilient in a fluctuating global environment.
3.4 Crisis Management and Market Stabilization
During periods of global crisis — such as financial collapses, pandemics, or wars — policymakers play a stabilizing role. They coordinate interventions like stimulus packages, bailouts, and monetary easing to restore confidence and liquidity in markets.
For instance, during the 2008 global financial crisis, coordinated actions by central banks and governments prevented a deeper economic collapse. Similarly, during the COVID-19 pandemic, massive fiscal and monetary responses helped maintain global trade flows and investment levels despite severe disruptions.
4. Interconnection Between Traders, Investors, and Policymakers
4.1 A Symbiotic Relationship
While their roles differ, traders, investors, and policymakers form a mutually dependent ecosystem.
Traders provide liquidity and efficiency that attract investors.
Investors supply the capital that drives global growth and trade volume.
Policymakers set the structure within which both can operate securely.
For example, a trader may profit from short-term movements created by new policy announcements, while investors adjust long-term strategies based on those same signals. Policymakers, in turn, analyze market reactions to gauge the effectiveness of their decisions.
4.2 Feedback Loops and Global Impact
The actions of one group often influence the others in a feedback loop:
If policymakers tighten monetary policy, investors may withdraw funds, leading traders to adjust their positions.
If traders detect currency instability, policymakers may intervene to stabilize exchange rates.
Investor confidence, reflected in capital inflows or outflows, often guides future policy decisions.
This constant interplay ensures that global trade remains dynamic and adaptive, capable of responding to new challenges and opportunities.
5. Challenges and Future Outlook
5.1 Technological Disruption
The rise of AI-driven trading, blockchain, and digital currencies is reshaping the roles of traders and investors. Algorithms now execute billions of trades daily, while decentralized finance (DeFi) is bypassing traditional intermediaries. Policymakers are challenged to keep pace with this rapid innovation while ensuring transparency and stability.
5.2 Geopolitical Tensions and Protectionism
Trade wars, sanctions, and regional conflicts can disrupt global supply chains. Policymakers must balance national interests with global cooperation. Traders and investors, in turn, must adapt to shifting regulations, tariffs, and political risks — making flexibility and diversification more critical than ever.
5.3 Sustainable and Inclusive Growth
The global trading system is under pressure to become more sustainable and inclusive. Investors are pushing for green finance; policymakers are designing carbon-neutral trade policies; and traders are exploring ethical sourcing. The collaboration between these three groups will determine whether global trade can evolve into a system that benefits both people and the planet.
Conclusion
The story of global trading is not just about goods, currencies, or capital — it’s about the interaction of human decisions across borders and markets. Traders bring liquidity and efficiency; investors provide capital and confidence; and policymakers ensure order and fairness.
Together, they form the three pillars of the global economic structure. Their coordinated actions determine how wealth is created, distributed, and sustained across nations. In an era of technological transformation and geopolitical complexity, their collaboration will be essential for building a resilient, equitable, and sustainable global trading system.
The Central Role of Oil in the Global Economy1. Historical Context: Oil as a Catalyst of Industrial Growth
Oil’s journey as a central economic commodity began in the late 19th and early 20th centuries. Before the industrial revolution, economies relied heavily on coal, wood, and human or animal labor. However, the discovery and commercialization of oil transformed industries.
Industrial Expansion: Oil provided a high-density energy source that powered machinery, ships, and eventually automobiles, creating unprecedented economic productivity.
Global Trade Networks: The discovery of oil in the Middle East, the Americas, and later Africa led to new trade routes and foreign investments. Multinational oil companies emerged, laying the groundwork for global economic interdependence.
Economic Crises and Oil: Events like the 1973 oil embargo demonstrated oil’s ability to influence global inflation, unemployment, and economic stagnation. The embargo highlighted the dependence of industrialized economies on stable oil supplies.
Thus, oil became more than a fuel—it evolved into an economic strategic asset.
2. Oil and Energy Dependence in the Global Economy
Oil is crucial because modern economies are heavily energy-dependent. Almost every sector, from agriculture to services, indirectly relies on oil.
Transportation: Over 90% of global transportation—including road, air, and maritime travel—relies on petroleum products like gasoline, diesel, and jet fuel. The movement of goods and people is inseparable from oil, which links production to consumption on a global scale.
Industrial Production: Oil derivatives serve as feedstock for petrochemicals, plastics, fertilizers, and synthetic materials. Industries such as chemicals, textiles, and pharmaceuticals depend on stable oil supplies to function efficiently.
Electricity and Heating: Although renewable energy is rising, oil remains essential in power generation in several regions and for heating in colder climates.
Energy security—ensuring uninterrupted access to oil—thus becomes synonymous with economic stability. Countries lacking domestic oil reserves must navigate global markets, often exposing themselves to price shocks and geopolitical tensions.
3. Economic Implications of Oil Prices
Oil prices are among the most influential factors in global economic performance. Fluctuations in oil prices affect inflation, trade balances, and national budgets, making oil a core economic variable.
Inflationary Pressures: Rising oil prices increase production costs for almost every good, from food to electronics, resulting in inflation. Conversely, falling oil prices can reduce inflation but may hurt oil-exporting economies.
Trade Balances: Countries that import large volumes of oil face trade deficits when prices rise, whereas oil-exporting nations can experience windfalls. For example, Middle Eastern economies are heavily dependent on oil revenues for public spending.
Economic Growth: Stable and moderate oil prices support consistent industrial and transport costs, enabling steady economic growth. Volatile oil prices, however, can disrupt investment, employment, and consumption patterns globally.
The interconnectedness of oil with economic indicators highlights its role as both a commodity and an economic lever.
4. Oil in Global Financial Markets
Oil is not just a physical commodity; it is also a financial asset traded in global markets, affecting investment flows and monetary policy.
Futures and Derivatives: Crude oil futures and options contracts allow investors and producers to hedge against price volatility, impacting global finance. Major benchmarks like Brent and WTI guide pricing and investment decisions worldwide.
Currency Impacts: Oil-exporting countries often peg their currencies to oil revenue fluctuations, affecting global currency markets. For instance, the U.S. dollar is closely linked to oil trade due to the petrodollar system.
Investor Behavior: Global investors monitor oil price trends to assess risks and returns in sectors like energy, transportation, and manufacturing. Sharp price movements can trigger stock market volatility and influence central bank policies.
Financial markets thus transform oil into a global economic barometer, influencing decisions far beyond the energy sector.
5. Geopolitical Influence of Oil
Oil is a central driver of international politics and diplomacy. Control over oil resources often translates into economic power and political leverage.
Resource-Rich Economies: Countries with abundant oil reserves, such as Saudi Arabia, Russia, and the United States, wield significant geopolitical influence. Their oil policies can shape alliances, trade agreements, and regional stability.
Conflict and Competition: Oil-rich regions have historically experienced conflicts over resource control, including wars, territorial disputes, and sanctions. Access to oil can determine strategic priorities for both state and non-state actors.
Energy Diplomacy: Nations negotiate energy partnerships, pipelines, and trade agreements to secure reliable oil supplies. For example, China’s Belt and Road Initiative includes energy infrastructure to ensure access to critical oil resources.
Oil’s geopolitical dimension underscores its dual role as both an economic and strategic asset.
6. Oil’s Role in National Development
For many economies, oil is a foundation for development. Revenues from oil exports fund infrastructure, healthcare, education, and social programs.
Economic Diversification Challenges: While oil wealth provides immediate revenue, overreliance on oil can hinder diversification. Countries like Venezuela have struggled with economic instability due to dependence on oil exports.
Investment in Technology and Infrastructure: Nations often reinvest oil revenues into modernization projects, energy exploration, and industrialization. This creates employment, stimulates domestic industries, and enhances global competitiveness.
Social and Political Stability: In oil-rich countries, oil revenue can fund welfare programs and subsidies, maintaining political stability. Conversely, declining oil revenues can lead to unrest and economic contraction.
Thus, oil is not just a commodity; it is a development tool with both economic and social ramifications.
7. Oil, Innovation, and Technological Advancements
Oil has been a catalyst for technological innovation in extraction, refining, and energy efficiency.
Extraction Technology: Innovations such as hydraulic fracturing, deepwater drilling, and enhanced oil recovery techniques have expanded supply and reduced production costs.
Refining and Petrochemicals: Advances in refining processes allow the production of higher-value products and alternative fuels. Petrochemical innovations contribute to plastics, synthetic fibers, and industrial chemicals.
Energy Transition: Oil revenue funds research into renewable energy, hybrid fuels, and carbon capture technologies, highlighting its paradoxical role in both dependence and the transition toward sustainability.
Oil’s contribution to technological progress demonstrates its multifaceted influence on global economies.
8. Environmental and Economic Trade-offs
While oil drives economic growth, it also poses environmental and long-term economic challenges.
Climate Change and Pollution: Burning fossil fuels contributes to greenhouse gas emissions, air pollution, and climate-related economic risks. Governments face the dual challenge of promoting growth while reducing carbon footprints.
Stranded Assets: Transitioning to renewable energy may render oil reserves unprofitable, creating financial losses for companies and governments.
Economic Externalities: Oil-dependent economies face exposure to price shocks, geopolitical instability, and environmental liabilities, emphasizing the need for strategic diversification.
Balancing economic growth with environmental sustainability is a central challenge of oil’s role in the 21st century.
9. Future Outlook: Oil in a Changing Global Economy
Despite renewable energy growth, oil remains central to the global economy due to its high energy density, infrastructure, and entrenched usage.
Transition to Renewables: Electric vehicles, solar, and wind energy will reduce oil demand in transportation and power generation over time. However, petrochemicals and industrial applications will continue to rely on oil.
Geopolitical Shifts: New oil producers, technological advances, and changing alliances will reshape the global oil market. Countries that adapt to these changes can leverage oil as a strategic economic tool.
Economic Resilience: Oil-exporting countries will need to diversify economies to mitigate price volatility, while oil-importing nations must invest in energy efficiency and alternative energy to reduce dependency.
The future of oil is one of adaptation, where its role will evolve but remain influential for decades.
10. Conclusion
Oil occupies a central and multifaceted role in the global economy. Its historical significance, influence on energy systems, integration into financial markets, and geopolitical impact make it indispensable to modern economic life. While environmental concerns and technological shifts may reduce reliance on oil in some sectors, its contribution to industrial production, transport, and global trade remains profound.
Policymakers, investors, and businesses must understand oil not merely as a commodity, but as a strategic resource that shapes economic stability, technological advancement, and international relations. Managing oil’s influence, balancing sustainability, and navigating geopolitical dynamics will remain central challenges for global economic governance.
Ultimately, oil is more than a fuel—it is an economic lifeline, a political tool, and a catalyst for development, making it one of the most critical resources in human history.

Global Market Risks and Rewards1. Introduction to the Global Market Landscape
The global market functions as a single ecosystem that links economies, corporations, and investors worldwide. With technology, globalization, and liberalized trade policies, even small and medium-sized enterprises (SMEs) can participate in international trade. However, the very interdependence that fuels growth also magnifies vulnerabilities — such as financial crises, geopolitical tensions, and supply chain disruptions.
Therefore, participation in global markets is a balance of risk and reward, shaped by economic cycles, political decisions, innovation, and global events.
2. Major Rewards of Participating in Global Markets
a. Economic Growth and Expansion Opportunities
One of the most significant rewards of global market participation is access to new consumer bases. Companies can move beyond saturated domestic markets to tap into emerging economies with growing middle-class populations. For instance, Indian IT companies like Infosys and TCS expanded globally, gaining large revenue shares from clients in North America and Europe.
Global exposure allows companies to scale production, diversify demand, and strengthen their brand presence. Investors also gain from exposure to fast-growing regions and sectors unavailable in their home markets.
b. Diversification of Investments and Risk Spreading
For investors, the global market offers a chance to diversify portfolios. By investing in multiple countries and asset classes, they can reduce exposure to country-specific risks such as inflation, political instability, or currency depreciation. For example, when one economy slows down, another may be in a growth phase — creating a natural hedge.
This diversification principle works across equities, commodities, bonds, and even digital assets, spreading risks while increasing long-term stability.
c. Innovation, Technology Transfer, and Knowledge Sharing
Globalization promotes cross-border innovation. Companies operating in international markets often adopt advanced technologies and management practices from developed economies. Likewise, emerging economies benefit from foreign direct investment (FDI) and partnerships that bring expertise, modern infrastructure, and new skills.
For instance, the automobile industry in India and Mexico has grown significantly due to joint ventures with global players who introduced efficient production technologies and quality control standards.
d. Competitive Advantage and Cost Efficiency
Operating in a global marketplace encourages firms to become more efficient and competitive. They must innovate continuously, optimize costs, and maintain high product standards to survive. This process improves overall productivity and quality in both domestic and international markets.
For example, multinational corporations (MNCs) strategically set up production units in countries with lower labor and operational costs, such as Vietnam or Bangladesh, enabling them to reduce costs while maintaining global quality standards.
e. Access to Capital and Financial Markets
Global markets open access to international funding sources. Companies can issue bonds or stocks in foreign markets to attract investors and raise capital at lower interest rates. Developing countries also gain from global financial flows through FDI, portfolio investments, and sovereign funds.
For instance, many Asian startups receive venture capital from the U.S. and Europe, boosting innovation and entrepreneurship.
3. Key Risks of Global Market Participation
While rewards are significant, global markets also carry systemic risks that can impact profits, stability, and long-term growth.
a. Political and Geopolitical Risks
Politics plays a vital role in shaping trade and investment decisions. Sudden changes in government policies, taxation, trade restrictions, or sanctions can disrupt business operations. Geopolitical conflicts — such as tensions in the Middle East or U.S.–China trade wars — can destabilize global supply chains and affect commodity prices.
For instance, the Russia–Ukraine war in 2022 led to energy supply shocks, surging oil and gas prices, and inflation across Europe, showing how one regional conflict can ripple through the global economy.
b. Exchange Rate and Currency Risks
Currency fluctuations directly affect international trade and investments. A company exporting goods to another country may face losses if the foreign currency weakens against its home currency. Similarly, investors holding assets in multiple currencies may face returns volatility due to exchange rate shifts.
For example, if the U.S. dollar strengthens sharply, emerging market currencies often fall, increasing the debt burden of countries or companies that borrowed in dollars.
c. Economic and Financial Market Risks
Global financial markets are deeply interconnected — which means crises spread rapidly. The 2008 global financial crisis began in the U.S. housing market but soon spread worldwide, affecting banks, investors, and governments globally.
Similarly, inflation, interest rate hikes, or recessions in major economies like the U.S., China, or the Eurozone can influence investment flows, commodity prices, and capital markets globally.
d. Supply Chain and Logistics Risks
The COVID-19 pandemic revealed how fragile global supply chains can be. Lockdowns, port delays, and labor shortages disrupted production and trade across sectors. Overdependence on a single supplier or region (e.g., China for electronics manufacturing) can create vulnerabilities.
Companies are now diversifying supply chains — a concept called “China + 1” strategy — to reduce geographic concentration risk.
e. Legal and Regulatory Risks
Each country has its own laws on taxation, labor, environment, and intellectual property. Multinational companies must comply with multiple legal frameworks, which can be complex and costly. Sudden changes in trade policies, tariffs, or environmental standards can affect profitability.
For instance, stricter data protection laws in Europe (GDPR) forced global tech firms to revamp their data-handling systems, adding compliance costs.
f. Environmental and Climate Risks
Climate change has become a major factor in global business and trade. Extreme weather, resource scarcity, and environmental regulations affect production and logistics. Companies with high carbon footprints face increasing pressure from both regulators and investors to transition toward sustainable models.
Environmental disruptions — such as floods in Southeast Asia or droughts in Africa — can also lead to supply shortages and price spikes in food and commodities.
g. Cybersecurity and Technological Risks
As trade and finance shift to digital platforms, cybersecurity risks have multiplied. Hacking, ransomware, and data breaches can cause severe financial and reputational damage. Financial markets, logistics systems, and digital payments depend on secure IT infrastructure — making cybersecurity a top priority for global firms.
h. Cultural and Operational Risks
Differences in language, culture, and business practices can lead to misunderstandings and inefficiencies. A product successful in one country might fail in another due to different consumer preferences or cultural sensitivities.
For example, Western fast-food chains initially struggled in Asian markets until they localized menus and marketing strategies.
4. Balancing Risk and Reward: Strategic Approaches
To succeed in global markets, businesses and investors must balance risks with potential rewards through strategic planning and diversification.
a. Risk Management and Hedging
Companies use hedging instruments like futures, options, and forward contracts to protect against exchange rate and commodity price fluctuations. Insurance policies can mitigate risks from political instability or natural disasters.
For example, exporters hedge currency exposure to lock in future exchange rates and stabilize revenues.
b. Geographic and Sectoral Diversification
Expanding into multiple countries or sectors helps spread risk. A company heavily dependent on one market may face losses during local downturns, while a diversified firm can offset that with growth elsewhere.
For investors, holding a mix of assets — stocks, bonds, commodities, and foreign equities — reduces portfolio volatility.
c. Sustainable and Responsible Business Practices
Modern global markets increasingly reward companies that adopt Environmental, Social, and Governance (ESG) principles. Sustainable businesses attract long-term investors, gain regulatory advantages, and reduce exposure to environmental or ethical risks.
Green investments, renewable energy projects, and responsible sourcing are not only good for the planet but also create competitive advantages.
d. Technological Adaptation and Innovation
Digital transformation, automation, and AI-driven analytics help firms manage operations efficiently and respond to global challenges. Technology enables real-time monitoring of logistics, market trends, and customer needs, improving adaptability and profitability.
e. Strategic Alliances and Partnerships
Collaboration with local partners, joint ventures, or regional alliances helps global firms understand local markets, comply with regulations, and build trust. Such partnerships reduce entry risks while leveraging local expertise.
5. Emerging Trends Influencing Global Risks and Rewards
The dynamics of global markets are constantly evolving. Several emerging trends are reshaping the risk-reward balance.
a. Shift Toward Emerging Economies
Asia, Africa, and Latin America are expected to drive most global growth in the next decades. Investors and corporations see significant opportunities in these fast-growing markets — though they often come with higher political and currency risks.
b. Rise of Digital and Decentralized Finance
Cryptocurrencies, blockchain, and digital payment systems are transforming how international transactions occur. They offer efficiency and lower costs but also introduce regulatory uncertainty and cyber risks.
c. Reshoring and Supply Chain Realignment
Post-pandemic, many countries are encouraging domestic manufacturing and reducing dependence on foreign supply chains. This reshoring trend reduces vulnerability but may increase costs in the short term.
d. Focus on Green and Inclusive Growth
Governments and investors are aligning with climate goals, encouraging low-carbon industries, and penalizing polluting sectors. Green energy, electric vehicles, and carbon trading markets are creating new global investment opportunities.
6. Conclusion: The Dual Nature of Global Markets
The global market is a double-edged sword — offering unprecedented rewards while exposing participants to complex risks. Economic interdependence ensures that prosperity in one region can fuel global growth, but crises can just as easily spread across borders.
Success in the global arena requires strategic risk management, adaptability, and continuous innovation. Companies and investors who understand these dynamics — and balance opportunity with caution — can not only survive but thrive in this interconnected world.
In essence, the global market is not just about trade and investment; it is about understanding the rhythm of global change — where risk and reward coexist as inseparable partners in the journey toward progress and prosperity.

Understanding Global Event Risks1. Defining Global Event Risks
Global event risks refer to sudden or prolonged events that significantly affect global systems — from trade and finance to security and natural resources. These events are often unpredictable in timing but can have measurable impacts once they occur.
Examples include:
Geopolitical tensions such as wars, border disputes, or terrorism.
Economic crises like financial meltdowns, debt defaults, or currency collapses.
Pandemics such as COVID-19, which disrupted global supply chains and labor markets.
Natural disasters including earthquakes, tsunamis, or climate-driven catastrophes.
Technological disruptions, such as cyberattacks or digital infrastructure failures.
The key characteristic of global event risks is their interconnected impact — what begins as a localized issue can quickly become a global concern.
2. Classification of Global Event Risks
Global event risks can be broadly classified into several categories:
a. Political and Geopolitical Risks
These involve government actions, regime changes, conflicts, or diplomatic breakdowns that affect trade routes, investment flows, and international alliances.
Examples:
Russia-Ukraine war and its impact on global energy prices.
US-China trade tensions affecting technology supply chains.
Middle East conflicts influencing oil markets.
b. Economic and Financial Risks
These include global recessions, inflationary shocks, debt crises, and stock market collapses.
Examples:
The 2008 Global Financial Crisis.
The European Sovereign Debt Crisis.
Inflation surges after the COVID-19 pandemic due to disrupted supply chains.
c. Environmental and Climate Risks
Climate change has become a persistent global threat. Rising sea levels, floods, droughts, and wildfires can devastate infrastructure and food systems.
Examples:
The 2023 heatwaves in Europe and Asia affecting energy demand.
Flooding in Pakistan (2022) disrupting agriculture and industry.
d. Technological and Cyber Risks
The increasing digitalization of global systems brings vulnerabilities to cyberattacks, data theft, and digital espionage.
Examples:
Cyberattacks on critical infrastructure or financial systems.
Disruptions in semiconductor supply chains.
AI-driven misinformation campaigns influencing markets and politics.
e. Health and Pandemic Risks
Global health emergencies can halt production, trade, and travel.
Example:
The COVID-19 pandemic, which caused the biggest global economic contraction since World War II.
f. Social and Humanitarian Risks
Mass migrations, social unrest, and inequality can destabilize societies and economies.
Examples:
Refugee crises due to conflicts or climate disasters.
Civil protests affecting industrial output or governance.
3. The Interconnected Nature of Global Risks
In today’s globalized economy, risks rarely exist in isolation. Political instability may trigger economic sanctions; economic downturns can lead to social unrest; and environmental disasters can fuel migration crises.
For instance:
The war in Ukraine not only created a geopolitical crisis, but also an energy shock, food shortage, and inflationary wave across Europe and Asia.
A cyberattack on a financial institution could lead to market panic, liquidity shortages, and regulatory crackdowns.
This web of interdependence means that risk management today must take a systemic approach — considering how one event can cascade into others.
4. Measuring and Analyzing Global Event Risks
Understanding risk requires both quantitative and qualitative assessment. Analysts use several tools and indicators to measure the probability and potential impact of global events:
a. Economic Indicators
GDP growth rates, inflation, and employment levels help identify potential downturns.
Bond spreads and currency volatility signal financial stress or geopolitical uncertainty.
b. Geopolitical Analysis
Political stability indexes, sanctions data, and defense expenditures give clues to upcoming conflicts or policy shifts.
c. Climate and Environmental Data
Monitoring global temperature anomalies, carbon emissions, and disaster frequency helps assess long-term environmental risks.
d. Cybersecurity Reports
Institutions like Interpol, Europol, and private cybersecurity firms track attack trends and vulnerabilities.
e. Scenario Planning
Organizations simulate various “what-if” scenarios — for example, a war in a major oil-producing region or a cyberattack on banking systems — to test their preparedness.
f. Global Risk Reports
The World Economic Forum (WEF) and IMF publish annual risk reports that rank threats by likelihood and impact. These reports help governments and investors prioritize their strategies.
5. Impact of Global Event Risks on the Economy and Markets
Global events influence nearly every aspect of economic life:
a. Trade Disruptions
Wars, sanctions, or pandemics can disrupt shipping lanes and supply chains. Businesses face shortages, higher costs, and delays.
b. Financial Market Volatility
Investors often react quickly to uncertainty. Stock markets may fall, currencies fluctuate, and bond yields shift. Safe-haven assets like gold and the US dollar typically rise.
c. Inflation and Commodity Prices
Energy and food prices often surge during crises, as seen in the post-Ukraine war inflation spike.
d. Corporate Strategy and Investment
Companies may delay expansions, diversify suppliers, or relocate operations to manage risk exposure.
e. Policy Responses
Governments and central banks intervene through stimulus packages, interest rate changes, or fiscal reforms to stabilize markets.
f. Social and Labor Impacts
Job losses, wage pressures, and reduced consumer confidence can follow prolonged global shocks.
6. Case Studies of Major Global Event Risks
a. The 2008 Financial Crisis
Triggered by the collapse of the US housing bubble, it spread globally due to interconnected banking systems. The crisis led to mass unemployment, austerity policies, and long-term shifts in regulation.
b. The COVID-19 Pandemic
Lockdowns halted travel, production, and trade. Governments injected trillions in stimulus, but inflation and debt burdens grew. The event redefined global health governance and digital transformation.
c. Russia-Ukraine Conflict (2022-Present)
The invasion disrupted global energy markets, food supply chains, and international alliances. Sanctions on Russia reshaped trade flows, pushing countries toward alternative energy sources and defense spending.
d. Climate-Driven Events
Extreme weather in the 2020s has affected agricultural yields, insurance costs, and migration patterns. These long-term risks now feature prominently in global financial planning.
7. The Role of Global Institutions in Managing Risks
a. International Monetary Fund (IMF) and World Bank
They provide financial aid and policy guidance during crises to prevent economic contagion.
b. World Health Organization (WHO)
Coordinates global responses to pandemics, sets health guidelines, and assists vulnerable nations.
c. World Trade Organization (WTO)
Mediates trade disputes and ensures smoother recovery from disruptions.
d. United Nations (UN)
Addresses humanitarian, environmental, and peacekeeping challenges, aiming to stabilize conflict regions.
e. Central Banks and Regional Alliances
The U.S. Federal Reserve, European Central Bank, and others coordinate monetary policies to manage inflation and liquidity crises.
f. Private Sector and NGOs
Corporations and non-profits contribute through innovation, sustainability projects, and disaster relief efforts.
8. Managing and Mitigating Global Event Risks
Risk management is not about eliminating uncertainty but about building resilience. Key strategies include:
a. Diversification
Businesses spread their operations and supply chains across multiple regions to avoid dependence on one market or source.
b. Hedging and Financial Instruments
Investors use options, futures, and insurance contracts to protect against market volatility or commodity price swings.
c. Scenario Planning and Stress Testing
Banks and corporations conduct regular simulations to test their ability to survive shocks like currency crashes or cyberattacks.
d. Geopolitical Intelligence
Firms increasingly invest in geopolitical advisory services to anticipate policy changes and security risks.
e. Sustainable and Green Policies
Adopting eco-friendly practices reduces exposure to regulatory penalties and environmental disruptions.
f. Technological Preparedness
Cyber resilience, data encryption, and backup systems help guard against digital threats.
g. Crisis Communication and Coordination
Transparent communication between governments, corporations, and the public ensures faster response and recovery during global events.
9. Future Trends in Global Event Risks
The risk landscape is evolving rapidly. Some future trends include:
a. Technological Warfare and AI Risks
AI-driven misinformation, autonomous weapons, and data manipulation could redefine future conflicts.
b. Climate Migration
Rising sea levels and droughts may push millions to migrate, creating social and political strains.
c. Supply Chain Re-Localization
Nations are reshoring production to reduce dependency on foreign suppliers, creating new trade dynamics.
d. Digital Currency and Financial Stability
Central Bank Digital Currencies (CBDCs) may alter the global payment system but also bring cybersecurity challenges.
e. Energy Transition Risks
As economies shift from fossil fuels to renewables, transitional disruptions in energy prices and jobs will occur.
f. Multipolar World Order
Power is shifting from Western dominance to a multipolar setup with China, India, and regional blocs gaining influence. This could lead to both cooperation and competition.
10. The Importance of Awareness and Adaptability
Understanding global event risks requires not just analysis but agility — the ability to adapt policies and strategies as new challenges arise. The modern era rewards entities that are proactive, data-driven, and globally aware.
Governments must design flexible policies for energy, health, and trade.
Businesses must incorporate risk intelligence into decision-making.
Investors must diversify and remain vigilant for cross-market signals.
Citizens must stay informed, as global shocks increasingly affect local economies and daily life.
Conclusion
Global event risks are a defining feature of the 21st-century world. They remind us that our economies, technologies, and societies are deeply interconnected. From financial meltdowns to pandemics, from cyberattacks to climate disasters, each event tests the resilience of global systems.
The key to navigating these challenges lies in understanding interconnections, building preparedness, and fostering international cooperation. In an era where uncertainty is constant, risk awareness becomes not a luxury but a necessity — shaping the policies, strategies, and innovations that safeguard global stability and progress.
How to Set a Stop Loss in Price Action Trading Forex Explained
Wrong stop loss is one of the main reasons why newbie traders lose money.
I will share with you a proven stop loss strategy for price action trading Forex.
I will explain how to identify a safe stop loss level for any chart part, trend line and a breakout that you trade.
Learn how to set a safe stop loss easily on any time frame and no matter whether you are day trading, scalping or swing trading.
To correctly put a stop loss for trading price action in forex market, first, let's discuss 2 major types of price action patterns that you should know.
Trend line based patterns
The first type of patterns is called trend line based patterns.
In this category, we put all the patterns where trend lines are used as entries or confirmations.
Here is the list of these patterns:
Rising/falling parallel channels,
Rising/falling wedges,
Rising/falling expanding wedges/channels.
For example, in a rising parallel channel, its support is a strong vertical structure. It provides a safe place to buy the market from.
Alternatively, its breakout will provide a strong confirmation to sell.
Horizontal neckline based patterns
The second type of patterns is called neckline based patterns.
In this category, we include all chart patterns that lie on a horizontal neckline.
A signal that we rely on to trade these patterns is a breakout of their necklines.
Here is the list of these patterns:
Double top/bottom,
Head and shoulders and inverted one,
Ascending/descending triangle,
Cup and handle and inverted one.
Here is how we set a stop loss in trend line based patterns.
If we buy the market from a support line of a wedge or a channel, expecting a growth, we will need to the last bearish movement from the high of the pattern to the point where it touches a support line - our entry.
Our safe stop loss will be 1.272 fibonacci extension (from its high to low) of this movement.
If we sell the market after a breakout of a support line of a wedge or a channel, we will take the last bearish movement from the high of the pattern to the low of a breakout candle.
Our safe stop loss will be 1.272 fibonacci extension (from its low to high) of this movement.
Look how it works in practice:
If we sell the market from a resistance line of a wedge or a channel,
we will take the last bullish movement from the low of the pattern to the point where it touched a resistance line.
Our safe stop loss will be 1.272 fibonacii extension (from its low to high) of this movement.
Look how it works in practice:
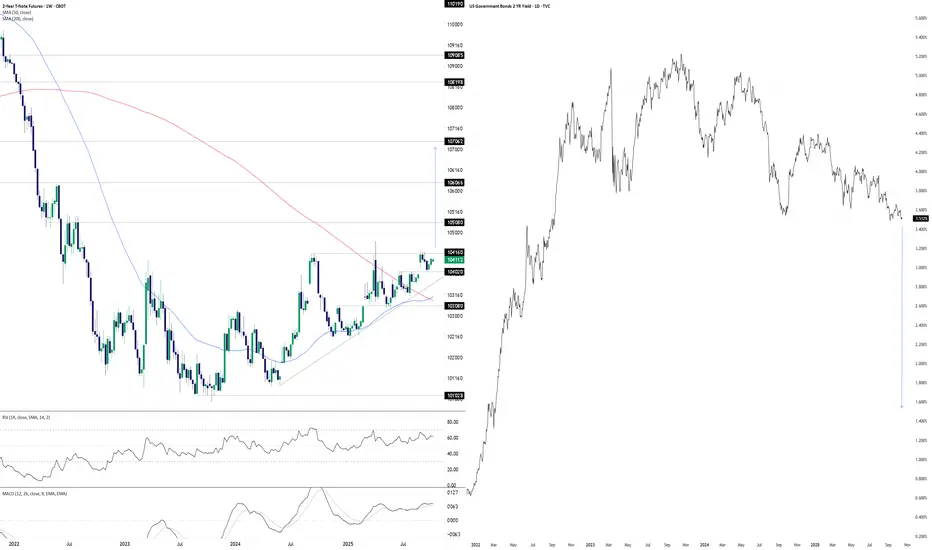
Here is a safe stop loss for selling USDJPY forex pair from a resistance of a falling wedge.
If we buy a bullish breakout of a resistance line of a wedge or a channel, we will take a bullish movement from the low of the pattern to a high of the breakout candle.
Our safe stop loss will be 1.272 fibonacci extension (from its high to its low) of this movement.
Here is how easily we can set a stop loss, using this strategy, buying a breakout of a resistance line of a falling channel on NZDUSD forex pair.
And here is how we set stop loss for neckline based patterns.
If we see a breakout of a neckline of a bearish pattern, and we want to sell, we will need to find a pattern range: a low of the neckline of the pattern and highest high of the pattern.
Based on that, we will draw fibonacci extension (from its lows to high).
Our safe stop loss will be 1.272 extension.
That is how we put a stop loss, using this method on EURUSD, trading head & shoulders.
If we buy a breakout of a neckline of a bullish pattern, our safe stop loss will be based on 1.272 extention (from high to low) of the range of the pattern - the highest high of the neckline and the lowest low of the pattern.
That is how a safe stop loss for a cup & handle pattern on EURUSD looks. I drew fib.extension from the neckline's high to pattern's low.
This simple method will help you to always put a safe stop loss.
Integrate that in your trading plan and avoid losses, trading price action.
❤️Please, support my work with like, thank you!❤️
I am part of Trade Nation's Influencer program and receive a monthly fee for using their TradingView charts in my analysis.
Impact of Geopolitical Tensions on Supply Chains1. Introduction to Geopolitical Tensions and Supply Chains
Geopolitical tensions refer to conflicts, disputes, or strained relations between countries, often involving political, economic, or military dimensions. These tensions can disrupt international trade and global supply chains, which rely on the smooth movement of goods, services, and information across borders. Supply chains are interconnected networks of suppliers, manufacturers, logistics providers, and distributors. When geopolitical crises arise—such as wars, sanctions, or territorial disputes—they can cause delays, increase costs, and force companies to seek alternative routes or suppliers. In an era of globalization, even a localized conflict can have far-reaching effects on industries worldwide.
2. Trade Restrictions and Sanctions
One of the most immediate effects of geopolitical tensions is the imposition of trade restrictions, tariffs, and sanctions. Countries may restrict exports or imports of critical goods like oil, technology, or raw materials to exert political pressure. For example, sanctions on Russia following the Ukraine conflict disrupted the supply of natural gas and rare earth metals, causing ripple effects in energy-intensive industries and electronics manufacturing. Companies dependent on sanctioned countries face compliance risks, legal penalties, and the need to find alternative suppliers, often at higher costs.
3. Disruption of Transportation and Logistics
Geopolitical tensions often create unsafe or restricted transport routes, impacting maritime, air, and land logistics. Shipping lanes, like the Strait of Hormuz or the South China Sea, can become contested zones, raising insurance costs and causing shipping delays. Similarly, airspace restrictions force rerouting of cargo flights, increasing fuel consumption and delivery times. Ports in conflict zones may halt operations entirely, forcing supply chains to seek distant ports and increasing lead times. These disruptions not only delay deliveries but also create bottlenecks that affect the entire global distribution network.
4. Volatility in Commodity Prices
Geopolitical crises often trigger sharp fluctuations in commodity prices, particularly oil, gas, and metals. These price swings directly affect transportation costs and manufacturing expenses. For instance, during periods of Middle East instability, crude oil prices can spike, increasing the cost of shipping and production for industries reliant on fuel. Similarly, conflict in rare earth-producing regions can disrupt electronics and automotive industries, as these minerals are critical in high-tech manufacturing. Companies must adapt to these volatile conditions, often by hedging prices or maintaining strategic reserves of essential materials.
5. Supply Chain Diversification and Resilience Challenges
Geopolitical tensions highlight the vulnerability of single-source or regionally concentrated supply chains. Companies may face pressure to diversify suppliers and manufacturing locations to reduce risk. However, diversification comes with challenges such as higher operational costs, longer lead times, and complex coordination across multiple countries. For example, firms heavily reliant on Chinese manufacturing for electronics faced difficulties during U.S.-China trade disputes, prompting efforts to establish alternative production hubs in Southeast Asia or India. While diversification improves resilience, it also increases the complexity of global supply chain management.
6. Impact on Workforce and Production
Conflict or political instability can disrupt the availability of labor in affected regions. Strikes, protests, or military conscription reduce workforce productivity, while migration crises can strain labor markets in neighboring countries. Factories in politically unstable regions may face temporary closures, production slowdowns, or workforce shortages. For multinational companies, this unpredictability can delay production schedules and contractual obligations, ultimately affecting revenue and customer trust. In addition, geopolitical tensions can lead to restrictions on skilled labor movement, limiting access to essential technical expertise in global supply chains.
7. Cybersecurity Threats and Industrial Espionage
Geopolitical tensions often escalate cyber threats targeting supply chains. Nation-state actors may attempt to disrupt industrial operations, steal intellectual property, or sabotage logistics networks. Critical sectors such as defense, energy, and pharmaceuticals are particularly vulnerable. Cyberattacks can halt production, corrupt shipment data, or compromise financial transactions. Companies must invest in robust cybersecurity measures and contingency planning to protect their supply chain from these emerging risks. The integration of digital technologies in supply chains increases efficiency but also amplifies vulnerability to politically motivated cyber threats.
8. Financial and Insurance Implications
Geopolitical instability increases the financial risk of supply chains. Higher insurance premiums, cost of hedging against currency fluctuations, and increased interest rates for trade financing are common consequences. Companies may face liquidity challenges if payments are delayed due to banking restrictions in sanctioned countries. Financial risk management becomes critical to maintaining continuity in global operations. Firms may also have to maintain emergency funds or negotiate flexible credit terms with suppliers and logistics providers to cushion against sudden disruptions caused by geopolitical events.
9. Regulatory Compliance and Legal Challenges
Operating across regions with tense political relations requires strict adherence to international regulations, export controls, and sanctions. Violating these regulations, even unintentionally, can result in severe penalties, reputational damage, and operational restrictions. Companies must constantly monitor changes in laws across countries, ensure compliance, and train personnel accordingly. For instance, restrictions on dual-use technologies, military-grade materials, or certain chemicals may force supply chain redesigns. Legal complexities add operational overhead and require robust compliance management systems.
10. Strategic Shifts and Long-Term Supply Chain Transformation
Persistent geopolitical tensions push companies to rethink long-term strategies. This includes reshoring or nearshoring production, building strategic reserves, investing in automation, and leveraging local suppliers to reduce dependency on high-risk regions. Supply chain digitization and predictive analytics are increasingly used to anticipate disruptions and optimize logistics routes. Furthermore, geopolitical awareness is becoming a core part of corporate strategy, influencing investment decisions, market entry, and partnerships. Companies that proactively adapt to geopolitical realities can build competitive advantages through resilient, flexible, and agile supply chains.
Conclusion
Geopolitical tensions have a profound impact on global supply chains, affecting trade flows, transportation, commodity prices, workforce availability, cybersecurity, financial stability, and regulatory compliance. While these disruptions present challenges, they also create opportunities for companies to enhance supply chain resilience through diversification, technology adoption, and strategic planning. In an interconnected global economy, understanding and mitigating geopolitical risks is no longer optional—it is critical for maintaining operational continuity and competitive advantage.
Introduction to OPEC and Its Role in Global Oil Markets1. What is OPEC?
The Organization of the Petroleum Exporting Countries (OPEC) is an intergovernmental organization founded in 1960 by five countries: Iran, Iraq, Kuwait, Saudi Arabia, and Venezuela. Its primary purpose is to coordinate and unify petroleum policies among member countries to stabilize oil markets. OPEC’s membership has since expanded to 13 countries as of today, including nations like United Arab Emirates, Nigeria, Algeria, and Angola. By pooling their resources and coordinating production strategies, OPEC aims to influence oil prices and maintain market stability. It operates under a formal charter and holds regular meetings to discuss production quotas, market conditions, and global economic trends.
2. Historical Context and Formation
OPEC was formed during a period of global economic transformation. In the 1950s, oil prices were largely controlled by multinational corporations called the “Seven Sisters”, which dominated exploration, production, and pricing. Oil-producing countries often felt that they were not receiving fair value for their natural resources. In response, OPEC’s founding members sought to assert sovereignty over their oil reserves, control production levels, and ensure fair pricing for their exports. This shift marked a turning point in global energy politics, giving oil-producing nations greater influence over the world economy.
3. Objectives of OPEC
OPEC’s core objectives include:
Stabilizing oil markets to avoid extreme price volatility.
Securing fair and stable revenues for member countries.
Ensuring efficient, economic, and regular supply of petroleum to consumers.
Providing a steady return on investment to those engaged in oil production.
By balancing supply and demand, OPEC aims to create an environment where both producers and consumers benefit, avoiding abrupt price shocks that can destabilize economies.
4. OPEC Structure and Decision-Making
OPEC’s decisions are made collectively by its member states through the Conference of Ministers, which meets twice a year or more frequently if necessary. Key organs include the Secretary-General, who oversees operations, and various technical committees that analyze market trends, demand projections, and global oil inventories. Decisions about production quotas are consensus-based, meaning that all members must agree on output adjustments. This structure gives OPEC the ability to exert influence over global oil supply but also requires careful negotiation due to differing national interests among members.
5. OPEC’s Role in Oil Production and Pricing
OPEC controls about 40% of global oil production and more than 70% of proven oil reserves. By adjusting production quotas, OPEC can directly influence global oil supply, which in turn impacts prices. For instance, reducing production can tighten supply and push prices up, whereas increasing production can flood the market and lower prices. While OPEC does not set prices directly, its production policies strongly influence benchmark crude oil prices such as Brent and WTI. In essence, OPEC acts as a stabilizing force in a volatile market, helping prevent extreme swings that can disrupt global economies.
6. OPEC and Market Stabilization
One of OPEC’s primary mandates is market stabilization. Global oil markets are highly sensitive to geopolitical events, technological changes, and shifts in demand. OPEC monitors these factors to prevent sudden shortages or oversupply. For example, during the 1970s oil shocks, OPEC’s production cuts led to soaring prices, while in recent decades, coordinated production increases helped counteract periods of low demand. The organization also provides long-term market forecasts, helping member states plan investments and manage their economies more effectively.
7. OPEC’s Influence on the Global Economy
Oil is a critical commodity in the global economy, impacting everything from energy costs to inflation and trade balances. OPEC’s actions can influence fuel prices, industrial production, transportation costs, and consumer prices worldwide. For oil-importing nations, OPEC decisions often translate into higher or lower energy bills, affecting their macroeconomic performance. Conversely, oil-exporting countries rely on stable OPEC-led prices to fund infrastructure, social programs, and economic development initiatives. The organization, therefore, plays a dual role: balancing the interests of producers while indirectly affecting global consumers.
8. Challenges Facing OPEC
OPEC faces multiple challenges in the modern energy landscape:
Non-member competition: Countries like the United States, Russia, and Canada have significant shale and unconventional oil production, reducing OPEC’s market share.
Internal disagreements: Member countries have different economic needs, sometimes leading to disputes over production cuts or quota allocations.
Renewable energy transition: Global moves toward renewable energy and reduced fossil fuel consumption threaten long-term oil demand.
Geopolitical instability: Conflicts, sanctions, or political tensions in member countries can disrupt supply and affect OPEC’s credibility.
Addressing these challenges requires strategic diplomacy, flexibility in production, and collaboration with other major producers through initiatives like OPEC+.
9. OPEC+ and Global Cooperation
In recent years, OPEC has partnered with non-member countries, forming OPEC+, which includes Russia, Mexico, and other oil producers. This collaboration aims to coordinate production policies more broadly, enhancing OPEC’s influence in global markets. OPEC+ decisions have become particularly significant in responding to events like the COVID-19 pandemic, where drastic production cuts were required to stabilize collapsing oil prices. By expanding its cooperative network, OPEC has adapted to changing energy dynamics while maintaining relevance in a competitive global market.
10. Future Outlook and Strategic Importance
Looking ahead, OPEC’s role is likely to evolve in response to energy transition, climate policies, and technological innovation. While global demand for oil may plateau or decline over the long term, OPEC’s ability to manage supply, influence prices, and coordinate policies ensures it remains a critical player in the energy sector. Additionally, OPEC continues to invest in research, market intelligence, and sustainability initiatives to navigate uncertainties. For policymakers, investors, and businesses, understanding OPEC’s strategies is essential for anticipating price fluctuations, supply risks, and global energy trends.
Conclusion
OPEC is more than just a cartel of oil-producing countries; it is a strategic organization that balances the economic interests of producers and consumers. By coordinating production, stabilizing prices, and influencing global energy markets, OPEC plays a pivotal role in the global economy. While facing modern challenges like renewable energy and geopolitical risks, OPEC’s adaptive strategies and partnerships ensure it remains a central force in shaping the future of oil markets.
Introduction to Regional Price Differences1. Definition and Concept of Regional Price Differences
Regional price differences occur when the cost of a product or service varies between regions due to a combination of factors such as transportation costs, local demand and supply conditions, taxes, and market competition. These differences are not limited to goods alone but also extend to services like housing, healthcare, and education.
For example, the price of a smartphone may differ between metropolitan cities and rural areas due to logistical costs and varying consumer purchasing power. Regional price differences highlight the economic disparities between regions and help in understanding regional market dynamics.
2. Factors Causing Regional Price Differences
Several factors contribute to the variations in prices across regions:
Transportation and Logistics: Shipping goods over long distances increases costs. Remote areas often pay higher prices due to transportation expenses.
Supply and Demand: Products in high demand in a particular region may be priced higher, while in areas of oversupply, prices tend to drop.
Taxes and Regulations: Different regions impose varied taxes, tariffs, and regulatory costs, affecting final prices.
Local Economic Conditions: Income levels, employment rates, and regional economic health influence what consumers can pay.
Market Competition: More competitive markets often have lower prices, while monopolistic or limited-supply regions may experience higher prices.
3. Importance for Businesses
Understanding regional price differences is vital for businesses to develop effective pricing strategies. By analyzing these variations, companies can:
Optimize profit margins by adjusting prices according to regional purchasing power.
Decide on the best locations for distribution and retail.
Design promotional strategies tailored to local market conditions.
For instance, a luxury brand may price products higher in urban areas where consumers have more disposable income, while offering discounts or lower prices in rural regions to boost sales.
4. Role in International Trade
Regional price differences also play a significant role in international trade. Countries with lower production costs or cheaper labor can export products at lower prices, creating competitive advantages. Conversely, regions with higher prices may import goods to meet consumer demand at affordable rates.
For example, agricultural products from developing countries may be cheaper than in developed countries due to lower labor costs, influencing global trade patterns and consumer choices.
5. Price Arbitrage and Market Efficiency
Price differences create opportunities for arbitrage, where traders buy products in a low-price region and sell them in a high-price region, earning profits from the difference. This mechanism helps in balancing prices over time, promoting market efficiency.
However, transportation costs, tariffs, and market access restrictions may limit arbitrage. For instance, oil or gas price differences between countries often lead to international trading strategies designed to exploit these variations.
6. Consumer Behavior and Regional Pricing
Regional price differences directly affect consumer behavior. Consumers often make purchasing decisions based on price sensitivity:
In high-price regions, buyers may reduce consumption, switch to alternatives, or seek imports.
In low-price regions, consumers may increase consumption or attract traders from high-price areas.
Understanding these patterns helps businesses and policymakers anticipate demand fluctuations and plan accordingly.
7. Government Policies and Interventions
Governments often intervene to address regional price differences, especially for essential goods. Policies include:
Subsidies: Lowering the cost of goods in high-price regions.
Price Controls: Fixing maximum prices to protect consumers.
Infrastructure Development: Reducing logistics costs to equalize prices between regions.
Such measures ensure affordability, reduce regional inequality, and stabilize markets.
8. Impact on Inflation Measurement
Regional price differences can distort inflation indices if not accounted for. For instance, the Consumer Price Index (CPI) may vary significantly between urban and rural areas. Policymakers often use weighted averages or regional indices to capture the true impact of inflation on households across different regions.
Ignoring regional differences could mislead monetary policy decisions, affecting interest rates, taxation, and social welfare programs.
9. Technological and Digital Influence
Technology and e-commerce platforms are gradually reducing regional price differences. Online marketplaces allow consumers to access products from anywhere, often at competitive prices.
Price Comparison Tools: Help consumers find the lowest prices across regions.
Digital Payments and Logistics Solutions: Facilitate faster, cheaper movement of goods.
However, challenges remain, such as last-mile delivery costs, regional taxes, and local market conditions.
10. Future Trends and Implications
Regional price differences will continue to evolve with globalization, technology, and changing consumer behavior. Key trends include:
Increased Market Transparency: Consumers can compare prices globally, narrowing differences.
Dynamic Pricing Models: Businesses will adopt region-specific pricing using AI and big data.
Sustainable Supply Chains: Reducing logistics and production costs may lead to more uniform pricing.
Policy Adjustments: Governments may enhance infrastructure and regulations to ensure equitable access to goods.
Understanding these dynamics is crucial for businesses, investors, and policymakers to remain competitive and responsive to market needs.
Conclusion
Regional price differences are a fundamental feature of economic markets, influenced by a combination of supply-demand dynamics, logistics, government policies, and technological developments. They impact businesses, consumers, and trade flows while offering opportunities for profit and efficiency. By analyzing these differences, stakeholders can make informed decisions, ensure fair pricing, and contribute to regional economic development.
Gold as a Safe Haven Asset During Market Uncertainty1. The Historical Role of Gold as a Store of Value
Gold’s reputation as a safe haven asset is deeply rooted in history. Long before modern currencies were created, gold was used as money due to its rarity, durability, and universal acceptance. Empires and civilizations—from the Romans to the Chinese—recognized its intrinsic value. Unlike paper currencies, which can lose value due to inflation or political manipulation, gold has maintained its purchasing power over centuries. This enduring legacy has built investor confidence, making gold the ultimate hedge against economic collapse or monetary instability.
2. Gold’s Relationship with Inflation and Currency Devaluation
One of the key reasons investors flock to gold during uncertainty is its ability to preserve value during inflationary periods. When central banks print excess money or economies experience hyperinflation, the real value of currency declines. Gold, on the other hand, cannot be printed or artificially inflated. Its supply grows slowly through mining, keeping its scarcity intact. Historically, during times of high inflation—such as the 1970s oil crisis—gold prices surged as investors sought protection from declining fiat currency values.
3. Gold’s Performance During Financial Crises
Gold tends to perform strongly during financial market crises. For instance, during the 2008 Global Financial Crisis, stock markets around the world plummeted, yet gold prices surged from around $700 to over $1,200 per ounce in the following years. Investors shifted their capital from volatile equities and collapsing real estate markets into gold as a safer store of wealth. Similarly, during the COVID-19 pandemic in 2020, when uncertainty and market panic dominated, gold reached a record high of over $2,000 per ounce, reinforcing its role as a safe haven asset in times of chaos.
4. Gold’s Role in Portfolio Diversification
In investment strategy, diversification is key to managing risk. Gold often acts as an effective hedge because it has a low or even negative correlation with traditional asset classes like equities or bonds. When markets are in turmoil, stocks often decline, but gold tends to rise or remain stable. By including gold in a portfolio, investors can reduce volatility and overall risk exposure. Institutional investors, mutual funds, and even central banks include gold as a strategic component to ensure portfolio stability during downturns.
5. Gold as a Hedge Against Geopolitical Risk
Geopolitical instability—such as wars, trade conflicts, or political crises—creates uncertainty in global markets. During such times, currencies fluctuate, stock indices decline, and investor confidence weakens. Gold often becomes the preferred asset during these events because it is not tied to any one government or economy. For example, during the Russia-Ukraine conflict in 2022, global demand for gold increased as investors sought refuge from potential currency devaluation and market disruptions. Its universal acceptance makes it a neutral and borderless asset that retains value regardless of political boundaries.
6. Central Bank Policies and Their Impact on Gold
Central banks play a major role in influencing gold prices. When central banks adopt expansionary monetary policies—such as lowering interest rates or increasing money supply—gold prices often rise. Low interest rates reduce the opportunity cost of holding non-yielding assets like gold, making it more attractive to investors. Additionally, when central banks themselves buy gold, it signals trust in its long-term value. In recent years, emerging economies like China, India, and Russia have increased their gold reserves to diversify away from U.S. dollar dependence, strengthening gold’s status as a global reserve asset.
7. Investor Psychology and Market Sentiment
Gold’s appeal is not just economic—it’s psychological. During times of fear or uncertainty, investors instinctively move toward tangible assets that they can trust. Gold’s physical nature and intrinsic value give it emotional security that paper assets lack. This “flight to safety” effect means that when news of market instability spreads, investors collectively buy gold, driving up its price. This psychological factor reinforces the cycle of gold appreciation during uncertain times, as more people seek safety in an asset they perceive as stable and permanent.
8. Gold vs. Other Safe Haven Assets
While gold is the most well-known safe haven asset, others—like the U.S. dollar, Swiss franc, or U.S. Treasury bonds—also attract investors in crises. However, gold holds unique advantages. Unlike currencies, which can be manipulated through monetary policy, gold’s value is independent of any central authority. It is also free from credit risk, meaning it cannot default like bonds. Furthermore, unlike real estate or commodities like oil, gold is highly liquid and portable. This makes it an ideal asset for immediate protection and long-term wealth preservation during global financial stress.
9. Technological and Industrial Demand Supporting Gold Prices
Beyond its financial role, gold has growing industrial and technological applications, especially in electronics, renewable energy, and medical devices. Its conductivity and resistance to corrosion make it a critical material in high-tech industries. This real-world demand adds a fundamental layer of value to gold, ensuring that its price is not solely dependent on investor sentiment. Jewelry demand—especially from countries like India and China—also supports its global market stability. Together, these factors create a strong baseline for gold prices, even when financial markets are calm.
10. The Future Outlook for Gold as a Safe Haven
Looking ahead, gold’s role as a safe haven is expected to remain strong. In a world marked by rising geopolitical tensions, digital currency volatility, and potential economic slowdowns, investors will continue viewing gold as a stabilizing force. The rise of digital gold and gold-backed exchange-traded funds (ETFs) has made it easier for retail investors to participate in the gold market. Moreover, as global debt levels rise and faith in fiat currencies weakens, the demand for gold is likely to persist. Even in an increasingly digital economy, gold’s timeless appeal as a tangible, limited, and universally trusted asset ensures its continued relevance.
Conclusion
Gold’s reputation as a safe haven asset is well-deserved and time-tested. It offers protection against inflation, currency devaluation, market volatility, and geopolitical instability. Its scarcity, universal acceptance, and psychological comfort make it a unique hedge in uncertain times. Whether held by individuals, institutions, or central banks, gold continues to shine as a reliable symbol of stability and security.
In a global economy where uncertainty is the only constant, gold stands as a timeless reminder that true value endures beyond market cycles and monetary systems. For investors seeking long-term security amid financial turbulence, gold remains the ultimate safeguard of wealth.

How Freight Powers International Trade Flows1. Freight as the Foundation of Global Commerce
Freight transportation is the essential mechanism that makes global trade possible. Every product traded internationally — from electronics to food grains — must move through freight networks. Whether through container ships, cargo planes, or freight trains, these modes connect producers in one part of the world to consumers in another. Approximately 90% of global trade by volume moves via maritime freight, highlighting its dominance. The efficiency of freight systems determines how smoothly global trade operates and influences everything from delivery speed to product pricing.
2. Integration of Global Supply Chains
Freight is at the heart of global supply chain integration. Modern supply chains are complex networks where raw materials, components, and finished goods move between multiple countries before reaching the end consumer. For example, a smartphone may have chips from Taiwan, displays from South Korea, and assembly in China before shipping to global markets. Freight systems synchronize these movements, ensuring that production timelines are maintained and inventory flows efficiently. The coordination between shipping, warehousing, and logistics creates a seamless global trade structure that supports industries worldwide.
3. Maritime Freight: The Engine of Bulk Trade
The shipping industry is the most significant segment of freight transportation in international trade. Containerization — the use of standardized containers — revolutionized the way goods are transported, allowing easy transfer between ships, trucks, and trains. Bulk carriers transport essential commodities like oil, coal, iron ore, and grains that sustain global industries. Ports such as Singapore, Rotterdam, and Shanghai are critical trade hubs facilitating the majority of maritime trade. The cost-effectiveness of sea freight enables developing nations to participate in global trade by exporting raw materials and importing manufactured goods efficiently.
4. Air Freight: Speeding High-Value Trade
While maritime freight dominates in volume, air freight leads in value and speed. It is essential for transporting perishable goods, electronics, luxury items, and pharmaceuticals. Global courier companies such as FedEx, UPS, and DHL operate vast networks connecting continents within hours. Air freight supports industries where time-sensitive delivery is crucial, such as e-commerce and medical supply chains. During global crises — like the COVID-19 pandemic — air freight played a vital role in distributing vaccines, medical equipment, and emergency goods worldwide. Its ability to reduce transit time makes it indispensable to modern trade flows.
5. Rail and Road Freight: Connecting Landlocked Economies
Not all countries have direct access to seaports. For landlocked nations like Nepal, Afghanistan, or Switzerland, rail and road freight are critical for connecting to global markets. Rail freight offers cost-effective long-distance land transport, particularly across continents such as Europe and Asia. The Trans-Eurasian Railway, linking China to Europe, is a prime example of how rail corridors enhance international trade efficiency. Road freight complements rail by providing “last-mile” connectivity between ports, warehouses, and distribution centers. Together, these modes ensure that even remote regions can participate in the global trade network.
6. Technological Advancements in Freight Logistics
Modern freight systems are becoming increasingly digitalized, boosting the speed and reliability of trade flows. Automation, artificial intelligence (AI), GPS tracking, and blockchain are transforming freight logistics. Smart ports use automated cranes and drones to monitor cargo, while AI optimizes shipping routes to reduce fuel costs and emissions. Blockchain enhances transparency by providing real-time tracking of goods and verifying trade documents securely. Technologies such as the Internet of Things (IoT) allow constant monitoring of temperature, humidity, and location, which is vital for sensitive cargo like pharmaceuticals and food. These innovations make freight operations more efficient, resilient, and sustainable.
7. Freight Infrastructure as a Trade Enabler
Robust infrastructure development is a major driver of trade competitiveness. Ports, airports, railways, highways, and logistics hubs form the physical foundation of global freight systems. Countries investing heavily in infrastructure — such as China’s Belt and Road Initiative (BRI) — are reshaping global trade corridors. Improved infrastructure reduces transit times, minimizes delays, and cuts transportation costs. Additionally, intermodal terminals allow seamless transfer of cargo between different transport modes, ensuring efficiency throughout the trade journey. Well-developed freight infrastructure attracts foreign investment and strengthens a nation’s position in global trade networks.
8. Freight Costs and Trade Competitiveness
Freight costs significantly influence the pricing and competitiveness of goods in international markets. High transportation costs can make exports less attractive and imports more expensive. For instance, small island nations often face higher freight charges, limiting their trade potential. Conversely, countries with efficient freight systems enjoy lower trade costs and increased global competitiveness. Reductions in freight costs — through containerization, fuel efficiency, and digital logistics — have helped lower global trade barriers. Economists often consider freight efficiency as a key indicator of a country’s ability to compete in the international market.
9. Environmental Impact and the Push for Green Freight
Freight transportation, while essential for trade, also contributes to carbon emissions and environmental pollution. The maritime industry alone accounts for nearly 3% of global CO₂ emissions. As a result, there is growing emphasis on green freight initiatives, such as cleaner fuels, electric vehicles, and energy-efficient logistics. Organizations like the International Maritime Organization (IMO) are enforcing stricter emission standards to ensure sustainable shipping. Rail and electric freight options are gaining popularity as eco-friendly alternatives. Sustainable freight systems not only protect the environment but also align with global trade’s shift toward ESG (Environmental, Social, and Governance) goals.
10. Freight Resilience and Global Trade Stability
Recent global events — from the COVID-19 pandemic to the Suez Canal blockage — have underscored the importance of freight system resilience. Disruptions in major shipping routes or shortages of containers can cause ripple effects across industries and economies. Strengthening freight resilience through diversification of trade routes, building buffer capacities, and adopting digital logistics solutions has become a global priority. Resilient freight networks ensure the uninterrupted flow of goods, stabilize supply chains, and maintain economic balance. Nations that invest in flexible and adaptive freight infrastructure are better equipped to handle future global disruptions.
Conclusion
Freight is more than just the movement of goods — it is the lifeline of international trade. It connects nations, drives industrial growth, and enables global economic interdependence. From the vast ocean shipping routes to the rapid air cargo lanes and the expanding rail corridors, freight systems form the invisible network sustaining global commerce. As technology advances and sustainability becomes a priority, the future of freight lies in smarter, greener, and more resilient systems. Efficient freight operations will continue to power global trade flows, shaping the next era of globalization and economic progress.
Difference Between Forward and Futures Forex Markets1. Definition and Basic Concept
Forward Market:
A forward forex contract is a private agreement between two parties to buy or sell a specific amount of a currency at a predetermined rate on a future date. It is a customizable contract where the terms—such as amount, delivery date, and exchange rate—are negotiated directly between the buyer and the seller.
Futures Market:
A futures forex contract, on the other hand, is a standardized agreement traded on an organized exchange (such as the Chicago Mercantile Exchange - CME) to buy or sell a currency at a set price on a specific future date. Futures contracts are governed by exchange rules and are not negotiable between individuals.
Example:
If an Indian importer knows they must pay $1 million in three months, they can lock in today’s rate with a forward contract negotiated with their bank. Alternatively, they could use a futures contract on the exchange to hedge the same exposure, but under standardized terms.
2. Trading Venue and Regulation
Forward Market:
The forward forex market is Over-the-Counter (OTC), meaning trades occur directly between parties—usually through banks, brokers, or large financial institutions. It is unregulated compared to futures markets, giving flexibility but also introducing counterparty risk.
Futures Market:
Futures contracts are traded on regulated exchanges, ensuring transparency, standardized contract sizes, and proper oversight by authorities such as the Commodity Futures Trading Commission (CFTC) in the U.S. This makes the futures market more secure and trustworthy for investors.
Key Difference:
OTC forward markets offer privacy and customization, whereas futures markets emphasize standardization, regulation, and transparency.
3. Contract Customization
Forward Market:
Forward contracts are fully customizable. Parties can decide the exact amount, currency pair, settlement date, and method of delivery. This flexibility suits businesses and institutions with specific hedging needs.
Futures Market:
Futures contracts are standardized in terms of contract size, maturity dates (e.g., March, June, September, December), and settlement procedures. Traders must accept these fixed terms, which can limit flexibility but make trading easier for speculative purposes.
Example:
A company wanting to hedge €2.5 million in three months can easily set that amount in a forward contract. In contrast, a futures contract might have a fixed lot size (say, €125,000 per contract), so the company would need to trade multiple contracts to approximate the desired amount.
4. Settlement and Delivery
Forward Market:
Settlement occurs on the agreed future date, and most forward contracts end in actual delivery of the currencies. However, some may be settled in cash based on the difference between the agreed rate and the spot rate at maturity.
Futures Market:
Most futures contracts are cash-settled before expiry, as traders often close their positions before the delivery date. Only a small percentage result in physical delivery of the currencies.
Key Point:
Forwards typically end with physical delivery, while futures are mainly used for speculation and hedging without actual currency exchange.
5. Counterparty Risk
Forward Market:
Since forwards are private agreements, there is a high counterparty risk—the possibility that one party may default on the contract. There is no intermediary guaranteeing the trade.
Futures Market:
Futures contracts eliminate counterparty risk because the exchange clearing house acts as the intermediary, guaranteeing that both sides meet their obligations. Traders must maintain margin accounts to manage default risk.
Result:
Futures offer greater security due to exchange-backed settlement mechanisms.
6. Mark-to-Market and Margin Requirements
Forward Market:
Forward contracts are not marked to market, meaning profits or losses are realized only at the contract’s maturity. No margin or daily settlement is required.
Futures Market:
Futures contracts are marked to market daily, meaning gains and losses are settled every trading day. Traders must maintain margin accounts (initial and maintenance margins) to cover potential losses, ensuring market integrity.
Example:
If the exchange rate moves unfavorably in a futures position, the trader must deposit additional funds to maintain their margin. In forwards, the loss or gain is realized only at the end.
7. Liquidity and Market Participants
Forward Market:
Liquidity in forwards depends on the specific currency pair and the parties involved. It’s dominated by banks, multinational corporations, and institutional investors seeking to hedge specific exposures.
Futures Market:
The futures market is highly liquid due to standardized contracts and participation from a wide range of players—hedgers, speculators, and institutional traders. Continuous trading ensures tight spreads and efficient pricing.
In summary:
Forwards serve mainly for hedging; futures attract both hedgers and speculators due to liquidity and transparency.
8. Purpose and Usage
Forward Market:
Primarily used for hedging long-term exposures. Forwards protect against adverse currency movements for future transactions like exports, imports, or loans in foreign currencies.
Futures Market:
Used for both hedging and speculation. Hedge funds and traders use futures to profit from short-term price movements in currency pairs or to manage portfolio risk efficiently.
Example:
A corporate treasurer uses forwards to hedge a future payment, while a speculator might use futures to bet on the dollar strengthening against the euro.
9. Pricing and Cost Structure
Forward Market:
Forward prices are determined by the interest rate differential between the two currencies and the current spot rate. There are no exchange fees, but the pricing may include a bank’s spread or commission.
Futures Market:
Futures prices are also influenced by interest rate differentials but may deviate slightly from forward rates due to daily margin settlements and market expectations. Traders also pay exchange and brokerage fees.
Key Insight:
Forward pricing is customized and negotiated privately, while futures pricing is transparent and visible on exchanges.
10. Transparency and Accessibility
Forward Market:
Forward markets are less transparent, as prices and deals are not publicly available. Only large players like banks and corporations typically participate due to the high transaction size.
Futures Market:
Futures markets are highly transparent. Prices, trading volumes, and open interest data are publicly available in real time, enabling fair competition and analysis for all traders.
Final Comparison:
Transparency in futures ensures fairness and easier access for retail and institutional investors, while forwards remain largely institutional and relationship-based.
Conclusion
While both forward and futures forex markets allow participants to hedge or speculate on future currency movements, their structure, purpose, and participants differ greatly.
Forwards offer customization and flexibility but come with higher counterparty risk and limited liquidity.
Futures provide standardization, security, and transparency, making them ideal for speculative trading and risk management in a regulated environment.
In summary:
Aspect Forward Market Futures Market
Trading Venue OTC (Private) Exchange-Traded
Customization Fully customizable Standardized
Regulation Unregulated Regulated
Settlement On maturity Daily (mark-to-market)
Counterparty Risk High Minimal
Participants Corporates, Banks Traders, Investors
Transparency Low High
Liquidity Moderate High
Margin Requirement None Required
Usage Long-term hedging Hedging & speculation
How Spot Forex Trading Works1. Understanding the Concept of Spot Forex Trading
Spot Forex trading, also known as spot FX, refers to the direct exchange of one currency for another at the current market rate, known as the spot price. Unlike futures or options contracts, where settlement happens at a later date, a spot transaction is settled “on the spot”, typically within two business days (T+2) for most currency pairs.
The Forex market is the largest and most liquid financial market globally, with a daily trading volume exceeding $7 trillion. It operates 24 hours a day, five days a week, allowing traders from around the world to speculate on currency price movements. Spot Forex trading forms the foundation of global currency trading, providing real-time exchange of currencies between participants such as banks, corporations, investors, and retail traders.
2. The Participants in the Spot Forex Market
The Spot Forex market involves multiple participants who trade for different purposes:
Central Banks – Manage currency reserves, stabilize exchange rates, and implement monetary policies.
Commercial Banks and Financial Institutions – Facilitate interbank trading and currency exchange for clients.
Multinational Corporations – Exchange currencies for international trade and investment purposes.
Hedge Funds and Investment Firms – Engage in speculative trading to profit from currency fluctuations.
Retail Traders – Individuals using online platforms to speculate on short-term price movements.
Each participant contributes to market liquidity, influencing price dynamics based on supply and demand.
3. Currency Pairs and Price Quotation
In the Forex market, currencies are always traded in pairs, such as EUR/USD, GBP/JPY, or USD/INR. The first currency is the base currency, and the second is the quote currency.
The price quote represents how much of the quote currency is required to buy one unit of the base currency. For example, if EUR/USD = 1.0900, it means 1 Euro = 1.09 US Dollars.
Each pair has:
Bid Price – The price at which the market (or broker) is willing to buy the base currency.
Ask Price – The price at which the market (or broker) is willing to sell the base currency.
The difference between these two is called the spread, which represents the broker’s commission or transaction cost.
4. How Spot Forex Transactions Are Executed
Spot Forex trading operates through over-the-counter (OTC) networks rather than centralized exchanges. When a trader places a buy or sell order on a trading platform, the broker executes it through liquidity providers or the interbank market.
For instance, if a trader buys EUR/USD, they are effectively buying Euros while selling US Dollars at the current spot rate. The transaction is typically settled within T+2 days, though in practice, many brokers offer rolling spot contracts, which are automatically extended daily for speculative purposes.
Execution types include:
Market Orders – Executed instantly at the best available price.
Limit Orders – Executed when the market reaches a specified price level.
Stop Orders – Triggered when the price crosses a set threshold to limit losses or capture breakouts.
5. The Role of Leverage in Spot Forex Trading
Leverage is one of the most distinctive features of the Forex market. It allows traders to control large positions with relatively small amounts of capital. For example, a 1:100 leverage ratio means that a trader can control a $100,000 position with only $1,000 of margin.
While leverage amplifies potential profits, it also magnifies losses, making risk management essential. Professional traders typically use moderate leverage and implement stop-loss mechanisms to protect against adverse movements.
Regulators in different regions impose varying limits on leverage — for example, 1:30 in the EU (ESMA regulations) and 1:50 in the US.
6. Determinants of Spot Forex Prices
Spot exchange rates are influenced by numerous macroeconomic, geopolitical, and technical factors:
Interest Rate Differentials: Higher interest rates attract foreign capital, boosting demand for the currency.
Economic Indicators: GDP growth, employment data, inflation, and trade balances affect currency valuation.
Central Bank Policies: Monetary tightening or loosening directly impacts currency strength.
Political Stability: Political risk or uncertainty weakens investor confidence, depreciating the currency.
Market Sentiment and Speculation: Traders’ collective expectations drive short-term fluctuations.
Global Events: Wars, pandemics, and natural disasters can trigger volatility across the Forex market.
In short, Forex prices are a reflection of global economic health and investor confidence.
7. Profit and Loss Calculation in Spot Forex
The profit or loss in a spot Forex trade is determined by the change in exchange rate between the time the position is opened and closed.
For example, if a trader buys EUR/USD at 1.0900 and sells it later at 1.1000, they gain 100 pips (the fourth decimal point represents a pip in most pairs).
Profit calculation formula:
Profit (USD)
=
Pip Movement
×
Lot Size
×
Pip Value
Profit (USD)=Pip Movement×Lot Size×Pip Value
For a standard lot (100,000 units), one pip in EUR/USD equals $10. Thus, a 100-pip move equals $1,000 profit.
Conversely, if the trade moves against the trader, losses occur at the same rate. Hence, understanding position sizing and pip value is crucial for effective risk management.
8. Settlement and Delivery in Spot Forex
While traditional spot Forex transactions involve physical delivery of currencies within two business days, retail traders rarely take delivery. Instead, brokers provide contract-based trading that simulates real exchange but is settled through cash differences in profit or loss.
For institutional participants, however, settlement occurs through systems like CLS (Continuous Linked Settlement), which eliminates settlement risk by synchronizing payments between major financial institutions globally.
Thus, while the spot market technically implies immediate delivery, in practice, most participants engage for speculative or hedging purposes without currency delivery.
9. Risk Management in Spot Forex Trading
Spot Forex trading carries inherent risks due to volatility, leverage, and unpredictable global events. To mitigate these, traders adopt structured risk management strategies:
Stop-Loss and Take-Profit Orders – Automatically close positions at predefined levels to control losses or lock in profits.
Position Sizing – Limiting trade size relative to account equity, often 1–2% per trade.
Diversification – Avoiding concentration in one currency pair or region.
Economic Calendar Monitoring – Tracking major events like central bank meetings and GDP releases to anticipate volatility.
Technical and Fundamental Analysis – Combining chart patterns with macroeconomic insights to make informed decisions.
Effective risk management ensures long-term sustainability and consistent returns in the Forex market.
10. Advantages and Challenges of Spot Forex Trading
Advantages:
High Liquidity: Tight spreads and minimal slippage due to massive global participation.
24/5 Availability: Traders can operate across global time zones without limitation.
Low Entry Barriers: Retail traders can start with small capital using micro or mini accounts.
Leverage Access: Enables higher market exposure with limited funds.
No Centralized Exchange: Global accessibility through OTC trading networks.
Challenges:
High Volatility: Sharp fluctuations can trigger significant losses.
Leverage Risk: Over-leveraging can wipe out accounts quickly.
Information Overload: Constant economic updates require active monitoring.
Broker Reliability: Unregulated brokers pose counterparty risks.
Psychological Pressure: Emotional control is essential for success in a fast-paced market.
Despite these challenges, spot Forex trading remains one of the most popular avenues for both institutional and retail investors due to its liquidity, flexibility, and potential for profit.
Conclusion
Spot Forex trading represents the core of the global currency market, enabling participants to exchange currencies directly at real-time rates. Its structure—comprising major participants, dynamic pricing, leverage, and decentralized execution—creates immense opportunities and risks alike. Understanding how the market functions, the economic forces behind exchange rates, and effective risk management techniques is crucial for success. Whether used for speculation, hedging, or international trade, the Spot Forex market remains a cornerstone of global finance, reflecting the heartbeat of the world’s economic and political landscape.
Future Trends in Global Index Trading1. Expansion of Thematic and Sector-Based Indices
Traditional indices like the S&P 500 or FTSE 100 are giving way to thematic indices that focus on specific industries or megatrends such as artificial intelligence, green energy, cybersecurity, biotechnology, and space technology.
Investors are increasingly allocating capital toward sectors that align with technological innovation or sustainability goals. This evolution will diversify index offerings and allow traders to gain exposure to cutting-edge sectors without needing to pick individual stocks.
For example, ESG and renewable energy indices are expected to attract major institutional inflows as global decarbonization policies intensify. Similarly, AI-focused indices will become a major attraction as machine learning reshapes corporate productivity.
2. Rise of AI and Algorithmic Trading in Index Management
Artificial Intelligence (AI) and algorithmic models are transforming index trading by enhancing speed, accuracy, and decision-making.
Advanced algorithms analyze massive data sets in real time, predicting market sentiment, volatility, and correlations between global indices. These tools enable traders to rebalance portfolios instantly and exploit arbitrage opportunities.
In the future, AI-driven “smart indices” could automatically adjust their weightings based on macroeconomic conditions, geopolitical risk, or investor sentiment — creating dynamic, self-optimizing benchmarks rather than static ones.
3. Increased Popularity of Passive Investing and ETFs
Over the past decade, passive index funds and exchange-traded funds (ETFs) have outperformed most active managers. This trend will continue as investors seek low-cost, diversified exposure to global markets.
Global ETF assets are projected to surpass $20 trillion by 2030, largely fueled by index-linked strategies. As more retail and institutional investors favor passive investing, liquidity in major indices like the MSCI World, NASDAQ-100, and Nifty 50 will deepen.
Moreover, fractional and automated ETF investing platforms will make index exposure more accessible, further democratizing global market participation.
4. Integration of ESG (Environmental, Social, and Governance) Criteria
Sustainability will be one of the defining features of future global index construction. Regulators and investors alike are demanding transparency, ethical governance, and environmental accountability.
ESG indices will not only track performance but also quantify corporate sustainability using measurable metrics such as carbon footprint, social equity, and board diversity.
In the next decade, “green indices” may become a mainstream benchmark, influencing capital allocation toward responsible corporations. Investors will increasingly use carbon-adjusted indices or climate risk-weighted indices to mitigate environmental exposure.
5. Real-Time Global Connectivity and 24/7 Trading
With technology reducing barriers between global markets, the concept of 24/7 trading across indices is becoming a reality.
Cryptocurrency markets already operate continuously, setting the precedent for traditional markets to follow. Index futures and global ETFs may soon be traded around the clock, allowing traders to react instantly to geopolitical or economic developments in any region.
Enhanced inter-market connectivity among exchanges in Asia, Europe, and North America will ensure smoother liquidity flow and minimize regional trading gaps.
6. Blockchain and Tokenization of Indices
Blockchain technology will revolutionize how indices are built, traded, and settled. Through tokenization, entire indices could be represented as digital tokens, allowing investors to buy fractional shares of global market indices seamlessly.
This innovation will make global index trading more transparent, secure, and accessible, particularly for retail investors.
Smart contracts could automate dividend distribution, rebalancing, and settlement, while decentralized finance (DeFi) platforms may introduce index-backed synthetic assets, enabling trading beyond traditional market hours.
The fusion of blockchain and finance will create a borderless, low-cost trading environment.
7. Customizable and Personalized Index Products
Investors of the future will demand customized indices that align with their personal risk tolerance, ethical values, or investment objectives.
Through AI-based portfolio construction, traders could create personal indices tracking specific sets of companies, sectors, or regions — effectively blending active and passive investing.
Robo-advisors and fintech platforms are already offering custom index portfolios that automatically rebalance based on user preferences, risk profiles, or global market movements.
This personalization trend will redefine how investors interact with global indices, making index trading both dynamic and individual-centric.
8. Data-Driven Trading and Predictive Analytics
The future of global index trading will rely heavily on big data, alternative data, and predictive analytics.
Beyond financial metrics, traders will analyze satellite imagery, shipping data, internet traffic, and sentiment analysis from social media to anticipate index trends.
Predictive models powered by machine learning will improve timing, reduce drawdowns, and identify early signals of macroeconomic shifts.
For example, sentiment data from millions of online sources could forecast the next market correction or bull run before it appears in traditional indicators.
Data-driven decision-making will become the cornerstone of competitive index trading.
9. Geopolitical and Economic Diversification
Global index traders must increasingly account for geopolitical risk, trade tensions, and currency fluctuations.
The rise of regional economic blocs — such as BRICS expansion, Asian market integration, and European green reforms — will lead to new regional index compositions.
Diversification across multiple regions will become essential to hedge against localized shocks like war, inflation, or policy shifts.
Future indices will incorporate multi-currency and multi-region components, helping investors reduce exposure to any single market’s volatility.
This diversification will also open opportunities for cross-border arbitrage and currency-hedged index products.
10. Regulatory Evolution and Market Transparency
As global index trading expands, regulatory oversight will strengthen. Authorities such as SEBI, SEC, and ESMA are developing frameworks to ensure data integrity, transparency, and investor protection in index creation and trading.
Future regulations will likely require disclosure of index methodologies, weighting criteria, and data sources, ensuring fairness and accountability.
Moreover, with the rise of AI and algorithmic trading, governments will impose ethical and operational standards to prevent manipulation and systemic risk.
Enhanced transparency will foster trust, attract more institutional participation, and create a stable global trading ecosystem.
Conclusion
The future of global index trading will be defined by technology-driven transformation, investor empowerment, and sustainable innovation.
AI, blockchain, ESG integration, and data analytics will reshape how indices are constructed, traded, and understood. The line between active and passive investing will blur as markets evolve toward automation, customization, and inclusivity.
As global economies become more interconnected, traders who embrace these trends — combining digital intelligence with strategic diversification — will thrive in the next generation of financial markets.

Options Blueprint Series [Intermediate]: ES Condor in the Clouds1 — The Market in a Cloud Layer
The S&P 500 (E-mini and Micro E-mini) futures have recently been caught in a curious atmospheric pattern — not of weather, but of price action. After a strong sell-off shook the market a few days ago, both Fibonacci extensions and retracement zones now cluster densely above and below the current price. When these are joined by multiple Floor Trader Pivot Points and Unfilled Order (UFO) zones sitting in similar regions, a clear message emerges: this market is potentially trapped in a range.
Resistance has been repeatedly observed near 6,873, while the lower boundary around 6,437 continues to attract buyers. The index seems to be trapped between Fibs — a typical post-volatility consolidation phase.
For traders who understand that sideways markets can be just as valuable as trending ones, this environment presents an opportunity. Instead of chasing direction, the goal becomes to capture time decay while staying within defined risk limits.
2 — The Strategy: Short Iron Condor Fundamentals
A Short Iron Condor combines two credit spreads:
A short call spread above current price
A short put spread below current price
Together, they create a “no-fly zone” for the underlying — a region where the trader earns maximum profit if price remains between the inner strikes.
This position benefits from:
Stable or neutral price movement
Time decay (theta)
Declining implied volatility
The Iron Condor offers defined risk and defined reward, making it a powerful candidate for range-bound markets like the current ES setup. While the maximum gain is limited to the net premium collected, the maximum loss is also capped, making this a risk-defined non-directional strategy.
Because this structure has both call and put spreads, it offers low Vega exposure — meaning it’s not overly sensitive to volatility shocks. For intermediate traders, this makes it a comfortable way to step beyond simple single-leg strategies and into the world of multi-leg, theta-driven structures.
3 — The Setup: Building the ES Condor
For this idea, we’re looking at the ES (E-mini S&P 500 Futures) options expiring on November 13.
The structure is built as follows:
Sell 6880 Call @ 34.43
Buy 6890 Call @ 31.69
Buy 6430 Put @ 55.32
Sell 6440 Put @ 57.07
This results in a net credit, generating the potential for a maximum profit of 4.49 points (per spread), while the maximum risk stands at -5.51 points. The reward-to-risk ratio comes to approximately 0.8:1, with a statistical win rate of 52.6% based on the current volatility surface, and the Breakeven points: 6,436 and 6,884.
As long as the ES price remains between these levels by expiration, the structure will achieve profitability. The Iron Condor works best when volatility remains stable or contracts — a condition currently supported by the post-drop equilibrium visible in implied volatility readings across near-term expirations.
4 — Chart Context: Technical Landscape Supporting the Range
The chart of the E-mini S&P 500 Futures (ES) reveals a tight compression zone forming between Fibonacci extensions and retracement levels above @ 0.618 (≈6,868) and below @ 0.618 (≈6,437). This overlap with Floor Trader Pivots — specifically R1 at 6,873 and S1 at 6,488 — paints a classic range structure. This setup can be the natural habitat for an Iron Condor.
While directional traders may feel frustrated by sideways movement, option sellers can see this as a period of controlled opportunity — where theta decay compensates for the market’s hesitation.
In other words, as long as ES continues to “hover in the clouds,” the Condor quietly collects premium.
5 — CME Product Specifications and Margins
Understanding the underlying contracts is essential when selecting between E-mini S&P 500 Futures (ES) and Micro E-mini S&P 500 Futures (MES) for this options setup.
E-mini S&P 500 (ES) Futures
Tick Size: 0.25 = $12.50 per tick
Trading Hours: Nearly 24 hours (Sunday–Friday, CME Globex)
Margin (approx.): $21,000 per contract
Micro E-mini S&P 500 (MES) Futures
Contract Size: 1/10 of ES
Tick Size: 0.25 = $1.25 per tick
Margin (approx.): $2,100 per contract
(Margins may vary slightly depending on volatility and broker policies.)
For smaller accounts or for traders looking to practice scaling and hedging, the MES provides a highly capital-efficient alternative to ES.
When executing the Short Iron Condor, traders may also consider margin offsets if the structure is risk-defined — a benefit when using portfolio margin accounts. However, margin usage will vary by broker and account type.
6 — Risk Management: Keeping the Condor in the Clouds
Every Iron Condor begins with a disciplined approach to risk.
Here’s how it can be managed:
Position Sizing: Determine exposure based on the maximum loss, not the credit received. For instance, risking 1–2% of account equity per structure keeps risk contained even during volatility spikes.
Exit Before Expiration: Avoid gamma risk in the final days. Closing the trade when 50–60% of the maximum profit is achieved can reduce time risk while locking in gains.
Adjustments: If price nears a breakeven zone (6,436 or 6,884), traders can consider rolling the threatened side further away or closing half of the position to reduce delta exposure.
Volatility Awareness: A volatility spike can temporarily pressure the mark-to-market value.
Because the Iron Condor is short Vega, it benefits from a calm or contracting volatility regime.
When markets are calm, this strategy works beautifully; when storms approach, it’s time to bring the Condor to the ground.
When charting futures, the data provided could be delayed. Traders working with the ticker symbols discussed in this idea may prefer to use CME Group real-time data plan on TradingView: www.tradingview.com - This consideration is particularly important for shorter-term traders, whereas it may be less critical for those focused on longer-term trading strategies.
General Disclaimer:
The trade ideas presented herein are solely for illustrative purposes forming a part of a case study intended to demonstrate key principles in risk management within the context of the specific market scenarios discussed. These ideas are not to be interpreted as investment recommendations or financial advice. They do not endorse or promote any specific trading strategies, financial products, or services. The information provided is based on data believed to be reliable; however, its accuracy or completeness cannot be guaranteed. Trading in financial markets involves risks, including the potential loss of principal. Each individual should conduct their own research and consult with professional financial advisors before making any investment decisions. The author or publisher of this content bears no responsibility for any actions taken based on the information provided or for any resultant financial or other losses.
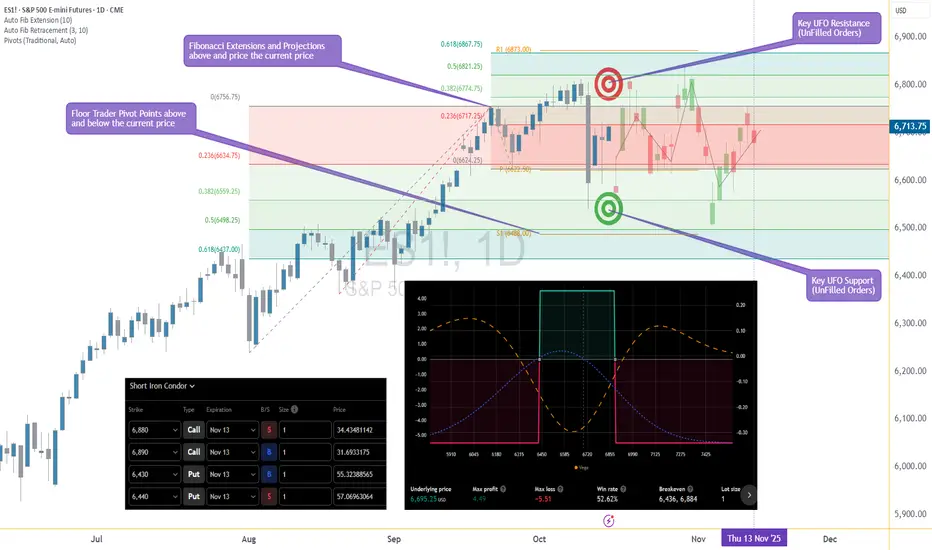
What Are These Messy Lines in my Chart? - Explaining the AlgosIf you’ve checked out my trading chart, you might’ve noticed it looks a bit complex — full of colorful lines and structures. But have you ever wondered what those lines are really for?
Each one is drawn to graphically identify the presence of invisible algorithms — the hidden forces that move the market. At any given time, multiple algorithms are battling for control of price direction. By visualizing their interaction on the chart, we can begin to see the true structure behind market movement.
Understanding this gives you a deeper insight into how markets actually function — and that insight can completely change the way you trade.
If you find this perspective useful, consider subscribing and diving deeper into this style of market analysis.

President Donald J. Trump (the real market maker) There are traders… and then there’s Donald Trump, a man who could move multi-trillion-dollar markets without ever opening a Bloomberg terminal. For years, investors studied technicals, Fibonacci ratios, and order flow to predict direction. But from 2017 onward, one force bent all that — policy surprises and public statements from the U.S. President himself.
Trump’s influence didn’t end when he left office. Even in 2025, markets still respond instantly to his tariffs, trade policies, and economic commentary. He became, in every sense of the word, “The Real Market Mover.”
🧠 When Policy Became Price
Traditionally, markets move on data, GDP releases, CPI, interest rates, central bank minutes. But during Trump’s tenure and resurgence in 2025, words carried the same weight as data. Tweets, press briefings, and tariff announcements created knee-jerk reactions that dwarfed technical setups.
Price action no longer followed pure structure, structure reacted to political noise.
1️⃣ The Trade War Shock — May 2019
Event:
In early May 2019, Trump tweeted that tariffs on $200 billion worth of Chinese imports would increase from 10% to 25%. This came unexpectedly after months of optimism about trade negotiations.
Market Reaction:
The S&P 500 fell over 2% in two sessions.
USDJPY dropped as traders sought safety in the yen.
Gold (XAUUSD) spiked from around $1,270 to $1,300 in a matter of days.
Global equity markets — from Shanghai to Frankfurt — mirrored the sell-off.
chart : S&P 500
Lesson:
Fundamentals can erase weeks of technical buildup in hours. Chart structure provided direction, but timing belonged to policy.
2️⃣ Oil’s Verbal Rescue — April 2020
Event:
After the COVID-19 collapse sent oil below $20 a barrel, Trump publicly claimed he had spoken to both Vladimir Putin and Saudi Crown Prince Mohammed bin Salman, saying they agreed to large output cuts.
Market Reaction:
chart ; WTI gain
WTI Crude surged over 30% in a single day, one of the sharpest one-day gains in modern oil history.
Energy stocks rebounded aggressively.
CAD and NOK, both oil-linked currencies, caught strong bids.
Lesson:
Market psychology is as powerful as supply and demand. Traders weren’t just pricing crude — they were pricing hope.
3️⃣ Bitcoin’s “Not a Fan” Tweet — July 2019
Event:
On July 11, 2019, Trump tweeted:
“I am not a fan of Bitcoin and other cryptocurrencies, which are not money and whose value is highly volatile...”
Market Reaction:
chart : BTCUSD drop
BTCUSD dropped from $12,000 to below $9,000 within a week.
Altcoins mirrored the sell-off.
Volatility spiked across crypto derivatives exchanges like BitMEX and Deribit.
Lesson:
Even a decentralized market isn’t immune to centralized sentiment. In crypto, narrative drives volatility faster than fundamentals.
4️⃣ The Iran Strike — January 2020
Event:
On January 3, 2020, the U.S. conducted an airstrike that killed Iranian General Qassem Soleimani.
Geopolitical tension spiked overnight.
Market Reaction:
chart : GOLD gain
Gold (XAUUSD) jumped nearly 3%, touching $1,600, a level not seen since 2013.
Oil (WTI) surged over 4% on supply concerns.
Equities and risk currencies sold off sharply.
Lesson:
Geopolitical shocks move markets not because of numbers, but uncertainty. Traders price fear, not fundamentals.
5️⃣ The 2025 Tariff Shock & Crypto Liquidation
Event:
In October 2025, Trump announced 100% tariffs on all Chinese imports, alongside restrictions on software exports and AI-linked technology. The announcement came suddenly during a campaign rally and caught the market completely off guard.
Market Reaction:
chart : BITCOIN drop
Bitcoin fell by nearly 14% in 24 hours, triggering the largest liquidation in crypto history — over $19 billion in leveraged positions wiped out.
Nasdaq futures dropped over 3% pre-market.
Gold (XAUUSD) broke above $4,000 per ounce for the first time ever, peaking near $4,125, while Silver (XAGUSD) hit record highs above $45.
Yuan (USDCNH) weakened rapidly as investors rushed into the U.S. dollar and Japanese yen.
Lesson:
When macro meets emotion, liquidity vanishes. No technical setup can prepare you for a macro shock of that scale. The market doesn’t just move, it reprices reality.
6️⃣ “Phase One” Relief — December 2019
Event:
After months of trade tension, Trump announced that the U.S. and China had reached a “Phase One” trade deal.
Market Reaction:
The S&P 500 broke to new highs above 3,200.
USDJPY rose as risk appetite returned.
Gold briefly cooled off from safe-haven highs.
Lesson:
Fear creates liquidity gaps, but relief fills them even faster. Markets always overreact in both directions.
🔍 Final Word
Trump didn’t just comment on the economy, he is a market event.
Every tariff, tweet, and offhand remark had measurable price consequences.
In 2025, when Bitcoin collapsed and gold surged to $4,000+, traders witnessed once again that in modern markets, politics and price are inseparable.
For those who rely only on charts, remember:
“technicals shows where; fundamentals decide when.”
put together by : Pako Phutietsile as @currencynerd

ESG Investing and Sustainable Finance1. Defining ESG Investing
ESG investing refers to the practice of incorporating Environmental, Social, and Governance factors into investment analysis and decision-making processes. Unlike traditional investing, which primarily evaluates financial metrics, ESG investing considers the broader impact of business activities on society and the environment.
1.1 Environmental Factors
Environmental criteria assess a company’s stewardship of natural resources and its impact on the planet. Key areas include:
Climate Change and Carbon Emissions: Evaluating a company’s carbon footprint and strategies for transitioning to a low-carbon economy.
Resource Management: Efficient use of energy, water, and raw materials.
Pollution and Waste: Efforts to minimize environmental contamination.
Biodiversity and Ecosystem Protection: Initiatives to protect natural habitats and biodiversity.
1.2 Social Factors
Social criteria examine how companies manage relationships with employees, suppliers, customers, and communities. Key considerations include:
Labor Practices: Fair wages, worker safety, and freedom of association.
Diversity and Inclusion: Representation of minority groups in leadership and workforce.
Human Rights: Ensuring operations do not contribute to violations of human rights.
Community Engagement: Positive contributions to local communities through philanthropy or development programs.
1.3 Governance Factors
Governance evaluates how companies are directed and controlled, ensuring accountability and transparency. This includes:
Board Structure and Independence: Diverse and independent boards to oversee management.
Executive Compensation: Aligning incentives with long-term performance.
Ethical Business Practices: Anti-corruption policies, transparency, and compliance with regulations.
Shareholder Rights: Ensuring stakeholders have a voice in major corporate decisions.
2. Sustainable Finance
Sustainable finance is a broader concept that encompasses ESG investing but also includes financing activities aimed at promoting sustainability across the economy. It involves directing capital toward projects and initiatives that support long-term environmental and social goals while managing financial risks. Sustainable finance integrates ESG considerations into lending, investing, insurance, and risk management practices.
2.1 Key Objectives
The primary objectives of sustainable finance are:
Risk Mitigation: Identifying ESG-related risks that could impact financial returns.
Capital Allocation: Directing funds to projects that promote sustainability, such as renewable energy or social infrastructure.
Market Transformation: Encouraging companies to adopt sustainable practices through financial incentives.
Long-term Value Creation: Balancing financial returns with positive societal impact.
2.2 Instruments in Sustainable Finance
Several financial instruments are used to advance sustainable objectives:
Green Bonds: Debt securities earmarked for environmental projects, such as renewable energy, energy efficiency, or pollution control.
Social Bonds: Bonds that fund initiatives addressing social challenges, such as education, healthcare, and affordable housing.
Sustainability-linked Loans (SLLs): Loans where the interest rate is tied to achieving ESG targets.
Impact Investing: Investments explicitly intended to generate measurable social or environmental benefits alongside financial returns.
ESG Funds and ETFs: Mutual funds or exchange-traded funds that prioritize companies with strong ESG performance.
3. Evolution of ESG Investing
ESG investing has evolved from niche socially responsible investing (SRI) to a mainstream approach. The evolution can be traced through several phases:
3.1 Socially Responsible Investing (SRI)
In the 1960s and 1970s, SRI gained popularity as investors sought to avoid companies involved in tobacco, alcohol, or apartheid-related activities. The primary motivation was ethical or religious rather than financial.
3.2 ESG Integration
By the early 2000s, investors began integrating ESG factors into financial analysis. This marked a shift from exclusionary approaches to proactive risk and opportunity assessment.
3.3 Impact Investing
Emerging in the 2010s, impact investing focuses on generating measurable social or environmental outcomes alongside financial returns. It emphasizes accountability and transparency in reporting impact.
3.4 Global Adoption
Today, ESG investing is a global phenomenon, with trillions of dollars in assets under management guided by ESG criteria. Regulatory frameworks, corporate disclosure standards, and investor demand have accelerated adoption.
4. ESG Integration Approaches
Investors employ several methodologies to integrate ESG factors into decision-making:
4.1 Negative Screening
Excludes companies involved in controversial activities (e.g., tobacco, fossil fuels, weapons manufacturing).
4.2 Positive Screening
Selects companies with strong ESG performance relative to peers. This approach rewards leaders in sustainability.
4.3 ESG Integration
Incorporates ESG factors into traditional financial analysis to assess risk-adjusted returns. For example, evaluating a company’s exposure to climate risks can influence its valuation.
4.4 Thematic Investing
Focuses on specific ESG themes, such as renewable energy, gender equality, or sustainable agriculture.
4.5 Shareholder Engagement
Investors actively engage with companies to encourage better ESG practices, including proxy voting, dialogue with management, and filing resolutions.
5. Measuring ESG Performance
Measuring ESG performance is challenging due to the lack of standardized metrics. Several frameworks and rating systems help investors assess ESG risks and opportunities:
5.1 ESG Ratings Agencies
Companies like MSCI, Sustainalytics, and FTSE Russell provide ESG ratings based on multiple criteria, including environmental impact, labor practices, and governance structures.
5.2 Reporting Standards
Global Reporting Initiative (GRI): Provides comprehensive sustainability reporting guidelines.
Sustainability Accounting Standards Board (SASB): Focuses on financially material ESG factors for investors.
Task Force on Climate-related Financial Disclosures (TCFD): Encourages reporting on climate-related risks and opportunities.
5.3 Key Performance Indicators (KPIs)
Companies track quantitative and qualitative ESG metrics, such as carbon emissions, employee diversity ratios, or board independence.
6. Drivers of ESG Investing
Several factors have contributed to the rapid growth of ESG investing:
6.1 Regulatory Pressure
Governments and regulatory bodies worldwide are increasingly mandating ESG disclosure and sustainability reporting, making ESG integration a compliance necessity.
6.2 Investor Demand
Institutional investors, such as pension funds and sovereign wealth funds, are prioritizing ESG investments due to risk mitigation, reputational considerations, and long-term value creation.
6.3 Risk Management
ESG issues, such as climate change, social unrest, or corporate governance scandals, pose financial risks. Integrating ESG factors helps mitigate these risks.
6.4 Societal Awareness
Consumers and stakeholders increasingly favor businesses with responsible and ethical practices, influencing corporate behavior and investment decisions.
6.5 Technological Advancements
Data analytics, artificial intelligence, and blockchain enhance ESG data collection, measurement, and verification.
7. ESG Investing and Financial Performance
A key debate revolves around the relationship between ESG investing and financial returns. Empirical studies suggest:
Companies with strong ESG performance often demonstrate lower operational risks, higher efficiency, and better reputation.
ESG portfolios may experience lower volatility and improved risk-adjusted returns over the long term.
However, short-term financial trade-offs can exist, particularly in industries requiring high capital expenditure for sustainability transitions.
Overall, evidence increasingly supports the notion that ESG integration can enhance long-term financial performance while promoting sustainability.
8. Challenges in ESG Investing
Despite its growth, ESG investing faces several challenges:
8.1 Lack of Standardization
Different rating agencies and frameworks produce inconsistent ESG scores, complicating investment decisions.
8.2 Greenwashing
Companies may exaggerate or misrepresent ESG initiatives to attract investment, undermining credibility.
8.3 Data Gaps
Limited or unreliable ESG data, particularly in emerging markets, poses analytical challenges.
8.4 Balancing Financial and Social Returns
Investors must navigate the trade-offs between financial performance and societal impact.
8.5 Regulatory Fragmentation
Differing ESG regulations across regions create complexity for multinational investors.
9. Global Trends in ESG Investing
ESG investing has gained global momentum, with several notable trends:
9.1 Growth in Assets Under Management (AUM)
ESG-focused funds and sustainable investment vehicles have seen exponential growth. As of 2025, global ESG AUM exceeds $50 trillion.
9.2 Climate-Focused Investing
Climate risk has emerged as a primary driver, leading to increased investment in renewable energy, electric vehicles, and carbon mitigation technologies.
9.3 Integration in Emerging Markets
Emerging economies are increasingly adopting ESG principles, with opportunities in clean energy, social infrastructure, and sustainable agriculture.
9.4 Policy and Regulatory Developments
The European Union’s Sustainable Finance Disclosure Regulation (SFDR), the U.S. SEC’s climate disclosure requirements, and similar initiatives worldwide are shaping investment behavior.
9.5 Technological Innovation
Fintech solutions, AI-powered ESG analytics, and blockchain-based impact verification enhance transparency and reporting.
10. Case Studies
10.1 Renewable Energy Funds
Funds investing in solar, wind, and hydroelectric projects demonstrate how ESG investing can align financial returns with environmental impact.
10.2 Gender Lens Investing
Investment funds focusing on companies promoting gender equality in leadership roles have shown positive social outcomes without sacrificing returns.
10.3 Green Bonds
Green bond issuance has financed infrastructure projects that reduce carbon emissions, demonstrating how capital markets can support sustainability.
11. Future of ESG Investing and Sustainable Finance
The future of ESG investing and sustainable finance appears promising, driven by:
Enhanced Standardization: Efforts to harmonize ESG reporting standards will improve comparability and trust.
Integration with AI and Big Data: Advanced analytics will enable more precise ESG risk assessment.
Focus on Net-Zero Transitions: Investors will increasingly finance decarbonization projects to meet global climate goals.
Increased Regulatory Convergence: Global alignment of ESG rules will facilitate cross-border sustainable investment.
Emergence of New Asset Classes: Instruments such as carbon credits, biodiversity credits, and sustainability-linked derivatives will grow.
Sustainable finance is likely to become central to global capital allocation, making ESG principles a core aspect of investment strategy rather than an optional add-on.
Conclusion
ESG investing and sustainable finance represent a fundamental shift in the global financial ecosystem. By integrating environmental, social, and governance considerations, investors can mitigate risks, seize opportunities, and contribute to a more sustainable future. The evolution from socially responsible investing to sophisticated ESG strategies reflects the growing recognition that long-term financial performance is intrinsically linked to sustainability.
Despite challenges like greenwashing, data gaps, and regulatory fragmentation, ESG investing continues to gain momentum globally. Technological advancements, policy support, and rising societal expectations are driving adoption across industries and regions. As sustainable finance becomes mainstream, it promises to reshape capital markets, align economic activity with global sustainability goals, and create value for both investors and society at large.
In essence, ESG investing is not just an ethical choice; it is a strategic imperative that blends profit with purpose, demonstrating that responsible finance can drive both economic and social progress.

Commodity Supercycles and Resource ScarcityIntroduction
Commodities—ranging from energy and metals to agricultural products—are the essential building blocks of the global economy. Their prices fluctuate based on demand and supply dynamics, technological progress, and macroeconomic cycles. However, history reveals that commodity markets often experience prolonged periods of rising and falling prices known as “commodity supercycles.” These cycles, typically lasting decades, reflect fundamental transformations in the world economy—industrial revolutions, rapid urbanization, or structural shifts in demand.
In recent decades, economists and investors have increasingly linked commodity supercycles to resource scarcity, the growing challenge of balancing finite natural resources with the expanding needs of humanity. As population growth, industrialization, and the transition to green technologies intensify, questions about the sustainability of resource use have become central to global economic planning.
This essay explores the concept of commodity supercycles, their historical patterns, causes, and implications, as well as the relationship between these cycles and resource scarcity. It also examines how emerging trends such as renewable energy, recycling technologies, and geopolitical tensions are shaping the next possible supercycle.
Understanding Commodity Supercycles
A commodity supercycle refers to a long-term, broad-based price boom across multiple commodities, driven by structural shifts in global demand. Unlike short-term price fluctuations due to seasonal or cyclical economic activity, supercycles typically last 20 to 40 years. They are usually tied to periods of rapid industrialization or technological transformation that cause sustained increases in commodity consumption.
For example, the post-World War II reconstruction era, the 1970s oil shocks, and the China-led industrialization of the 2000s each corresponded with major supercycles. These booms were followed by extended downturns as supply caught up with demand or economic growth slowed.
Economists identify three key phases of a commodity supercycle:
Expansion Phase – Rising demand, limited supply, and increasing investment in resource extraction.
Peak and Plateau Phase – Supply gradually expands, demand growth stabilizes, and prices reach their highest levels.
Contraction Phase – Oversupply, slowing demand, and technological changes drive prices down over a long period.
Each phase reflects deep economic transformations that go beyond traditional business cycles, often linked to the rise and fall of global powers, demographic shifts, and major infrastructure booms.
Historical Overview of Commodity Supercycles
1. The 19th Century Industrial Revolution Cycle (1850–1914)
The first recognized supercycle was driven by the Industrial Revolution in Europe and North America. Rapid urbanization, rail expansion, and mechanized manufacturing led to soaring demand for coal, iron, steel, and agricultural commodities.
Technological innovation in steam engines, metallurgy, and transportation created a massive pull on global resources. Colonization expanded access to raw materials, but prices still rose sharply due to unprecedented demand. This cycle ended with the onset of World War I and the Great Depression, which collapsed trade and industrial output.
2. The Post-World War II Boom (1945–1973)
The second major supercycle followed World War II, driven by reconstruction in Europe and Japan, the rise of suburbanization, and the U.S. economic boom. Infrastructure projects, automobiles, and consumer goods required steel, copper, oil, and agricultural commodities. The Bretton Woods system, which stabilized exchange rates, and the establishment of multilateral trade institutions like the IMF and World Bank, supported global growth.
The cycle peaked with the 1973 oil crisis, when OPEC’s embargo sent oil prices skyrocketing, causing inflationary pressures and economic slowdown.
3. The China-Driven Supercycle (2000–2014)
The most recent supercycle was fueled by China’s industrialization and urbanization after joining the World Trade Organization (WTO) in 2001. Massive infrastructure spending, steel production, and construction caused an extraordinary demand surge for iron ore, copper, aluminum, coal, and oil.
Prices of most commodities reached historic highs between 2008 and 2011. However, by 2014, a slowdown in China’s growth and global oversupply brought the cycle to an end. The collapse in oil and metal prices marked the beginning of a prolonged downturn.
Causes of Commodity Supercycles
Several structural forces interact to create supercycles. The most significant include:
1. Industrialization and Urbanization
Periods of intense industrial expansion, such as in 19th-century Britain or 21st-century China, lead to sharp increases in commodity demand. Infrastructure development, housing, and manufacturing all require raw materials, creating upward pressure on prices.
2. Demographic Growth
Population booms in emerging economies increase demand for food, energy, and housing. For example, post-war baby booms and the rise of the global middle class have repeatedly expanded resource consumption.
3. Technological Innovation
Technological revolutions both create and destroy demand for commodities. The internal combustion engine increased oil demand; renewable technologies now increase demand for lithium, nickel, and copper. These transitions often reconfigure global trade flows.
4. Supply Constraints
Commodity supply is slow to adjust due to long investment cycles, geological limitations, and political instability. For instance, developing a new copper mine can take over a decade. Limited supply elasticity amplifies the impact of demand shocks.
5. Geopolitical and Policy Factors
Wars, trade restrictions, or resource nationalism can tighten supply and intensify price cycles. The 1970s oil crisis and recent Russia-Ukraine conflict illustrate how geopolitics can trigger commodity surges.
Resource Scarcity: A Growing Challenge
Resource scarcity refers to the limited availability of natural resources relative to human demand. This scarcity is not only physical but also economic—driven by rising extraction costs, environmental degradation, and geopolitical constraints.
1. Physical and Geological Limits
Many commodities, especially fossil fuels and certain metals, exist in finite quantities. As high-quality reserves are depleted, extraction becomes more expensive and energy-intensive. For example, new oil discoveries have declined steadily since the 1980s, raising concerns about “peak oil.”
2. Environmental Constraints
Mining, deforestation, and fossil fuel extraction cause environmental damage and carbon emissions. Climate change policies now restrict resource exploitation, creating a trade-off between economic growth and sustainability.
3. Economic and Political Constraints
Resource access is often limited by political instability, nationalization of assets, and export controls. Countries with critical resources may use them for strategic leverage, increasing global scarcity risk.
4. Water and Food Scarcity
Beyond metals and energy, water and arable land are becoming increasingly scarce. Global warming, desertification, and pollution threaten agricultural productivity, leading to food security challenges and potential social unrest.
The Link Between Supercycles and Resource Scarcity
Supercycles often exacerbate resource scarcity. During expansion phases, intense demand leads to rapid depletion of reserves, environmental damage, and overexploitation. As production costs rise, prices increase, creating feedback loops that sustain the cycle.
Conversely, resource scarcity can trigger new supercycles by increasing extraction costs and limiting supply. For example, the transition to renewable energy requires massive amounts of critical minerals like lithium, cobalt, and rare earth elements—resources that are themselves scarce and geographically concentrated.
This dynamic interplay means that resource scarcity is both a driver and a consequence of commodity supercycles. As one resource becomes scarce, economies adapt by shifting demand to substitutes—sometimes triggering new cycles in different commodities.
Case Studies: Resource Scarcity in Action
1. Oil and Energy Scarcity
Oil remains the world’s most important commodity. Periods of high prices, such as during the 1970s and 2000s, reflected both demand surges and fears of resource exhaustion. While technological innovations like fracking temporarily alleviated scarcity, geopolitical risks and environmental constraints continue to threaten long-term supply stability.
2. The Green Energy Transition and Critical Minerals
The global push toward decarbonization has created massive demand for metals such as lithium, nickel, cobalt, and copper. Electric vehicles (EVs), solar panels, and batteries rely on these inputs. However, these minerals are heavily concentrated in a few countries—such as the Democratic Republic of Congo (cobalt) and Chile (lithium)—raising concerns over future bottlenecks and new forms of resource dependency.
3. Water Scarcity and Agricultural Commodities
Climate change-induced droughts are reducing freshwater availability for irrigation. In regions like South Asia and Africa, this threatens food production and could trigger volatility in agricultural commodity markets such as wheat, rice, and soybeans. As populations grow, the risk of food inflation and social instability rises.
The Emerging 21st-Century Supercycle
Many analysts believe the world may be entering a new commodity supercycle, driven by structural transformations such as green industrialization, digital infrastructure, and geopolitical realignments.
Key Drivers:
Energy Transition – The shift from fossil fuels to renewables increases demand for transition metals and critical minerals.
Geopolitical Fragmentation – Resource nationalism, trade wars, and sanctions are disrupting supply chains, raising production costs.
Reindustrialization in the West – Efforts to “reshore” supply chains and reduce dependency on China are spurring domestic infrastructure investment.
Global Population and Urban Growth – With the world population surpassing 8 billion, resource demand for housing, energy, and food remains robust.
However, this new supercycle differs from past ones—it is shaped by sustainability imperatives, technological advances, and decarbonization policies. While demand for green metals is booming, fossil fuel demand may plateau or decline, making this supercycle more selective and diversified.
Economic and Market Implications
1. Inflationary Pressures
Sustained commodity price increases can fuel inflation, especially in emerging economies reliant on imports. The 2021–2023 period illustrated how energy and food shortages contributed to global inflation spikes.
2. Investment Opportunities
Supercycles create profitable opportunities in mining, energy, and infrastructure sectors. Investors anticipate long-term demand by financing exploration and extraction. However, volatility remains high, requiring risk management strategies.
3. Shifts in Global Power
Resource-rich nations—such as Australia, Chile, and Saudi Arabia—gain geopolitical leverage during supercycles. Conversely, resource-dependent importers face economic vulnerability and trade deficits.
4. Technological Innovation
Scarcity stimulates innovation. Rising commodity prices encourage investment in recycling, substitution, and efficiency technologies. For example, advances in battery chemistry aim to reduce reliance on cobalt.
Managing Resource Scarcity: Sustainable Pathways
To mitigate the risks of resource scarcity and stabilize future supercycles, policymakers and industries must pursue sustainable resource management strategies.
1. Circular Economy
Recycling and reusing materials can reduce pressure on primary extraction. The shift toward a circular economy—where waste becomes input—offers a long-term solution to resource depletion.
2. Technological Substitution
Innovation can replace scarce materials with more abundant ones. For instance, sodium-based batteries may reduce dependence on lithium, and carbon composites may replace steel in some applications.
3. Diversification of Supply
Developing multiple sources for critical materials reduces geopolitical dependency. Collaborative international frameworks can ensure more equitable resource distribution.
4. Resource Efficiency
Improving energy and material efficiency across industries can lower demand growth. Smart grids, energy-efficient buildings, and sustainable farming techniques play key roles.
5. Global Governance and Cooperation
International institutions must coordinate policies for resource management, ensuring fair trade, transparent supply chains, and environmental protection. Initiatives like the Extractive Industries Transparency Initiative (EITI) promote responsible mining and investment.
Conclusion
Commodity supercycles are more than economic phenomena—they are reflections of humanity’s evolving relationship with the planet’s resources. Each cycle marks a phase of industrial transformation, technological progress, and social change. Yet, they also expose the vulnerabilities of a world dependent on finite natural assets.
As we enter a new era defined by climate imperatives, energy transitions, and population growth, resource scarcity is likely to be the defining economic and political challenge of the 21st century. Whether this results in instability or innovation depends on how effectively societies manage the delicate balance between consumption and conservation.
Future supercycles may not be characterized by endless extraction, but by smart utilization, circular economies, and technological breakthroughs. In this sense, the path ahead requires not only economic foresight but also environmental responsibility—because managing resource scarcity wisely will determine the sustainability of global growth itself.
International Trade Policies and Market Reactions1. Evolution of International Trade Policies
1.1 Early Mercantilism to Free Trade
From the 16th to 18th centuries, trade was dominated by mercantilist policies — where nations sought to maximize exports and minimize imports to accumulate gold and silver. Colonial powers like Britain, France, and Spain established monopolistic trade routes to extract wealth from colonies.
The late 18th and 19th centuries saw the emergence of free trade ideology, led by economists like Adam Smith and David Ricardo. Smith’s The Wealth of Nations (1776) argued that nations should specialize in producing goods where they hold an absolute advantage, while Ricardo’s theory of comparative advantage demonstrated that even less efficient countries benefit from trade if they specialize relatively.
The 19th century ushered in a wave of trade liberalization, with the British Corn Laws repeal (1846) marking a major shift toward open markets.
1.2 The Rise and Fall of Protectionism
The Great Depression (1929–1939) marked a turning point. Countries imposed tariffs and quotas to protect domestic industries, triggering a global collapse in trade. The infamous U.S. Smoot-Hawley Tariff Act (1930) raised tariffs on over 20,000 imports, leading to retaliations and worsening economic conditions.
After World War II, nations recognized the need for cooperative trade frameworks to prevent such economic nationalism. This led to the establishment of the General Agreement on Tariffs and Trade (GATT) in 1947, promoting tariff reduction and trade liberalization.
1.3 The WTO Era and Beyond
In 1995, GATT evolved into the World Trade Organization (WTO) — a comprehensive body overseeing global trade rules, dispute resolution, and policy negotiations. WTO membership grew to 160+ nations, significantly integrating developing economies into the global system.
However, by the 2010s, trade liberalization faced resistance. The rise of China, global financial crises, nationalism, and technological disruptions renewed debates on whether free trade truly benefits all. Trade wars — especially between the U.S. and China — revealed the fragility of the open trading system.
2. Key Instruments of International Trade Policy
2.1 Tariffs
A tariff is a tax imposed on imported goods. It serves both as a revenue source and a protectionist tool. For instance, higher tariffs on steel imports make domestic steel more competitive. However, they often lead to retaliatory tariffs, inflationary pressure, and inefficiencies in global supply chains.
2.2 Quotas and Import Restrictions
Quotas limit the volume of imports of specific goods. Unlike tariffs, which adjust prices, quotas directly restrict quantities. Quotas are often used in sensitive industries such as agriculture, textiles, and automobiles to protect domestic producers.
2.3 Subsidies and Export Incentives
Governments often provide subsidies to domestic industries to boost exports. For example, agricultural subsidies in the U.S. and EU have long been criticized for distorting international competition. Export incentives, such as tax breaks, help national firms expand globally.
2.4 Trade Agreements
Trade agreements are either bilateral, regional, or multilateral. They define trade rules, tariffs, and dispute resolution frameworks. Examples include:
NAFTA/USMCA (North America)
European Union (EU) Single Market
ASEAN Free Trade Area (AFTA)
Comprehensive and Progressive Agreement for Trans-Pacific Partnership (CPTPP)
Such agreements often lead to increased cross-border investments and market integration.
2.5 Non-Tariff Barriers (NTBs)
NTBs include standards, licensing requirements, and regulations that indirectly restrict trade. For instance, safety standards on food imports or environmental norms on manufacturing can act as barriers, especially for developing nations.
3. Role of International Organizations
3.1 The World Trade Organization (WTO)
The WTO is the primary body overseeing trade liberalization and dispute settlement. It ensures that trade policies are predictable, transparent, and non-discriminatory. However, the WTO has struggled to address digital trade, state subsidies, and China’s economic model, leading to calls for reform.
3.2 International Monetary Fund (IMF)
While not a trade body, the IMF stabilizes global financial systems by providing liquidity to countries with trade imbalances. Its policies often influence trade indirectly through exchange rate stabilization and macroeconomic adjustments.
3.3 World Bank and Regional Development Banks
The World Bank, Asian Development Bank (ADB), and African Development Bank (AfDB) finance infrastructure that supports trade — ports, logistics, and transport networks. These institutions promote trade integration for developing economies.
3.4 Regional Trade Blocs
Organizations like the European Union (EU) and African Continental Free Trade Area (AfCFTA) represent regional approaches to trade governance, focusing on internal liberalization while negotiating collectively with external partners.
4. Case Studies: Trade Policy and Market Reactions
4.1 U.S.-China Trade War (2018–2020)
The U.S.-China trade conflict began when the United States imposed tariffs on Chinese goods worth over $360 billion, accusing China of intellectual property theft and unfair subsidies. China retaliated with tariffs on U.S. exports.
Market Reactions:
Equity markets fell sharply during tariff announcements, with major indices like the S&P 500 and Shanghai Composite showing volatility.
Commodity prices, especially soybeans and rare earth metals, were disrupted due to changing trade routes.
The U.S. dollar strengthened as investors sought safety, while emerging market currencies depreciated.
Multinational corporations diversified production out of China, shifting supply chains to Vietnam, India, and Mexico.
4.2 Brexit and European Trade Dynamics
The United Kingdom’s exit from the European Union (Brexit) in 2020 marked a historic shift in trade policy. It introduced customs checks and regulatory divergence.
Market Reactions:
The British pound (GBP) experienced extreme volatility, depreciating nearly 15% after the 2016 referendum.
UK equity markets underperformed, while European indices also saw uncertainty.
Long-term bond yields dropped due to investor flight to safety.
Trade volumes between the UK and EU initially fell but later stabilized as new trade deals were negotiated.
4.3 NAFTA to USMCA Transition
The United States-Mexico-Canada Agreement (USMCA) replaced NAFTA in 2020, modernizing rules on digital trade, labor, and environmental standards.
Market Reactions:
North American equity markets reacted positively due to reduced uncertainty.
The Canadian dollar and Mexican peso gained strength after the deal’s ratification.
Automobile industry supply chains adapted to new “rules of origin,” affecting production strategies.
4.4 COVID-19 Pandemic and Trade Restrictions
During the COVID-19 crisis, nations imposed export bans on medical equipment, vaccines, and food products, disrupting supply chains globally.
Market Reactions:
Commodity and logistics markets experienced historic price spikes.
Shipping costs (Baltic Dry Index) soared, reflecting port closures and demand surges.
Equities in logistics and technology sectors gained, while tourism and manufacturing sectors declined sharply.
5. Mechanisms of Market Reactions to Trade Policies
5.1 Currency Markets
Currency values are among the most sensitive indicators of trade policy changes. A nation imposing tariffs on imports can experience currency appreciation if it reduces import demand. Conversely, trade tensions often weaken emerging market currencies due to capital outflows.
Example: During the 2018 trade war, the Chinese Yuan (CNY) depreciated over 10% against the U.S. Dollar (USD), reflecting reduced export expectations.
5.2 Stock Markets
Trade policies directly affect corporate profits and investor sentiment:
Export-heavy industries (e.g., technology, manufacturing) are vulnerable to tariffs.
Domestic-oriented sectors (e.g., utilities, healthcare) may benefit from protectionist measures.
Stock markets often respond immediately to policy news. For instance, when trade agreements are signed, equity indices surge due to improved confidence.
5.3 Commodity Markets
Trade policies influence the demand and supply dynamics of commodities:
Oil and metals prices react to industrial production expectations.
Agricultural commodities are highly sensitive to tariffs and quotas.
Example: During the U.S.-China trade conflict, China shifted soybean imports from the U.S. to Brazil, boosting Brazilian exports and altering global price structures.
5.4 Bond Markets
Government bond yields reflect investor risk perceptions. During trade disputes, investors seek safe-haven assets like U.S. Treasuries or German Bunds, pushing yields down. Conversely, successful trade agreements often lead to yield increases as growth expectations rise.
5.5 Investor Sentiment and Volatility
Trade uncertainty amplifies market volatility. The VIX Index, a measure of market fear, often spikes during trade negotiations or tariff announcements. High volatility can deter investment, increase hedging costs, and reduce liquidity.
6. The Political Economy of Trade
Trade policy decisions are influenced not only by economics but also by domestic politics and geopolitical strategy. Policymakers balance between protecting local industries and maintaining international competitiveness.
Protectionism appeals to domestic voters during unemployment or deindustrialization phases.
Free trade is supported by multinational corporations and export-oriented economies.
Geopolitical trade tools, such as sanctions or technology restrictions, are increasingly used to assert national power — seen in U.S. restrictions on Chinese semiconductor access.
Thus, trade policy often reflects both economic rationale and strategic interests, leading to complex market outcomes.
7. The Future of Global Trade Policy
7.1 Digital Trade and E-Commerce
The rise of digital trade — cross-border e-commerce, data flows, and cloud services — is reshaping trade frameworks. The WTO and regional agreements now include digital trade chapters, ensuring free data flow while protecting privacy.
7.2 Green Trade Policies
Climate change has introduced carbon border adjustment mechanisms (CBAM) and ESG-linked trade standards. For example, the EU’s CBAM imposes tariffs on imports with high carbon footprints, influencing global supply chains toward sustainability.
7.3 Regionalization and Supply Chain Realignment
The post-pandemic world is witnessing “friend-shoring” and regionalization — where trade partners are chosen based on political alignment rather than cost efficiency. This trend reshapes trade flows, especially in semiconductors, rare earths, and energy.
7.4 Reforming the WTO
To remain relevant, the WTO must adapt to the digital economy, industrial subsidies, and state capitalism. Its dispute settlement system, currently weakened, needs restoration for fair enforcement of rules.
7.5 Artificial Intelligence and Automation
AI and robotics are transforming production and trade competitiveness. Nations that leverage technology to increase productivity will gain comparative advantages, altering traditional labor-cost-based trade models.
Conclusion
International trade policies form the framework through which global commerce operates, shaping patterns of production, consumption, and investment. Over time, the pendulum has swung between free trade and protectionism, reflecting shifting political priorities and economic realities.
Market reactions to trade policy changes are immediate and far-reaching, influencing currencies, equities, bonds, and commodities. Investors interpret these signals to assess risks and opportunities across global markets.
As the world faces geopolitical fragmentation, technological transformation, and environmental imperatives, the future of trade policy will depend on adaptability and cooperation. A balance between national interests and global integration will be key to ensuring sustainable economic growth and market stability.

Geopolitical Risks and Market Volatility1. Introduction
Financial markets thrive on stability, transparency, and predictability. However, the world is rarely stable — political tensions, wars, trade disputes, and diplomatic breakdowns often disrupt this equilibrium. These disruptions, known as geopolitical risks, can trigger market volatility — sharp fluctuations in asset prices as investors react to uncertainty. In the modern interconnected world, where economies are tightly woven through trade and capital flows, even a local conflict can send ripples across global markets.
The interplay between geopolitics and market volatility is not new. From oil shocks in the 1970s to Russia’s invasion of Ukraine in 2022, geopolitical events have consistently tested global investors’ ability to manage uncertainty. Today, as the world faces new risks — shifting power dynamics, energy crises, cyber warfare, and climate-related security threats — understanding how geopolitics drives market behavior has become essential for policymakers, investors, and businesses.
2. Understanding Geopolitical Risk
Geopolitical risk refers to the probability that political, social, or military events will adversely impact the global economy or financial markets. These risks often arise from the actions of states, non-state actors, or changes in global governance systems. Unlike financial or operational risks, geopolitical risks are exogenous — they originate outside the economic system and are harder to predict or quantify.
2.1 Types of Geopolitical Risks
Military Conflicts and Wars
Wars directly disrupt trade, energy supply, and investment flows. For example, the 2022 Russia–Ukraine war reshaped global energy markets and led to inflationary shocks in Europe and beyond.
Trade Wars and Economic Sanctions
When major economies impose tariffs or sanctions, global supply chains are affected. The U.S.–China trade war (2018–2020) disrupted global technology and manufacturing sectors, reducing investor confidence.
Political Instability and Regime Change
Coups, elections, or political transitions can create uncertainty about policy continuity. Investors tend to withdraw capital from politically unstable regions, leading to currency depreciation and stock market sell-offs.
Terrorism and Security Threats
Terrorist attacks, such as those on September 11, 2001, can cause short-term panic and long-term risk repricing in financial markets.
Resource Conflicts and Energy Security
Countries competing for oil, gas, or rare earth minerals can destabilize markets. For instance, tensions in the Strait of Hormuz — through which 20% of the world’s oil passes — often cause crude prices to spike.
Cyber Warfare and Information Attacks
State-sponsored cyberattacks on financial institutions or critical infrastructure can disrupt global capital markets and reduce trust in digital systems.
Global Alliances and Sanctions Regimes
Shifting alliances like BRICS expansion, NATO dynamics, or Western sanctions can reshape global trade, currency reserves, and capital flows.
3. Mechanisms Linking Geopolitics to Market Volatility
Geopolitical events affect markets through multiple channels, both direct and indirect.
3.1 Investor Sentiment and Risk Aversion
When geopolitical tensions rise, investors tend to move from risky assets (equities, emerging-market bonds) to safer ones (U.S. Treasuries, gold, and the U.S. dollar). This phenomenon, called the “flight to safety”, leads to a sell-off in risk assets and a rally in safe havens. For example:
During the Russia–Ukraine conflict, gold prices surged above $2,000 per ounce as investors sought refuge.
U.S. Treasury yields fell as investors bought bonds, despite inflation concerns.
3.2 Impact on Trade and Supply Chains
Wars, sanctions, or tariffs can disrupt global supply chains, raising production costs and slowing growth. For example:
The Red Sea shipping disruptions and Taiwan Strait tensions have threatened semiconductor and energy transport routes.
Higher logistics costs translate to inflation, which affects central bank policies and, in turn, financial markets.
3.3 Energy and Commodity Prices
Energy markets are particularly sensitive to geopolitical risk. Oil prices react sharply to conflicts in the Middle East, OPEC decisions, or Russian production cuts. Since energy costs feed into nearly all economic sectors, geopolitical shocks often lead to global inflation.
3.4 Currency and Capital Flows
Political instability often leads to currency depreciation as investors withdraw capital. Emerging markets are especially vulnerable — for instance, Turkey’s lira or Argentina’s peso tend to fall during domestic or regional instability. Conversely, “safe-haven” currencies such as the U.S. dollar, Swiss franc, and Japanese yen typically strengthen.
3.5 Central Bank and Policy Reactions
Geopolitical risks force central banks to navigate between inflation control and financial stability. For example:
The European Central Bank (ECB) struggled to balance energy-driven inflation with growth risks following the Ukraine war.
The U.S. Federal Reserve may slow rate hikes during heightened uncertainty to prevent market collapse.
4. Historical Case Studies of Geopolitical Volatility
4.1 The 1973 Oil Crisis
Triggered by the Arab–Israeli conflict and OPEC’s oil embargo, crude oil prices quadrupled within months. Global inflation soared, causing recessions in Western economies. Stock markets worldwide plunged, and the crisis redefined energy security as a core geopolitical concern.
4.2 The Gulf Wars (1990–1991, 2003)
Both Gulf Wars caused spikes in oil prices and temporary global market corrections. While short-lived, these shocks reinforced the sensitivity of markets to Middle Eastern instability.
4.3 9/11 Terrorist Attacks (2001)
The September 11 attacks led to the closure of U.S. stock exchanges for nearly a week. When trading resumed, the Dow Jones Industrial Average fell over 7% in one day — the largest single-day drop at the time. The shock also reshaped global security spending and introduced new risk metrics into financial modeling.
4.4 The U.S.–China Trade War (2018–2020)
The imposition of tariffs on billions of dollars of goods disrupted supply chains, hurt technology stocks, and weakened global growth forecasts. Investors fled emerging markets, and volatility indices like the VIX surged repeatedly during trade negotiations.
4.5 Russia–Ukraine Conflict (2022–Present)
This conflict triggered one of the largest market disruptions since 2008. Energy prices soared, European equities dropped sharply, and inflation rose globally. The war accelerated global de-dollarization trends, strengthened NATO alliances, and spurred defense sector growth — all while increasing market uncertainty.
5. Measuring Geopolitical Risk
5.1 The Geopolitical Risk Index (GPR)
Developed by Caldara and Iacoviello (2018), the GPR Index quantifies geopolitical tensions using newspaper coverage of wars, terrorist acts, and political crises. It provides a statistical measure to correlate geopolitical shocks with financial volatility.
5.2 Market Volatility Index (VIX)
Known as the “fear index,” the VIX measures implied volatility in S&P 500 options. During geopolitical crises, the VIX typically spikes — reflecting investors’ anxiety about future price swings.
5.3 Credit Default Swaps (CDS) and Bond Spreads
When geopolitical risks rise, sovereign bond spreads widen, and CDS prices increase — signaling that investors demand higher premiums for holding risky debt.
6. Asset Class Responses to Geopolitical Shocks
6.1 Equities
Short-term reaction: Immediate sell-offs due to uncertainty.
Medium-term: Recovery often depends on how the conflict evolves.
Sector performance: Defense, energy, and cybersecurity stocks often outperform during crises.
6.2 Fixed Income
Government bonds — especially U.S. Treasuries — act as safe havens. Yields typically fall as bond prices rise. However, inflation-linked bonds may perform better when geopolitical shocks cause price spikes.
6.3 Commodities
Gold, silver, and oil are the most sensitive commodities to geopolitical risk.
Gold = hedge against uncertainty.
Oil = reflects conflict-related supply fears.
Agricultural commodities = affected by sanctions or export bans (e.g., Ukraine’s grain crisis).
6.4 Currencies
Safe-haven currencies (USD, JPY, CHF) gain during crises, while risk-sensitive ones (AUD, emerging-market FX) weaken. Sanctions can cause currency collapses, as seen with the Russian ruble in early 2022.
6.5 Cryptocurrencies
Bitcoin and other digital assets have shown mixed reactions — sometimes acting as alternative hedges, though volatility remains high. During the Russia–Ukraine war, crypto transfers surged as citizens sought to bypass banking disruptions.
7. The Role of Media, Information, and Speculation
In the digital age, information speed amplifies volatility. News outlets, social media, and algorithmic trading systems react instantly to geopolitical headlines. False or exaggerated reports can cause flash crashes or speculative bubbles.
For instance, a single tweet about potential military action or sanctions can trigger billions in market movements within seconds. This information-driven volatility underscores the role of behavioral finance — where investor psychology magnifies reactions to uncertainty.
8. Managing Geopolitical Risk in Investment Strategy
8.1 Diversification
Geographically diversified portfolios can cushion against regional shocks. Holding assets across continents or currencies reduces exposure to any single geopolitical event.
8.2 Safe-Haven Allocation
Investors often include gold, U.S. Treasuries, or defensive stocks (utilities, consumer staples) in portfolios to offset riskier holdings during crises.
8.3 Hedging Instruments
Options, futures, and currency forwards allow investors to hedge geopolitical risk. For instance, crude oil futures can protect against energy price spikes.
8.4 Scenario Analysis and Stress Testing
Institutional investors model “what-if” scenarios (e.g., China–Taiwan conflict, Middle East escalation) to assess portfolio resilience. Stress testing helps anticipate extreme outcomes.
8.5 Political Risk Insurance
Multinational corporations use political risk insurance to mitigate losses from expropriation, contract breaches, or civil unrest.
9. Emerging Geopolitical Themes Affecting Markets
9.1 U.S.–China Rivalry
Beyond trade, competition extends into technology (AI, semiconductors, 5G) and global governance. “Tech decoupling” may reshape global supply chains and capital flows.
9.2 The Rise of Multipolarity
The post-Cold War unipolar world is giving way to a multipolar one — where the U.S., China, Russia, India, and regional powers like Saudi Arabia assert influence. This creates overlapping alliances and uncertainty in global trade.
9.3 Energy Transition and Green Geopolitics
As nations shift toward renewable energy, control over critical minerals (lithium, cobalt, nickel) becomes strategic. The geopolitical race for green resources could replicate past oil conflicts.
9.4 Cyber and Information Warfare
Modern conflicts often occur in cyberspace — targeting infrastructure, elections, or corporate systems. The financial cost of cyber incidents can exceed physical warfare impacts.
9.5 Middle East and Energy Stability
Tensions involving Iran, Israel, and Gulf states continue to influence oil and gas supply expectations, shaping inflation and central bank decisions.
9.6 Climate and Migration Pressures
Climate-induced displacement, food insecurity, and water scarcity are emerging geopolitical flashpoints that can trigger political instability and financial disruption.
10. Long-Term Implications for Global Markets
Geopolitical risks are no longer isolated shocks — they are structural forces shaping long-term investment strategy. Globalization is evolving toward “selective interdependence”, where nations collaborate in some areas but compete fiercely in others. Investors must adapt to a world where volatility is structural, not temporary.
10.1 Regionalization of Trade and Finance
Global supply chains are being reconfigured toward “friend-shoring” — producing goods in politically aligned countries. This reduces efficiency but enhances resilience.
10.2 Defense and Security Spending Boom
Nations are ramping up defense budgets, benefitting aerospace and cybersecurity sectors. Investors view these as long-term growth areas.
10.3 Inflationary Geopolitics
Energy and commodity disruptions keep inflation structurally higher, challenging central banks and altering interest rate expectations.
10.4 Financial Fragmentation
The global financial system may divide along geopolitical lines — with parallel payment systems, currency blocs, and reserve diversification away from the U.S. dollar.
11. Conclusion
Geopolitical risks and market volatility are inseparable components of the global financial ecosystem. From oil shocks and trade wars to cyber conflicts and power shifts, political dynamics shape investor sentiment, asset prices, and capital flows.
While technology has made markets faster and more efficient, it has also magnified the speed at which geopolitical uncertainty spreads. The challenge for investors is not to avoid geopolitical risk — which is impossible — but to understand, anticipate, and adapt to it.
In a world where power is diffused, alliances are shifting, and crises are increasingly interconnected, the ability to interpret geopolitical signals will define the next generation of successful investors and policymakers.
Ultimately, geopolitical awareness is not optional — it is a strategic necessity in managing portfolios, protecting economies, and ensuring stability in an unpredictable global landscape.
Global Bond and Fixed Income Markets1. Introduction
The global bond and fixed income markets form the backbone of the world’s financial system. These markets are where governments, corporations, and institutions raise capital by issuing debt instruments—promises to repay borrowed funds with interest. Bonds, treasury bills, notes, and other fixed-income securities collectively represent trillions of dollars in outstanding obligations, making this one of the largest and most liquid asset classes globally.
Unlike equity markets, where investors purchase ownership stakes in companies, the fixed income market revolves around lending. Investors essentially become creditors, earning predictable income through periodic coupon payments and principal repayment upon maturity. The stability and reliability of these returns make bonds a cornerstone for institutional investors, central banks, and individuals seeking steady income or capital preservation.
In 2025, the total global bond market exceeds $140 trillion, spanning government debt, corporate bonds, municipal debt, supranational issuances, and structured credit instruments. The market’s depth, liquidity, and risk-return spectrum make it indispensable to modern finance, influencing monetary policy, interest rates, and economic growth worldwide.
2. The Role and Importance of Fixed Income Markets
The global fixed income market serves several critical economic functions:
Capital Formation:
Governments and corporations issue bonds to fund infrastructure projects, corporate expansion, research, and public programs. Without bond markets, large-scale financing would rely solely on bank loans, limiting growth.
Monetary Policy Implementation:
Central banks conduct open market operations primarily using government securities. By buying or selling these securities, they manage liquidity, control interest rates, and influence inflation.
Benchmark for Other Assets:
Government bond yields act as a benchmark for pricing corporate bonds, equities, and even mortgages. The risk-free rate, derived from sovereign bonds, forms the foundation for asset valuation models globally.
Portfolio Diversification and Risk Management:
Bonds often move inversely to equities during downturns, providing diversification benefits. Institutional investors use them to balance portfolio risk and stabilize returns.
Safe-Haven Investment:
During financial uncertainty or geopolitical instability, investors flock to high-quality government bonds (such as U.S. Treasuries or German Bunds), seeking safety and liquidity.
3. Major Segments of the Global Bond Market
The fixed income universe comprises several segments, each catering to different issuers, investors, and risk profiles.
3.1. Government Bonds
Issued by national governments, these are considered the safest investments in the market.
Sovereign Bonds: Examples include U.S. Treasuries, U.K. Gilts, Japanese Government Bonds (JGBs), and Indian Government Securities (G-Secs).
Emerging Market Debt: Countries like Brazil, Mexico, or South Africa issue bonds denominated in local or foreign currency. These carry higher yields due to higher default risk.
Government bonds are critical for monetary policy, as their yields reflect market expectations of inflation and interest rates.
3.2. Corporate Bonds
Corporations issue bonds to raise capital for operations, expansion, or refinancing existing debt.
Investment-Grade Bonds: Issued by financially strong corporations (rated BBB- or higher).
High-Yield (Junk) Bonds: Issued by riskier companies offering higher yields to compensate for credit risk.
Corporate bonds are vital for economic expansion, providing businesses with an alternative to equity financing.
3.3. Municipal Bonds
Issued by states, cities, or local authorities to finance public projects like roads, hospitals, and schools. In countries like the U.S., municipal bonds offer tax-exempt interest income, making them attractive to individual investors.
3.4. Supranational and Sovereign Agency Bonds
Organizations such as the World Bank, European Investment Bank (EIB), or Asian Development Bank (ADB) issue bonds to fund development projects. These securities often enjoy high credit ratings and are used to promote sustainable financing globally.
3.5. Structured and Securitized Products
These include Mortgage-Backed Securities (MBS), Asset-Backed Securities (ABS), and Collateralized Debt Obligations (CDOs). They pool loans or receivables and repackage them into tradable securities. Structured finance became notorious after the 2008 financial crisis but remains a vital part of credit markets.
4. Key Participants in the Global Bond Market
Issuers:
Governments, municipalities, corporations, and supranational agencies.
Their objective is to raise funds at the lowest possible cost.
Investors:
Institutional Investors: Pension funds, insurance companies, mutual funds, and sovereign wealth funds dominate demand due to their large asset bases and need for steady returns.
Retail Investors: Participate through direct purchases or mutual funds.
Foreign Investors: Often buy sovereign and corporate bonds for yield diversification and currency exposure.
Intermediaries:
Investment banks underwrite and distribute bond issues.
Dealers, brokers, and electronic trading platforms facilitate secondary market trading.
Regulators and Rating Agencies:
Agencies like Moody’s, S&P Global, and Fitch Ratings assess issuer creditworthiness.
Regulators (like the SEC, ESMA, or SEBI) oversee transparency, disclosure, and market integrity.
5. Bond Valuation and Pricing Mechanisms
The value of a bond depends primarily on three factors — coupon rate, maturity, and prevailing market interest rates.
5.1. Present Value of Cash Flows
A bond’s price equals the present value of its future cash flows (coupons and principal). When market interest rates rise, bond prices fall, and vice versa. This inverse relationship between yields and prices defines fixed income market dynamics.
5.2. Yield Measures
Current Yield: Annual coupon divided by current price.
Yield to Maturity (YTM): The internal rate of return if held to maturity.
Yield Spread: The difference between yields of different securities, indicating relative risk.
5.3. Credit and Duration Risk
Credit Risk: Possibility of default by the issuer.
Duration: Measures bond price sensitivity to interest rate changes. Longer-duration bonds are more sensitive to rate movements.
6. Global Market Size and Regional Overview
6.1. United States
The U.S. has the world’s largest bond market, valued over $50 trillion. U.S. Treasuries are considered the global benchmark for risk-free assets. The Federal Reserve’s actions in buying or selling Treasuries directly impact global liquidity.
6.2. Europe
The Eurozone bond market includes German Bunds (considered ultra-safe) and peripheral debt from countries like Italy, Spain, and Greece. The European Central Bank (ECB) manages yields via quantitative easing and bond-buying programs.
6.3. Asia-Pacific
Japan’s bond market, dominated by JGBs, is the largest in Asia, though yields remain extremely low. China’s bond market has grown rapidly, becoming a key avenue for global investors seeking exposure to yuan-denominated assets. India’s G-Sec market is expanding, supported by reforms that enhance foreign participation.
6.4. Emerging Markets
Countries in Latin America, Africa, and Eastern Europe issue both local and dollar-denominated bonds. These offer higher returns but carry risks such as currency depreciation and political instability.
7. Fixed Income Derivatives and Innovations
Derivatives based on bonds—such as futures, options, swaps, and credit default swaps (CDS)—allow investors to hedge or speculate on interest rate and credit movements.
Interest Rate Swaps: Exchange fixed and floating rate payments to manage rate exposure.
Credit Default Swaps: Provide insurance against bond default.
Bond Futures: Allow hedging of portfolio value against rate changes.
The rise of Exchange-Traded Funds (ETFs) and green bonds has further diversified access and objectives within fixed income investing.
8. Influence of Macroeconomic Factors
Bond markets are deeply intertwined with macroeconomic conditions.
Interest Rates:
Central banks’ rate decisions directly affect bond yields. A rate hike lowers bond prices, while cuts drive them higher.
Inflation:
Rising inflation erodes the real return of fixed-income securities, leading investors to demand higher yields.
Fiscal Policy:
Government deficits increase bond supply, potentially pushing yields upward.
Currency Movements:
Exchange rate fluctuations impact returns on foreign-denominated bonds.
Global Risk Sentiment:
During crises, investors move funds from risky assets to safe-haven bonds, causing yield compression in developed markets.
9. Technological Evolution and Market Infrastructure
Modern bond markets are increasingly electronic, transparent, and efficient.
Electronic Trading Platforms: Platforms like Tradeweb and MarketAxess have revolutionized secondary bond trading.
Blockchain and Tokenization: Tokenized bonds and blockchain-based settlements are improving speed, transparency, and cost efficiency.
AI and Big Data Analytics: Used for credit analysis, risk modeling, and market forecasting.
These innovations are making fixed income markets more accessible and integrated across borders.
10. ESG and Green Bond Revolution
Environmental, Social, and Governance (ESG) investing has reshaped the bond landscape. Green bonds finance environmentally sustainable projects such as renewable energy and clean transportation.
The global green bond market surpassed $2 trillion in cumulative issuance by 2025.
Sustainability-linked bonds tie coupon payments to ESG performance metrics, promoting responsible corporate behavior.
Governments, development banks, and corporations alike are leveraging ESG bonds to align with global climate goals and attract sustainability-focused investors.
Conclusion
The global bond and fixed income markets are the quiet yet powerful engines of global finance. They enable governments to fund development, corporations to grow, and investors to achieve stability and income.
In an era marked by technological transformation, sustainability goals, and shifting monetary landscapes, fixed income markets are evolving rapidly. The interplay of interest rates, inflation, and global capital flows continues to shape their dynamics.
As the world transitions into a more interconnected, digital, and climate-conscious financial system, the bond market remains indispensable—not just as a financing mechanism but as the foundation upon which the modern economy rests.
The ability of fixed income markets to adapt—through innovation, transparency, and sustainability—will determine their continued strength and relevance in the decades ahead.

Something’s Brewing at the Front EndDonald Trump wants lower interest rates. He may well get his wish soon, at least at the front of the U.S. Treasury curve. The chart you’re looking at has two panes. On the left, we have U.S. two-year Treasury futures. On the right, we have two-year U.S. Treasury yields. The former uses a weekly tick, the latter daily.
With futures coiling in a well-defined ascending triangle pattern for more than a year, you get the sense that should we see a weekly close above 104’16’0, it may act as a catalyst to spark further upside, potentially explosive. The contract has been rejected at the level six separate times since July 2024, including four failed breakout attempts over the same period. This reinforces its importance. Given its proximity to the level with RSI (14) and MACD generating bullish momentum signals, attempt number seven—if we see it—stands a decent chance of sticking.
If we see a sustained break above 104’16’0, 105’08’0, 106’06’6 and 107’06’2 loom as the levels to watch, especially the latter as it aligns with the extension target based on the triangle’s height. If it were to be achieved, it points to a nominal two-year Treasury yield of around 1.5%.
That’s obviously far lower than where it currently resides, pointing to negative real rates given the Fed’s 2% inflation target and, in all likelihood, economic conditions far weaker than recent years or monetary policy being guided by factors other than fundamentals.
While the setup is tradable, if it plays out, it will have ramifications far beyond rate futures given the economic signal it would provide. When you look at recent moves in hard assets with perceived scarcity value, it appears many investors and traders are already positioning for such an environment.
Good luck,
DS